Free Backup to External Hard Drive in Windows 10/11 (Guide)
Why Backup Files to External Hard Drive
An external hard drive is a storage facility that provides a fast and easy way to back up large amounts of data. It is typically connected to a computer via USB ports, allowing users to copy files and folders to it as needed, and in some cases, even backup a system image to the drive.
Backing up data to an external hard drive instead of an internal disk has several advantages. This approach allows for more flexible storage options, as external drives can be easily moved or shared with others.
Save disk space: To avoid taking up too much disk storage, large backup images can be stored on external devices or in the cloud, freeing up space on your computer.
Protect data from OS errors: These backup images can withstand operating system issues, internal hard drive errors, and human mistakes, allowing for easy system or file restoration in the event of a disaster.
You can directly copy and paste or drag and drop certain files and folders to an external drive, and also use utilities to back up partitions, the operating system, or the entire disk to the external hard drive.
Here, I will discuss 3 methods to help you backup to external hard drive in Windows 11/10 or even earlier OS.
3 Methods to Backup Computer to External Drive in Windows 10/11
For small files and folders, copying and pasting in File Explorer is a simple way to backup data to an external drive. However, if you have larger files or specific backup needs, using a dedicated backup utility may be a more suitable option.
- To backup larger files, partitions, or even everything on the computer to an external drive, you can use a process called imaging. This involves creating a snapshot of the entire system, including all data, settings, and installed programs.
- To backup your operating system to an external hard drive, you'll need to create a system image of your current operating system. This can be done using the built-in backup tools in Windows (Windows Backup and Restore) or macOS (Time Machine).
- You can set up your computer to automatically backup your files to an external hard drive using Windows Backup or a third-party backup software. This way, you can schedule the backup to run at a specific time or interval, ensuring that your files are always up-to-date and safe.
- Save multiple versions of backed up data to be able to restore to a previous version if needed, ensuring data integrity and minimizing potential losses.
There are many backup utilities can help you do these things, both built-in ones and third-party ones. Here I will show you 3 of them.
Method 1. File History (built-in)
In Windows 10, you can use File History to automatically backup your files to an external hard drive, making it a convenient option for those who want to keep their files safe without much hassle. This feature was first introduced in Windows 8 and has been inherited by later versions of the OS.
To use this feature (take Windows 10 as an example), you just need to follow the steps:
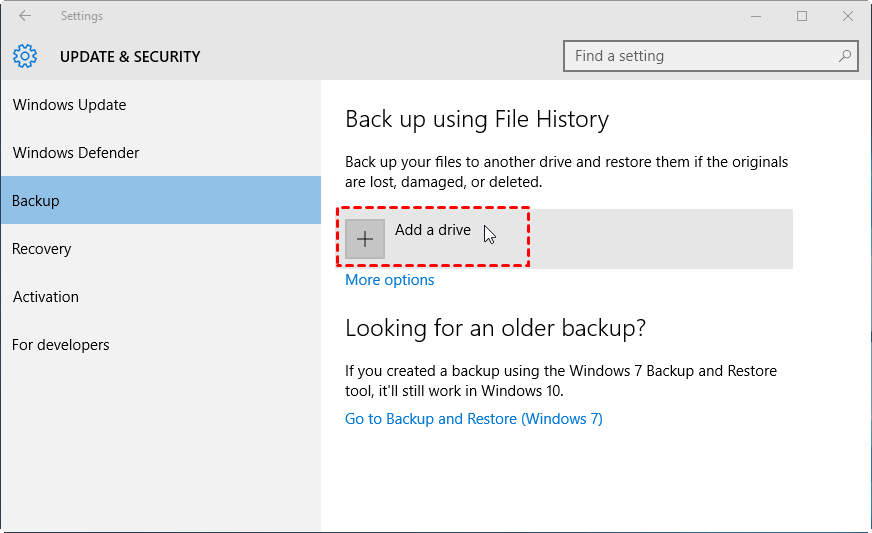
To access the Windows Backup feature, follow these steps: Click on the Start button, then select Settings. From the Settings window, click on Update & Security, and then select Backup from the menu.
To find File History, open the Start menu, click on Settings, and then select "Update & Security". In the resulting window, click on "Backup" (or "Backup settings" in some versions of Windows).
To customize the backup settings, click on "More options" and you can set the frequency, retention period, and specify which folders to include or exclude, as well as restore files.
✎This option is geared towards auto-protection for specific folders, but may not be the best choice for more flexible backup needs, and has limitations in Windows 11, such as not allowing non-preset folders to be backed up to an external hard drive.
Method 2. Windows Backup and Restore (built-in)
In addition to File History, Windows has an older backup utility called Backup and Restore, which can also be found in the Update & Security -> Backup page.
You have two options to start the backup by clicking "Go to Backup and Restore (Windows 7)":
- Create a system image: The operating system (OS) is essentially a blueprint or a set of instructions that tells your computer how to function. It's a complex software that manages and controls all the hardware components and other software programs on your device.
- Set up backup: backup Windows default (or selected) libraries and folders.
✎The Backup and Restore utility allows you to back up files, volumes, or system images to an external hard drive, but it's an older function that may not work well with the latest OS and devices, often resulting in errors and being time-consuming.
Method 3. Free Backup Software (best flexibility)
You don't have to use the backup options that come with Windows, as there are many effective backup software available on the market. One of the best free options for Windows is Qiling Disk Master Standard, which offers all-around backup and restore functions, an easy-to-use interface, and additional data protection tools to help keep your computer secure.
Backup options: System Backup, Disk Backup, Partition/Volume Backup and File Backup.
Supported system: Windows 11, Windows 10, Windows 8.1/8, Windows 7, Windows Vista, and Windows XP are all operating systems developed by Microsoft.
Backup storages: Storage devices come in various forms, including local disks, external hard drives, USB flash drives, network-attached storage (NAS), network shares, and cloud drives, among others. These devices allow users to store and access data from different locations, each with its own advantages and limitations.
You can add a schedule to automatically backup to an external drive daily, weekly, or monthly, and perform incremental backups that only copy changed files, as well as compress the backup image.
Download the freeware to try it out:
If you're running Windows Server, you can also turn to the specialized Server edition.
Backup to External Hard Drive in Windows 10 Step by Step
To make a backup to an external hard drive in Windows 10 automatically, you can use the built-in File History feature. This allows you to set up a backup schedule to automatically copy your files to an external drive, ensuring your important files are safely backed up. To set this up, go to Settings > Update & Security > Backup, and follow the prompts to select your external drive and set the backup schedule.
👉Preparations:
- Connect the external hard drive or USB drive to your computer, and ensure it can be detected by Windows.
- Install and launch Qiling Disk Master Standard.
1. Click Backup and you will see a list of options, including File Backup, System Backup, and Disk Backup. I'll select File Backup as an example, but you can choose any of these options to start a backup.
✎Besides backup, you can also select Sync on the left pane to sync files to an external hard drive, creating an exact copy of the data to the external drive automatically.
2. To specify the data you want to backup to an external hard drive, click on either the "Folders" or "Files" option.
3. To set the backup destination, select the attached external drive, and click "Proceed" to execute the backup.
👉Useful features:
- Options: Backup comments, email notification, backup compression, splitting, backup service, etc.
- Schedule Backup: To automate backups on a daily, weekly, and monthly basis, you can schedule tasks using a task scheduler like Task Scheduler in Windows or cron jobs in Linux/macOS. For daily backups, create a task that runs a script or program at a specific time each day.
- Backup Scheme: Choose a backup method (full, incremental or differential), and enable automatic backup cleanup to automatically delete older backups, a feature available in the Professional edition.
Conclusion
Backing up data to an external hard drive requires two essential components: a normal external hard drive and a powerful backup software. Before initiating the process, ensure the external hard drive has sufficient capacity to store all the data you need to backup, whether it's files, folders, partitions, the operating system, or the entire computer.
With Qiling Disk Master, the process of backing up and syncing data, as well as migrating to a new drive, can be simplified into just a few clicks. This tool offers comprehensive functions, including backup, sync, and disk clone features, allowing users to easily transfer their Windows installation to another drive, or even upgrade from a traditional HDD to a faster SSD.
You can also back up files to Qiling Cloud with the Cloud Backup feature, which offers 1TB of free cloud storage for 15 days after registering an account.
Related Articles
- Solved: External Hard Drive Freezes When Copying Files
- Solved | File is too Large to Copy to External Hard Drive (4 Ways)
- Backup External Hard Drive to Google Drive Efficiently (3 Ways)
- Can I Backup Dropbox to External Hard Drive Safely


