How to Create Partition with Qiling Disk Master?
Overview of Create Partition
Creating a partition on a hard drive is essentially the first step in making the drive usable for storing data. When you create a partition, you're setting the physical parameters of the disk, including the Main Boot Record (MBR) and the location for storing the boot record backup. This initial setup allows you to later create a file system and manage the disk using an operating system.
Creating multiple partitions allows for a separate operating system partition, enabling multi-boot setups, and keeping frequently used programs and data together, making it easier to manage your computer. This is especially useful when there is only one partition (C drive) on the disk.
- If you save all your data on the C drive, it will be erased when you recover the system, and there's no way to restore it.
- A system disk should not be cluttered with too many files and programs, as this can slow down the system's performance.
- If there are multiple partitions, each storing distinct types of data, it's easier for users to manage them.
- After partition creation, the size of the cluster will decrease, improving data storage efficiency, as smaller clusters minimize wasted space.
It's necessary to create multiple partitions on a hard disk due to various reasons, including separating system files from user data, improving disk organization, and enhancing security by isolating sensitive information. This allows for better management, flexibility, and protection of data.
How to Create Partition
Before You Do
- Download and install Qiling Disk Master on a Windows computer.
- To free up space on your drive, you'll need to have some unallocated space. If you don't have any, you can either shrink an existing partition using the "Resize Partition" feature to create some space, or use the "Split Partition" feature (which requires a paid upgrade) to split an existing partition into multiple ones.
- For MBR disks, be aware that you can only create up to 4 primary partitions or 3 primary and 1 extended partition with additional logical partitions, so check how many partitions are already on your hard drive. If you've reached the limit, you can convert a primary partition to logical and create additional partitions on it. GPT disks, on the other hand, have no such limitations, allowing you to create more primary partitions, but Windows restricts this to 128 partitions.
How to Create Partition with Partition Assistant
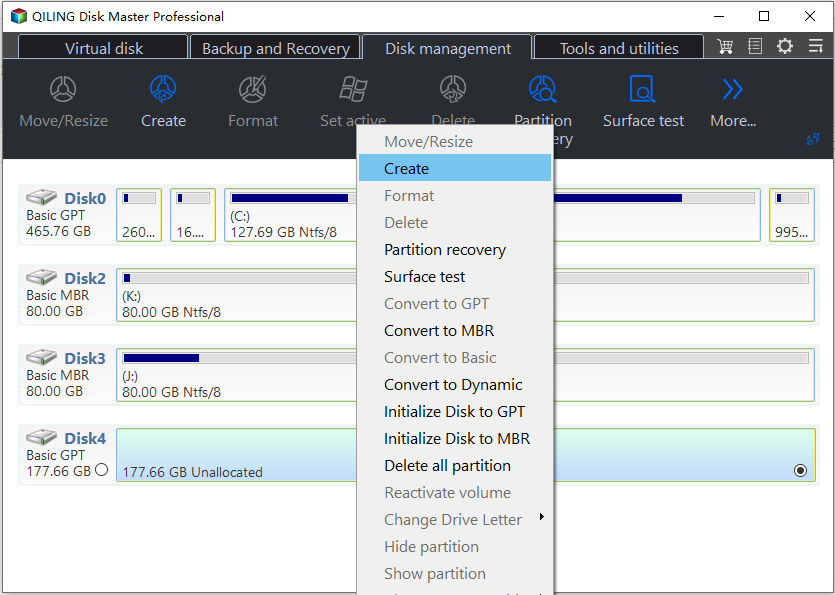
1. Install and launch Qiling Disk Master. Right-click the unallocated space or an existing partition and select "Create Partition" in the right panel.
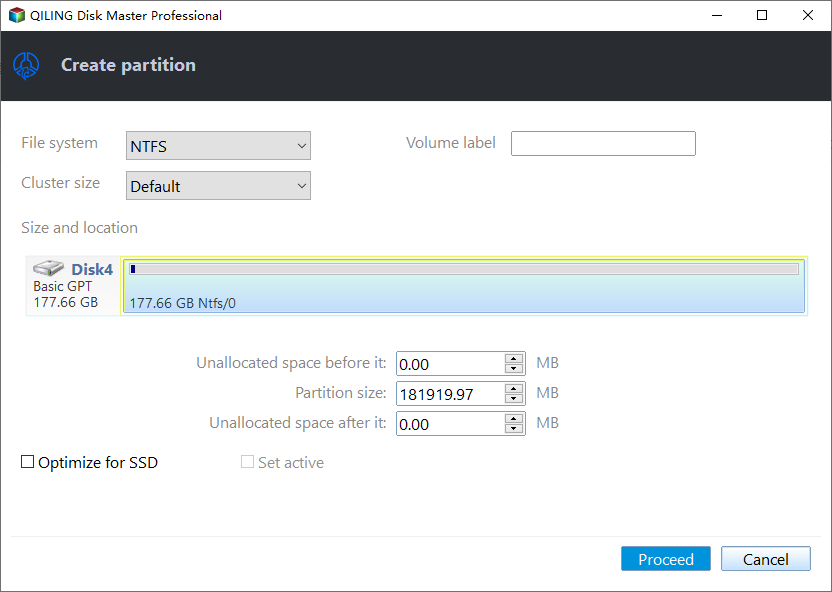
2. In the pop-up window, click "Advanced" to specify the information for the new partition, including partition size, partition label, drive letter, files system (NTFS or FAT), and partition type (logical or primary). You can specify the size of the new partition by dragging both edges. Once you're done with all settings, click "OK".
Tips:
- We suggest you set the partition file system as NTFS.
- If you set the drive letter as "None", the partition will be hidden and won't appear in "My Computer".
3. Now you can preview the new created partition. Click "Proceed" to start the operation.
Conclusion
To create partitions on a drive and make full use of your disk space, start by opening the Disk Management tool, which can be accessed by right-clicking on the Start menu and selecting "Disk Management." From there, select the drive you want to partition and click on the "New Simple Volume" option.
The feature is mainly used to partition a drive to a certain extent, and can be utilized in situations where you need to divide a drive into multiple sections for different purposes, such as separating system files from user data or creating a dedicated partition for a specific application.
- To maximize the use of unallocated space on a drive, create a partition on it, allowing you to store data on it.
- To better organize and manage your data, create separate partitions for different types of files, such as music, video, and documents. This will allow you to store and access your files more efficiently and effectively.
- To avoid losing all data in case of a system recovery or reinstallation, it's recommended to create multiple partitions on the drive. This way, if a problem occurs, only the affected partition will be rewritten, and the other data will remain safe.
Notes:
- To optimize SSD performance, enable the "SSD Partition alignment" option when creating partitions on the drive. This ensures the partition is aligned to the SSD's physical sectors, maximizing read and write speeds.
- If the disk is MBR style and has 4 primary partitions, you can't create a partition within the system partition. However, you can create a partition within a data primary partition, which will then be converted to a logical partition.
FAQs:
Q: Why the option "Create Partition" is greyed out?
A: The issue may be that you're trying to create a partition on an existing partition that's already BitLocker encrypted. To resolve this, you can try decrypting the BitLocker encryption on the partition first, and then attempt to create a new partition again.
Q: How long will it take to create a partition?
A: The time it takes to create a partition depends on the partition size, with normal creation taking seconds. However, if there are bad sectors, the process will be slower.
Q: No, you cannot create another primary partition on an MBR drive that already has 4 primary partitions. The MBR (Master Boot Record) partition table can only contain a maximum of 4 primary partitions.
A: You can create another partition on the drive, but it will be a logical partition by default. To create a primary partition, you'll need to first convert an existing primary partition to a logical partition.
Related Articles
- Write Zeros to Toshiba Hard Drive with Powerful Software
Need to write zeros to Toshiba hard drive, but does not find zero fill hard drive utility on the toshiba website? Click on this article and here are 3 ways you can use. - Best XXCopy Alternative for Windows 11/10/8/7 [Free]
Looking for XXCopy similar software in Windows? Read this article carefully to get the best free alternative to XXCopy and detailed steps of using it. - Error Code 4101: Failed to Create File
Solution for Error Code 4101 while making a full/incremental/differential backup to a physic disk or NAS/Share (network drive). - Failed to enable backup service
solution to the the error: “Failed to enable backup service encountered when creating a backup with Qiling Disk Master.

