How to Migrate OS to SSD with Qiling Disk Master [without Reinstallation]
Migrating Windows OS to a new HDD or SSD can be done easily with Qiling Disk Master, allowing you to transfer your OS without reinstallation. This ultimate guide provides a step-by-step process for migrating Windows 11/10/8/7/Vista/XP to a new storage device, making it a hassle-free experience.
Brief introduction of SSD & HDD
Before migrating your OS to an SSD or HDD, it's essential to understand the basics of these storage devices. SSDs (Solid-State Drives) and HDDs (Hard Disk Drives) are two different types of storage media, each with its own strengths and weaknesses.
HDD - Hard Disk Drive: The hard disk drive is the most basic computer storage device, used to store data, and typically contains local disks such as C, D, and F drives. Common hard disk capacities range from 80G to 2TB, and are categorized by interface type, including PATA, SATA, and SCSI. PATA drives offer a large capacity at a low price, making them suitable for home use, while SCSI drives have a smaller capacity but are more expensive and offer better performance and stability, often used in high-tech fields.
SSD - Solid State Drive: A solid-state hard disk, also known as a solid-state drive (SSD), is a type of hard disk made of a single, solid-state electronic storage chip. It consists of a control unit (flash chip) and a storage unit (DRAM chip), and shares many similarities with traditional hard disk drives (HDDs) in terms of interface, function, usage, appearance, and size. However, SSDs significantly outperform HDDs in terms of reading and writing speed, making them a popular choice in various industries, including the military, IT, aviation, and more.
Benefits of migrating OS to SSD
Moving Windows to an SSD can significantly improve processing speed, reduce boot time, and minimize the risk of data loss due to physical damage, creating a quieter working environment. Additionally, if your current hard drive is nearly full, migrating to a larger drive can provide much-needed storage space, making the process a compelling reason to upgrade.
How to migrate OS from HDD to SSD easily and safely without reinstallation
To migrate the OS to a new SSD or HDD, use Qiling Disk Master Professional's "Migrate OS to SSD" function, which quickly moves the system without reinstalling it, and supports MBR/GPT to MBR/GPT migrations. The hot clone technique allows running the OS during the migration process.
To see how the Demo version works, please download it now. This will give you a firsthand look at the functionality and features of the system.
Prerequisites for OS Migration
- Connect a destination drive (HDD or SSD) with sufficient space to store the migrated OS partitions, and attach it either internally or externally via USB during the disk clone process.
- Download and install Qiling Disk Master on the computer where you want to migrate the operating system.
To migrate a current running system to an HDD or SSD, you need to upgrade to a higher version of Qiling Disk Master, specifically to the Professional, Server, or above versions, as this feature is paid and not available in the standard version.
How to Migrate OS to SSD in Partition Assistant
1. To clone a system drive using Qiling Disk Master Professional, connect the SSD to your computer and ensure it can be detected. Then, launch the software and click on the "Tools and utilities" main tab, followed by selecting "System clone".
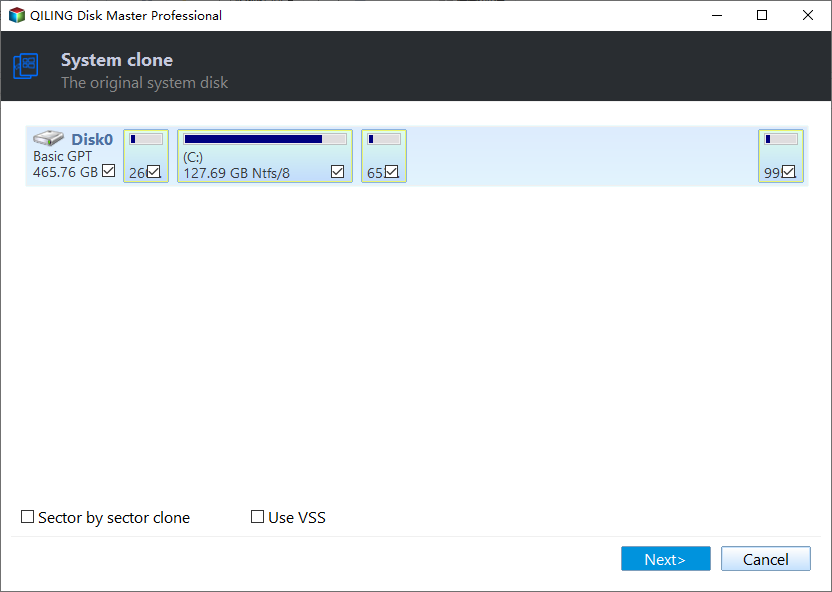
2. The Migrate OS to SSD wizard will run, helping you migrate your current OS to an SSD or HDD. To proceed, please click the "Next" button.
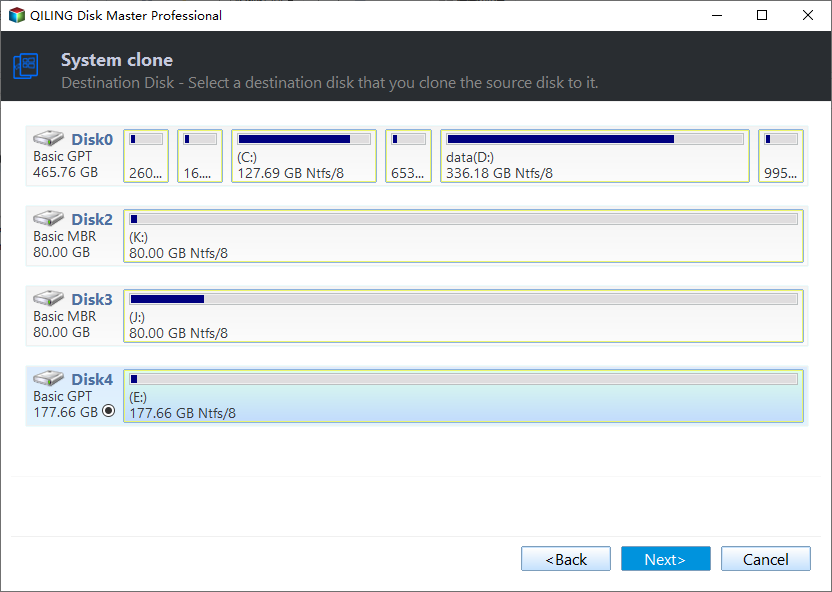
3. Select an unallocated space on your SSD as the target location. If there is no unallocated space, you can check "I want to delete all partitions on the disk 2 to migrate system to the disk" and then click "Next".
Tips:
- The program will automatically detect and list system partitions as source, allowing you to directly use an unallocated space on the listed destination drive as the destination location.
- If your system and boot partitions are on different drives, the drive with the boot partition won't be listed as a destination location.
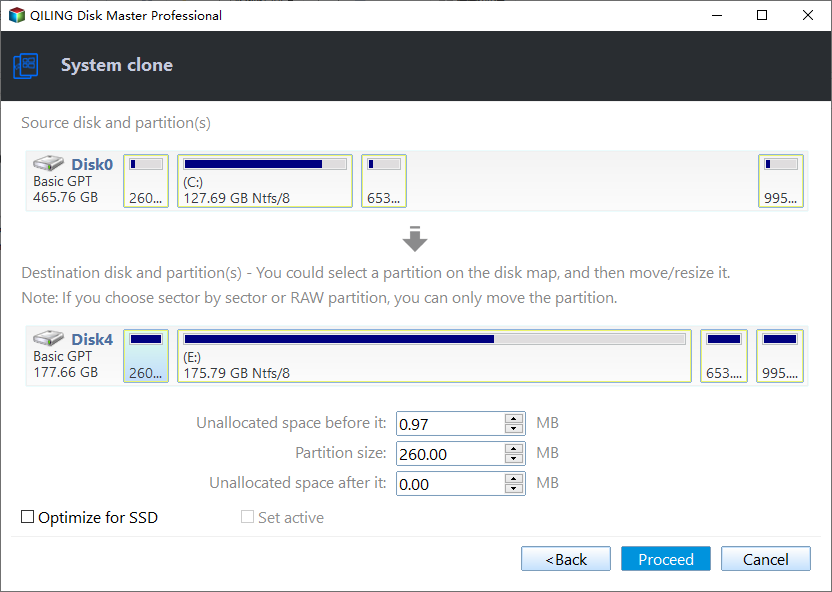
In this window, you can resize a partition and modify other information, such as location and drive letter, on the new disk, or keep the default settings.
5. After clicking "Proceed", the OS migration operation will begin. You will be back to the main interface where you can see the pending operations and preview the result of the operation. To commit it, please click "Proceed" and the OS migration operation will start.
6. A note about how to boot OS from SSD or HDD will be displayed, so keep that in mind and click "OK" to proceed.
7. After a successful migration, your PC will automatically restart. Once it boots up, you can follow the process to boot your PC from the new SSD, completing the transition to your new storage drive.
Conclusion
The OS migration was completed successfully, allowing the destination drive to be connected internally and booted from.
The "Migrate OS to SSD" wizard is primarily used in situations where a user wants to transfer their operating system and data to a Solid State Drive (SSD) for improved performance and reliability. This includes upgrading from a traditional hard drive to an SSD, or replacing a failing hard drive with a new SSD.
If the system boots slowly from the original HDD, you can use the tool to migrate OS to a larger HDD or SSD, resulting in a faster system boot speed and improved overall computer performance.
If the original system drive is too old, you can use a tool to migrate it and replace it with a newer HDD or SSD.
If your original system drive is running low on free space, you can use the built-in wizard to migrate the OS to a larger hard drive or solid state drive (SSD), effectively replacing it and freeing up more space.
How to Boot from the SSD
After cloning an operating system to an SSD, it's essential to physically connect the SSD to your computer internally, rather than using an external connector like USB, to ensure a successful boot.
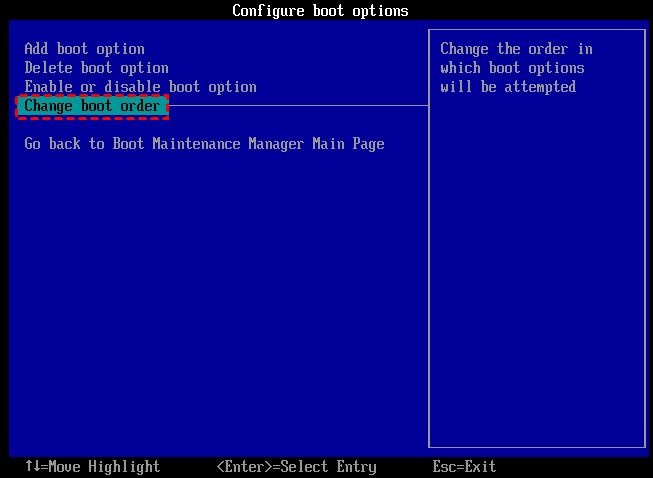
To change the boot disk to the SSD, restart your computer, enter the BIOS setup, change the boot order to prioritize the SSD, and boot from there.
Notes:
● To transfer the OS from a Master Boot Record (MBR) disk to a GUID Partition Table (GPT) disk, ensure that your motherboard supports EFI/UEFI boot. This is a crucial step as it affects the booting process of your operating system.
● To clone all partitions, including hidden partitions and data partitions, to another hard drive, you can use the Disk Clone Wizard.
● After the OS boots successfully from the SSD, you can wipe the HDD to use it as a data disk.
FAQs:
Q: I don't have enough information to provide a response to your question. Could you provide more details about the drive you would like to migrate to and why it's not listed?
A: The likely reason is that your system partition and boot partition are located on different physical drives, which are both being taken as your source system drive.
Q: After migrating the operating system, the source system will be deleted, not bootable. This is because the migration process typically involves replacing the original operating system with the new one, and the old system is no longer needed or functional.
A: The migration process won't affect the source system, allowing you to continue booting from the original system drive.
Q: You can't directly wipe the original OS drive as a data drive, as it contains system files and programs that are essential for the operating system to function. However, you can clone the original OS drive to a new drive, then wipe the original drive and use it as a data drive.
A: Once the OS migration is finished and your PC boots from the new drive without any issue, you can safely delete the old drive as a data drive.
Related Articles
- Free OS Migration Software: Migrate OS to SSD without Reinstallation
With the best free OS migration software--Qiling Disk Master, you can move your Windows operating system to a new SSD drive without reinstallation. - Migrate OS from One SSD to Another with Professional Software
This article will show you how to migrate os in Windows from one SSD to another in a convenient and fast way. - Best Tool for Transferring C Drive to SSD in Windows 10/8/7
It is a wise choice to transfer C drive to SSD from HDD since SSD comes with better speed and performance. Here we will teach how to move C drive to a new SSD drive and make it bootable as well. - Best Way to Move Windows Server SSD without Reinstalling System
Here comes the best way to move Windows Server 2003, 2008, 2012, 2016, 2019, SBS or Home Server 2011 to SSD and boot the system from successfully.


