How to Restore Windows 10 System Image to a New SSD
Quick Navigation:
- Why restore system image to new SSD?
- Backup and restore Windows 10 to new SSD with the snap-in tool
- ▶ Create Windows 10 system image and system repair disc
- ▶ Restore Windows 10 system image to new SSD
- Restore system image to new SSD with Qiling Disk Master🔥
- ▶ Preparations
- ▶ How to restore system image to new SSD
Why restore system image to new SSD?
Hard disk drive (HDD) is the traditional storage device. In the previous days, most computers used it to store data. But as time goes by, people found that the disk could not be enough to store all the data, and it was easy to break. Also, there are some other shortages.
Later, the solid state drive (SSD) came out. It has overcome many shortages of HDD--safer storage, faster running speed, smaller noise, and so on. Thus, many users want to change their old HDD to SSD to get better performance. Besides, some people change to the new SSD because their old device is broken.
SSD makes the computer perform better. However, they stored very important data on the old storage devices. Those people want to change the device, but do not want to abandon the old data. Is there a way to transfer OS and data from the old storage device to new SSD?
Backup and restore Windows 10 to new SSD with the snap-in tool
Windows systems do have their own backup and restore tool, which can backup system and restore it. Take Windows 10 as an example:
▶ Create Windows 10 system image and system repair disc
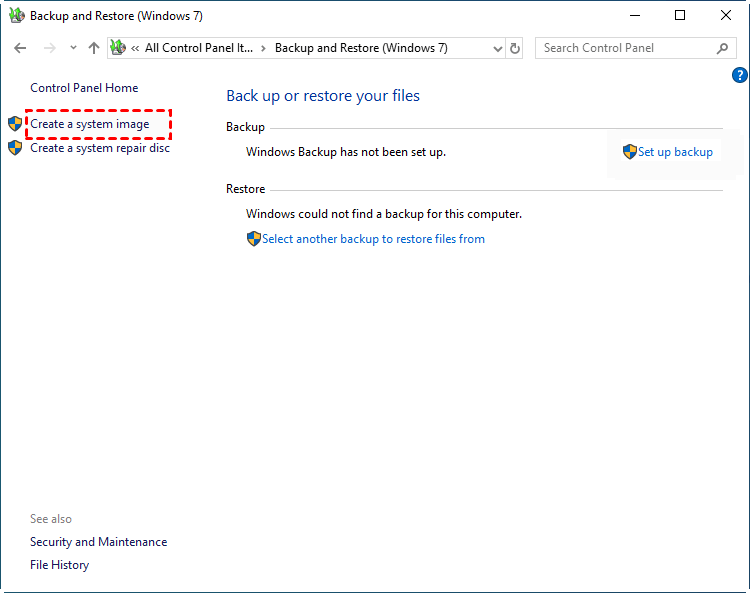
1. Connect a CD/DVD and an external drive to your computer. Type “backup” in the search box of the taskbar and select Backup settings from the result list.
2. In the pop-up window, select Go to Backup and Restore (Windows 7) > Create a system image.
3. Select the external hard drive to save your system image, and then click Next.
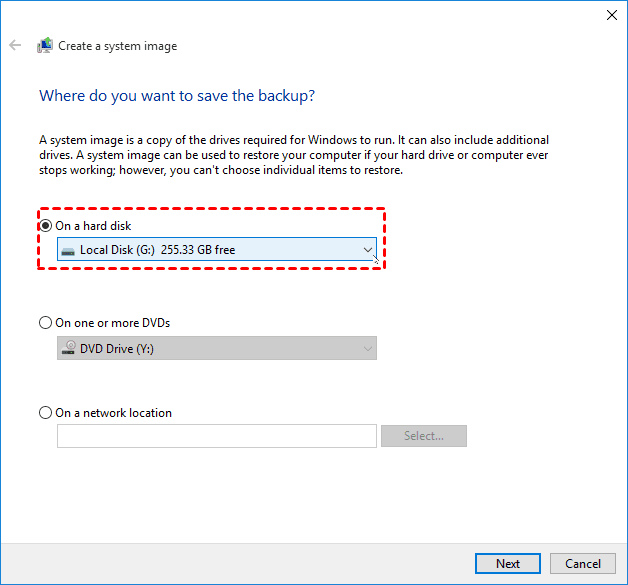
4. The drives that are required for Windows to run are included in the backup automatically. Confirm your settings, and then click Proceed.
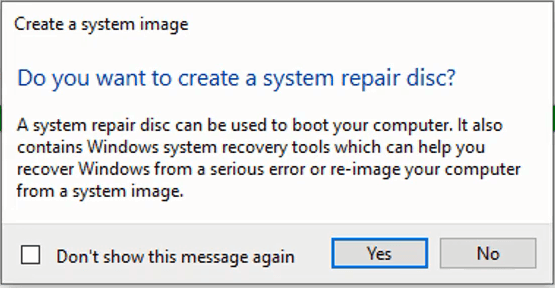
5. Click Yes when you are asked to create a system repair disc.
▶ Restore Windows 10 system image to new SSD
1. Shut down your computer. Replace the old system drive with the new SSD. Make sure the backup disk and system repair disc are still connected.
2. Boot your computer from the system repair disc. When the Windows Setup window appears, click Next > Repair your computer.
3. Select Troubleshoot >Advanced options > System Image Recovery > Windows 10 in turn.

4. In the Re-image your computer window, tick Use the latest available system image and follow the wizard to complete the system recovery process.

Although Windows built-in tool can help you transfer system image to new SSD, it will create a system backup image that takes a lot of space, and the system image recovery process is complicated. If there is a backup utility that can create system backup image with fewer space, and restore system image in a simpler way, why don't we try it?
Restore system image to new SSD with Qiling Disk Master🔥
Qiling Disk Master Professional can help people backup and restore system to new SSD in a few clicks. It works well in Windows 11/10/8.1/8/7/Vista/XP.
▶ Preparations
1. Download and install Qiling Disk Master on your computer.
2. Create a bootable media so that you can run backup and restore operations without loading the operating system. Or you can create a recovery environment to do so.

3. Create a system image with Qiling Disk Master. You may save the system image on an external hard drive or network location.

▶ How to restore system image to new SSD
Then, let's get started to restore system image to new SSD with the following steps. Please note that these steps are also applicable to move Windows 10 to a new computer with dissimilar hardware.
Step 1. Replace old HDD with new SSD. Connect the bootable USB drive and the backup disk (if you have saved system image to an external drive) to your computer.
Step 2. Boot your computer from the bootable USB. The Qiling Disk Master’s home interface will be shown at your sight. Click Restore > Select Image File and locate the system image you created before.

Step 3. Tick Restore this system backup and Restore system to other location, tick Universal Restore to ensure a bootable system. Then click Next to continue.

Step 4. Then, you need to select the new SSD to restore the system image to and click Next.

Step 5. Here you can see the operating summary. If there is no trouble, click Proceed.

>> SSD Alignment: this is designed especially for SSD. Here you can tick this box too, because it will improve the performance of your SSD.
✐ Easier way to restore system image without booting into Windows:
Instead of creating system image and bootable media one by one, you can use one key recovery software Qiling OneKey Recovery to create them simultaneously. It will add a boot menu on the computer as well as a fast key to access it, F11 or A, for example. Then, when your computer is not working, you can press F11 or A to access this software from WinPE and then restore system image with "OneKey System Recovery" option.

Related Articles
- Best Freeware to Clone SSD to New SSD in Windows 10/8/7
- Top 2 Easy Ways to Install Windows 10 on SSD
- Replace Laptop HDD with SSD without Reinstalling (with Video)
- The Best Way for Samsung Data Migration to Clone OS Only
To find the best way for Samsung Data Migration clone OS only, you can read this article carefully and learn the easiest way and the specific tutorial.