Best ADATA SSD Disk Migration Tool to Clone HDD to ADATA SSD
Quick Navigation:
- Why Need ADATA Cloning Software?
- ADATA Data Migration with Windows Backup and Restore
- Best ADATA Migration Utility - Qiling Disk Master
- How to Safely Clone HDD to ADATA SSD in Windows 11/10/8/7
- Conclusion
Why Need ADATA Cloning Software?
ADATA is a famous manufacturer of the solid state disk (SSD) in decades. There are so many users all over the world. Obviously, migrating data from HDD to ADATA SSD disk is very important to get better performance. In some cases, you have to use the ADATA SSD data migration tool:
- Your hard disk can't afford to hold any other data; you want to get your data cloned to a larger one, like an ADATA SSD disk.
- Important data must be migrated to ADATA SSD or others to prevent it from loss.
- You have a ADATA SSD with faster speed, more capacity and better performance; get your data transferred into the new one.
- Maybe you want to clone your system to ADATA SSD or other disks to prevent re-installing system in some circumstance.
There are two approaches to realize the ADATA data migration: Windows Backup and Restore, and the best ADATA SSD disk migration tool.
ADATA Data Migration with Windows Backup and Restore
Every Windows version has its feature to backup and restore data. You can backup your files, folders and system to other locations or external hard disk.
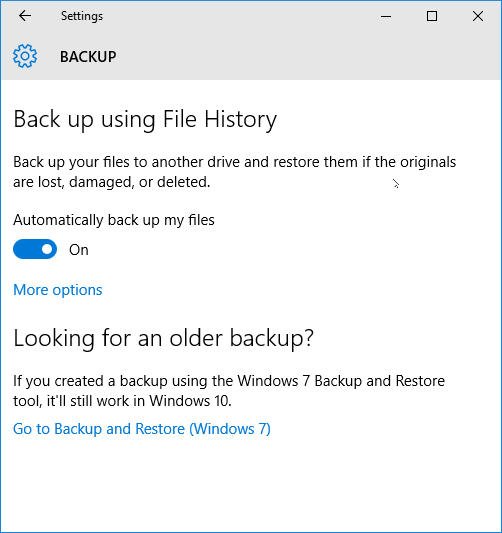
In Windows 10, you can go Start -> Settings -> Update & Security -> Backup. There are two options to back up your data: “Back up using File History” or “Looking for an older backup”.
In Windows 8, you need to access Start -> type Windows 7 file -> Windows 7 File Recovery -> Set up backup. Then follow the on-screen guide to migrate data to ADATA SSD.
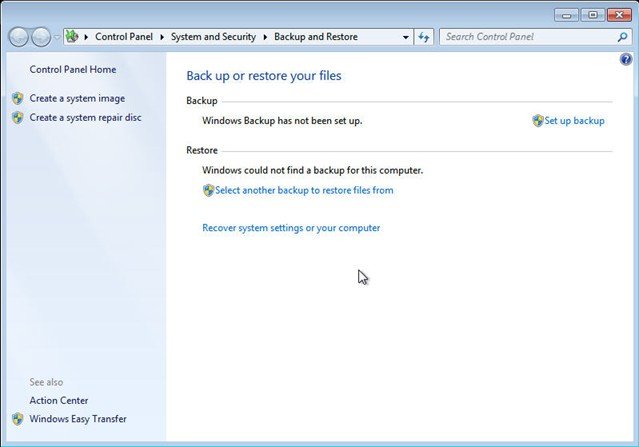
In Windows 7, please go to Start -> type backup -> select Backup and Restore -> click Set up backup and backup data with the wizard.
Although Windows backup software is very convenient, it’s obvious has some limitations. You can check them in the following.
- Only backup files in libraries, desktop, and in default Windows system folders.
- You cannot restore the individual file from the system image file.
- The image file could not use directly, you should restore your data from image file when the system data get damaged, it’s kind of complicated.
- It does not supports differential backup.
Thus, is there any other way to do the ADATA data migration with ease? The answer is positive.
Best ADATA Migration Utility - Qiling Disk Master Professional
As the best ADATA SSD migration tool in Windows 11/10/8/7, Qiling Disk Master Professional offer different features for you to satisfy you migrate data as you want:
- System Clone to migrate Windows operating system only without reinstalling, time-saving.
- Disk Clone to move everything from HDD to ADATA SSD without losing data.
- Partition Clone to move data easily.
- Backup any files you want.
- Restore individual file from the image backup file easily.
Besides, Qiling Disk Master has more powerful features than Windows backup utility, like system backup, disk backup, file backup, two-way sync, File Sync, File Sync, etc.
Please download the best ADATA SSD cloning software - Qiling Disk Master Professional 30 day free trial (The clone features in the free trial can only be demonstrated, please upgrade to enjoy), install and launch the program.
How to Safely Clone HDD to ADATA SSD in Windows 11/10/8/7
Important: Please backup your important data on the ADATA SSD before cloning, because the cloning operation will delete or overwrite the data on the ADATA SSD.
The following steps are showing how to safely perform ADATA drive clone (Clone HDD to ADATA SSD) with ADATA disk migration utility in Windows 11/10/8/7:
1. On the main console, click “Clone” at the left panel, then select “Disk Clone”.
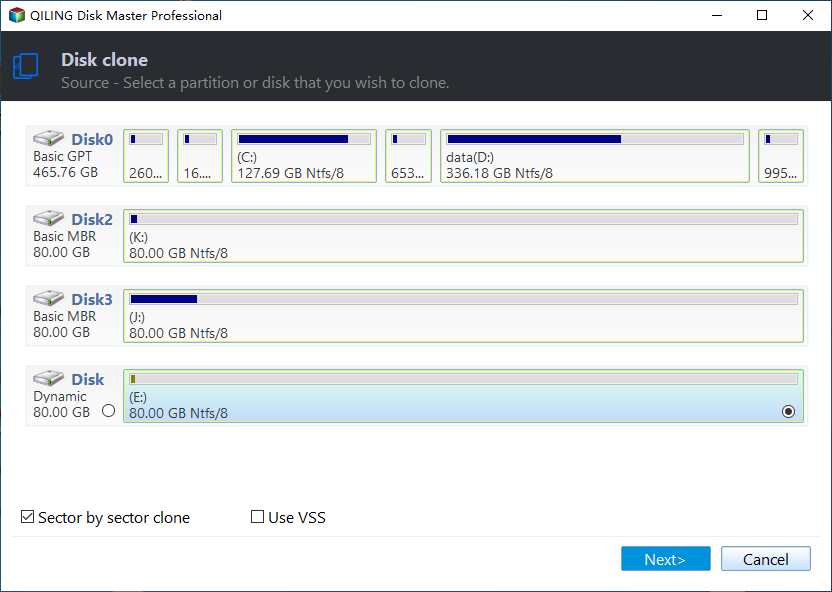
2. Choose the HDD as source disk to clone (here is Disk 0). Then press “Next” button to continue.
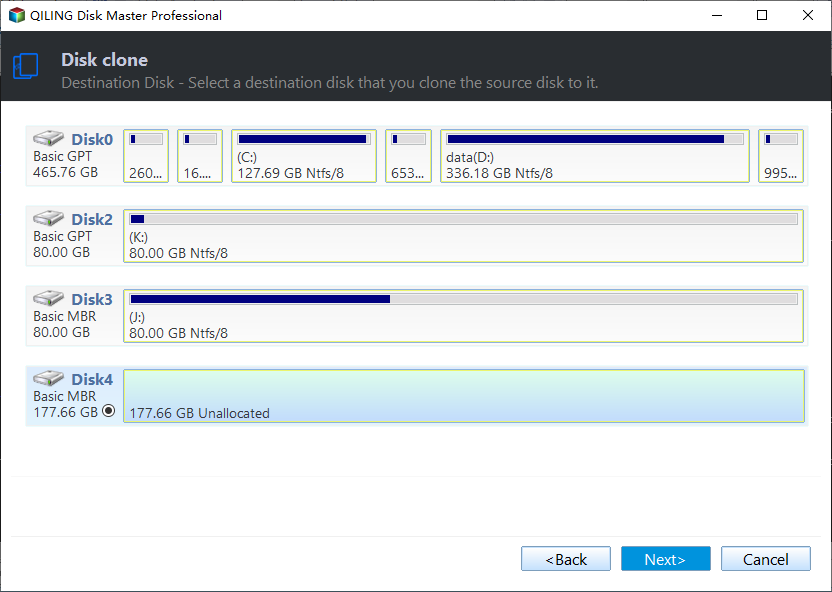
3. Select ADATA SSD drive as destination disk to save the data from source disk (here is Disk 2).
★Notes:
✍If there is a boot or system partition on the destination SSD disk, which makes the boot partition cannot boot when the clone operation completed. Thus, make sure you have the boot or system partition stored to other disk.
✍Make sure the ADATA SSD disk can hold the data of source disk if you are cloning large disk to smaller disk.
4. Check "SSD Alignment" to optimize the reading and writing speed for ADATA SSD and its lifespan.
5. Press the “Proceed” button to clone HDD to ADATA SSD easily.
★Tips: There are several additional options in this step.
✍Click “Edit Partitions” to adjust the size of partitions on the destination disk to fully use the storage space on the destination if you clone disk to larger ADATA SSD.
✍Tick “Sector by sector clone” to clone all sectors on the source disk whether the sector is in use or not. If you tick the option, make sure the capacity of ADATA SSD disk is larger than source disk, at least equal to the latter. And the time will be much longer.
✍If your destination disk is a SSD (like ADATA SSD) disk, please make sure you have ticked “SSD Alignment”, if else, just leave it alone.
After the ADATA SSD cloning finished with the ADATA migration utility, everything is done.
If you just cloned a system disk, please replace the HDD with the ADATA SSD, reboot the computer to boot from it, or just change the boot order in BIOS, and boot from the cloned ADATA SSD.
Conclusion
Qiling Disk Master is a professional ADATA SSD disk migration tool and it also applies for other brand of hard drives. The data migrated by Qiling Disk Master can be directly used, because it’s an exact replica of source disk and don’t have to restore operations to get data.
After comparing Qiling Disk Master and Windows built-in Backup program, Qiling Disk Master is more reliable and flexible to use, choose the one that right for you.
If you want to protect unlimited computers within your company, you can pick Qiling Disk Master Technician Plus. With the inbuilt Qiling Image Deploy tool, you deploy system image file to multiple computers over network easily, without repeated operations.
Related Articles
- Best Free ADATA SSD Clone Software - Qiling Disk Master
In this essay, you will find the best free ADATA SSD clone software to clone HDD/ SSD to ADATA SSD with step-by-step guide in Windows 10, 8, 7. - Download the Best Intel SSD Clone Tool for Windows 7/8/10
How to clone hard drive (HDD) to Intel SSD while the Intel Data Migration software not cloning? Try the Best Intel SSD clone tool - Qiling Disk Master to perform Intel SSD clone easily. - How to Clone Windows 10 to NVMe SSD (Step by Step Guide)
NVMe SSDs can be the perfect upgrade for your Windows 10/11 system and it is now easier than ever to clone Windows 10/11 OS to NVMe drive with a few simple steps. - Fixed: Samsung Data Migration Not Working with Windows 11, 10, 8, 7
Samsung Data Migration not working during cloning disk to Samsung SSD? This article will tell you why and how to fix it effectively.


