4 Methods to Automatically Backup SQL Server Databases
How do I auto backup SQL Server database?
While backing up a few SQL Server databases may not be a significant task, managing multiple databases with frequent backups can become labor-intensive. Automating SQL Server database backups can save time and effort, ensuring that your data remains consistent and recoverable.
To ensure the integrity and availability of your data, it's essential to automate SQL Server database backups. With multiple databases and frequent backups, manual setup can be laborious. Fortunately, there are several methods to automate SQL Server database backups, making it easier to maintain data consistency.
To ensure the integrity and availability of your data, it's essential to automate SQL Server database backups. With multiple databases and frequent backups, manual setup can be laborious. Fortunately, there are several methods to automate SQL Server database backups, making it easier to maintain data consistency.
To ensure the integrity and availability of your data, it's essential to automate SQL Server database backups. With multiple databases and frequent backups, manual setup can be laborious. Fortunately, there are several methods to automate SQL Server database backups, making it easier to maintain data consistency.
If you're tired of dealing with the complexities of manual SQL Server backup setup, there's a more straightforward solution. Instead of relying on batch files, command lines, or scripting, consider using a dedicated SQL auto backup software like Qiling Backup.
Are you tired of dealing with the complexities of manual SQL Server backup setup? Look no further!
Method 1. Best practice to auto backup SQL Server Database
Are you looking for a hassle-free way to auto backup SQL Server databases or instances? Look no further than Qiling Backup, a user-friendly software that makes it easy to automate your backups. With Qiling Backup, you can effortlessly backup as many databases as you want, daily, weekly, monthly, or at any interval you prefer.
In addition to its user-friendly interface and automated backup capabilities, Qiling Backup offers a range of advantages and features that cater to different needs and requirements. Whether you're looking to simplify your backup process, improve data security, or enhance your overall IT infrastructure, Qiling Backup has got you covered.
Fast backup and recovery: Qiling Backup performs auto with fast speed, which is vital for business continuity.
Incremental & Differential Backup: Support incremental and differential SQL backup to only backup newly added data or changed data to save time and space.
Auto Backup cleanup: It helps you to delete old or outdated SQL server backup versions automatically and therefore save storage space.
Great Compatibility: This software works with Windows 7 and Windows Server 2008 R2 onwards, and it allows you to backup SQL Server 2005 - 2022.
Are you looking for a reliable and efficient SQL backup solution? Look no further than Qiling Backup!
✍Note:
- Are you tired of dealing with cluttered backup storage and outdated backup versions? Look no further than Qiling Backup's Backup Cleanup feature!
- Staying on top of your backup tasks is crucial to ensure that your data is protected and up-to-date. With Qiling Backup, you can receive email notifications when your tasks are completed successfully or encounter any issues.
Method 2. Auto backup SQL database via Maintenance Plan
Maintaining your SQL Server database is crucial to ensure its optimal performance, security, and data integrity. SQL Server Management Studio (SSMS) provides a powerful tool to create a maintenance plan, which serves as a workflow of tasks to keep your database in top shape. This feature can also be used to schedule SQL Server backups, ensuring that your data is protected and up-to-date.
Backing up your SQL database is a crucial part of maintaining its integrity and ensuring business continuity. SQL Server Management Studio (SSMS) provides a simple and efficient way to schedule automatic backups of your database.
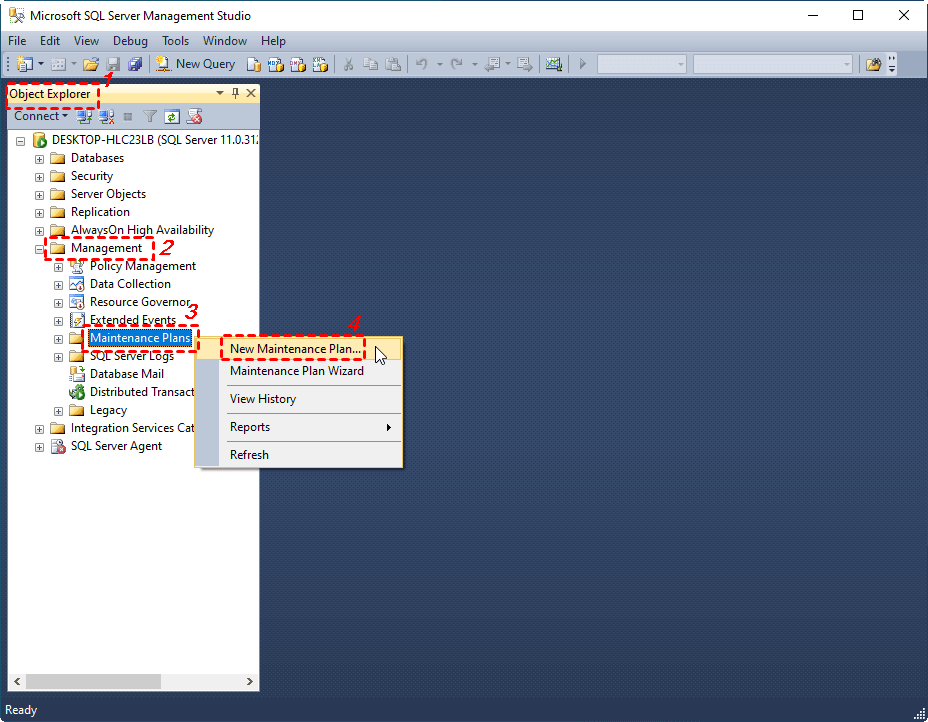
1. To automate SQL database backups, follow these steps:
They are essentially the same, but the wizard will lead you through the whole operation. Here I will choose the former as an example.
2. Launch SQL Server Management Studio (SSMS) and connect to your SQL Server instance.
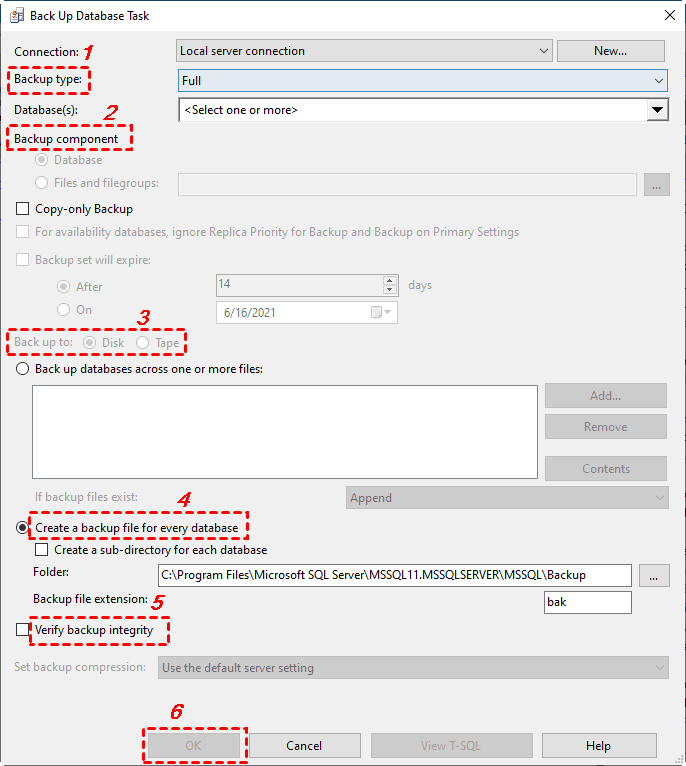
3. Double-click on the "Back Up Database Task" to configure it.
- Full backup A full backup includes all database objects, system tables, data, and transactions that occur during the backup. This type of backup captures a complete snapshot of the database at a specific point in time, ensuring that all data is included in the backup.
- Differential backup An incremental backup includes the data that has changed and transactions that occur during the backup process since the last full backup. This type of backup captures only the changes that have occurred since the last full backup, making it a more efficient and space-saving option for backing up databases with high transaction volumes or data changes.
- Transaction log backup includes transactions that have occurred on a database since the previous transaction log backup and then truncates the transaction log and then truncates a transaction log. A transaction log backup ensures database recovery to a specific point of time e.g. to a moment prior to data loss.
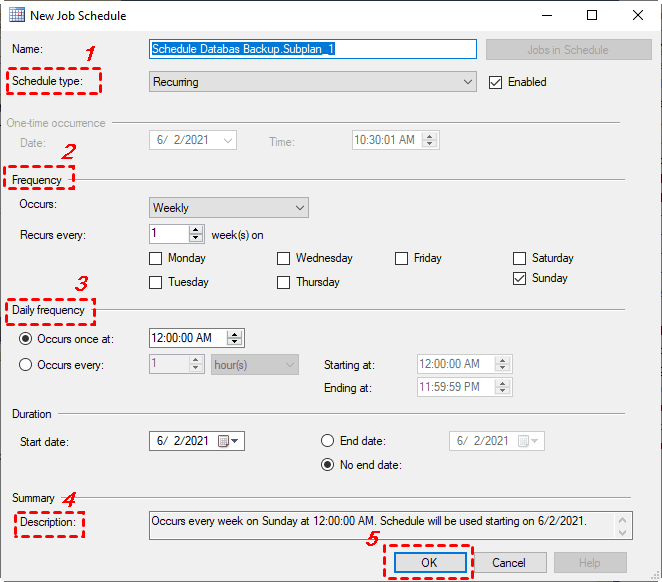
4. To automate the database backup task, you can now click on the calendar icon, specifically the **Subplan Schedule** option. This feature allows you to schedule a time-based SQL backup, ensuring that your database is regularly backed up without manual intervention.
In addition to scheduling the task, you can also configure the startup options to suit your needs. Instead of relying on a specific schedule, you can choose to start the task automatically under certain conditions.
5. Once you've completed the configuration, click "Save" to apply the changes. The SQL Server automatic backup task is now set up to run according to the specified schedule.
If you prefer to use the graphical user interface (GUI) wizard to automate SQL Server backup, this is the way to do it. However, if you have some knowledge of Transact-SQL (T-SQL), you may want to consider the alternative method, which provides more flexibility and customization options.
Method 3. Scheduled job to backup database with SQL Server Agent
The SQL Server Agent is a service that runs scheduled administrative jobs on your SQL Server instance. Each job is a collection of one or more job steps, and each step is a specific task that is executed as part of the job. For example, a job step might be a database backup, a database restore, or a SQL script execution.
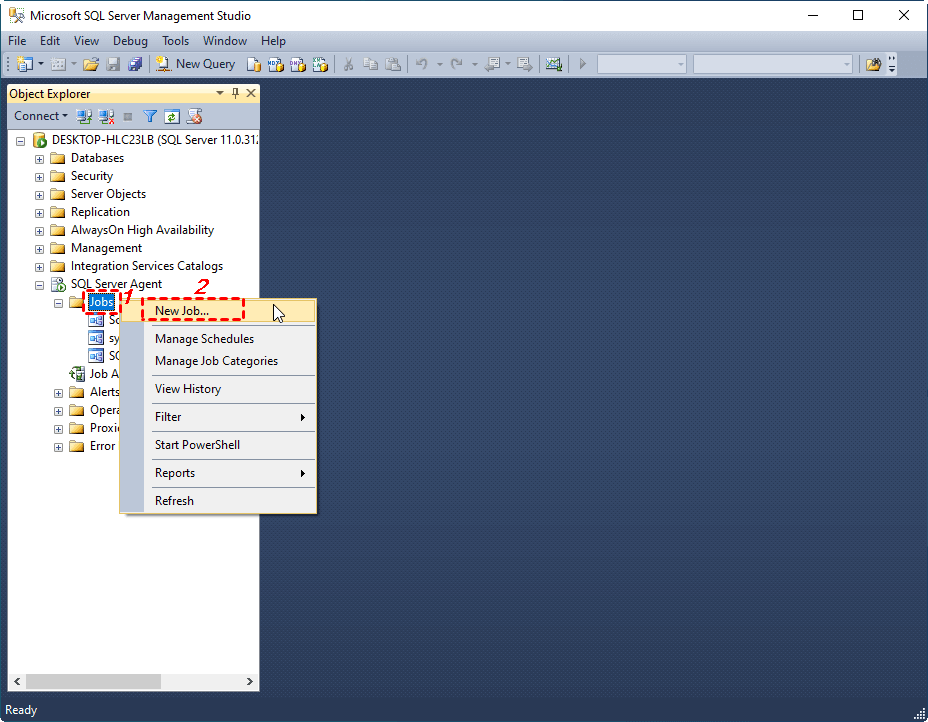
1. To use it, launch SSMS and connect to your instance. Make sure the SQL Server Agent is enabled. If not, right-click it and Start it. Then, choose New > Job from the right-click menu.
2. The New Job window will pop out. You can type its "Name" and "Description" in General tab.
3. To configure the job steps, navigate to the **Steps** tab. At the bottom-left corner of the window, click **New** to add a new step to the job.
The basic command for database backup was like:
TO DISK = 'D:\SQL Server\example.bak';
To configure a differential backup for one or more databases, you can modify the existing backup script by adding the `WITH DIFFERENTIAL` clause.
To backup the transaction log, you can modify the existing database backup command by replacing the word "DATABASE" with "LOG". This will create a backup of the transaction log for the specified database.
TO DISK = 'D:\SQL Server\example.trn';
Click **OK** to confirm the modified backup command. This will execute the command and create a backup of the transaction log for the specified database.
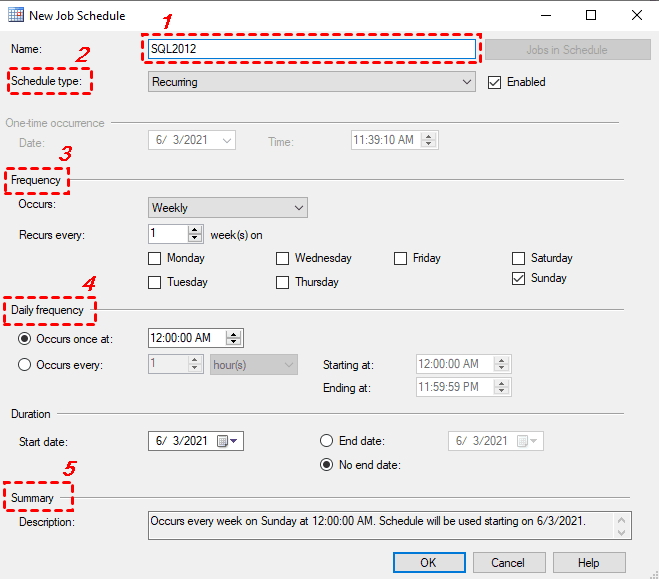
4. To set up a new schedule for your SQL Server backup, click the **New** button. This will allow you to create a customized schedule for your backup process.
5. With the main configuration complete, you have the option to either execute the setup immediately by clicking **OK**, or proceed to further customize the alerts and notifications settings. This will allow you to tailor the setup to your specific needs and preferences.
Once the job is set up, you can test it by right-clicking on the job and selecting **Start Job at Step...**. This will allow you to verify that the job is functioning correctly. If any issues arise, you can then refer to the **View History** option from the right-click menu to identify and troubleshoot any errors that may have occurred.
This function is not supported for SQL Express backups. If you are using SQL Express, please proceed to the next solution for alternative instructions.
Method 4. Automate SQL Server (Express) backup via Task Scheduler
Unlike full SQL Server editions, SQL Express lacks the Maintenance Plan and SQL Server Agent features in SSMS. As a result, users are left with limited choices for automating backups. One viable alternative is to create a batch file containing a Transact-SQL script and utilize the Windows Task Scheduler to automate the process.
To automate SQL Server Express backups, you'll need to prepare a few essential components. Follow these steps to set up a reliable backup system:
✎ Note: To execute Transact-SQL statements, system procedures, and script files, you'll need to use the SQLCMD utility. This utility is an essential tool for interacting with SQL Server databases.
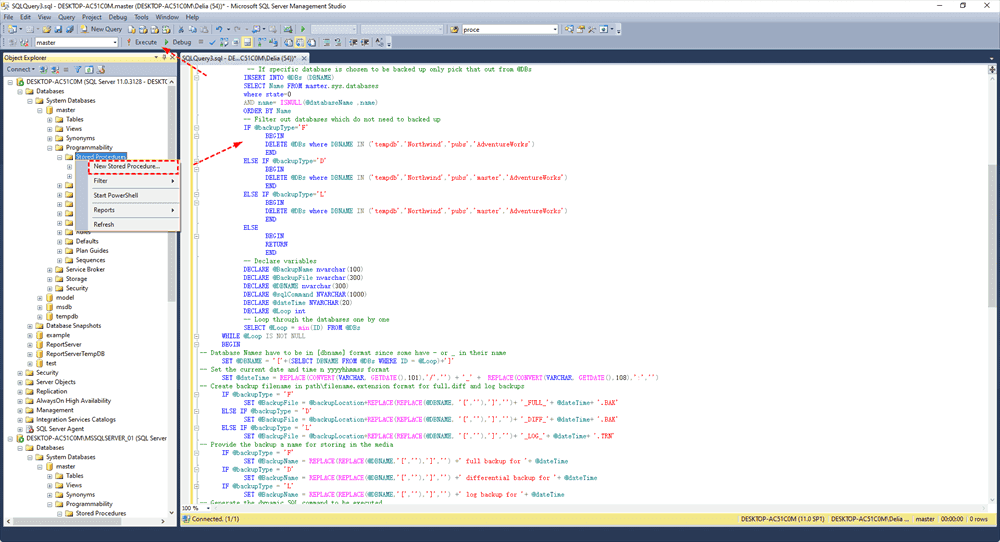
1. Connect to your SQL Server Express instance, find Stored Procedures under Databases > System Databases > master > Programmability. Right-click it and click New Stored Procedure.
2. In the SQLQuery window, copy all the content in this SQL Express Backups script provided by Microsoft, then click Execute button above. It will create a sp_BackupDatabases stored procedure in your master database.
3. To perform a full backup of your SQL Server Express databases, you can use the following basic command in a text editor:
To perform a full backup of all databases in the local named instance of MSSQLSERVER_01 using Windows Authentication, you can use the following command:
*You can copy the name of server and instance from Server Properties. Make sure it's correct.
If you prefer to use SQL Server Authentication instead of Windows Authentication, you can add the following switches to your backup command:
The `-E` switch allows you to use a trusted connection, which means you can authenticate with your Windows credentials without specifying a username and password. However, you cannot use the `-E` switch together with the `-U` or `-P` switches, which are used for SQL Server Authentication.
*To perform a differential backup, replace the last "F" with "D". For a transaction log backup, use "L" instead of "F".*
You can also back up individual SQL databases as you like, for example:
4. Save the file as .bat extension. You could give it a name such as Sqlbackup.bat.
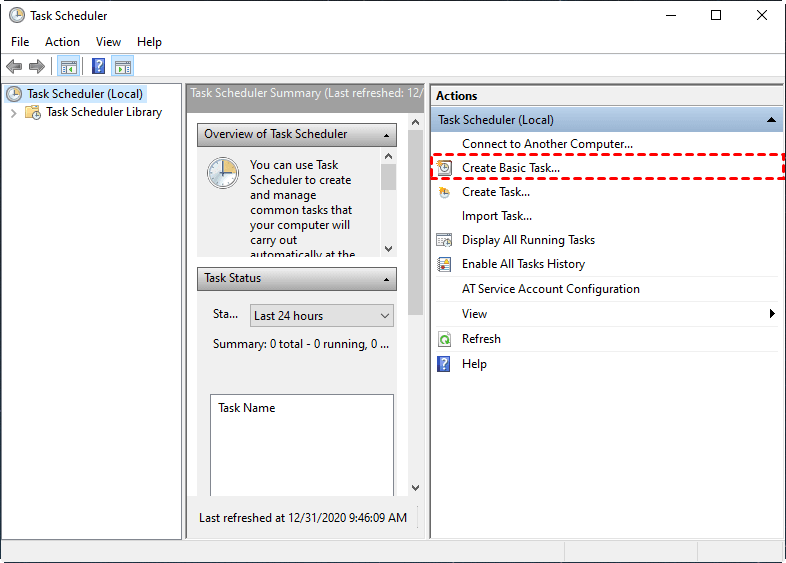
5. Open Task Scheduler to automate the backup batch file. You can find it either by searching for "task scheduler" in Windows, or going to Control Pane > Administrative Tools > Task Scheduler.
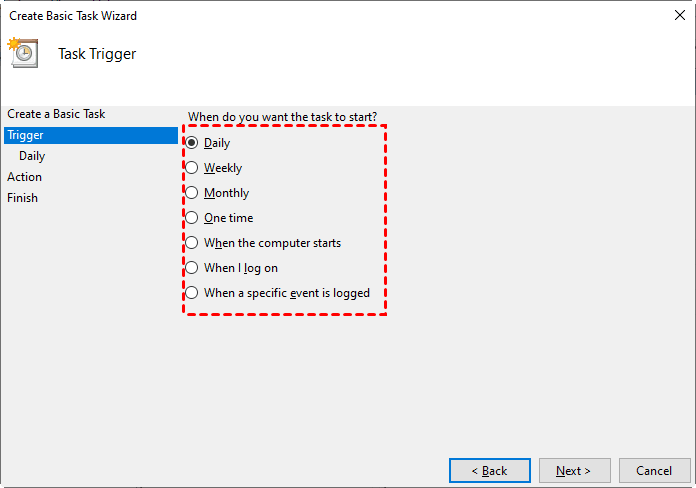
6. Click Create Basic Task and follow the wizard to choose a Trigger. If you want to perform SQL Server auto backup every day, then choose "Daily".
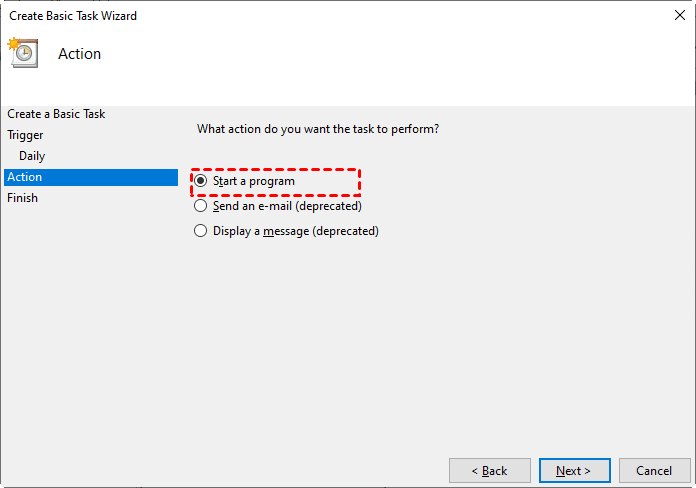
7. Choose the Action as "Start a program", and specify the batch file as the program. When the setup is complete, you've got a SQL Express automatic backup task to autorun.
To avoid cluttering your disk with numerous backup files, consider creating daily database backups with unique names in SQL Server. This way, you can easily distinguish between backups taken on different days.
Conclusion
Now that you're familiar with the process, you can schedule automatic backups in SQL Server 2022, 2019, 2017, 2016, and other versions. The methods outlined here will help you schedule SQL backups and automate the backup process for your SQL Server databases, ensuring they're recoverable in case of any issues.
While the methods outlined earlier can be effective, Qiling Backup is often considered the best practice for SQL Server backup. Its ease of use, powerful features, and fast performance make it an attractive option, especially for those who are not familiar with Transact-SQL scripting or find other methods too time-consuming.
Related Articles
- Schedule Database Backup in SQL Server 2012/2014/2016/2019
You will learn how to schedule database backup in SQL server 2012/2014/2016 using SQL Server Agent jobs and SQL Serve Maintenance Plans. Also, an easier way is included. - Backup SQL Server Database and Restore to Another Server | Guide
Here's a simple guide to backup SQL Server databases and restore to another server. In addition, you can also migrate databases via Copy Database Wizard, or try a centralized backup solution. Keep reading to learn the details. - Best Server Centralized Backup Strategy for Multiple Windows Servers
Do you need a centralized server backup strategy to protect multiple Windows servers or PCs on network? Here's a simple solution for home or business use. - Create Schedule Automatic Backup in Windows 10 [3 Ways Included]
You can easily create schedule automatic backup in Windows 10 with the help of Backup and Restore (Windows 7), File History and Qiling Disk Master Standard.
