Easily Backup Files to External Hard Drive in Windows 11, 10, 8, 7
Why do I need to backup computer files?
While some users underestimate the importance of file backup, thinking "data loss will never happen to me", the reality is that many people have fallen victim to system crashes, hard disk failures, power surges, and natural disasters, losing all their files and experiencing significant consequences. For those who spend a lot of time on their computer, a backup should be a non-negotiable part of their computer experience, providing a safeguard against data loss and its associated stress.
Backing up files helps you recover important data when disaster strikes, providing a copy of your files. This way, if your computer crashes or is attacked by a virus, you can restore files from backup images, preserving valuable information like financial data, photos, music, videos, and programs.
Should I save backup files to external hard drive?
Backing up your computer files to an external hard drive is a popular option among users. This is because external hard drives offer a convenient and cost-effective way to store and protect your files. They can be easily connected to your computer via a USB port, allowing you to access and transfer your files quickly and efficiently. Additionally, external hard drives are relatively inexpensive compared to other backup options, such as NAS devices or online storage services.
- Separately from your computer. Choosing a storage device outside a computer is recommended to prevent data loss in case of system crashes. This way, you can ensure that your important files and data are safe even if your computer experiences technical issues.
- The price is affordable. Today, external hard drives are highly reliable and relatively affordable, making them a great option for storing data. While CDs and DVDs are still a viable option for storing smaller amounts of data, their limited storage space makes them less practical for larger collections.
- The device is portable and can take everywhere. For users who need to use backup files at multiple locations, such as home and office, it's essential to have a system in place that allows for seamless access and management of these files across different places. This ensures that important data is always available and can be easily accessed from anywhere, reducing the risk of data loss or inaccessibility.
- Save backup time. Compared to NAS or online storage, backing up your files to an external hard drive doesn't require a reliable internet connection, resulting in faster backup times.
How to backup files to an external hard drive (3 ways)
To backup all files on an external hard drive in Windows, you may consider using Windows' built-in tools, such as Backup and Restore or File History. However, the easiest way to do this is not mentioned yet, which will be introduced first.
Note that a single backup only captures files at a certain time point. To ensure all changes made later are included, you need to create a schedule backup to continuously protect your files.
- Method 1: Backup all files to external hard drive with free backup software (Easiest)
- Method 2: Backup file to external drive with File History
- Method 3: Backup files to external hard drive with Backup and Restore
Method 1: Backup all files to external hard drive with free backup software (Easiest)
Qiling Disk Master Standard is a free backup software that allows you to backup files to an external hard drive in Windows 11, 10, 8.1, 8, 7, Vista, and XP. It also supports backing up the entire system, disk, and partition if needed, offering a range of advantages.
- Backup files automatically: To prevent data loss, you can set up automatic backups at regular intervals, such as daily, weekly, or monthly, to ensure your files are safely backed up at a scheduled time.
- Backup only changed files instead of full copy: To avoid filling up your backup disk quickly, you can choose to only backup files that have changed since the last backup, using incremental backup, instead of backing up all files every time.
- Other useful features: If you're concerned that your computer might fail, you can prepare a backup by creating a bootable USB or CD/DVD in advance.
Download the software, install it on your computer, and connect your external hard drive to the computer, making sure it's accessible.
This version only supports Windows 7/8/10/11. If you are currently using a server system, try Qiling Disk Master Server.
1. Launch this software, choose "Backup" and "File Backup" subsequently.
2. Select the files you want to backup, and optionally enter a new task name to distinguish it from other backups.
3. Click the folder shaped button and then select the connected external disk to store file backup image.
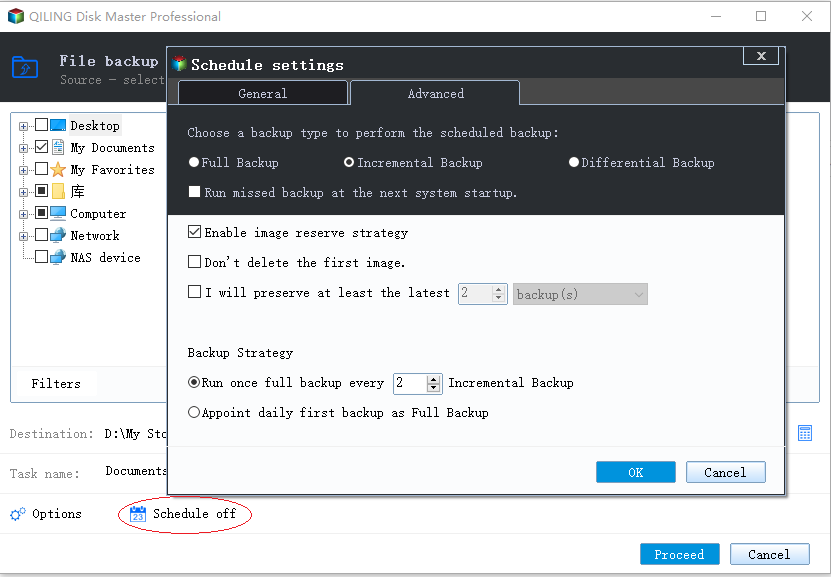
4. To automatically backup files to an external hard drive, enable schedule backup by clicking on "Schedule Backup" and then selecting the desired frequency, such as daily, weekly, or monthly, or triggering the backup upon a specific event or when the USB drive is plugged in.
5. After clicking "Proceed", the software will back up files to the external hard drive, with the option to back up changed files daily if selected previously. The default backup method is incremental, which only saves changed files since the last backup.
Once you've backed up your files, you can safely disconnect your external hard drive and store it in a secure location. If you ever need to replace your computer, you can simply plug in the external hard drive and recover all your backed-up files with ease.
✍ Helpful tips:
👉 You may initially feel satisfied with your backup disk, but it can become full over time. To address this issue, you can opt for deleting backup files using a method like By quantity, By time, or By daily/weekly/monthly cleanup. However, this feature is typically available in the professional or advanced editions of the software.
Method 2: Backup file to external drive with File History
File History is a free built-Windows File Backup tool, which was introduced in Windows 8, allows users to back up default and custom Libraries, including Public Folders, as well as Contacts, Desktop, and Favorites folders. Additionally, Windows 10 introduced the "Add Folders" feature, enabling users to specifically back up selected folders.
To backup files with file history, use the steps below:
1. Connect the external drive to your computer, and ensure it can be detected by the computer.
2. To start the backup process, click the "Start" button on your computer, type "backup" in the search box, and select the "Backup" option from the results. This will open the built-in backup utility on your computer, where you can configure the backup settings and start the backup process.
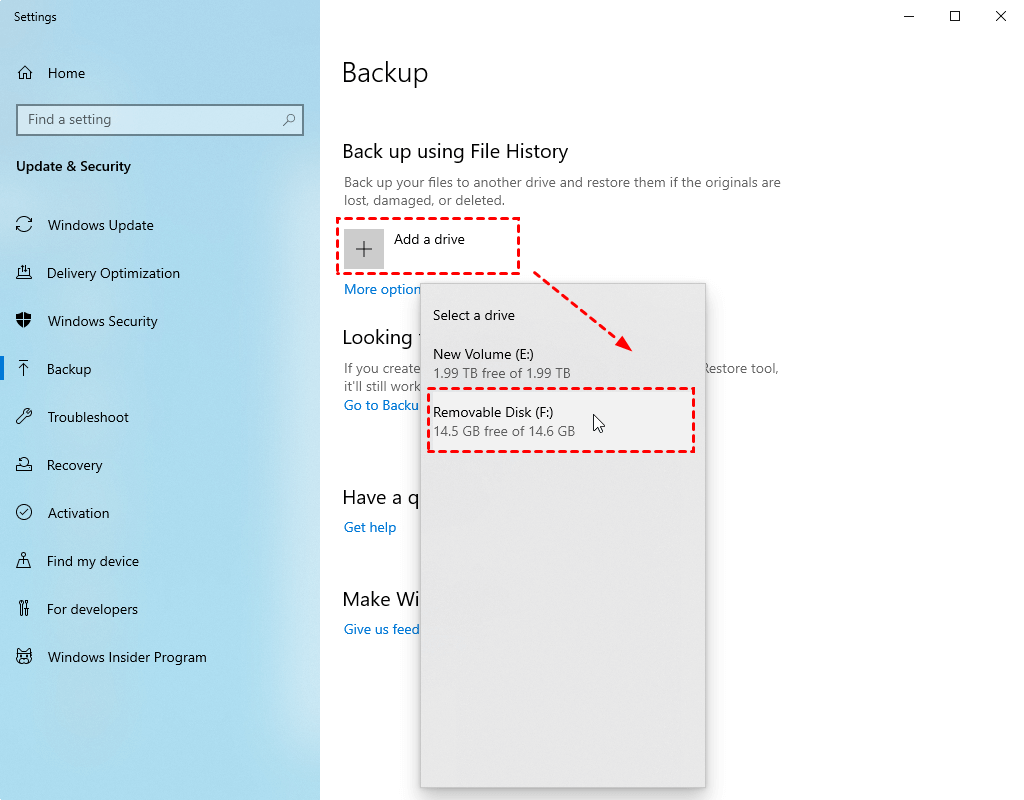
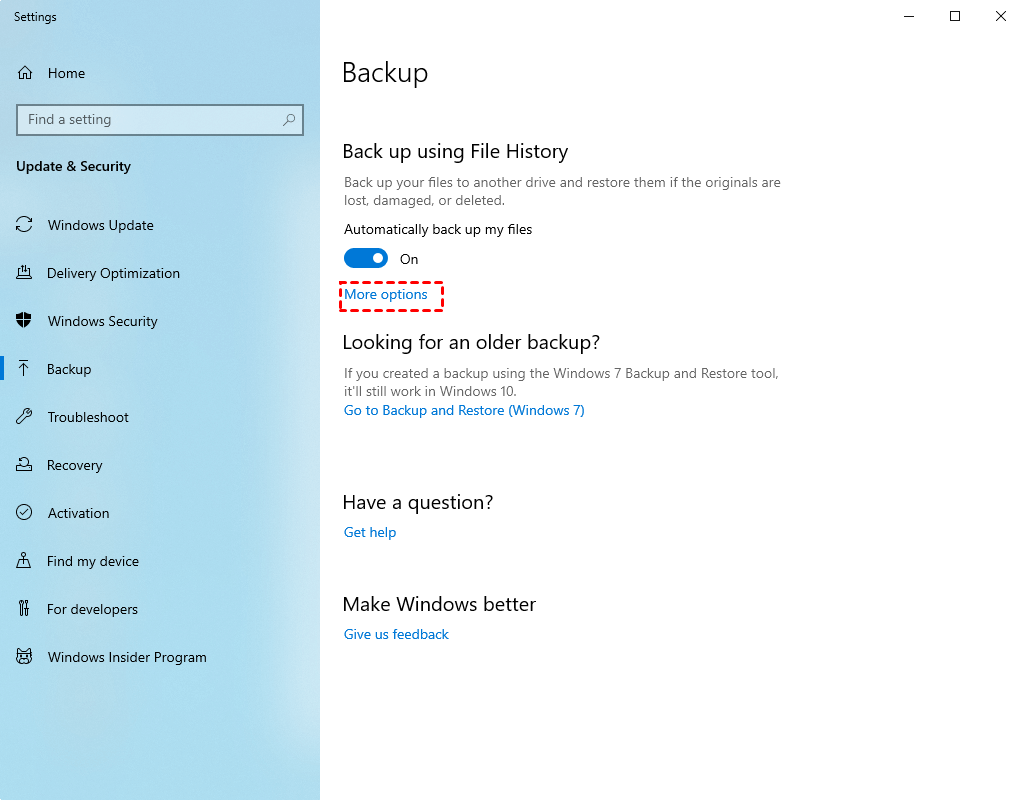
3. To enable automatic file backup, click "Add a drive" and select an external drive, then toggle the switch under "Automatically back up my files" to the on position.
4. To set up backup settings, click on "More options" and scroll down to "Back up my files", "Keep my backups", and "Exclude these folders". Select any desired settings for these options. Once you've made your selections, click "Back up now" at the top of the backup options to initiate an immediate backup of your files.
Method 3: Backup files to external hard drive with Backup and Restore
In Windows 7 and later versions, a free backup software called "Backup and Restore" allows users to back up individual files or the entire system as needed.
To backup files using the "Backup and Restore" feature, follow these steps: First, open the "Backup and Restore" control panel applet, which can be found in the Control Panel under System and Security. Then, click on the "Create a system image" or "Create a system repair disc" option, depending on your needs.
1. Connect your external hard disk to your computer, then type 'backup' in the search box and select the backup option to start the backup process.
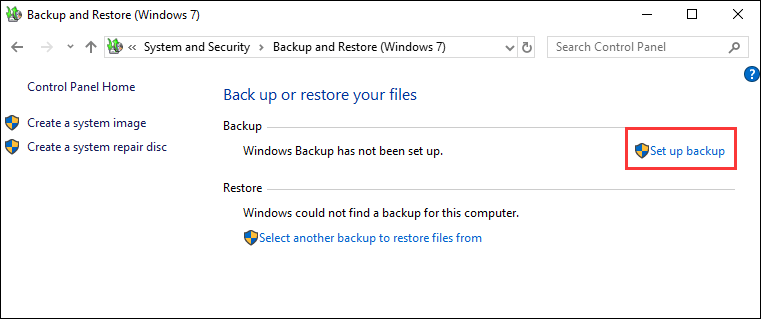
2. To set up a backup, click on the "Set up backup" button to add the first backup task.
3. Select the connected external drive, and click Next.
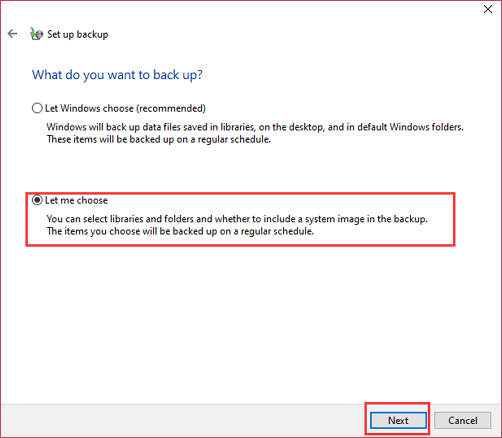
4. Tick "Let me choose" and click Next.
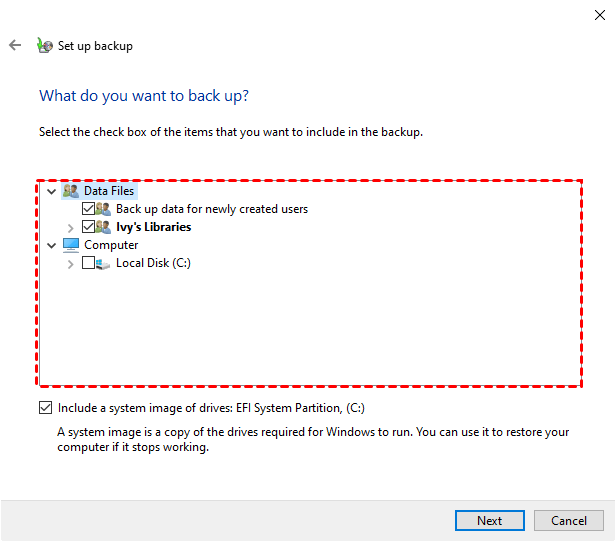
5. Check the folders you want to backup and click Next.
6. To modify the backup settings, click "Change schedule" and then click "Save settings and run backup" to start the task. Wait patiently until the operation is completed 100%.
The schedule backup is set to 7:00 PM every day. If this time is not convenient for you, you can change it to another time.
Tips on how to backup files to external hard drive in Windows 11:
If you are currently using Windows 11, the entrance to access File History and Backup and Restore may be a little difference. You have two ways in the following.
Way 1: Go to Control Panel > System and Security > File History or Backup and Restore (Windows 7) to access the backup settings.
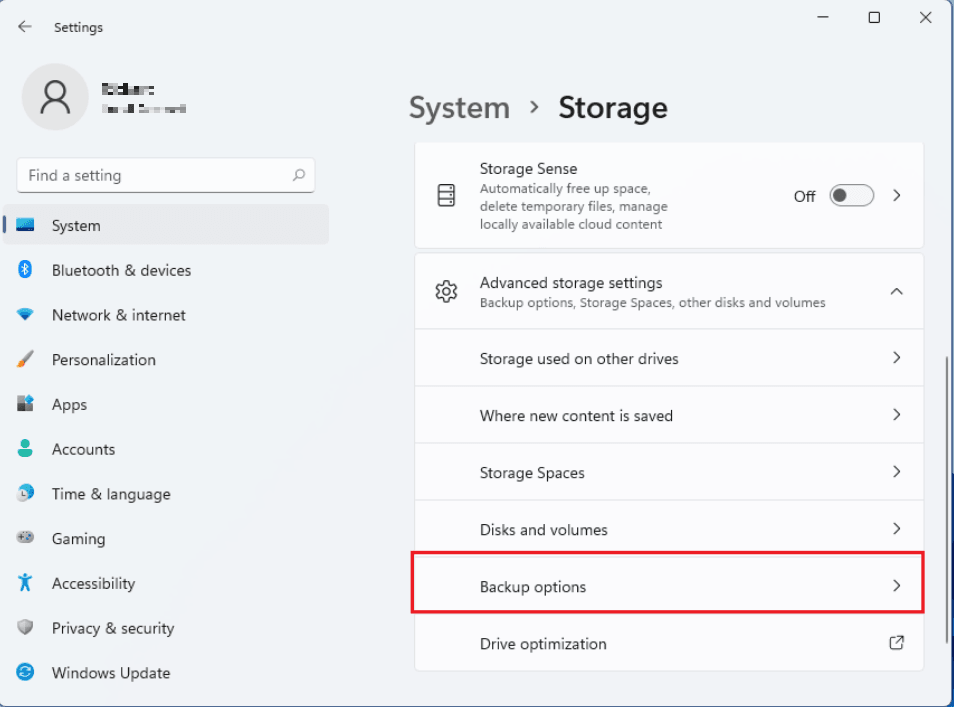
Way 2: To access backup options, go to Settings, then System, next Storage, followed by Advanced Storage options, and finally Backup options, where you can view Back up using File History or Looking for an older backup.
Written in the end
You can easily backup files to an external hard drive in Windows 10, 8, or 7 using built-in tools like Backup and Restore or File History. Alternatively, consider using free backup software like Qiling Disk Master Standard, which is a straightforward option.
This software has an intuitive interface, making it easy to understand and use. Additionally, it allows users to backup only changed files on a daily, weekly, or monthly basis, which helps to prevent disk space from running out. Furthermore, the advanced version offers automatic backup cleanup methods, eliminating the problem altogether. Just try it!
Related Articles
- Top Two Ways to Automatically Upload Photos to Dropbox
Saving photos manually to Dropbox is too much trouble. Things will get much easier if you can automatically upload photos to Dropbox. Luckily, there are two feasible ways. - Sync Files to Google Drive in Windows Server 2008 or Similar Storage
This article introduces you to how to perform Google Drive sync in Windows Server 2008 in different situations. Please click on to learn more about it! - Offline Files Cannot Synchronize Access Is Denied Windows 10
一. This article offers you 3 methods for offline files cannot synchronize access is denied in Windows 10 and an easy way to make network files always available offline. - Best Free Syncthing Alternative to Sync Files Between PCs
This tutorial provides the best free Syncthing alternative for Windows and shows how to sync files between computers via Syncthing and its alternative step by step.
