Best Practices to Backup Virtual Machine for Free
Why Backup Virtual Machine
Virtual machines provide customers with a complete operating system based on virtual hardware, similar to physical computers. As server virtualization grows, backing up virtual machines has become increasingly important, driven by two main reasons:
- Avoid critical data loss. If you have hundreds of virtual machines and never backed them up, a system crash or other accidents like virus attacks, disk failures, or hardware failures could result in immeasurable losses.
- Reduce business downtime. A fast and reliable disaster recovery solution is crucial for businesses, as extended unavailability of a virtual machine can result in significant and potentially incalculable business losses.
- Host-level vs Guest-level Virtual Machine Backup
- Is VM Snapshot Equivalent to VM Backup?
- Best Practices to Backup Virtual Machine for Free
- Step by Step Guide: Backup Virtual Machine Effortlessly
Host-level vs Guest-level Virtual Machine Backup
Virtual machine backups can be broadly categorized into two types: host-level and guest-level backups. Host-level backups capture files, application data, and virtual hardware, treating the virtual machine as a physical asset. In contrast, guest-level backups protect files and applications by treating the virtual machine as a separate entity, often referred to as image-based or file-based backups.
Both host-level and guest-level backup methods have their own advantages and disadvantages. Host-level backup, which works at the hypervisor level, is more efficient and easier to manage as it backs up entire VMs, including their configurations. On the other hand, guest-level backup, which requires an agent to be installed on each VM, offers more flexibility as it allows you to select specific files or data to back up, similar to physical machine backup.
Here I'll focus on a Guest-In smaller virtual environments, a level backup method may be more economical. If you're interested in learning more methods, you can refer to this virtual machine backup guide.
Is VM Snapshot Equivalent to VM Backup?
Snapshots of a virtual machine capture its state, data, and hardware configuration, allowing for quick restoration to a previous state. However, these snapshots, stored as .Avhd files, can consume significant storage space if multiple snapshots are created.
VM snapshots rely on a "chain" of virtual disks, with each snapshot creating a new delta disk. If any disk in the chain is damaged, the entire chain is compromised, making it difficult to recover from a snapshot.
VM snapshots have some limitations. They can't be used to revert to the current state of the machine, and restoring a snapshot only brings back the entire VM, not individual files or partitions. Additionally, taking multiple snapshots can lock the LUN and decrease the VM's performance.
Snapshots of virtual machines (VMs) can be used as a protective measure, but they should be used in conjunction with other backup solutions to ensure comprehensive protection.
Best Practices to Backup Virtual Machine for Free
Snapshots are not a substitute for backups, and since VMware and Hyper-V don't come with traditional backup options, most users opt for professional backup tools to protect their virtual machine data.
Here I will introduce a guest-Qiling Disk Master Standard is a free backup software that allows you to back up your entire operating system, including installed programs, configuration files, and personal data. It can be installed on a virtual machine and can also be used to back up virtual machines to external hard drives, such as USB flash drives, HDD, or SSD. Additionally, it can back up disks to physical computers or other computers via a network.
Unlike snapshots, backups created with Qiling Disk Master have several advantages, including [insert advantages here].
- It can backup and compress everything on the virtual machine to a small image file.
- It can be used to backup your system or files, and also to restore your system or files as needed.
- It can have multiple copies if you schedule a backup virtual machine.
- It can be stored on various locations, including physical drives, external hard drives, cloud drives, NAS, and more.
- The system does not rely on any part of the production infrastructure.
- The usability and security of the system is guaranteed, allowing users to encrypt backup, compress backup, split backup, check backup integrity, and manage backup disk space.
You could download the freeware to try it out.
If you want to run it on Windows Server, please choose the specialized Server edition.
Step by Step Guide: Backup Virtual Machine Effortlessly
With Qiling Disk Master, you could try the following two virtual machine backup strategies: you can backup the entire virtual machine, including its operating system, applications, and data, or you can backup just the user data, such as documents, pictures, and other files, while leaving the operating system and applications intact.
>> Backup Virtual Machine as physical machine: A virtual machine is essentially a digital replica of a physical machine, allowing it to perform the same tasks and functions. Since it's isolated, you can use a virtual machine to do anything a physical machine can do, and even more. To backup a virtual machine, you simply install a backup software on it and schedule the backup process, just as you would with a physical machine.
>> Backup VMDK files: VMware stores each VM as a VM file, typically a VMDK file, which can be backed up to protect data. This approach is resource-efficient and doesn't consume significant system resources or take a lot of time. The backup process is also handled by the ESXi server, making it a convenient and low-maintenance option.
If you're looking for a way to automate a schedule for specific data in a virtual machine, you have two options. For a more automated approach, you can use a script or tool that can run on the host machine to schedule tasks and interact with the virtual machine. Alternatively, if you want a simple method that won't affect the performance of the target machine, you can use a scheduling tool or service that runs on the host machine and interacts with the virtual machine without needing to install anything on the target machine.
Method 1: Backup VM as a Physical Machine
To backup Virtual Machine, download and install Qiling Disk Master Standard on your VM, and connect your target drive to the VM in advance. This is the first VMware backup strategy that uses free backup software to backup Virtual Machine (VMware/Hyper V/Virtualbox).
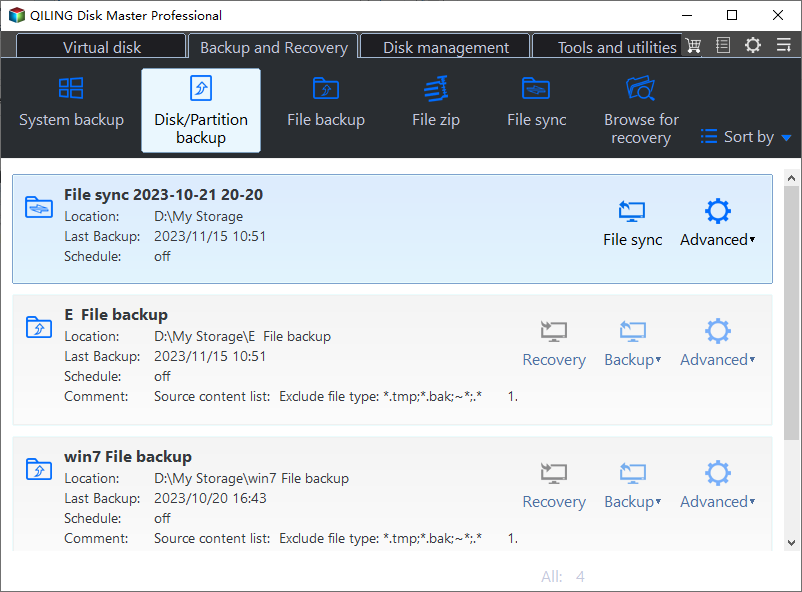
Step 1. Launch the software, click Backup and Disk Backup, and you can also backup system, partition or personal data of your virtual machine.
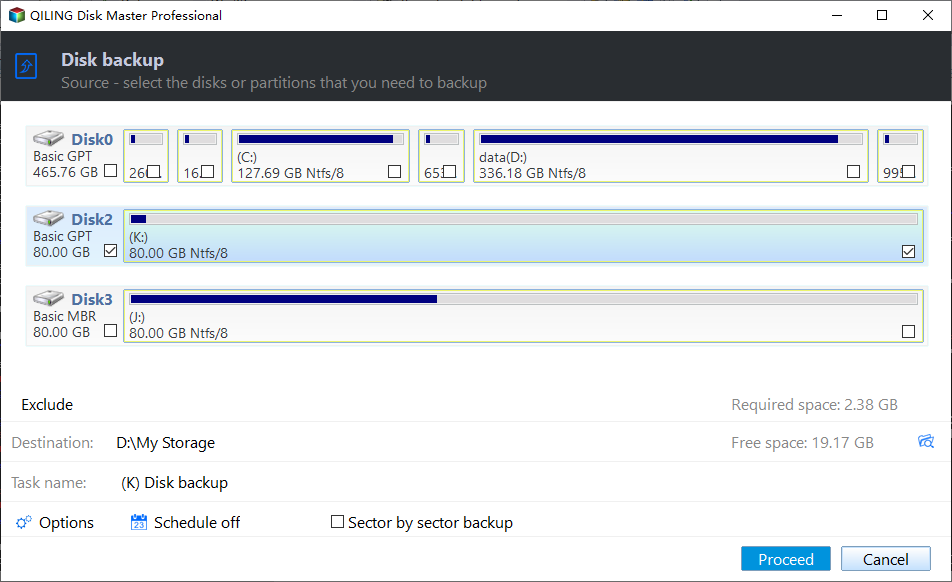
Step 2. Click Disks to select the disk you want to backup.
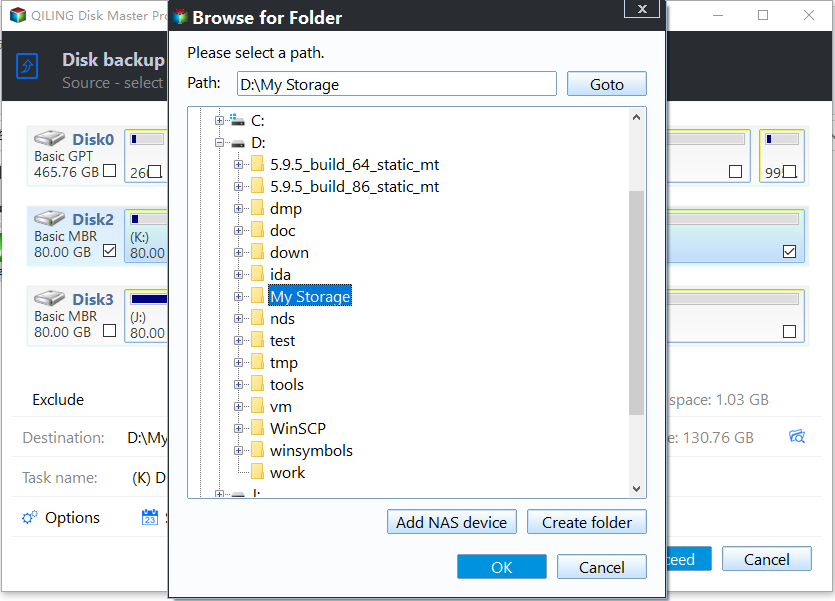
Step 3. Select a destination to save the backup image.
To backup to a physical computer or other computers, please click the inverted triangle button next to the "Backup" button and select the desired destination.
 To set up a network location, select the "Add Network Location" option and enter the required information, including the IP address, username, and password. Then, choose a shared folder as the destination path.
To backup to an external hard drive, click on the arrow and select "This PC" to locate your disk.
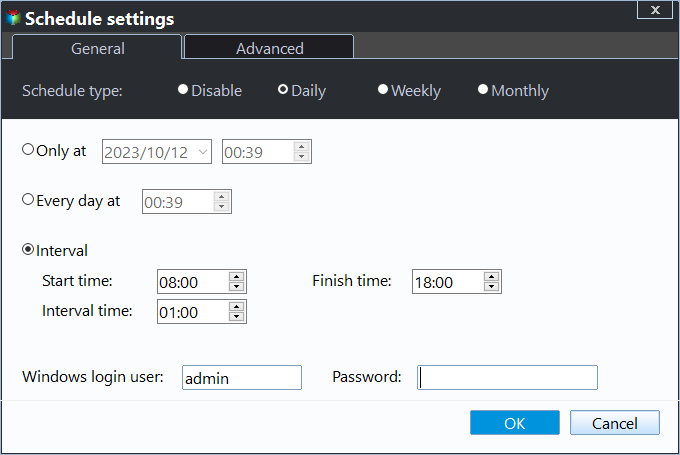
Step 4. Click Schedule to set automatic backup per day, week, or month. Then, run the backup task by clicking Proceed.
Notes:
◕ To prevent unwanted access, please encrypt the backup image during the process by clicking on "Options" and then "Enable encryption for backups".
◕ To check the integrity of your backup, click the Settings icon during the backup process and select the option to "Check backup integrity on completion".
◕ To ensure a complete backup, select the "Backup Mode" and then "Use Microsoft VSS" under the Backup Service, allowing you to backup a VMware virtual machine while it's running.
Tips:
◕ To minimize backup time and storage, consider using daily incremental or differential backups, which only save changed data and new apps. You can also adjust the backup frequency to suit your needs. Upgrading to Qiling Disk Master Professional will unlock these features.
◕ To backup the disk without interrupting computer use, you can use the "Wake up the computer to run scheduled task" feature to schedule backups during off-peak hours, like midnight.
◕ To prevent insufficient disk space, regular deletion of old backup images is necessary, which can be achieved through Backup Scheme, a feature supported by Qiling Disk Master Professional.
Method 2: Backup VM Files in Physical Machine
This backup strategy views a virtual machine as a file in a real computer that contains many .vmdk files. These files can be backed up quickly, making the process easier. To implement this strategy, you can simply copy the entire virtual machine folder and paste it to another folder. However, if the file is very large, this approach may be time-consuming.
To save time, you can try using a free backup software like Qiling Disk Master Standard to easily and quickly back up your files. This process can also be protected from unwanted access by compressing the files into an image file, which requires the image file to be restored in advance. This approach eliminates the need to run a virtual machine.
To ensure a safe and successful operation, make sure the virtual machine is powered off before proceeding with any operation, such as using VMware to check its status.
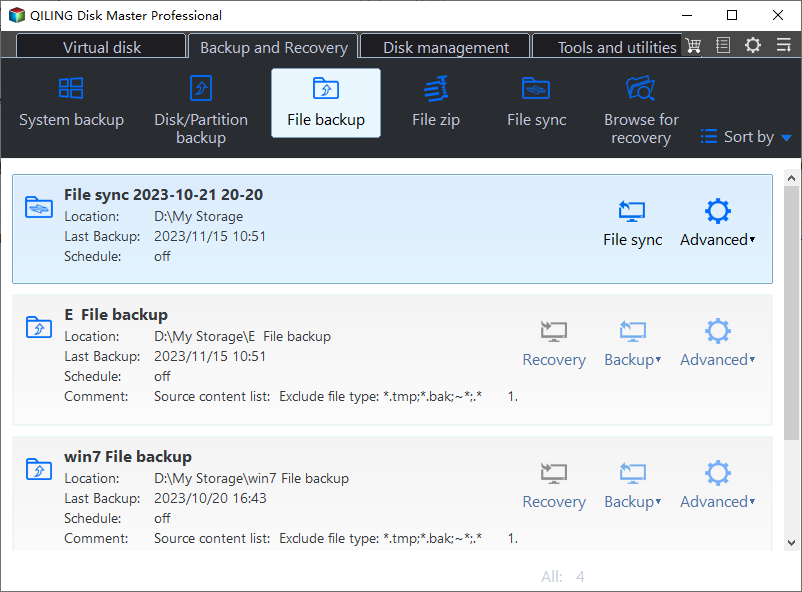
Step 1. Launch Qiling Disk Master Standard. Then, click Backup and File Backup in turn.
Step 2. Click Folder to select the folder contains all items of your virtual machine.
Step 3. Select a destination path for your VM files. It can be any detected storage in Windows.
Step 4. Set schedule backup and click Proceed.

Note: The methods described are also applicable to backing up virtual machines on various platforms, including VMware Workstation, Hyper V, VirtualBox, and others.
Written in the end
With Qiling Disk Master Standard, you can easily backup your virtual machine by following simple steps, and even customize the backup interval and save it to various storage devices like external devices, USB, CD/DVD, or NAS. It's a straightforward process. Give it a try.
4K UHD video playback, 4K UHD video recording, 4K UHD video editing, scheduled incremental or differential backup, event triggers, USB plug in, create bootable media, PXE boot tool, universal restore, encrypt, and more.
Related Articles
- 3 Best Practices for P2V (Physical to Virtual) Migration
Need to migrate Windows system from physical to virtual machine? Learn 3 best practices for P2V migration from this page. - How to Migrate OS to HDD or SSD in Windows 11/10/8/7?
This article tells how to migrate OS to HDD or SSD step by step via using Qiling Disk Master Professional. - Restore BIOS Based System Recovery Points to UEFI Based Computer
Learn how to restore BIOS based system recovery points to UEFI based computer in Windows 10/8.1/8/7 without reinstalling system and applications. - Top 2 Ways for Samsung SSD Secure Erase – Unrecoverable
This page presents 2 easy ways to perform Samsung SSD secure erase. Once the SSD has been wiped, it can never be recovered by anyone else.
