Bare Metal Recovery | Complete Guide in Windows 10, 11 and Server
- What is Bare Metal Recovery
- Advantages of Bare Metal Backup and Restore
- How to Perform Bare Metal Recovery in Windows PC and Server
- Easiest way to bare metal backup and restore Windows 11/10
- Create a bootable media with Qiling Disk Master
- Create bare metal backup in Windows 10/11 with Qiling Disk Master
- Bare metal restore Windows to dissimilar hardware with Qiling Disk Master
- Built-in way to perform bare metal recovery step by step
- Part 1. How to create a bare metal backup
- Part 2. How to prepare a bootable media
- Part 3. How to perform bare metal recovery
- Conclusion
What is Bare Metal Recovery
Bare metal recovery Bare Metal Recovery (BMR) is a powerful technique that allows you to restore a computer or server to its original state, without the need for a previously installed operating system or software. This process is also known as a "bare metal" restore, and it's a crucial tool for IT professionals and system administrators.
Performing a bare metal restore is a powerful technique that allows you to restore a computer or server to its original state, without the need for a previously installed operating system or software. This process is also known as a "bare metal" restore, and it's a crucial tool for IT professionals and system administrators.
Advantages of Bare Metal Backup and Restore
Bare Metal Restore (BMR) is a powerful backup solution that offers several advantages over other types of backups. In this article, we'll explore the benefits of BMR and why it's a popular choice among IT professionals and system administrators.
◆ Simplicity: Bare metal recovery is a powerful backup solution that offers several advantages over other types of backups. In this article, we'll explore the benefits of bare metal recovery and why it's a popular choice among IT professionals and system administrators.
◆ Safety: In the event of a catastrophic failure caused by a virus or ransomware, a machine can be left in a state of disarray. The traditional approach to recovery often involves reinstalling the operating system and applications, which can be a time-consuming and labor-intensive process.
With these benefits, bare metal recovery can be applied to many situations, like system or hard drive failures, virus invasion, hardware replacement, or even when you want to migrate physical machine to virtual machine, replace HDD with SSD, etc.
How to Perform Bare Metal Recovery in Windows PC and Server
Bare metal recovery is a versatile solution that can be applied to various situations, including system or hard drive failures, virus invasion, hardware replacement, migrating physical machine to virtual machine, replacing HDD with SSD, and more. This process can be performed in both Windows 11/10/8/7 and Windows Server 2022/2019/2016/2012 (R2) operating systems.
The whole process of bare metal recovery:
- Create a bare metal backup on a working machine.
- To initiate the bare metal recovery process, you need to boot the target machine into the Windows Recovery Environment. This can be done using the installation disc or a recovery drive.
- Restore the backup to a bare metal machine.
Performing a bare metal recovery can be simplified by using a reliable backup and restore program. This approach ensures that all necessary functions are included in a single, user-friendly interface.
Bare metal recovery is a process of restoring a system to its original state after a complete failure. This can be achieved using a backup and restore program or Windows integrated utilities.
- Easiest way to bare metal backup and restore Windows 11/10
- Built-in way to perform bare metal recovery step by step
Easiest way to bare metal backup and restore Windows 11/10
Qiling Disk Master is a powerful backup and restore tool that can help you achieve bare metal recovery in Windows operating systems. This tool provides a user-friendly interface and a wide range of features to ensure that your system is restored to its original state in the event of a failure.
▶ Qiling Disk Master is a powerful backup and restore tool that can help you achieve bare metal recovery and universal restore in Windows operating systems. This tool provides a user-friendly interface and a wide range of features to ensure that your system is restored to its original state in the event of a failure.
▶ Qiling Disk Master is a powerful tool that enables users to �reate bootable media and perform backups without the need to boot Windows. This feature is particularly useful in situations where the operating system is not functional or when performing system maintenance.
▶ Qiling Disk Master is a powerful tool that enables users to perform bare metal restore in various operating systems, including Windows 10/11 and Windows �erver editions. With its user-friendly interface and advanced features, Qiling Disk Master makes it easy to restore systems to their original state.create bootable media and perform backups without the need to boot Windows. This feature is particularly useful in situations where the operating system is not functional or when performing system maintenance.
▶ Qiling Disk Master is a powerful tool that enables users to perform bare metal restore in various operating systems, including Windows 10/11 and Windows �erver editions. With its user-friendly interface and advanced features, Qiling Disk Master makes it easy to restore systems to their original state.Server editions. With its user-friendly interface and advanced features, Qiling Disk Master makes it easy to restore systems to their original state.
Bare metal recovery is a process that restores a system to its original state, including all files, settings, and applications. In Windows 10, bare metal recovery can be performed using Qiling Disk Master Pro.
✍Procedures for different cases
- Case 1. Restore to another PC that cannot boot or has no pre-installed system
Create a Windows 10 bare metal backup and bootable media on source PC >> boot the target PC into WinPE >> perform the universal restore.
- Case 2. Restore to another bootable PC
Create a bare metal backup on source Windows 10 PC >> install Qiling Disk Master on target PC as well >> restore from the Windows 10 bare metal backup.
- Case 3. Restore to another hard drive on the same PC
Connect the target hard drive >> create a Windows 10 bare metal backup of the current disk >> restore the backup to the target hard drive.
Below I will explain all the function points involved, you just need to take the steps needed for your situation.
Create a bootable media with Qiling Disk Master
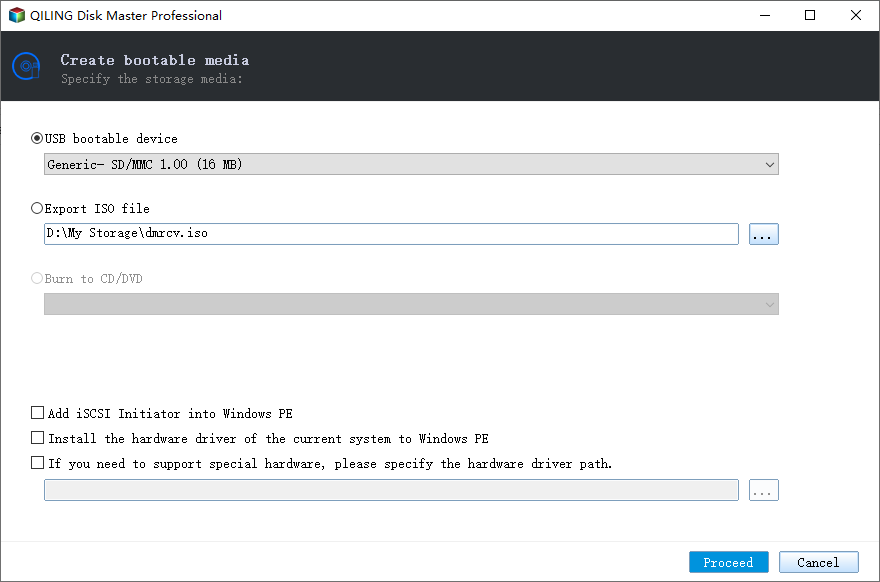
1. Download and install the tool, click Tools on the left sidebar and choose Create Bootable Media.
2. Choose storage media > Follow the wizard to create it.
● Windows PE The recommended PE boot mode is the **PE boot mode**. This mode is recommended for its compatibility and convenient operation.
● The created Windows PE disc has a unique feature that allows it to boot from both legacy BIOS mode and UEFI mode. This dual-boot capability makes it a versatile option for users who need to work with different systems.
● In addition to booting from a Windows PE disc, you can also PXE boot the computer and then use Universal Restore to restore the system image. This option provides an alternative way to restore the system, offering flexibility and convenience.
Create bare metal backup in Windows 10/11 with Qiling Disk Master
1. To create a system backup, you can use the Universal Restore tool. This tool provides a user-friendly interface to backup your system partitions or entire disk.
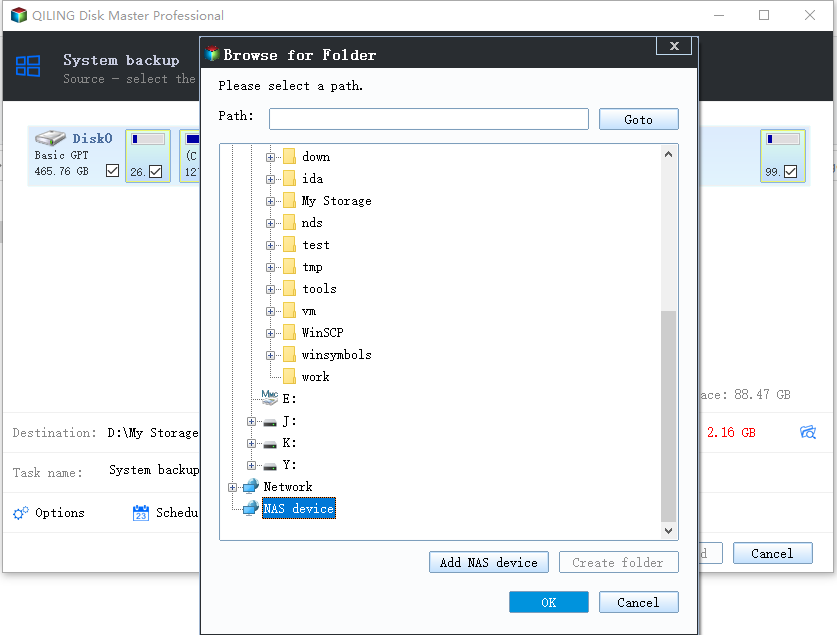
2. When creating a system backup using the Universal Restore tool, you need to specify a destination to save the system image. This is where the backup will be stored, and it's essential to choose a location that's reliable and accessible.
When creating a system backup using the Universal Restore tool, you may want to select a network location as the destination for the backup. This can be a convenient option if you have a network-attached storage (NAS) device or a shared drive on your network.
3. Confirm the operation and click Proceed to create bare metal backup in Windows 10.
In addition to creating bare metal backups, the Universal Restore tool offers several other features that can be useful in various scenarios:
Options: manage backup mode, comments, email notification, compression, splitting, encryption, etc.
Schedule: set up automatic backup on the basis of Daily/Weekly/Monthly/Event triggers/USB plug in.
Scheme: set Full/Incremental/Differential backup method and auto delete older backups to save your storage space intelligently.
Bare metal restore Windows to dissimilar hardware with Qiling Disk Master
1. To begin the backup and restore process, you need to boot the target computer into Windows PE using the bootable media you created. This process is straightforward and ensures that the target computer is in a stable state for the backup and restore process.
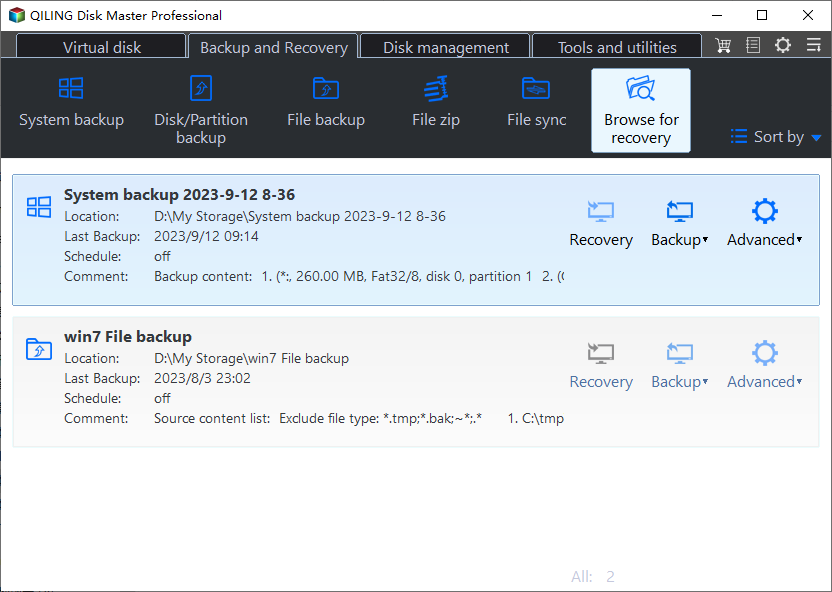
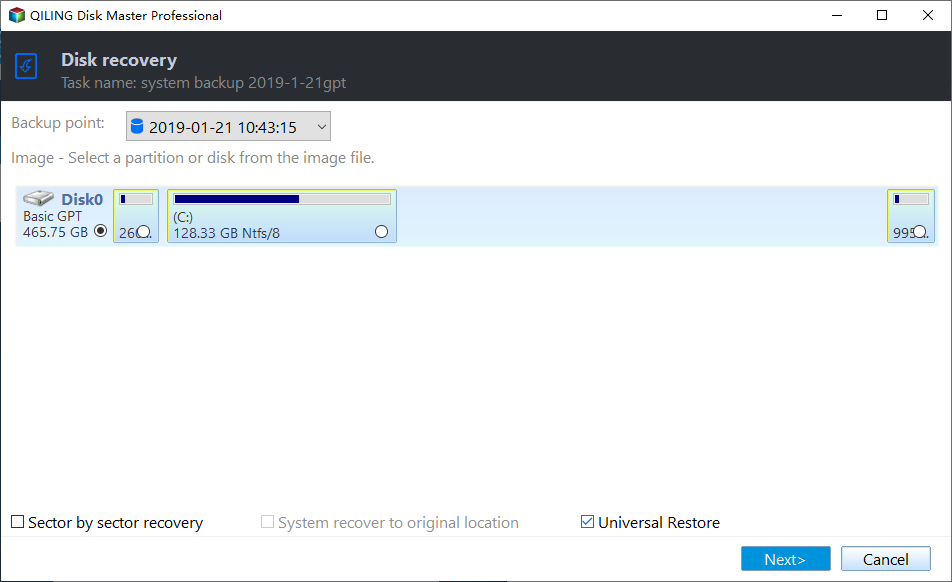
2. Go to Restore tab, choose Select Image File and locate and select the Windows 10 bare metal backup from the removable devices or network.
3. Choose Restore this image backup, tick Restore system to other location and hit Next.
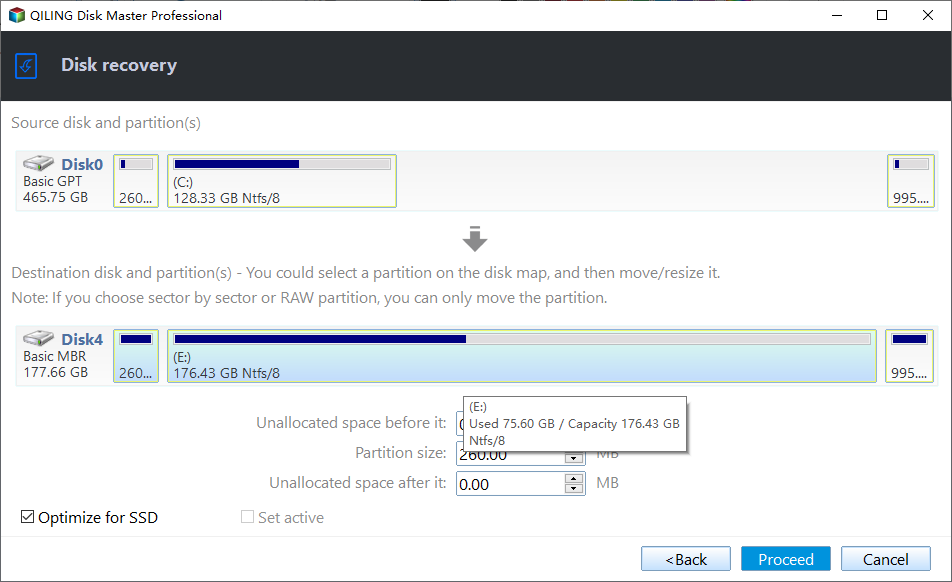
4. Select the destination that you want to perform bare metal recovery in Windows 10, and click Next.
5. Confirm the operation and make sure Universal Restore is ticked. Then Proceed and wait for it to finish.
Built-in way to perform bare metal recovery step by step
Given the diversity of hardware and systems, it may not be difficult to do a bare metal recovery with built-in utilities, but there are many limitations and it is easy to make a mistake in one of the steps. If you don't mind taking a little detour, you can refer to the following guide using all built-in Windows utilities.
Now I'll introduce it in the following aspects:
- Part 1. How to create a bare metal backup
- Part 2. How to prepare a bootable media
- Part 3. How to perform bare metal recovery
Part 1. How to create a bare metal backup
To bare metal restore Windows 10/11/8/7 or Windows Servers with built-in utilities, you need a bare metal backup at first. If you've created it on this computer before, that's great. If not, or if this is a new hard drive or computer, you may need to create the backup on another normally working computer with the same boot mode (Legacy/UEFI).
Method 1. Create bare metal backup with WBadmin
Range of application: Windows 11/10/8/8.1/7 and Windows Server 2022/2019/2016/2012/2008(R2)
Search for "command prompt" in the search box on task bar > "Run as administrator" > Type the command like "wbadmin Proceed –backuptarget: F –allcritical –quiet" > press "Enter".
You can customize the command by changing the target driver letter, drives you want to backup, and parameters of the backup. Detailed steps have been described in bare metal backup and restore with WBadmin.
Method 2. Create a system image in Backup and Restore
Range of application: Windows 11/10/8/8.1/7
For Windows 10/8/7: Search for "backup and restore" in search box > choose "Backup and Restore (Windows 7)" > "Create a system image" > follow the wizard to complete the system image backup.
For Windows 11: Go to Settings -> System -> Storage -> Advanced Storage options > Backup options, then scroll down to Looking for an older backup and select Go to Backup and Restore (Windows 7) to access this software and create a system image.
Method 3. Create bare metal backup with Windows Server Backup
Range of application: Windows Server 2008 (R2), 2012 (R2), 2016, 2019, 2022
Launch "Windows Server Backup" > click Backup Once > select Different options > check Custom backup configuration >choose Add Items and Bare metal recovery in the Select items for Backup> follow the wizard to complete the backup.
Windows Server Backup (WSB) is a built-in backup tool in Windows Server operating systems, first introduced in Windows Server 2008. It provides a simple and efficient way to create backups of system data, including a bare metal recovery feature.
Part 2. How to prepare a bootable media
To perform bare metal recovery, you need to enter Windows Recovery Environment with the installation CD. If you don't have any, you can also create a bootable media by your own.
For Windows 11/10/8/7
If you're unable to access your Windows installation, you can create a recovery USB drive or a system repair disc to help you recover your system. While both options serve the same purpose, there are some differences between them.
System repair disc can help you to access all Windows recovery options. You'll need a CD or DVD to create it.
Recovery drive consists of essential Windows components and the environment. So in addition to getting access to Windows recovery options, it can also be used to reset or reinstall the computer. You'll need a USB drive that's at least 16 gigabytes.
Learn how to create recovery drive or repair disc.
For Windows Server
Bare metal recovery for Windows Server involves restoring the operating system and data to a server in a way that doesn't require the original installation media. This process is also known as a "bare metal restore" or "bare metal recovery.
Learn how to create Windows server recovery disk
📢Notes:
- If you're performing a bare metal recovery on a computer that doesn't have a functioning operating system (OS), you'll need to use a Windows installation disk. This is because the system repair disc or recovery drive won't work on a non-system computer.
- When it comes to troubleshooting and recovery, two popular options are the system repair disc and the recovery drive USB. While both can be useful, they have some key differences.
Part 3. How to perform bare metal recovery
Before performing bare metal recovery in Windows, it's essential to consider a few key factors to ensure a successful process, especially when restoring to a computer with dissimilar hardware.
◾ When performing Windows bare metal recovery, it's essential to ensure that the boot mode of the original computer and the target computer are compatible. This includes Legacy and UEFI boot modes. If the boot modes are different, you may encounter the error "System image restore fails because of EFI/BIOS".
◾◽ When performing bare metal recovery, it's crucial to ensure that the target disk has enough disk space to accommodate the restored system. This is particularly important when restoring to a new machine.
◾◽◾ The target disk has to be formatted with NTFS.
How to perform bare metal recovery on Windows 10/11
To recover a bare metal backup created with built-in utilities, you'll need to enter the Windows Recovery Environment (WinRE). Here's a step-by-step guide on how to perform bare metal recovery in Windows 10:
1. Insert the installation disc or recovery media to boot the computer that needs recovery.
2. Select the language and keyboard, then click Next on Windows Setup.
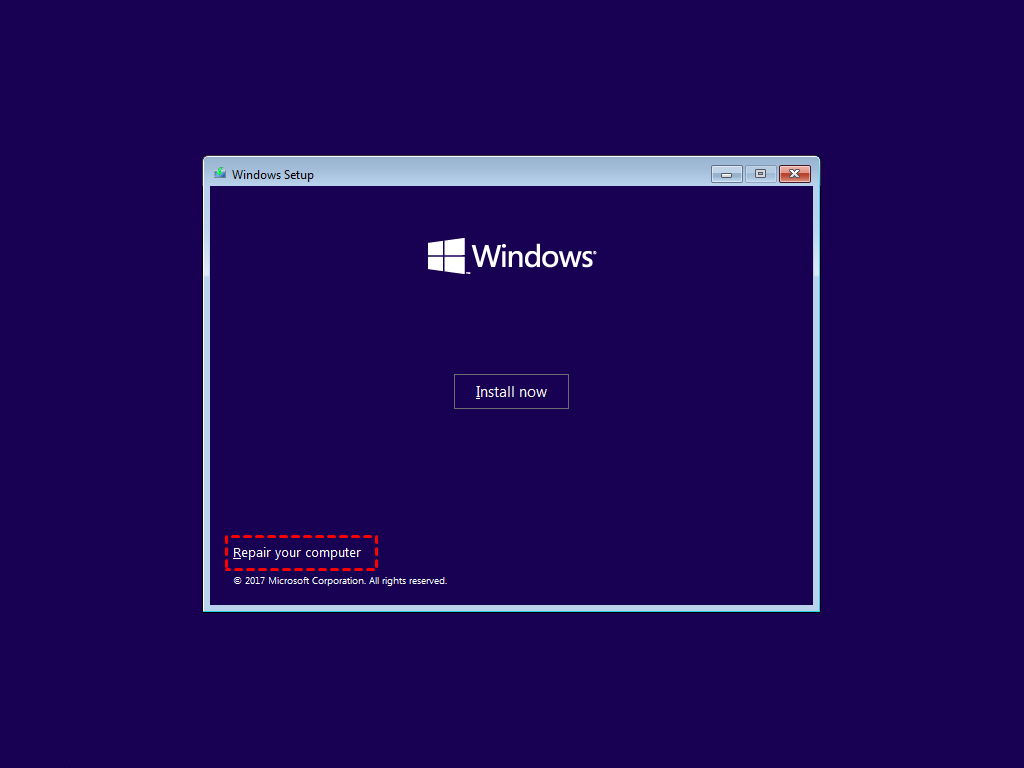
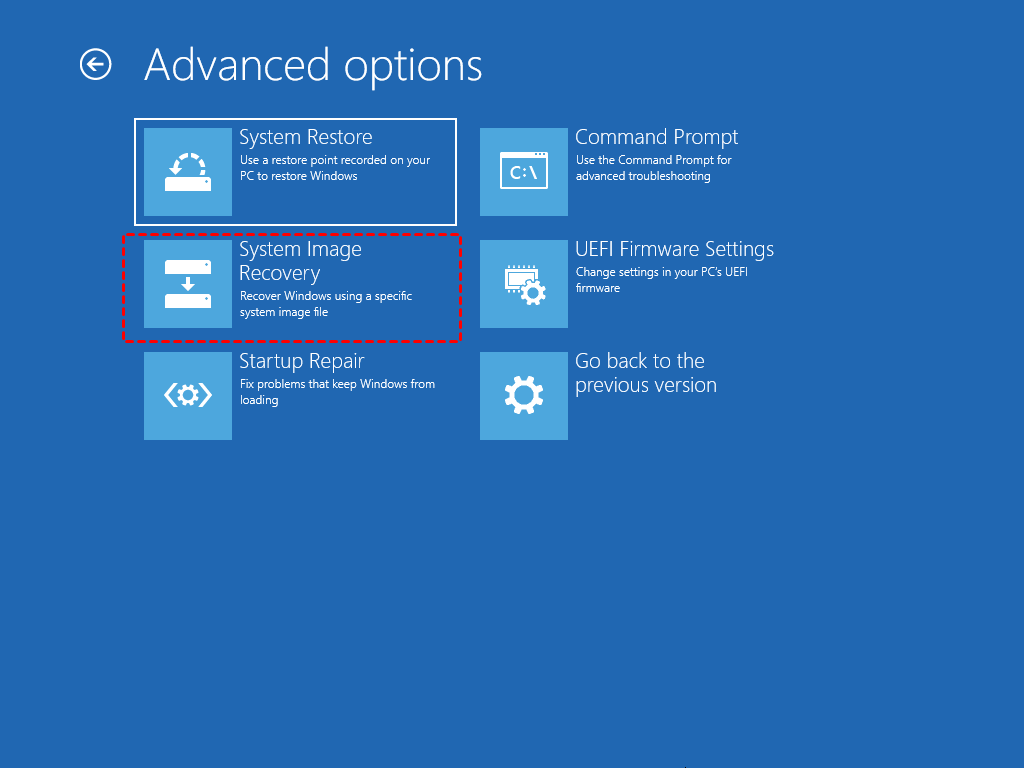
3. Click Repair your computer > Troubleshoot > Advanced Options.
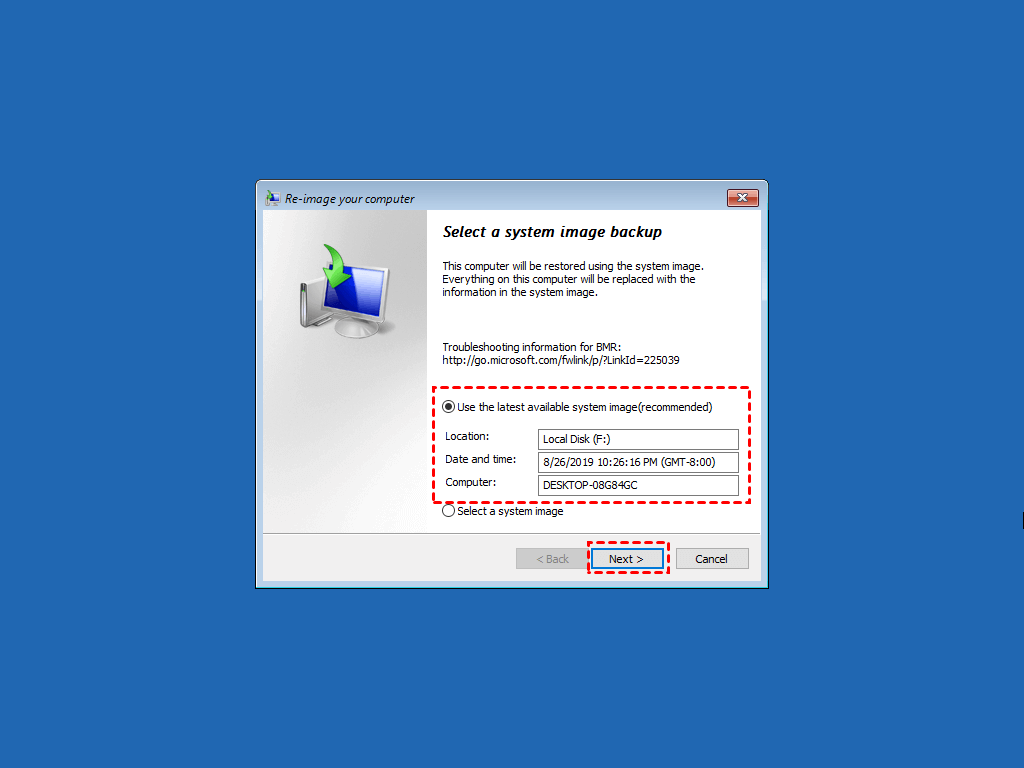
4. Select System Image Recovery and follow the wizard to perform a bare metal restore in Windows 10. If you create the backup with WBadmin, you can also perform bare metal recovery with Command Prompt.
5. Select the system image saved on a removable device or network location, and click Next.
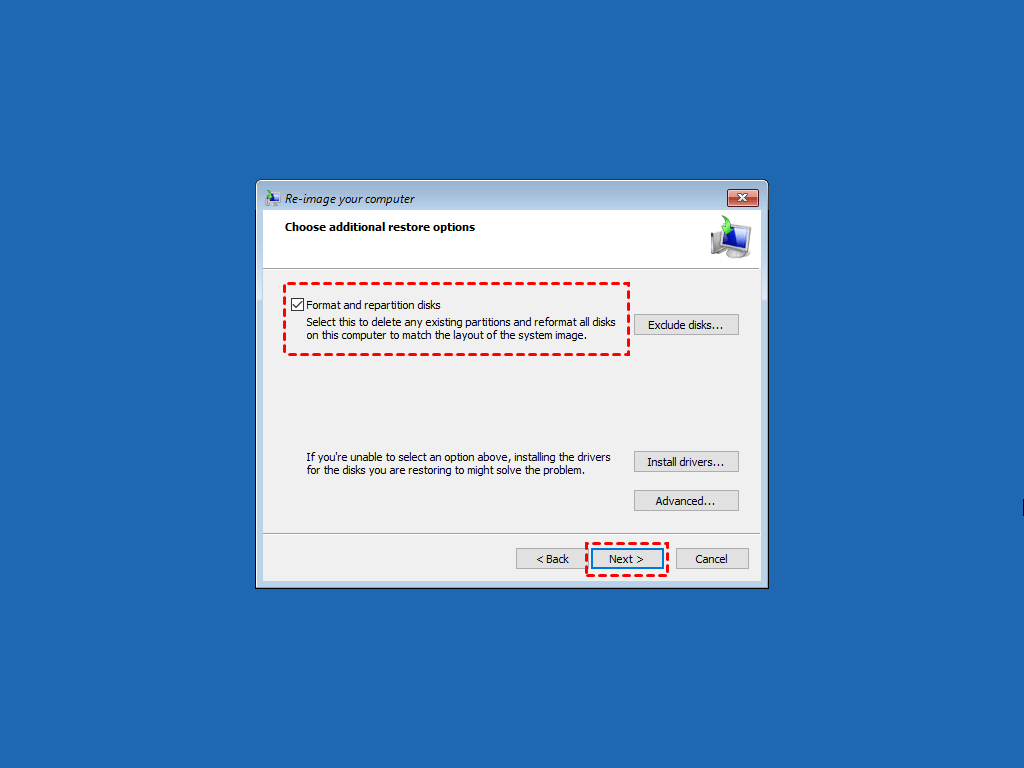
6. Choose additional restore options and click Next.
7. Confirm the information, click Finish and then Yes to start bare metal recovery in Windows 10. It may take hours to restore and the computer will reboot automatically.
How to perform Windows Server Backup bare metal recovery different hardware
To perform bare meta restore in Windows Server, you still need to enter the RE recovery environment. The steps are below. Here take Windows Server 2008 bare meta restore as an example.
1. Insert the Windows Server installation disc or recovery drive to boot the target machine.
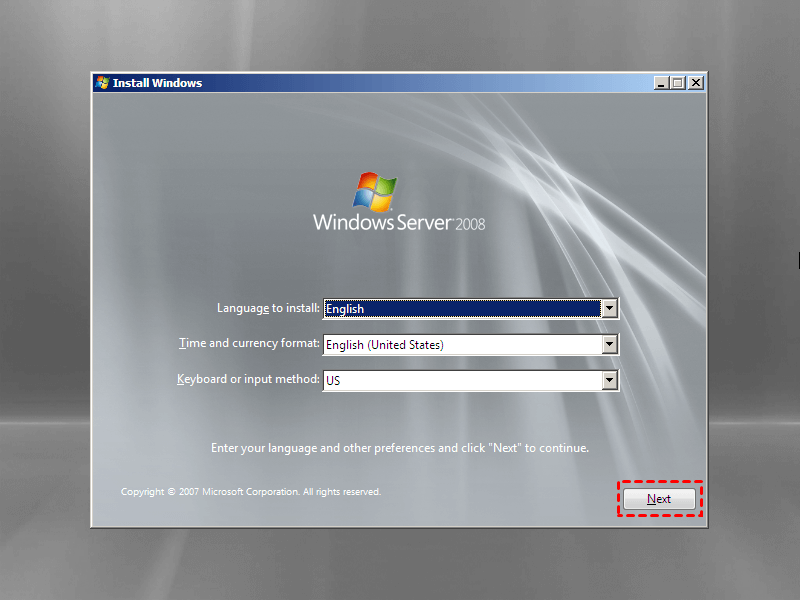
2. Select the language and other preferences and click Next to continue.
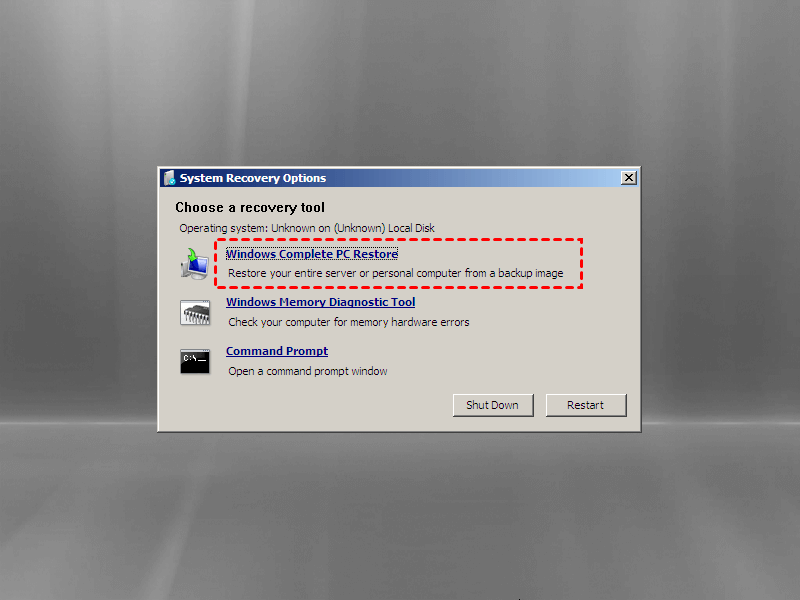
3. Click Repair your computer to choose Windows Complete PC Restore from System Recovery Options. Optionally, you can select Command Prompt to restore WBadmin bare metal backup.
4. Select the bare metal backup you want to restore and click Next. If the image is saved on a removable devices, you should connect it at first. You can also select it from a network location.
5. Confirm the backup and click Finish to start restoring it to the bare hardware. It may take some time depending on how much data to be restored. Please wait patiently till the process ends.
Conclusion
Bare metal recovery is a powerful method to restore a crashed computer or build a new one without the need for reinstallation. This process can be performed on both Windows PCs and Windows Servers, using either built-in utilities or third-party bare metal recovery software to simplify the process.
Qiling Disk Master is a powerful tool that goes beyond creating bootable media and performing bare metal restore. Its versatility makes it an essential addition to any IT professional's toolkit. In addition to its core features, Qiling Disk Master offers a range of useful functions that can be leveraged for daily data protection and hard drive replacement.
Related Articles
- Create Windows 10 Bare Metal Backup for Bare Metal Recovery
Bare metal backup can help you restore system to new computer with dissimilar hardware. This article offers you two ways, and the latter one is easier. - Windows Server Backup Bare Metal Recovery to Different Hardware
It's easy to create a Windows Server Backup for Bare Metal Recovery, but can you restore it to another machine with different hardware? How to do it without boot errors? - Restore Windows Backup to New Computer (Different Hardware Supported)
You will learn how to restore Windows 10 backup to new computer with the same or dissimilar hardware easily and quickly. Follow the method below and restore your computer now!. - P2V Windows 10 | The Simplest Way to Convert Physical to Virtual
P2V Windows 10 has plenty of benefits. But if you're not computer savvy, the process may seem complicated and confusing. Therefore, I'd like to provide a very easy solution to convert physical machine to virtual machine.
