How to Change Boot Drive on Windows 10 [Compatible with Windows 11]
What is boot drive?
The boot drive is the primary drive that contains the operating system and is used to start up a computer, also known as the system drive. During startup, the computer's BIOS/UEFI reads the boot sector of the boot drive, which contains the necessary information to load the operating system.
The boot drive is the storage device where the operating system is installed, typically a hard disk drive (HDD), solid-state drive (SSD), or other capable storage, which stores the OS during initial computer setup.
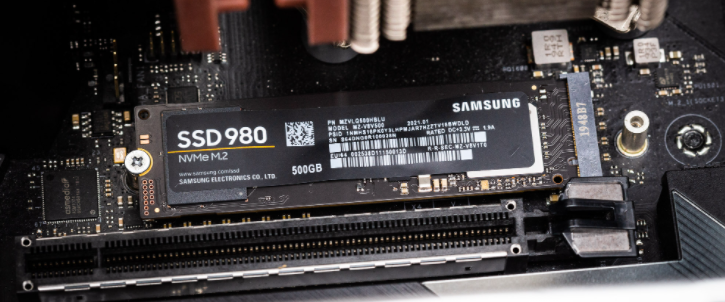
Upgrading a computer by installing a new storage device, such as an NVMe SSD, may require setting the NVMe as the boot drive in the system's BIOS/UEFI settings to ensure proper startup using the new storage device.
Tip: To learn more about BIOS and UEFI, you click on "Boot from Legacy or UEFI Successfully".
How to change boot drive on Windows 11, 10, 8, and 7
To change the boot drive on Windows 10 or 11, follow these steps. First, understand what a boot drive is, which is the primary drive where your operating system is installed. This method works for various computer brands like ASUS, Dell, MSI, and Samsung. To proceed, you can refer to the following steps, which will guide you through the process of changing the boot drive on your Windows operating system.
Turn on your computer and immediately start pressing the BIOS/UEFI access key, which may vary depending on your computer's manufacturer, but commonly used keys include F2, F10, Delete, or Esc, and if unsure, check your computer's documentation or google for the specific key for your computer model.
▶ How to change boot drive from BIOS▶ How to change boot drive from BI
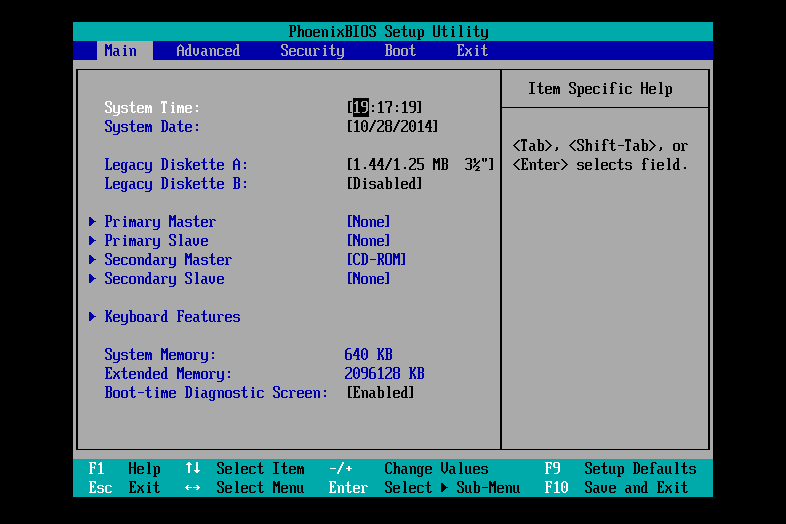
✦ Once you enter the BIOS setup utility, you'll see a menu with various options, and you can navigate through it using the arrow keys on your keyboard.
✦ Look for a section labeled "Boot" or "Boot Order" in the BIOS settings, the exact name and location may vary depending on the BIOS version.
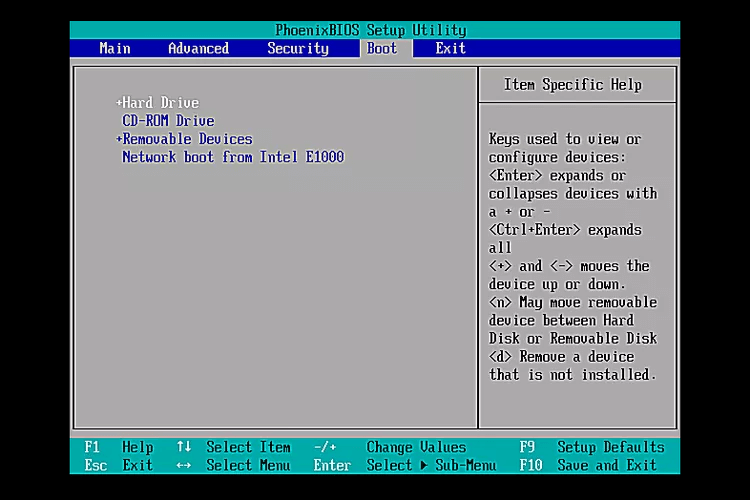
✦ Within the "Boot" section, a list of available drives or devices is displayed, representing the boot order with the topmost drive being the current boot disk.
✦ Select the current boot disk and press Enter, or follow the instructions provided to change the boot disk.
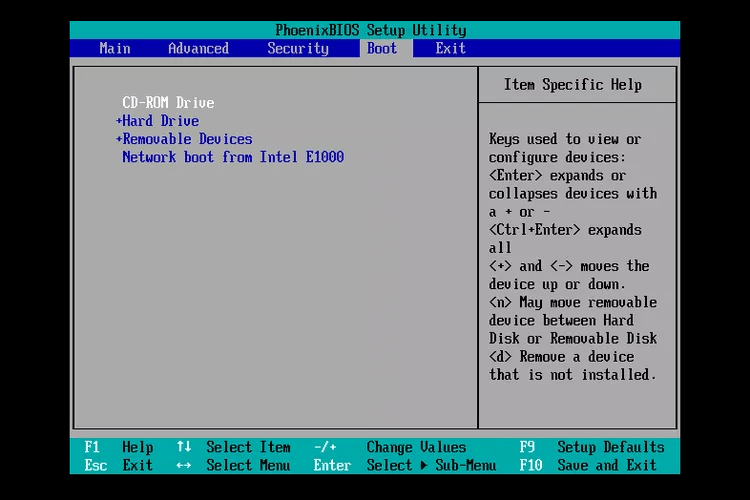
✦ Choose the new boot disk from the list of available drives, making sure it's properly connected to your computer if it's not already listed.
✦ To prioritize the new boot disk, locate the boot order settings in the BIOS or UEFI firmware. This is typically done by pressing a designated key (usually + or -) during the boot process.
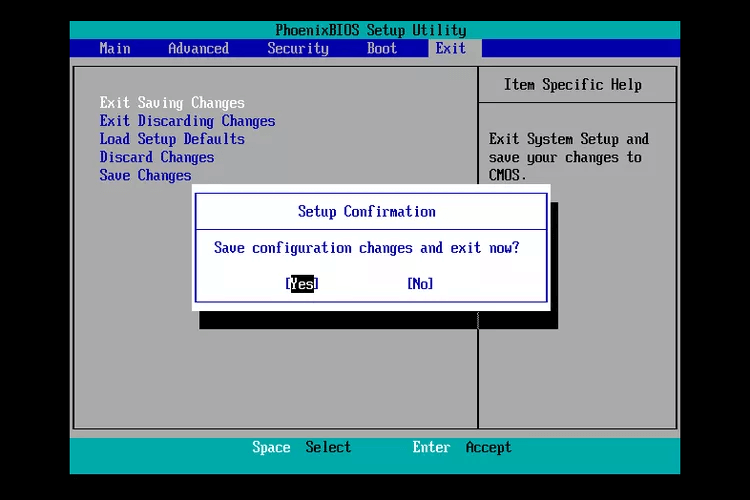
✦ Save the changes and exit the BIOS setup utility. Look for an option like "Save and Exit" or "Exit and Save Changes."
Your computer will restart, and upon booting, it should now load from the selected disk if it contains a compatible operating system.
▶ How to change boot drive from UEFI
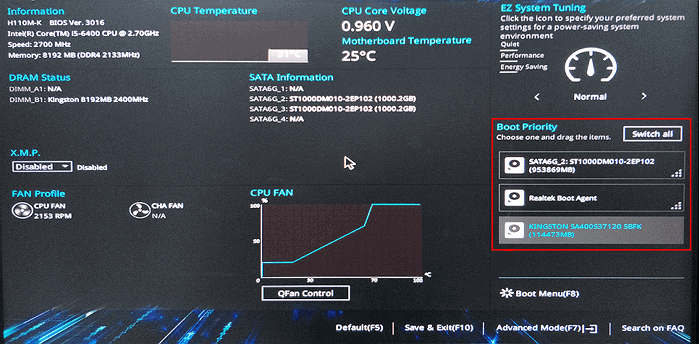
In UEFI, changing the boot drive typically involves navigating to the Boot Order or Boot Priority settings, which can be accessed through the UEFI firmware settings. From there, users can reorder the boot devices or set the priority of the desired boot drive. This process may involve selecting the new boot drive as the primary boot device and saving the changes.
✦ Once you enter the UEFI setup utility, you'll typically see a graphical interface with various options, such as boot order, time and date, and other settings.
✦ Look for a section labeled “Boot Priority” in the UEFI settings, the exact name and location may vary depending on your UEFI version.
✦ To change the current boot disk, select the disk you want to boot from and follow the provided instructions. Make sure the new drive is properly connected to your computer before proceeding.
✦ Move the new boot disk to the top of the boot sequence in the UEFI interface to make it the first device to be checked for boot.
✦ Likewise, save the changes and exit the UEFI Setup Utility.
✦ Your computer will restart, and if it has a compatible operating system, it should now boot from the selected disk.
The steps and options within UEFI can vary by computer manufacturer and firmware version, so it's a good idea to consult your computer's documentation or seek help from a technical professional if you're unsure about any step or the consequences of changing settings.
- ★Warning:
- If you've changed the boot order but still can't boot from the destination disk, it's likely that the computer is not in the correct boot mode.
- If the boot drive is an MBR disk, set the boot mode to Legacy.
- If the boot drive is a GPT disk, you need to confirm that the PC's motherboard supports UEFI boot mode. If not, you may need to convert the GPT to MBR.
Change boot drive to SSD on Windows 10/11 (2 options)
To change the boot drive, you can either migrate the current OS to the new disk without reinstalling, which is a quicker option, or do a clean installation of Windows on the SSD, which is a more time-consuming process.
▶ Method 1. Migrate OS to SSD
Qiling Disk Master Professional is a powerful tool that helps you migrate your Windows OS to a new SSD or HDD without losing any data, making it suitable for all Windows users, including those with XP to Windows 11.
It also supports cloning a hard drive to another drive, allocating free space, moving installed programs to another drive, resetting Windows password, etc. besides migrating the Windows operating system.
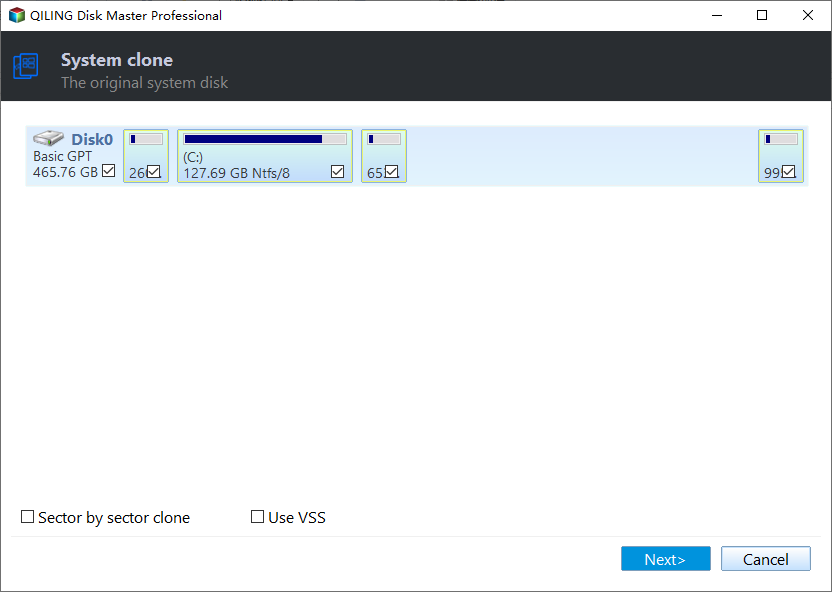
Step 1. To migrate an OS using Qiling Disk Master Professional, install and launch the software, then navigate to the "Tools and utilities" tab page and select the "Migrate OS" option.
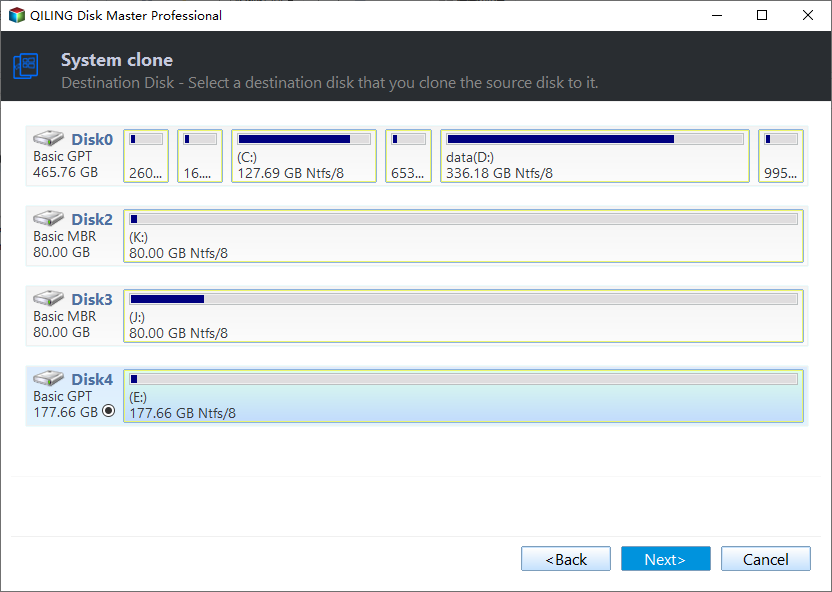
Step 2. Select destination SSD/HDD and click "Next".
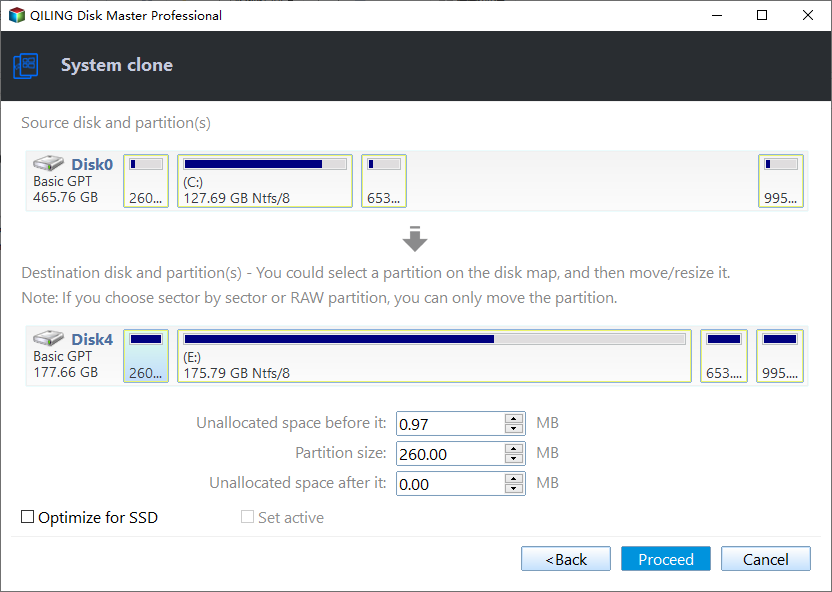
Step 3. In the window, you can resize the partition being created on the SSD/HDD drive and click "Next".
Step 4. To commit the pending operation, click "Proceed" on the main interface.
Step 5. Read the prompts, and then click "Yes".
After migrating the OS to the new hard drive, you can then change the boot drive to boot from it. This usually involves going into the BIOS settings and setting the new hard drive as the primary boot device. Once you save the changes and exit the BIOS settings, your computer should boot from the new hard drive.
▶ Method 2. Clean install Windows on SSD
If you want a clean install Windows on your SSD, you can try using the Windows Media Creation Tool, which I'll demonstrate next.
Things you need to prepare:
☞ Find your Windows product key.
☞ Prepare a USB larger than 10G.
☞ To connect the new hard drive to the computer, prepare a SATA to USB cable. This cable will allow you to transfer data from the hard drive to the computer, making it easier to set up and configure the drive.
Step 1. Create Windows Installation Media first.
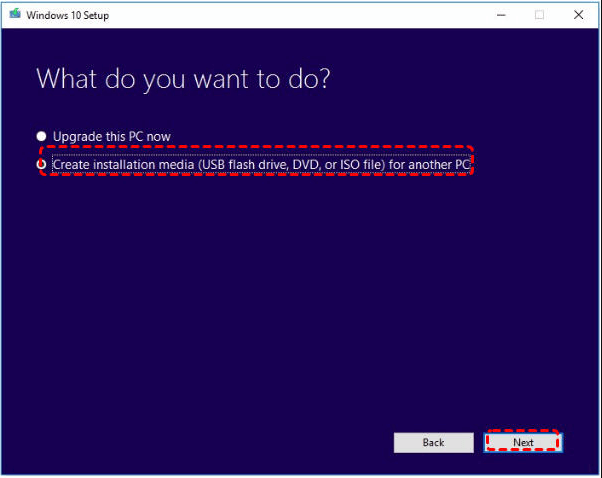
Step 2. Run and select "Create installation media". Click "Next".
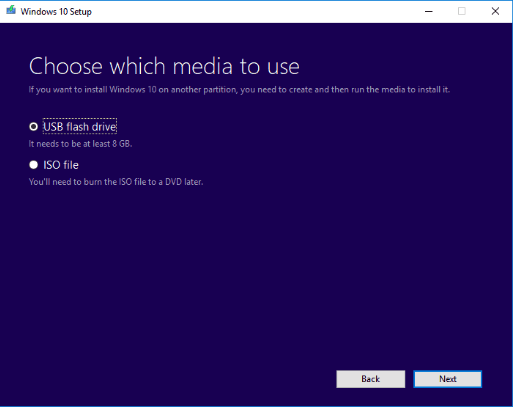
Step 3.Here, select "USB flash drive" and click "Next" to create a bootable USB drive for installation.
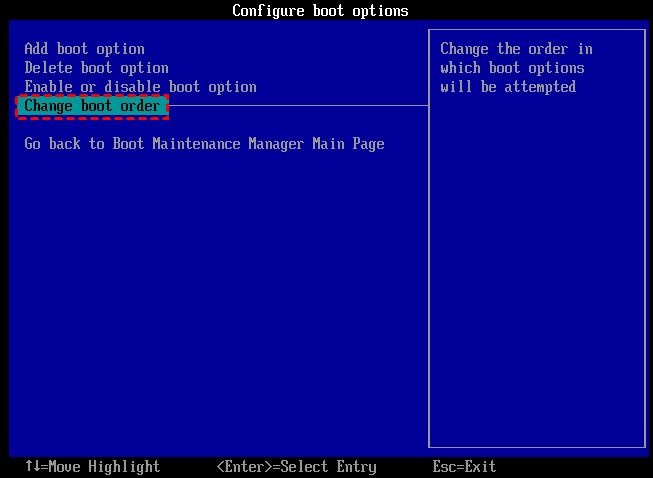
Step 4. To change the boot order, you'll need to enter the BIOS settings. This is usually done by pressing a specific key when you first turn on the computer, such as F2, F12, or Del.
Step 5. Launch the Windows installation program, select the desired language, and follow the installation instructions.
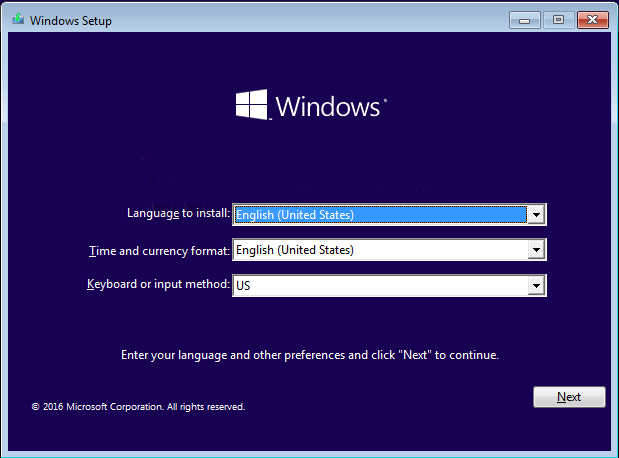
After replacing the old hard drive with a new one, you simply need to swap them and update the boot drive in the BIOS or UEFI settings.
Conclusion
Changing the boot drive on Windows 10 is a relatively straightforward process that can be done from both the BIOS and UEFI settings. Additionally, if you're looking to migrate your operating system to a solid-state drive (SSD), a tool like Qiling Disk Master Professional can be a useful option, offering a simple and efficient solution.
To migrate your OS to Windows Server, switch to Qiling Disk Master Server, which is designed for Windows Server 2022, 2019, 2016, 2012(R2), 2008(R2), etc.
Related Articles
- How to Clone Windows 10 to Smaller SSD And Boot Successfully
How to clone Windows 10 to smaller SSD? Download the safe and easy cloning software, which can clone Windows OS without reinstalling. - Free Corsair Data Migration Software for Cloning
How to clone hard drive to Corsair SSD safely? The best free Corsair data migration software - Qiling Disk Master provides you powerful way to migrate data to Corsair easily with just a few clicks. - How to Clone A Computer System and Boot from It Successfully
Do you want to know how to clone a computer system and boot from it successfully? You can find the answer from this tutorial. - Full Guide | HP Omen 15-ce0xx RAM and SSD Upgrade
This article shares HP Omen 15-ce0xx RAM upgrade tutorial and offers a guide to upgrading your SSD for better performance.
