Easy Way to Clone System Disk to SSD with Secure Boot
Why clone system disk to SSD?
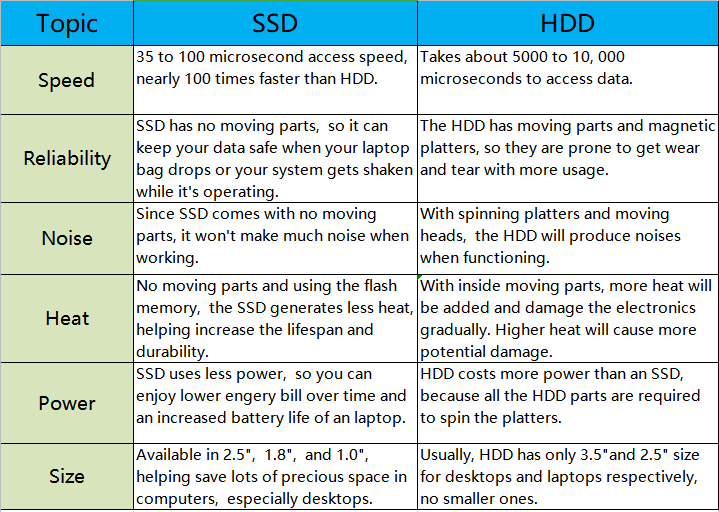
Compared to traditional HDDs, SSDs offer numerous advantages, including faster data access, higher reliability, and lower power consumption. The emergence of PCIe NVMe SSDs has further amplified the performance gap between SSDs and HDDs, making SSDs the preferred choice for many users. As a result, cloning the Windows system disk to an SSD is a popular option for those seeking to upgrade their computer's performance.
Best cloning software for system disk
Cloning your current system hard disk drive to a solid-state drive (SSD) requires reliable disk cloning software. Qiling Disk Master Professional is highly recommended for this task, offering several key highlights, including the ability to clone system disk, clone disk to SSD, clone disk to HDD, and clone disk to image, making it a versatile and efficient tool for disk cloning and migration tasks.
✍ Bootable clone: If you don't copy a partition related to the operating system to the new SSD, you won't be able to boot Windows from the SSD. This cloning tool can clone all partitions, including hidden ones, ensuring the cloned SSD is bootable.
✍ Considerate: This cloning tool allows cloning of a system disk to a smaller SSD, by only cloning the used space on the current disk, accommodating smaller SSD capacities.
✍ The software is compatible with various Windows operating systems, including Windows 11, 10, 8.1, 8, 7, XP, and Vista.
✍ 4K alignment: It can perform 4K alignment on SSDs to enhance performance when cloning a system disk to an SSD.
How to: Clone system disk to SSD without boot issues
To clone a system hard drive to an SSD using Qiling Disk Master Professional, follow these steps. First, ensure the computer is turned off and the SSD is properly connected. Next, boot up the computer from a Qiling Disk Master Professional bootable CD or USB drive.
Before the operation:
♦ The capacity of the SSD should be at least equal to the amount of used space on the source disk, but doesn't necessarily need to be larger than the original disk's capacity.
♦ If you have files on your SSD, back them up before proceeding, as the cloning process will erase all data on the destination disk.
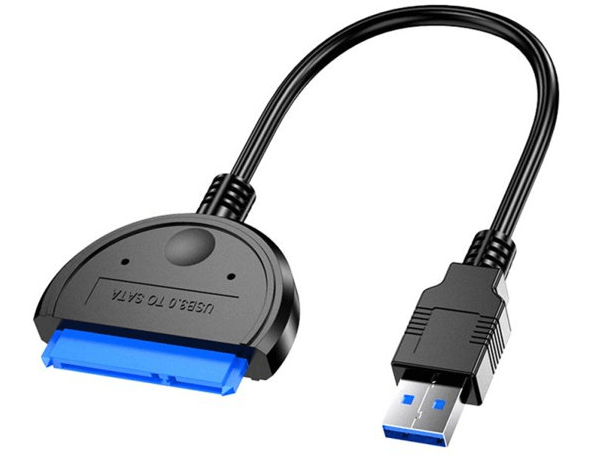
♦ Connect your SSD to your computer via a SATA cable. If your laptop doesn't have a SATA port, you might need a SATA to USB adapter to make the connection.
Step 1. Install and run the software, then click on the "Tools and utilities" tab page and select "Clone Disk" from the options.
Step 2. To rewrite the system disk, you need to locate the system disk, which is usually the disk where your operating system is installed. Once you've identified the system disk, choose it as the source disk for the rewrite operation.
PS.: If you need to clone a hard drive with bad sectors and the target SSD has the same or larger capacity than the source disk, choose the sector-by-sector clone method.
Step 3. Choose the SSD as the destination disk.
PS.: If data is saved on an SSD, you'll be asked to delete all partitions and wipe all data on the SSD.
Step 4. In this window, you can adjust the partition size on the destination SSD. To optimize the SSD's performance, tick the box next to "Optimize the performance of SSD..
PS.: If you clone a HDD to a smaller SSD, you won't be able to use the "Clone without resizing partitions" option, as the smaller SSD won't have enough space to accommodate the larger HDD's partitions.
After the installation is complete, a note will pop up about how to boot the OS from the destination disk. Read and keep this in mind.
Step 5. In the main interface, to perform cloning operation, click Proceed.
Notes:
▪ A reboot is necessary for this operation as it involves the system. This will ensure that the system is in a known good state, which is required for the operation to complete successfully.
▪ If the storage space of the SSD is too small to hold all data on your current hard drive, it's best to clone only OS-related partitions to the SSD using Migrate OS to SSD.
How to: Boot from SSD after cloning system disk
To successfully boot from a cloned SSD after cloning your system disk, follow these steps: Ensure the cloned SSD is properly connected to your computer, either as a replacement for the original disk or as a separate drive. Restart your computer and enter the BIOS settings (usually by pressing F2, F12, or Del keys) to set the cloned SSD as the primary boot device. Save the changes and exit the BIOS settings.
If your computer allows you to boot with both the old HDD and new SSD at the same time, you can reboot and enter the BIOS setup by pressing ESC, F1, F2, F8, or F10 during the startup screen. Once in the BIOS setup, use the arrow keys to navigate to the Boot tab, select the new cloned SSD as the priority in the boot sequence, save the changes, and exit the BIOS setup utility.
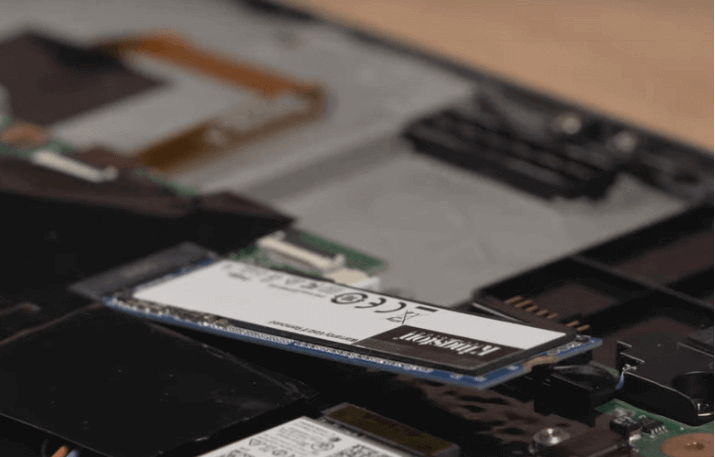
When your PC has no extra drive bay, you'll need to remove the old system disk, install the new cloned SSD, and then boot from the SSD.
Step 1. Unplug the power and remove the battery from your laptop.
Step 2. 1. Press and hold the power button for about 10 seconds to release any residual power.
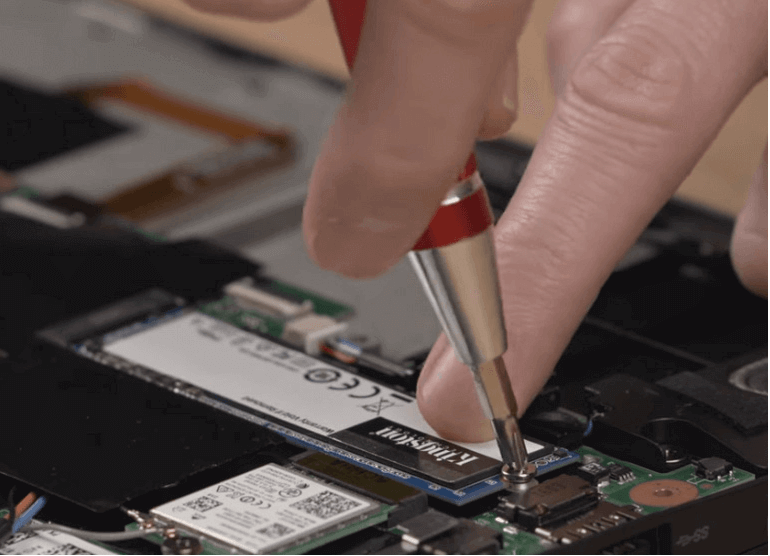
Step 3. Remove the case cover and locate the old system disk on the motherboard. Loosen the screw and unplug your old drive.
Step 4. To install the SSD, first, locate the bracket that was removed with the old disk, and place the new SSD into the bracket. Then, secure the SSD to the bracket using the screws that were provided with the bracket.
Step 5. Place the case cover and battery back onto the computer, and then connect the power.
Conclusion
Upgrading the system disk to an SSD or replacing it with a larger one without reinstalling Windows and applications is a great option, and cloning the disk is a nice choice. Qiling Disk Master Professional can efficiently and easily complete this operation, and it also features other useful functions, such as copying data partitions to a new hard drive, recovering lost partitions, and converting dynamic disks into basic disks without data loss.
To clone an OS disk in Windows Server 2022/2019/2016/2012 (R2)/2008 (R2)/2003 without encountering boot failure, you can utilize Qiling Disk Master Server.
Related Articles
- How to Convert System Boot Disk to GPT without Losing Data?
Need to convert system disk to GPT, but not want to reinstall the OS? Here, you can learn how to convert MBR system disk to GPT without losing data or Windows operating system in Windows step by step. - How to Fix Non-System Disk Error or Disk Error in Windows XP/7/10 Freely?
Could not boot up your system and get non system disk or disk error message on black screen in Windows XP/7/10? The best freeware-Qiling Disk Master will help you out without reinstalling Windows. - C Drive Is Filling Up By Itself in Windows 7 – Fix It with 6 Solutions
To deal with C drive full in Windows 7/8/10, you can run anti-virus, fix corrupted file system, disable Hibernation, and so on. - Solved: SCCM PXE Boot Not Working
This tutorial focus on how to solve the problem of SCCM PXE boot not working. To boot client computers easily, you can turn to Qiling Disk Master Professional.


