Clone UEFI GPT Disk to SSD Successfully and Secure Boot
- Scenario: How to Clone a UEFI Hard Drive
- UEFI (GPT) Disk
- Best UEFI (GPT) Disk Cloning Software - Qiling Disk Master
- Steps to Clone UEFI Disk to SSD in Windows 7/8/10/11
- How to Boot from Cloned SSD
- Conclusion
Scenario: How to Clone a UEFI Hard Drive
UEFI(GPT) Disk
GUID Partition Table (GPT) uses the UEFI (Unified Extensible Firmware Interface) to define hard disk.
Master Boot Record (MBR) uses the BIOS partition table to define a disk.
Thus, you have to format the system drive partition with GUID partition table file system when you deploy Windows operating system to a UEFI-based storage device. Sometimes, it is also used in some BIOS systems due to the MBR’s limitation.
The UEFI/GPT disk has the default partitions: System Partition, Microsoft Reserved Partition, Windows Partition, and Recovery Partition according to Microsoft.
Best UEFI(GPT) Disk Cloning Software - Qiling Disk Master
Sometimes, some hard disks will snap-in disk cloning software or data migration tool for users to migrate data for certain purposes. First of all, if you own the following hard drives, you have to look for the exclusive disk cloning software on the hard disk before cloning UEFI HDD to SSD:
- Samsung hard drive: Samsung Data Migration Software for Consumer SSD, which is designed for migrating the operating system, programs, and personal files from their current hard drive to the new Samsung SSD.
- WD hard drive: WD SmartWare or WD Anywhere backup software is available.
- Intel hard drive: Intel ® Data Migration Software.
- Seagate hard drive: Seagate DiscWizard software.
- Transcend hard drive: Transcend SSD Scope software, is a disk management software and allows you to clone an entire SSD to another one. However, you might meet the Transcend SSD Scope not working for system clone issue.
However, those hard drive cloning software is not applied to other brands of hard disk, and even not for all those hard drives of the specified brands. Besides, those data migration software have some limitations to transfer when cloning, not for partition clone, file sync, etc.
Therefore, how to clone UEFI disk to SSD easily? The best UEFI disk cloning software – Qiling Disk Master Professional is more flexible to use and powerful than the above mentioned hard drive cloning software.
★ It offers multiple clone modes, including System Clone, Disk Clone and Partition Clone. You can choose the right mode based on your needs.
★ It is capable of hot clone, which means you can continue using your computer during the cloning process.
★ You can also create a bootable media to clone hard drive without booting Windows.
★ It applies to Windows XP, Vista, 7, 8, 8.1, and 10/11 (all editions, 32-bit and 64-bit).
Please download Qiling Disk Master 30 day free trial first and have a try. The Clone features in free trial can be demonstrated only, please upgrade to enjoy.
Steps to Clone UEFI Disk to SSD in Windows 7/8/10/11
Here is how to clone UEFI(GPT) disk to SSD drive (take smaller SSD for example):
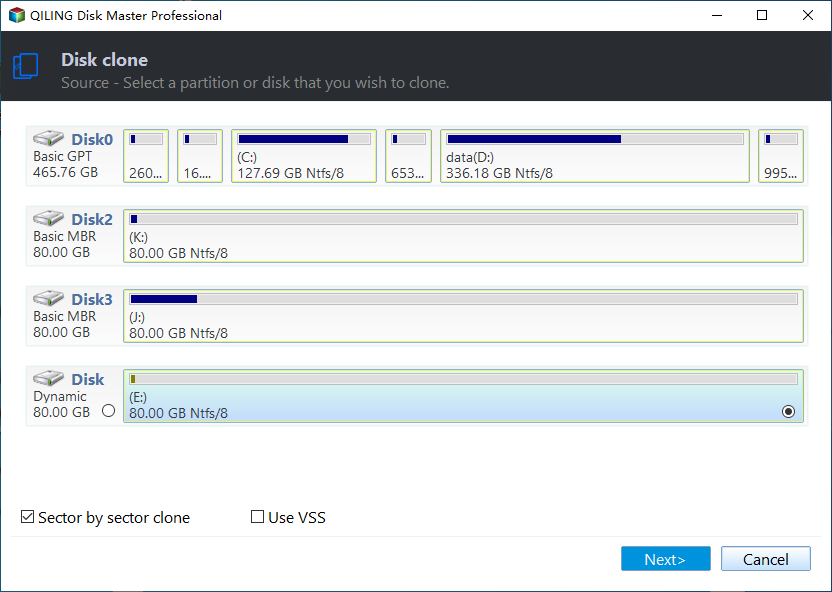
1. Execute the best UEFI disk cloning software after installing; choose Clone -> Disk Clone in turn on the main window.
2. Pitch on the UEFI (GPT) disk as the source disk, and click Next.
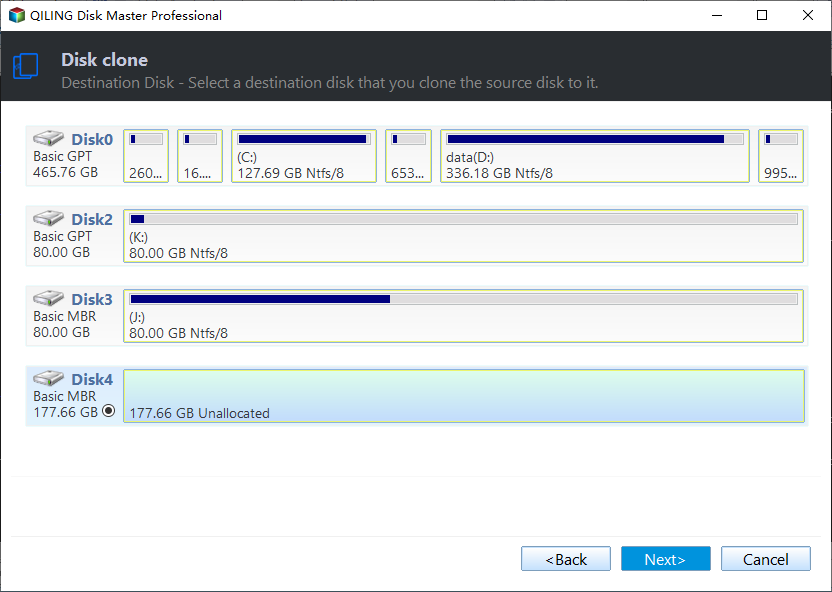
3. Choose the smaller SSD as the destination disk, and press Next.
★Tip: Make sure the smaller SSD can hold all the data from the UEFI/GPT disk, or it will fail to clone due to insufficient space.
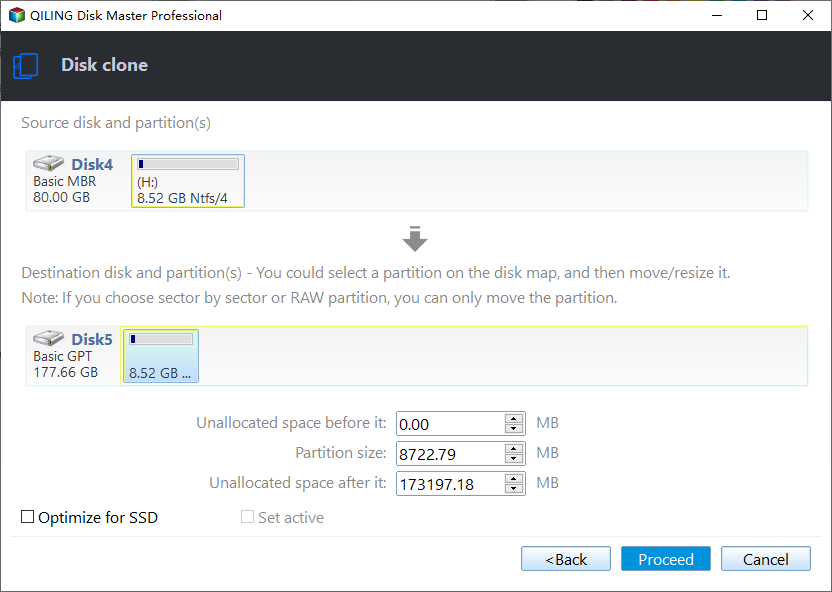
4. Preview the operation to cloning UEFI (GPT) disk to SSD, and check SSD Alignment option, and then press Proceed.
▶ Useful options:
① Edit partitions
>> You could tick "Add unused space to all partitions" or "Manually adjust partition size" to make full use of disk space if you clone GPT HDD to a larger SSD.
>> If the UEFI disk contains more than 3 primary partitions and you are cloning it to an MBR disk, the program will copy the first 3 partitions by default. To make the cloned data intact, you can use the option "Convert the destination disk from MBR to GPT" to change the partition style of the target SSD.
② Sector by sector clone: if you tick this option, you have to prepare an SSD larger than the UEFI disk, then it will clone all the sectors on the UEFI disk and it will clone much longer.
③ SSD Alignment: this option will quicken the reading and writing speed for your SSD drive.
★Tips:
✍To get the best performance from the cloned disk, it's suggested to transfer Windows 10 to NVMe. Because it has the fastest transfer speed.
✍Beisde cloning UEFI disk, you still can use it to clone hard drive to larger drive, clone MBR disk to GPT, migrate Windows 10 to M.2 SSD, clone M.2 SSD to M.2 SSD, etc.
If you would like to clone UEFI disk to larger drive without using the Edit Partitions, you will get an unallocated space after the clone finished, you could merge unallocated space to C drive or other existing partitions, or create a new partition to fully use the storage space on the larger drive.
How to Boot from Cloned SSD
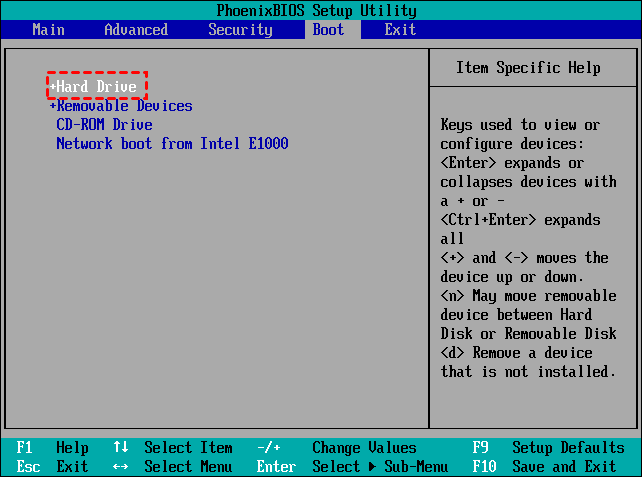
After performing UEFI disk clone to SSD in Windows 11/10/8/7, you could shutdown the computer, replace the original UEFI/GPT hard disk with the smaller SSD, and then enter BIOS via F2, F10, F12, DEL or ESC key (depending on your manufacturer) while booting to set the smaller SSD as the first boot device, and finally boot your computer normally.
Conclusion
According to the above steps, it’s easy to clone UEFI disk to SSD with the help of Qiling Disk Master. Besides, this powerful UEFI disk cloning software allows you to clone hard disk to larger SSD (like clone 128GB SSD to 256GB SSD), migrate Windows 10 operating system to SSD without reinstalling OS.
If you are running Windows Server 2003, 2008, 2012, 2016, 2019, 2022 (including R2), SBS 2003, 2008, 2011, you could try Qiling Disk Master Server to enjoy more advanced features, like cloning server hard drive, Qiling PXE Boot Tool, etc.
Related Articles
- Best UEFI Disk Imaging and Cloning Software
- The Easiest Way to Clone GPT Disk to Smaller SSD
- How to Clone GPT to MBR SSD (Worry-Free Tutorial)
- How to Clone MBR to GPT Disk in Windows 10/8/7 Directly


