Fix Cloned Hard Drive Won't Boot in Windows 7 Easily (5 Ways)
- User Case
- Reasons for Cloned Hard Drive Won't Boot in Windows 7
- How to Fix Cloned Hard Drive not Booting
- Method 1. Connect Hard Drive to Your Computer Internally instead of Externally
- Method 2. Set the Cloned Hard Drive as the First Boot Drive.
- Method 3. Convert Disk to MBR/GPT and Reconcile Boot Mode
- Method 4. Repair Boot Records
- Method 5. Directly Clone Hard Drive with A Reliable Cloning Software
- Summary
User Case
Try booting in safe mode and then run a System File Checker (SFC) scan to identify and replace any corrupted system files. If that doesn't work, try running a System Restore to a point before the cloning process. If the issue persists, it's possible that the cloning process itself caused the problem, and you may need to reinstall Windows 7. You can also try checking the Event Viewer for any error messages related to the hard drive or disk controller. If you're still having trouble, you may want to consider seeking help from a professional.
If a cloned hard drive won't boot in Windows 7, causing a blue screen, it could be due to bad sectors on the disk or not setting the cloned disk as the first boot disk in BIOS.
Reasons for Cloned Hard Drive Won't Boot in Windows 7
In Windows 7, cloned hard drives often fail to boot due to several common reasons. One possible cause is a mismatch between the boot sector and the operating system's configuration, which can be resolved by checking the boot order in the BIOS settings.
- Source disk contains bad sectors: This will directly cause the cloned disk to be unbootable.
- Other devices: Cloning a hard drive can be affected if you have multiple devices, as it may cause the cloned hard drive to not boot properly.
- Incomplete clone: You can't clone the entire system because your system disc may have a system reserved partition or an EFI system partition, which can't be cloned.
- Disk Type and Boot Mode Mismatch: If you have an MBR disk, you must boot from Legacy mode. If you use GPT disk, you need to boot from UEFI mode, or the cloned drive won't boot.
- Incorrect boot order: To avoid this, you can use a Live CD or USB to access your system and change the boot order in the BIOS settings from there. This way, you can safely change the boot order without affecting the system's ability to boot.
How to Fix Cloned Hard Drive not Booting
To address the issue of a cloned hard drive not booting, let's first understand the reasons behind it, which I can provide later. Once we've identified the causes, I can offer 5 simple solutions to help resolve the problem. You can proceed to read on and follow the specific steps below to fix the issue.
Method 1. Connect Hard Drive to Your Computer Internally instead of Externally
If your cloned hard drive doesn't boot, check that it's properly connected to your computer. If it's connected externally, try connecting it internally instead, so the computer can properly organize the disk.
Method 2. Set the Cloned Hard Drive as the First Boot Drive.
To ensure the cloned hard drive is recognized as the first boot option, especially when you have multiple hard drives on your computer, check your BIOS settings. In the BIOS, set the cloned hard drive as the first boot option by selecting it from the list of available drives. This will ensure that the cloned hard drive is recognized as the primary boot device when you start your computer.
Step 1. Restart your computer press the required key (F1, F2, F10, F12, Delete, etc.) to enter BIOS settings.
Step 2. Find the boot menu and set the cloned hard drive as the first boot option among all the devices.
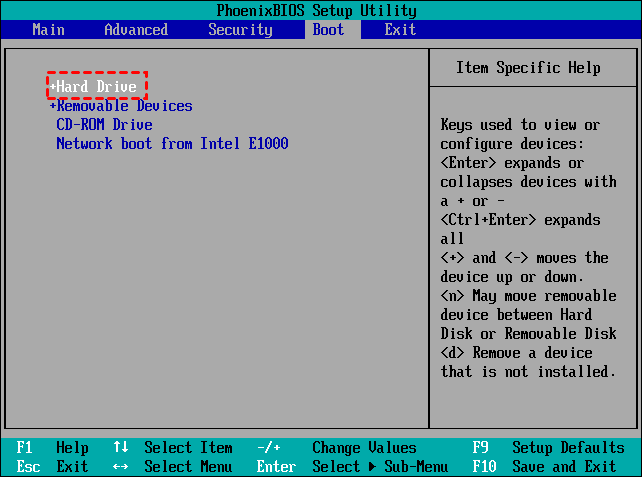
Step 3. Press F10 to save the settings and exit.
Method 3. Convert Disk to MBR/GPT and Reconcile Boot Mode
Cloning a drive can be unsuccessful if it's not done correctly, resulting in a drive that's cloned but won't boot properly. This can be due to different partition styles or incorrect boot modes, which can cause issues with the cloned drive's ability to boot successfully.
The source and target disks must be of the same type, such as both being MBR or both being GPT, to ensure a successful cloning process. To verify the disk type, follow these steps.
Step 1. Insert the target disk into your computer.
Step 2. Open Disk Management, right-click on the source disk, and select Properties.
Step 3. Check the partition style of the source disk and target disk in turn.
The Master Boot Record (MBR) and GUID Partition Table (GPT) correspond to different boot modes - Legacy and UEFI, respectively. When cloning a drive, the resulting drive will not automatically boot in the wrong mode. To set the correct boot mode, follow these steps.
Step 1. Restart your computer and then constantly press the F2, F8, F12, or Del to enter the BIOS settings.
Step 2. In the startup screen, choose Boot > UEFI/BIOS Boot Mode. Then press Enter
Step 3. Next select Legacy or UEFI according to your partition style.
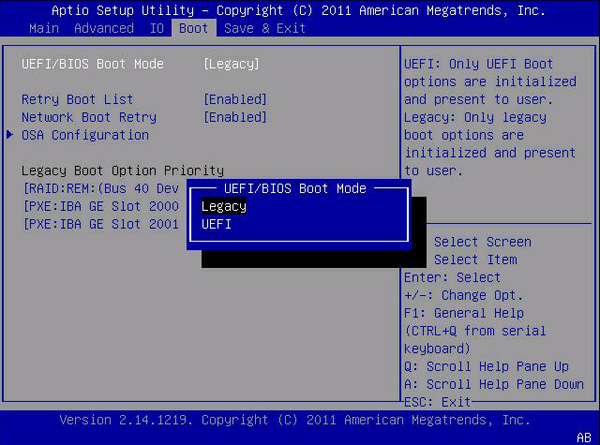
Step 4. Finally, save the settings and restart your computer.
Method 4. Repair Boot Records
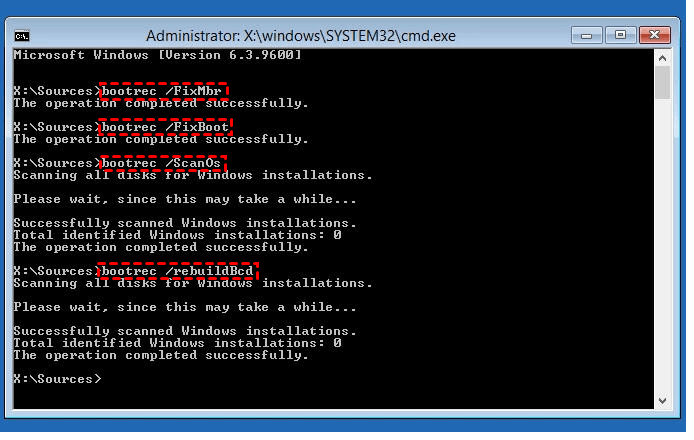
To repair the corrupted boot record in Windows 7, you can use the built-in tool called "Bootrec" in the Command Prompt. First, you need to boot from a Windows 7 installation media, then select the language and other options, and choose the "Repair your computer" option. Next, select the Command Prompt option, and then type "Bootrec /fixmbr" and press Enter. This will rewrite the master boot record.
Step 1. Press and hold the F8 key as your computer restarts. Then enter the Advanced Boot Options menu.
Step 2. Choose Safe Mode with Command Prompt and then press Enter.
Step 3. Type the following commands and press Enter after each command line.
- bootrec /fixmbr
- bootrec /fixboot
- bootrec /scanos
- bootrec /rebuildbcd
Step 4. Exit and restart your computer.
Method 5. Directly Clone Hard Drive with A Reliable Cloning Software
You can also clone your disk using safe and reliable disk cloning software like Qiling Disk Master Professional. This method allows you to successfully boot your computer from the cloned disk, eliminating the risk of the cloned hard drive not booting. With this software, you can enjoy the advantages of disk cloning, such as creating a backup of your original disk, and have a working clone ready in case you need to replace or upgrade your original disk.
- Support multiple forms of clone: This tool can be used not only for disk cloning, but also for system cloning or partition cloning.
- Support cloning different disk types: It supports cloning GPT to MBR without converting partition styles, and vice versa.
- Sector by sector clone: This feature will clone all sectors on your disk, including system reserved partitions or EFI system partitions.
- Intelligent clone: Under the default mode, Clonezilla will clone hard drives by skipping bad sectors, allowing you to clone a hard drive with bad sectors.
- Different system: It supports Windows 11/10/8/7/XP/Vista, etc.
You can follow the graphic tutorial below:
Step 1. Download Qiling Disk Master Professional, install and launch it, click Clone > Disk Clone.
Note:
The Professional edition allows cloning of both data and system disks from MBR to MBR/MBR to GPT, or GPT to GPT/GPT to MBR, while the Standard edition is suitable for cloning data disks only.
Step 2. Select the original hard disk as the source disk. Then, click Next.
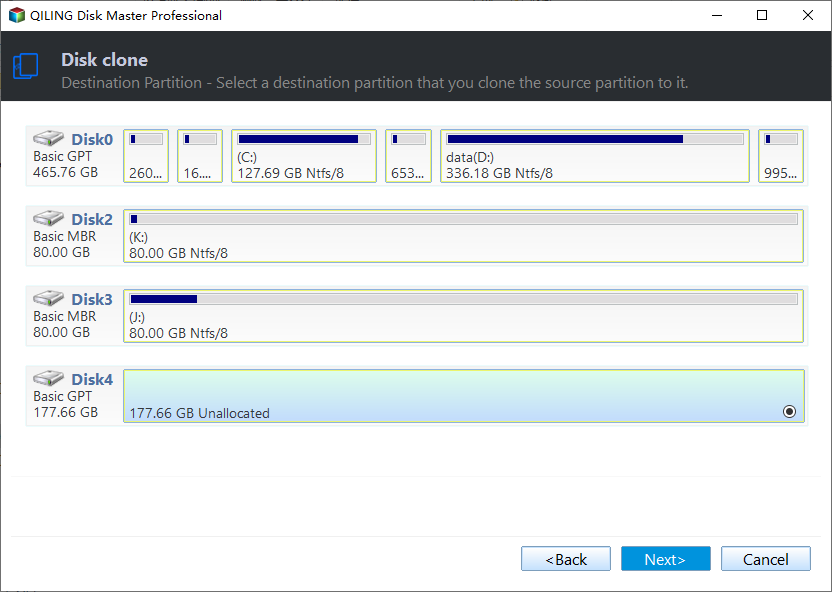
Step 3. Select the new disk as the destination disk. Then, click Next.
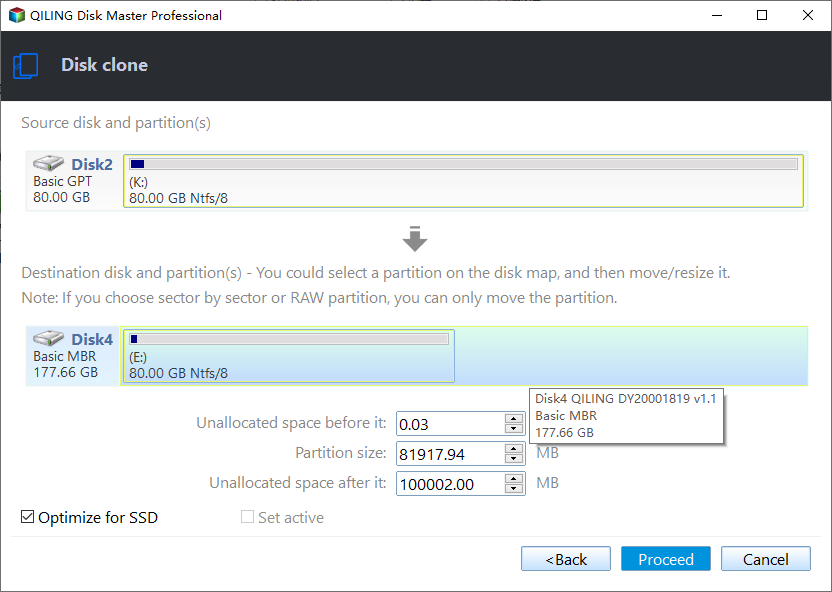
Step 4. Confirm your operations and click Proceed.
Notes:
- Edit Partitions: This function allows you to resize a large partition on a target disk, either by adding unused space to all partitions or manually adjusting partition sizes.
- SSD Alignment: If you have an SSD, you can enable this option to take advantage of its faster read and write speeds.
- Sector By Sector Clone: If the target hard drive is equal to or larger than the original disk, you can enable this option.
Summary
If your cloned hard drive won't boot, there are five methods you can try to fix the issue. I recommend using Qiling Disk Master, which can clone the disk directly and ensure a secure boot, making it a convenient and reliable option.
The Sector By Sector Clone feature allows for cloning both used and unused sectors, providing a complete clone and avoiding incomplete clones. It is compatible with Windows systems.
This software offers a great backup and restore feature, allowing you to safely store your important files. It can be downloaded to enjoy these benefits.
Related Articles
- Quick Fix: Cloned SSD Won't Boot in Windows 10/8/7
Read this article to learn how to fix cloned SSD won't boot on Windows 11/10/8/7. If you don't want to get trapped, try an alternative in Windows to clone HDD to SSD without booting problem. - Clone to New Computer Windows 7 Won't Boot? Solved Now!
If you are troubled with the error that cloned to new computer Windows 7 won't boot, you can learn how to fix the error and restore Windows 7 image to different hardware stably from this page. - 4 Steps to Create Windows 7 Bootable Clone Disk
You will learn how to create Windows 7 bootable clone of hard drive and make it bootable with best disk cloning software - Qiling Disk Master. - Toshiba NTI Backup Now EZ Free Alternative and Guide
Qiling Disk Master Standard is more than a Toshiba NTI Disk Master Now EZ free alternative, it is an independent and powerful backup software.

