Quick Answer: Create a System Image Not Working for USB Drive
Can’t Create a System Image to USB Flash Drive - Is It Really Impossible?
Usually, Windows Operating System users would like to create a system image to USB flash drive, which can restore OS to a normal state from the system image file when Windows OS corrupted. However, it must be frustrating when you create a system image not working for USB drive in Windows 11/10/8/7.
Maybe you've encountered this situation. You were told that you could not backup system because the drive not formatted as NTFS when you first try. To create a system image to a USB drive, it must be formatted to use the NTFS file system. Then, format the USB flash drive to NTFS, but the computer displayed the information "The drive is not a valid backup location" so that you still cannot backup system to the USB drive.

The reason why you got this message is Backup and Restore don’t allow using USB Flash drive as destination. Since the size of USB drive is quite small so that the space filled up quickly. Moreover, the USB flash drive could be easily lost or accessed by other people. But is it really impossible? The answer is NOT, According to answer.microsoft.com, you can use it as a network location for backup. Note NTFS file system is required as well.
The Drive Is Not a Valid Backup Location - How to Create System Image On USB Drive
You can backup system to USB drive with built-in tool as long as you use it as a network location. But how to make it? You can follow the complete guide in the following.
Format USB Flash Drive in NTFS File System
Step 1. Right-click the USB drive and select Format in the pop-up window.
Step 2. Select NTFS under the File system column.
Step 3. Afterward, click Start to format USB in NTFS file system.

Share USB drive through Properties
Step 1. Right-click the USB drive and select Properties in the next window.
Step 2. Go to the Sharing tab and see if it's shared. If not, select Advanced Sharing below.
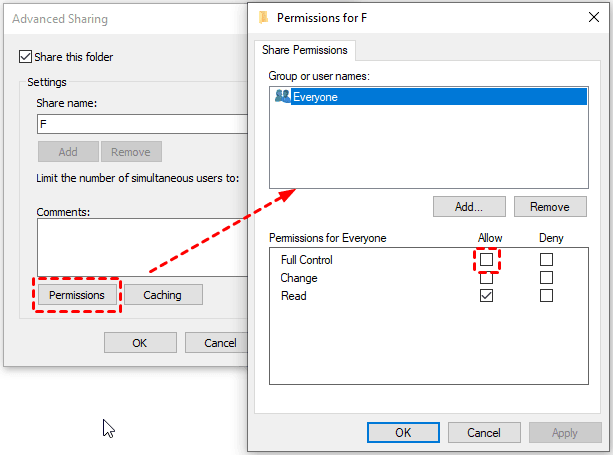
Step 3. In the Advanced Sharing window, check Share this folder option. Then, click on Permissions and then select Full Control under the Permissions for Everyone. After that, click Apply and OK to go back in the Properties tab.
Step 4. At this time, you can see "Shared" under the Network File and Folder Sharing. Copy the shared path for preparation.
Backup System to USB Drive with Network Location
Step 1. Type backup setting in the search box and select it. Then, in the Backup settings window, select Go to Backup and Restore (Windows 7) to access this software.
Step 2. Select Create a system image at the left panel.
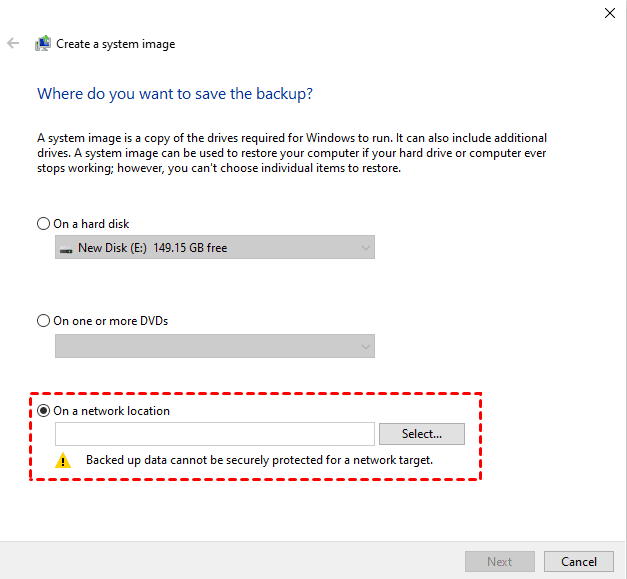
Step 3. Tick On a network location and paste the shared path you previously copied. Then, click OK to confirm you want to backup system image to USB drive.
Step 4. Click Next and Proceed to perform system backup.
More Flexible Way to Create a System Image to USB Drive
The above way is very useful, but the steps are a little complicated. And the system image can take up quite a lot of disk space even if it's said to compress the backup image. And you can only schedule sutomatic backup system when you using Set up backup option. Since it has many restrictions, you could consider using a more flexible software to create system image to USB drive.
Free backup software Qiling Disk Master Standard is a good choice. It does not limit the backup destination, so you can easily backup system to USB drive or any other storage devices, such as, external hard disk, network drive, cloud drive, etc. And all the file system are supported. In addition, you can enjoy the following benefits:
- Minimize the backup image size: This software provides multiple features to help you reduce the backup size as far as possibel, such as, Normal or High compression level, Intelligent Sector Backup, Incremental Backup, etc.
- Schedule Backup System: You can still enjoy Daily, Weekly, Monthly, etc schedule backup settings.
- All version of Windows system supported.
Then, please download Qiling Disk Master Standard and launch it to create system image on Windows 10 or other systems.
1. Select Backup -> System Backup.

2. Select the USB flash drive as destination to save the system image file (here is F partition). At this step, you can also select NAS device, network share, external hard disk, internal hard disk as destination.

✦ Tips:
✿ Type a name into Task Name box (here is System Backup) to distinguish it from other tasks.
✿ The Qiling program will select the partition associated with system files automatically to ensure Windows OS could be restored properly. You don’t have to select manually.
3. Press Proceed to image Windows system.

✦ Tips:
☂ Options allows you to comment, compress, split, encrypt (paid) the system backup, enable email or SMS notification, etc.
☂ Schedule Backup enables you create system image regularly, like Daily, Weekly, Monthly, Event triggers, USB plug in (the last two features are premium features, please upgrade to Qiling Disk Master Professional or higher to enjoy.
☂ Backup Scheme is capable of deleting old backup images automatically while the backups over the number you specified before)
Wait until the process complete, it's suggested to create bootable media with USB or CD/DVD or recovery environment in advance. Both of them can help you boot your computer from it and perform system restore without booting into Windows. The later one is to add a boot menu on the current computer and does not require any storage device.
★ Advanced way to create a system image in Windows
Qiling OneKey Recovery offers you a more advanced way to create a system image in Windows. After clicking OneKey System Backup at the main interface, you'll see two options as follows:
- Backup system to Qiling OneKey Recovery Partition: you are allowed to create a factory recovery partition to save the image file.
- Backup system to other location: you are allowed to save the image file on a local disk, external hard drive, or USB flash drive, etc.

And you can still enjoy compress feature to reduce the backup size, and keep changes from previous backup regularly using Daily, Weekly, Monthly Scheduler.

The End
Hope the above ways work for you. You can choose to use USB drive as network path if you prefer using built-in tool. But if you want a more flexible way with less restrictions, you could use Qiling Disk Master Standard to help you.
With it, you can not only create system image to USB drive with all file system, but also make this task run automatically. And you can minimize the backup size with its useful features, such as, Intelligent Sector Backup, Compresion, Incremental Backup, etc.
More so, it allows you to delete old backup image to free up disk space for new backup. Thus, you don't need to worry about any data loss after system image recovery. If needed, you can upgrade to the professional version to enjoy it.
Related Articles
- Create Windows 10 System Image on USB Flash Drive Easily
- Quick Guide to Create Windows 10/8/7 System Image on a USB Drive
- 2 Ways to Restore Windows 10 System Image to New Hard Drive
- How to Move/Migrate Sage 50 Accounting Software to New Server
View two effective solutions to move Sage 50 to a new server. Check this in-depth tutorial right now!