3 Ways to Create a System Repair Disc in Windows 10/8.1/8/7
Why need to create a system repair disc?
In case of system failure, Windows provides System Recovery Options, allowing you to fix some errors, restore your system, repair Windows files, recover previous settings, and more.
To use the system recovery options, you need a Windows installation disc. If you don't have a Windows installation disc, then you can create a system repair disc to boot the computer that has serious problem and then start System Recovery Options to make your computer work normally again. Besides that, a system repair disc can also help you restore your computer from a system image or restore point.
In a word, it's necessary to create system repair disc. It can help you get out of the trouble as soon as possible when your computer goes wrong. Read on to get three methods.
How to create a system repair disc in Windows 10/8.1/8/7?
There are two Windows built-in utilities can help you create a system repair disc: Create a system disk (CD/DVD) & Create a recovery drive (USB).
- For Windows 7 and Windows 10 users, you can simply create a system repair disk via the Backup and Restore utility. It can help you troubleshoot Windows when it won't boot correctly. Also, it can help you restore your computer from a system image backup.
- For Windows 8/8.1 users (Windows 8 has removed the feature Backup and Restore) and Windows 10 users, you can choose to create a recovery drive. It gives you access to the same troubleshooting tools as a system repair disc. In addition, it can also help you reinstall Windows as long as the recovery drive copies the system files necessary for reinstallation from your current computer.
For Windows 7 or Windows 8 users, it's clear enough which tool to choose to create a system repair. However, for Windows 10 users, which one is better?
Well, one important thing you should know is that: the system repair disc can let you troubleshoot problems on different PCs that running the same Windows version, while the USB-based recovery drive is only tied to the PC that you used to create it.
Actually, besides the Windows 10 built-in utility, there's one free third-party tool that can help you create system repair disk in an easy way. It is available for all Windows versions, including Windows 10/8.1/8/7/XP. And it supports both CD/DVD disc and USB flash drive. If you are interested in, just refer to Part 3 to get the method.
Part 1. Create system repair disc in Windows 7/10
- Make sure you have inserted a writable empty disc to your computer and make sure it is detected.
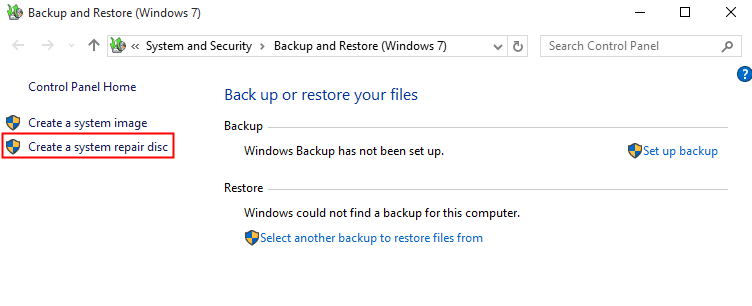
- Type "backup" into the search box and select Backup and Restore.
- You can find Create a system repair disc in the left pane and click it.
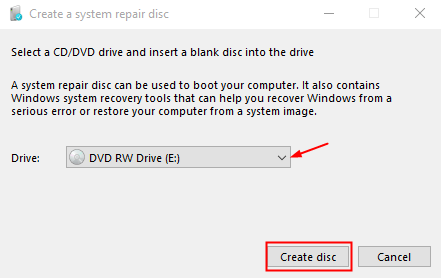
- By default, the CD/DVD disc is detected automatically. If not, select it manually. Then click on Create disc.
- Windows will start to create disc right after the clicking.
Part 2. Create a recovery drive in Windows 8/8.1/10
- Connect the USB drive to your computer.
- Type "recovery drive" into the search box. In the listed results, select Create a recovery drive.
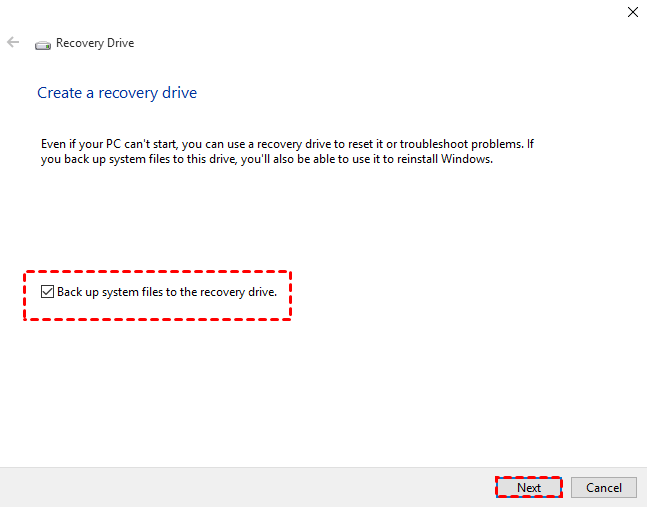
- In the pop-up window, check the option "Back up system files to the recovery drive" and click Next.
Note: If you check Back up system files to the recovery drive, it gives you a chance to reinstall your computer in a pinch.
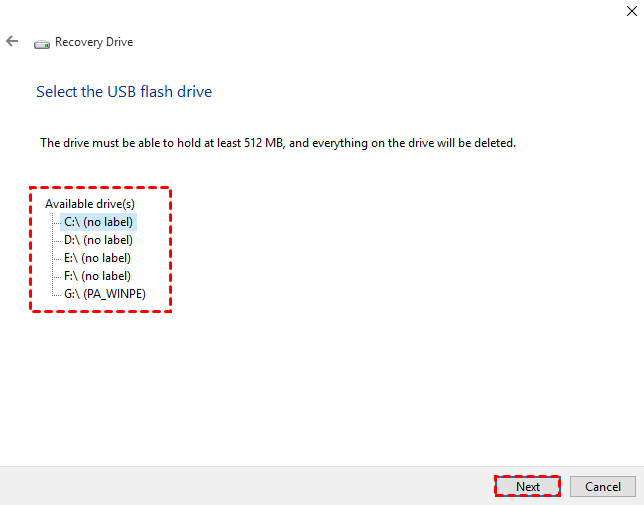
- Select the USB flash drive, and click Next to continue.
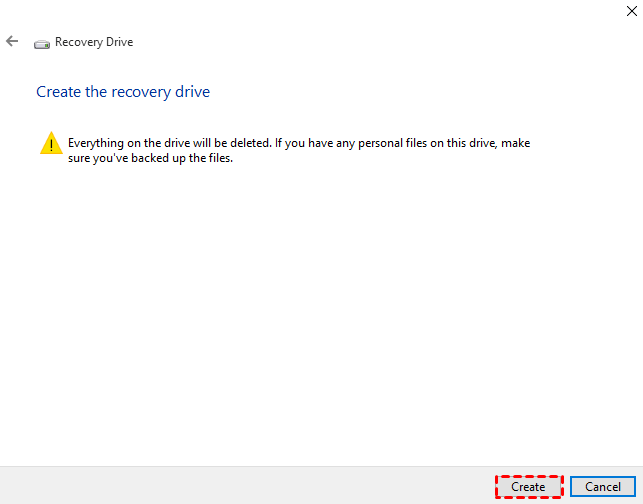
- Click Create to begin creating the recovery drive.
Now you know how to create a system repair disc in Windows 7/8.1/8/10. If you ever want to use the system repair disk, insert the disc and restart your computer. If your computer starts directly from the hard drive instead of the repair disk, enter BIOS to configure your computer to boot from the CD/DVD or USB drive.
However, unlike installation disc, the system repair disc and recovery disk may not boot other computers except the one that created it. If you may fail to create a system recovery disk or system repair disc with an error message that System repair disc could not be created (0x80070057), which is often caused by the incapability with other software, or other errors. Then you can create bootable rescue disk with third-party software to restore your computer.
Part 3. Create bootable rescue media with Qiling Disk Master
Qiling Disk Master Standard, a powerful Windows backup software, allows you to create bootable rescue media using DVD/CD or USB drive. If you don't have DVD/CD or USB drive at hand, you can create an ISO image file so you can burn to any removable devices. It supports directly create bootable media on Windows 10/8/8.1/7. If your computer runs Windows XP or old version of Windows before it, you will need to install AIK before creating bootable disc.
To create bootable media:
- Download, install and launch it.
- Click Tools and then choose Create Bootable Media.
- Select a type of bootable media you want to create and click Next to continue. For better performance, the Windows PE bootable disc is recommended. It also enables you to boot from legacy MBR or GPT/UEFI mode.
Note: You can download a pre-build PE from Qiling server by selecting "Download WinPE creating environment from internet", Windows AIK/ ADK is no longer required.
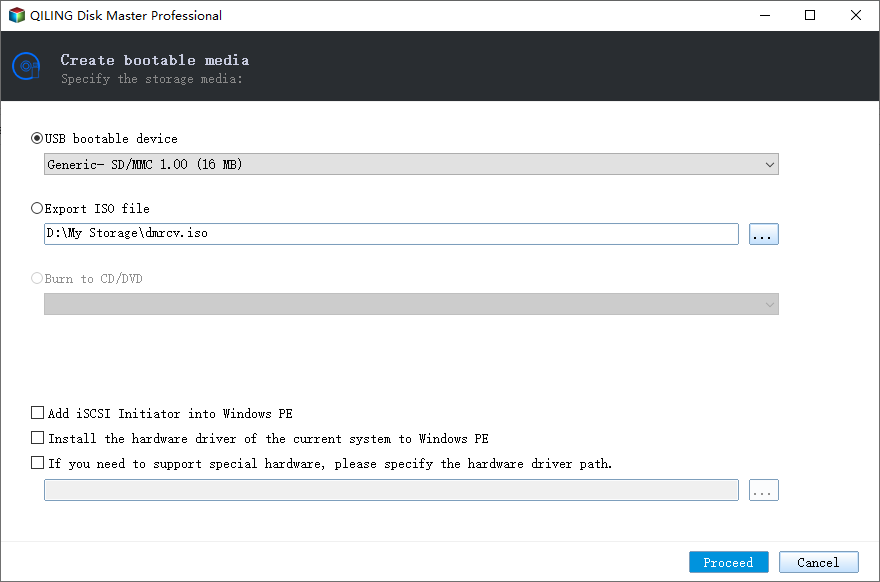
- Select the storage device or specify the location path where you want to export the ISO file, and then click Next to start. Wait for the process to complete and click Finish.
Tips: In case of unexpected system failures, you could also go "Tools" > "Recovery Environment" to enable the boot option of Qiling Disk Master recovery environment. It allows you to boot into WinPE and peform backup/restore with Qiling Disk Master as well. This feature is available in Qiling Disk Master Professional.
Conclusion
That's all for how to make a system repair disc in Windows 10/8/7/XP. If you have more than one computer, you can create a bootable media with Qiling Disk Master which can boot any PCs regardless of Windows 10/8/7/XP/Vista or other Windows system it runs.
If you want it to be able to boot Windows Servers, you can download Qiling Bacupper Server. It also lets you create a system image backup to that bootable media or other storage devices, so you can boot the recovery disk to restore your computer, even when it is unbootable.
If you don't want to connect any removable devices to boot your computer when it is in serious condition, you can also create a recovery partition on your internal hard drive, which allows you to restore your computer when it is not working without any removable devices.
Related Articles
- 2 Easy Ways to Create Windows 10 System Image
You will learn how to create system image backup for Windows 10 and use it step by step. Choose one among 4 methods below! - 4 Methods to Fix Startup Repair Windows 7 Loop
How to fix start repair loop Windows 7? This article offers you 4 solutions to solve Windows 7 stuck in start repair infinite loop safely. - 6 Ways to Repair Windows 10 When Your PC Has Issues
When your Windows 10 is acting strange or failing to boot, you can use these 6 methods to repair Windows 10 quickly. - Delete Shadow Copies in Windows Server 2012 R2 (3 Ways)
You can learn how to delete shadow copies in Windows Server 2012 R2 with 3 effective methods, as well as one more powerful protect it and save disk space.
