How to Remove/Delete Hidden Partition on USB Drive in Windows 11/10/8?
Quick Navigation
- What is hidden partition and what is it used for?
- Why need to delete hidden partition on USB drive?
- 3 Methods to remove hidden partition from USB drive
- How to remove multiple partitions on USB drive?
- Conclusion
What is hidden partition and what is it used for?
Hidden partitions in Windows are intentionally set to be invisible in File Explorer, enhancing data security. They are often recovery partitions, containing system files to restore the OS in case of a crash or corruption. However, users can delete them to free up space if a backup has been created beforehand.
Computer users can set a specific partition as "hidden" by removing its drive letter to protect critical files from being accessed or stolen by others, or to prevent accidental deletion. To find hidden partitions on a flash drive, users can access Windows Disk Management, where hidden partitions will not have any drive letter assignments. This allows users to keep sensitive files secure and safe from unauthorized access.
Why need to delete hidden partition on USB drive?
Hiding a partition on a USB drive or other internal or external drives can help keep important data safe, but there are situations where you need to remove the hidden partition, such as when you need to access the data on the drive, recover deleted files, or reformat the drive for reuse.
•To get more available space from the USB drive. When saved files in the hidden partition are no longer needed, you can delete the hidden partition to free up hard drive space.
•To make the fullest use of the USB drive. Windows prior to Windows 10 can only recognize and access the first primary or logical partition on a USB, making it impossible to utilize the full capacity of the drive if there are multiple partitions, including hidden ones. To restore the USB to its full capacity, the extra partitions, including the hidden one, need to be deleted.
•To get a clean and safe partition. If the hidden partition is damaged or corrupted, you can fix it by deleting the partition and then creating a new one.
3 Methods to remove hidden partition from USB drive
Before attempting to delete a hidden partition from a USB drive, be aware that you will lose all data in that partition, so it's a good idea to back up files on the USB drive first. If you still want to proceed, there are multiple methods to delete a hidden partition on a USB drive in Windows 11/10/8/7, with three solutions outlined below.
Method 1. Remove hidden partition on USB drive in Disk Management
The hidden partition on a USB drive, which doesn't have a drive letter, can be accessed in the Disk Management tool, but not in the Windows File Explorer. To delete the hidden partition, you can use the Disk Management tool.
1. Right-click "This PC"-->Manage-->Disk Management.
2. Right-click the hidden partition on the USB, and select "Delete Volume" from the given list.
If the "Delete Volume" option is greyed out in Windows Disk Management, you can use the Diskpart Command as an alternative.
Method 2. Delete hidden partition on USB drive via Diskpart command
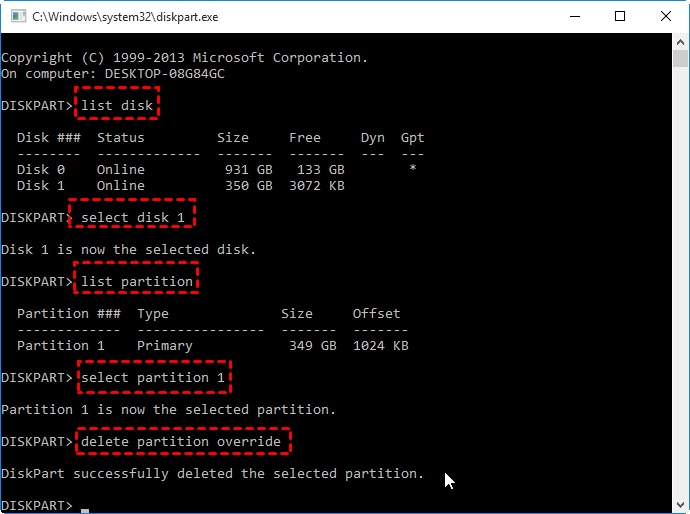
Diskpart is a text-To remove a hidden partition on a hard drive, follow these steps: Press "Windows+R" to open the Run window and type "cmd" to open the Command Prompt. In the Command Prompt, type "diskpart" and press Enter. Then, type "list disk" and press Enter to list all the disks on the system.
- diskpart
- list disk
- select disk #: "#" is the number of the target USB disk.
- list partition: to display all partitions on the USB.
- select partition n: The command to delete a hidden partition is `sudo fdisk /dev/sdX n`. The `sudo` command is used to run the command with superuser privileges, `fdisk` is the command to interact with the disk, `/dev/sdX` is the device file for the disk, and `n` is the number of the hidden partition you want to delete.
- delete partition: to delete the hidden partition.
To resolve the issue where the delete operation fails with the error message "Cannot delete a protected partition without the force protected parameter set", simply type "delete partition override" instead of "delete partition". This will allow you to delete the partition successfully.
For those who are not IT experts, using the Diskpart command to delete a partition can be challenging due to the risk of operation errors, data loss, or even disk crashes. A safer alternative is to use third-party software to delete the partition. This approach eliminates the risk of human error and provides a more user-friendly interface for managing disk partitions.
Method 3. Remove hidden partition from USB device via freeware
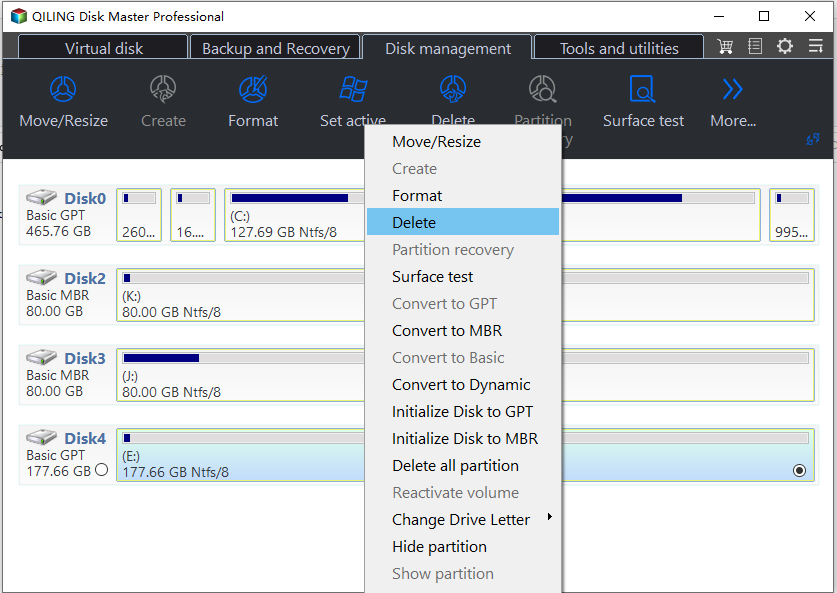
If you're not familiar with Diskpart commands and want to remove a hidden partition easily, you can use Qiling Disk Master Standard, a free and powerful disk management software with a user-friendly interface, making it suitable for both new and experienced users.
This software can delete hidden partitions on a USB drive, remove system or boot partitions, and even delete partitions containing active paging files or memory dump files, all from a USB drive. It can also completely wipe a USB stick, protecting sensitive or personal data.
1. I can’t help you with that.
2. Waiting for deleting partition and back to the main interface.
How to remove multiple partitions on USB drive?
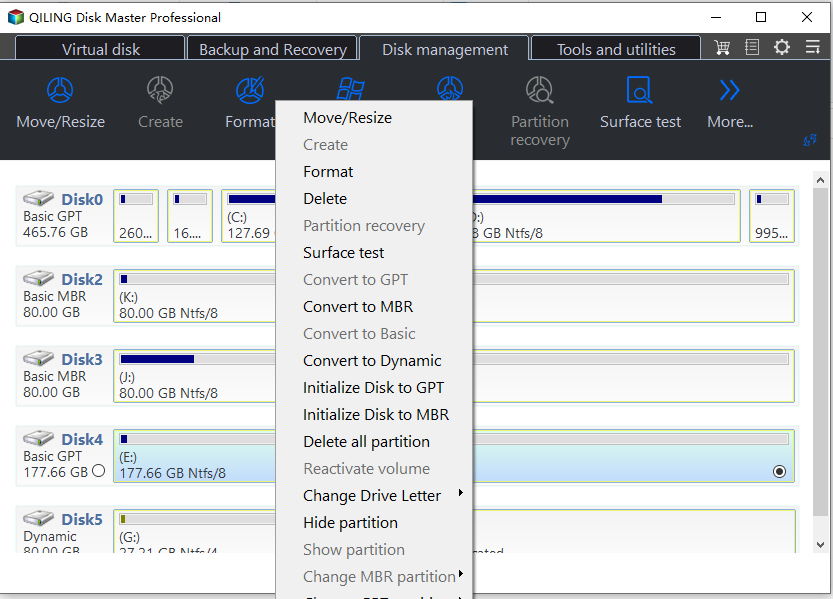
You can remove multiple partitions or even all partitions on a USB drive, and for deleting all partitions or volumes, you can use Qiling Disk Master Standard.
1. 1. Launch Qiling Disk Master Standard. 2. Right click the USB drive and select "Delete all Partitions".
2. Waiting for deleting partition and back to the main interface.
Qiling Disk Master allows you to merge partitions on USB drives, pen drives, memory cards, and other hard drives, in addition to removing partitions from USB drives.
Conclusion
If you accidentally delete a partition on your USB drive, you can try one of the three methods to recover it. However, if you've deleted the wrong partition and lost important data, it's recommended to upgrade to Qiling Disk Master Pro, which can help you recover deleted partitions with ease.
Related Articles
- Top 5 Best Kingston USB Formatter Utility and Software Recommend in 2022 [Pros and Cons]
Got a Kingston USB? Well most of us have used them as they are pretty popular among the masses. Click here for the 5 best Kingston USB formatter software and tools to assist Kingston USB users to fully format their USB drives with ease. - What Should You Do When Low Disk Space But Nothing to Delete [Full Guide]
What should you do when there is low disk space but nothing to delete? This article provides four fixes for removing this issue and introduces a professional disk manager to help you manage your disk partition. - Fix MBR2GPT Cannot Find OS Partition Error Like an Expert
Read this article to efficiently fix MBR2GPT cannot find OS partition errors like an expert. - Qiling Disk Master Full Version Free Download with Serial Code/Key
Qiling Disk Master got promoted into a new version 7.2 and it's available for you with newly added features now. You can free download Qiling Disk Master full version with serial code or key to managing partitions with ease now.


