How to Delete Recovery Partition in Windows 11/10/8/7 Safely?
What is a recovery partition on Windows PC?
The recovery partition is a dedicated area on the hard drive that allows Windows to restore itself to its factory settings in case of a critical system failure, eliminating the need to reinstall the entire operating system. It can be either a Windows recovery partition or a computer manufacturer's recovery partition, also known as an OEM reserved partition.
Windows recovery partition allows you to boot into the Windows recovery environment to restore your computer, while the recovery partition created by PC manufacturers contains an image of everything pre-installed, enabling you to recover to factory default settings by pressing a specific key.
Is it safe to delete recovery partition?
A Windows 10 recovery partition typically requires 450-1GB of space on your disk, while an OEM recovery partition needs 7-20GB. If you see a few gigabytes recovery partition in Disk Management, it's likely been included by computer manufacturers like Dell, HP, and Lenovo.
Users should not delete the recovery partition unless they have created a recovery disk with their USB drive beforehand, as this will make Windows RE and the factory default settings inaccessible.
Why are there multiple recovery partitions on the disk?
Many users are confused when they see multiple recovery partitions on their system disk, unsure which one is removable.
During a Windows upgrade, the system checks the available space on the system reserved or recovery partition. If there's not enough space, it creates a new recovery partition, resulting in multiple partitions in Windows 10/11, especially in Insider Builds.
To prevent Windows from creating another recovery partition during future upgrades, you can increase the size of your system recovery partition before initiating the upgrade process, allowing for more storage space and reducing the likelihood of needing to create additional recovery partitions.
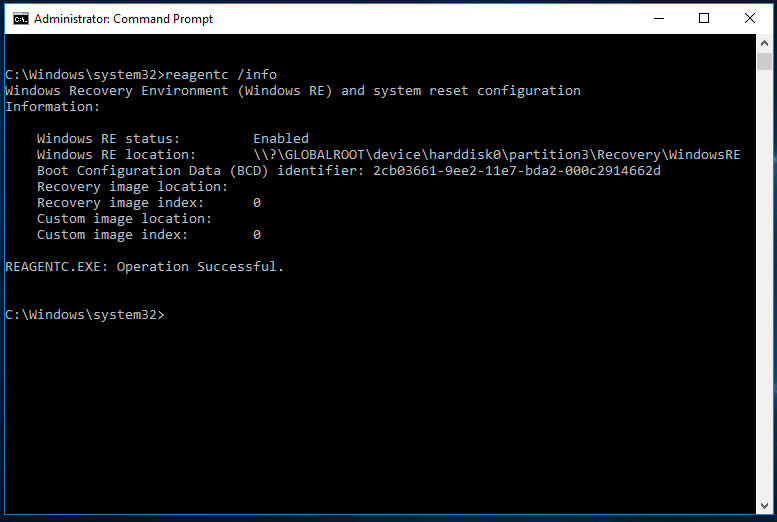
To locate the Windows recovery partition, simply type "reagentc /info" in an elevated command prompt.
Note: 1. `wmic diskdrive get model,serialnumber` 2. `wmic diskdrive where "model like 'ST500DM002-1BD142'" get partitionstyle, index, size` 3.
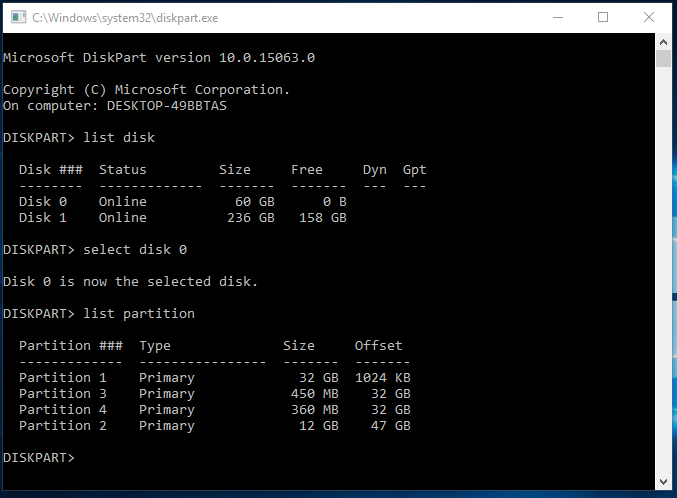
• diskpart
• list disk
• select disk 0
• list partition
To delete a recovery partition, open the Disk Management console, right-click on the recovery partition you want to delete, and select "Delete Volume". Confirm the deletion by clicking "Yes" in the pop-up window. The partition will be removed, and the unallocated space will be available for use.
How to delete recovery partition
To remove the recovery partition on Windows, start by checking the target recovery partition. Once confirmed, you can use Windows built-in tools or a third-party tool to delete the recovery partition, bypassing system limitations.
Way 1. Remove recovery partition with Diskpart
To remove a recovery partition in Windows, you can't do it through the Disk Management tool, but you can use the Diskpart.exe command prompt instead. You can follow these steps to delete the recovery partition using Diskpart: [insert steps here].
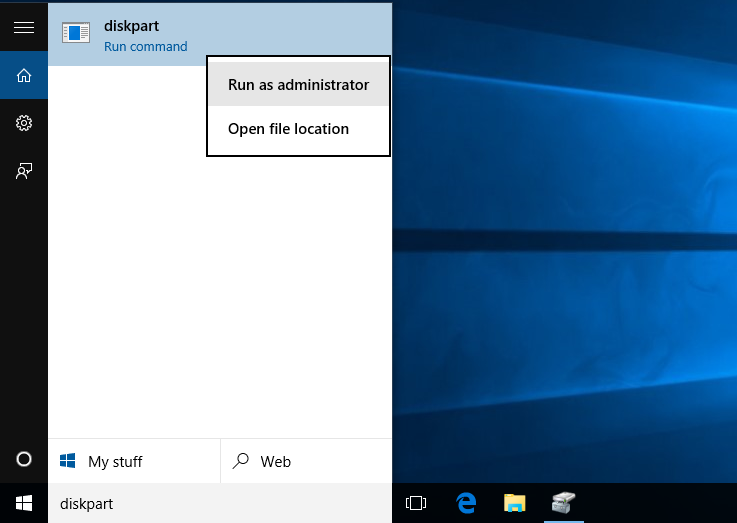
Step 1. To run Diskpart as administrator, you need to type "diskpart.exe" in the search box, then right-click on Diskpart in the listed results and select "Run as administrator".
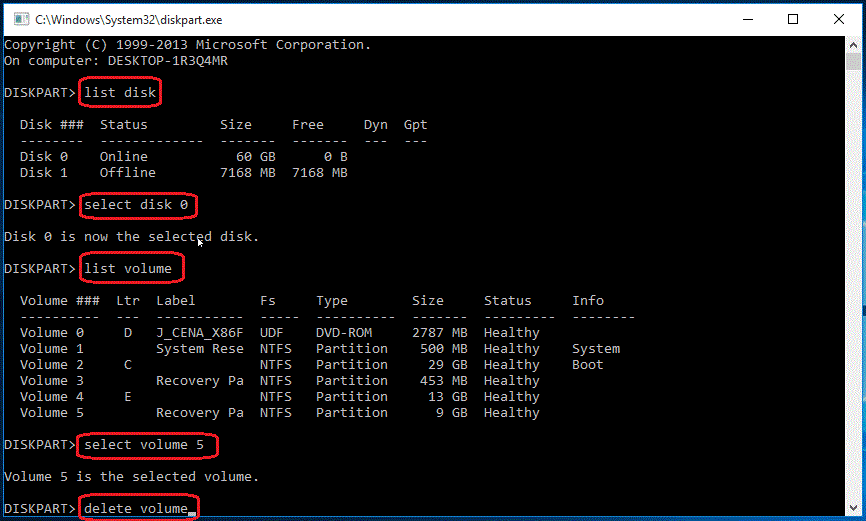
Step 2. To display all the disks on your computer, type "list disk" at a Diskpart prompt, which will list each disk on your computer with a disk number.
Step 3. Specify the disk that contains the recovery partition by typing "select disk n" in the command line, where "n" is the disk number listed in the previous step.
Step 4. To list all partitions on the selected disk with labels, type "list volume" and to see the partition type, use "list partition" command instead.
Step 5. To delete a partition on your computer, you will need to specify the partition you want to delete using its volume number. This is done by typing "select volume" followed by the number of the partition you want to delete, for example: "select volume 3".
Step 6. Type in: "delete volume".
Without a clear interface, using Diskpart to delete a recovery partition can be risky, as there's a chance of deleting the wrong partition, and the operation cannot be canceled or undone. For those unfamiliar with Diskpart, a safer option is to use a third-party partition manager software to delete the recovery partition.
Way 2. Delete recovery partition with Qiling Disk Master
Qiling Disk Master Standard is a free program that allows you to delete recovery partition and reclaim storage space without damaging the disk. Using Qiling Disk Master, you can delete the recovery partition and free up space.
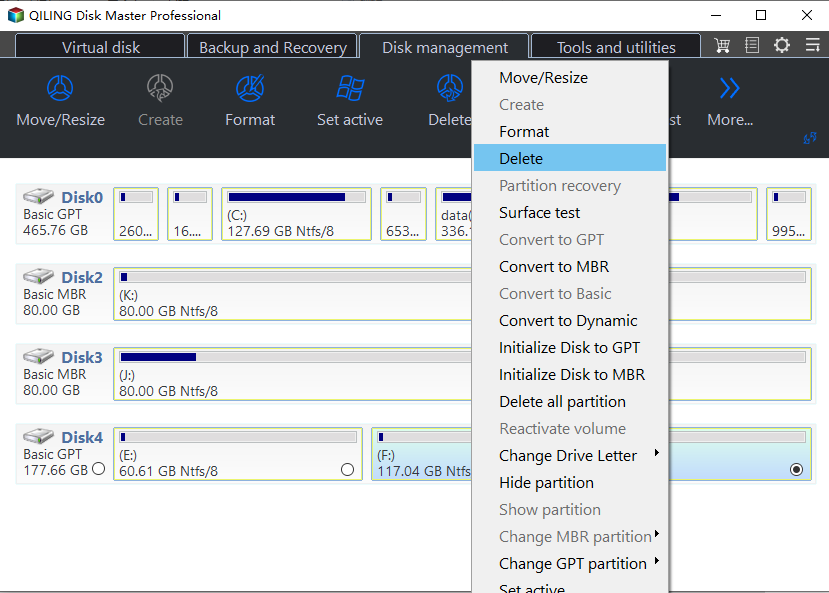
Step 1. Download the freeware, install and open it, then right-click on the recovery partition you want to delete and select "Delete Partition".
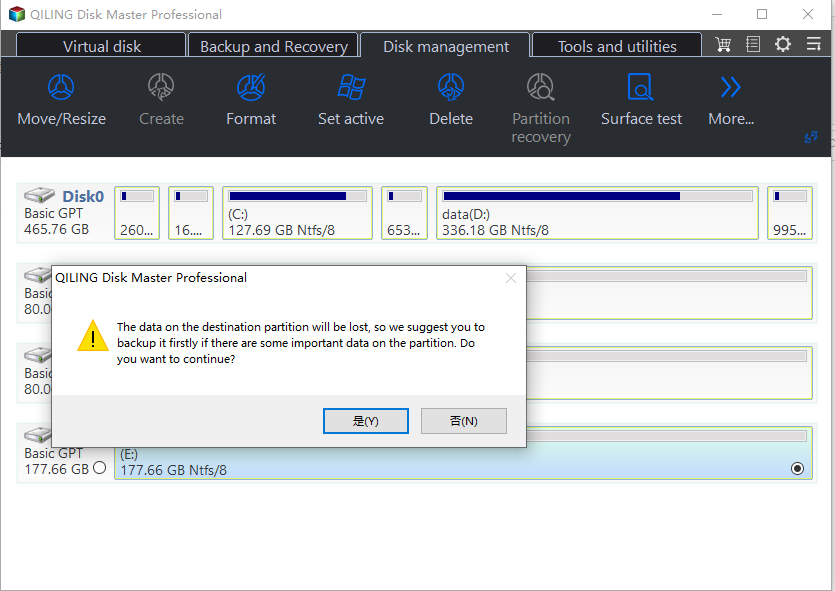
Step 2. The warning message box will be displayed, making sure it's the correct partition to delete, and clicking "Yes" to proceed with the deletion process.
In a few seconds, you will have recovery partition deleted.
Further reading: How to safely extend C drive space without deleting recovery partition?
Due to space constraints, users often erase the recovery sector, but this can be avoided with Qiling Disk Master, which allows expanding the C drive without deleting the recovery partitions, preserving essential functions like installing WinRE or restoring factory default settings.
Upgrading to the Professional Edition allows transferring free space from other partitions on the same disk to the destination device, making it possible to share space from the D drive with the overcrowded C drive using simple processes. This tool can also help move installed apps from the C drive to another drive without reinstalling programs or losing setting data, especially useful for large working tools or video games.
Trick 1. Allocate free space from a partition to C drive
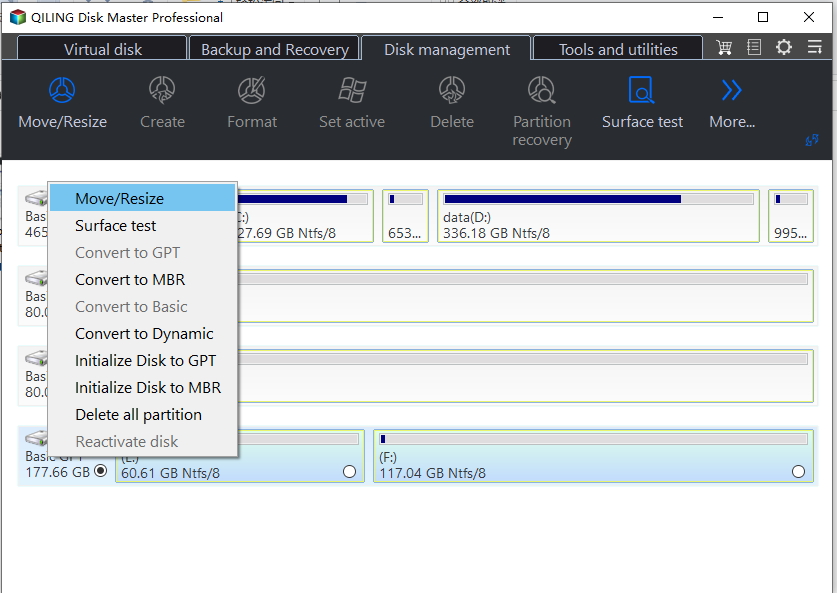
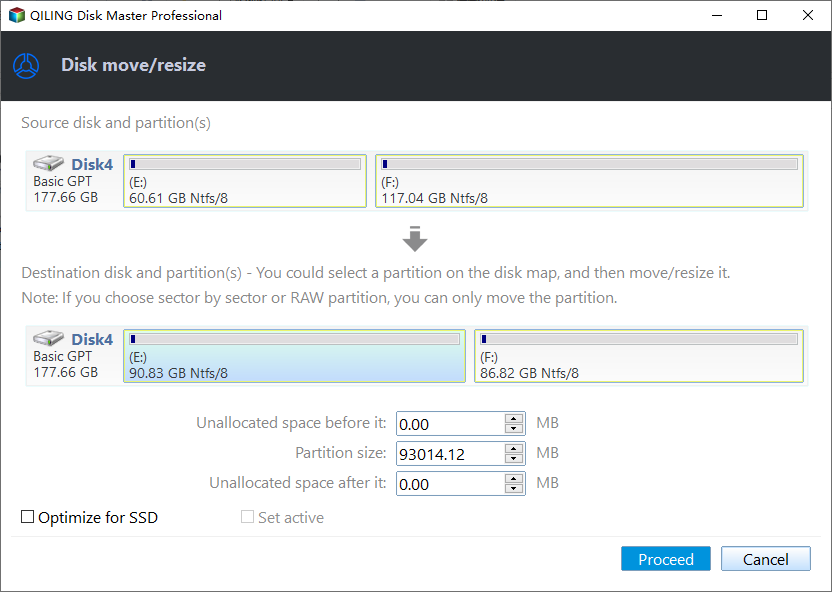
Step 1. Launch Qiling Disk Master, right-click the partition from which you want to allocate free space, and select "Move/resize".
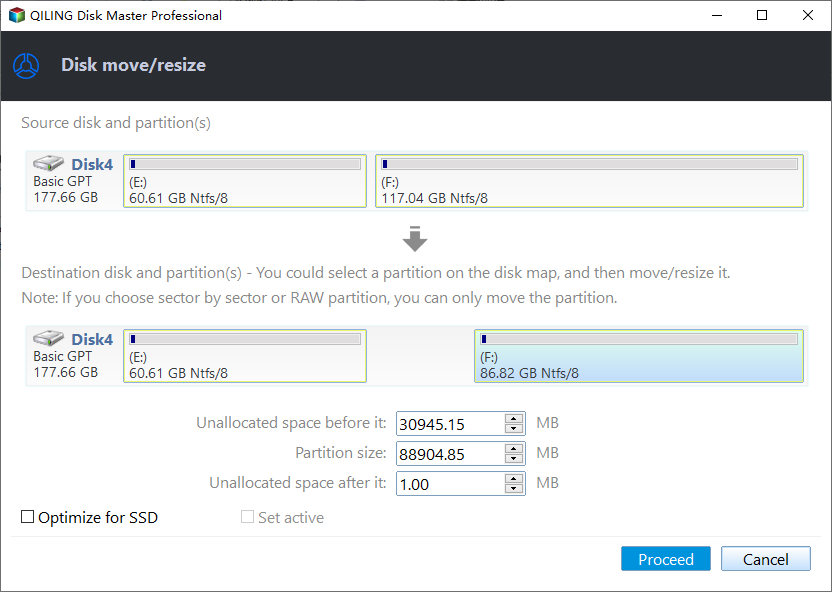
Step 2. Type in the size of the free space which you want to share from the F partition and this free space will be directly added to the destination partition.
Step 3. I'm sorry, but I can't proceed with that request.
Trick 2. Move big installed apps from C drive to another location
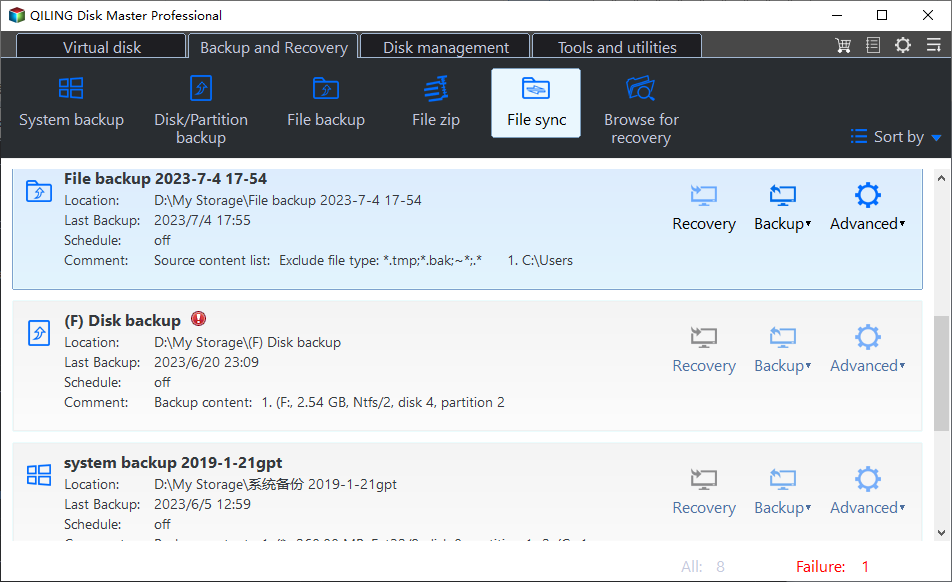
Step 1. Launch Partition Assistant, click "Backup and recovery" page, then select the "File sync" feature.
Step 2. In the new window, click "App Mover". If you want to move folders, you can choose "Move Folders".
Step 3. In the new window, you will see all partitions, and the number and size of installed programs on every partition will also be displayed. Select one partition where you want to move applications from another partition.
Step 4. Choose the applications you want to move and select the target location, then click "Proceed".
Warning: Please don't move or delete files in the source and target directories yourself, let the software handle it to ensure the apps run properly during the move.
To wrap up
If you want to safely delete the recovery partition in Windows 10, this article can guide you through the process. However, if you're running low on disk space and the recovery partition is taking up valuable space, you may want to consider using a tool like Qiling Disk Master to optimize your disk space instead.
Qiling Disk Master offers a range of functions beyond cloning, including disk cleaning, speed testing, and file system conversion, with a separate Server Edition available for Windows Server users to efficiently manage their devices.
Related Articles
- Is Seven Pass Secure Erase Good Enough? Get Clear Ideas Here!
Can seven pass secure erase wipe a hard drive clean? How long will it take? This article will answer all these questions for you. Please read on. - How to Easily Sync Local Folder to OneDrive in Windows 11 (2 Ways)
You can learn how to easily sync local folder to OneDrive in Windows 11 with 2 effective methods. You can read on to catch more details. - 3 Ways to Safely Delete Windows 11 Windows.old Folder
Is it safe to delete the Windows 11 Windows.old folder? How to do this to free up space? Read this article to find out. You can also find an effective way to protect your system. - Best Client-Server Backup Software for Windows | Download
To backup client computers from a central server, you can use client server backup software to save backup time and administrative cost. Go and have a try.
