Step-by-Step Guide for Dell XPS 8910 SSD Upgrade
The scenario: Dell XPS 8910 adding SSD
Dell XPS 8910 Desktop, featured with Intel I7 Quad Core processor and high-performance graphics, powers all your tasks from photo/video editing to gaming. One of the amazing parts about Dell XPS 8910 is the easy-open chassis, which enables you to expand and upgrade things like graphics and memory to meet your specific needs.
Some users consider adding NVMe SSD to Dell XPS 8910 so that they can use the SSD as a boot drive and the OEM hard drive as a storage drive. Following is what one user asked in Dell Community:
“I have an XPS 8910 with a 1TB HDD and would like to install a 256GB SSD which would act as a C bootup drive. Can someone please explain how this is done? Would I be able to restore Windows 10 and my other programs to the SSD and leave the data on the existing HDD?
Thanks for your help!”
Actually, there are two methods you can resort to in this situation. First, you can backup Windows 10 and other programs and then restore them to the SSD. Second, you can clone Dell hard drive to SSD without the restoring process. Apparently, the second method will save you much time and effort. I’ll walk you through the second method in the following parts.
Best disk cloning software for Dell XPS desktop SSD upgrade
Reliable, specialized disk cloning software will help you a lot with Dell XPS hard drive replacement. Qiling Disk Master Professional is the best disk cloning software that supports all Windows PC operating systems, including Windows 11/10/8.1/8/7/Vista/XP.
- It owns the features of Disk Clone, Partition Clone and System Clone. You can use it to copy the entire disk, a particular partition or only Windows OS according to your situation.
- You are allowed to clone large HDD to smaller SSD only if the smaller SSD is large enough to hold the data on the HDD. Cloning SSD to larger SSD is also supported.
- The cloning process will run in the background, so you can use the computer for other things during the process.
Download and install Qiling Disk Master now. Then, learn a step-by-step guide for Dell XPS 8910 SSD upgrade from the next part.
How to upgrade Dell XPS 8910 boot drive to SSD simply
Before you start, there are some preparations:
▪ Choose an SSD that is compatible with Dell XPS 8910. Both M.2 NVMe SSD and 2.5-inch SATA SSD are supported. If you are not sure which one to choose, here are some recommendations.
▪ Bear in mind that the destination SSD will be overwritten in the cloning process, so do file backup for your SSD before clone if there are important data on it.
Now follow the instructions below and upgrade Dell XPS 8910 boot drive with the best cloning software - Qiling Disk Master Professional:
Step 1. Add the target SSD to Dell XPS 8910 and make sure it is detected.
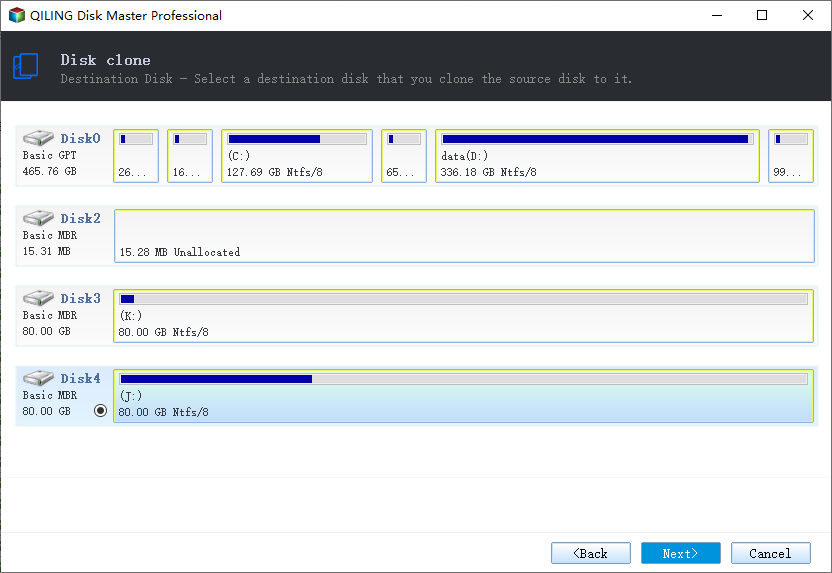
Step 2. Launch Qiling Disk Master. Click “Clone” on the left pane and select “Disk Clone”.

Tip: If you want to clone OS only to the destination SSD, please use the System Clone feature.
Step 3. Select the original HDD as the source disk and click “Next”.

Step 4. Select the destination SSD you have connected to your computer and click “Next”.
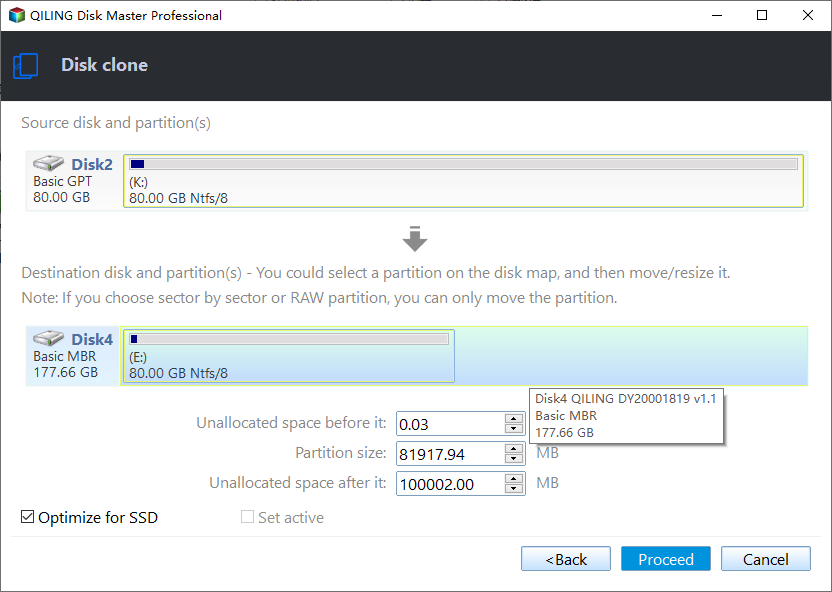
Step 5. Tick “SSD Alignment” to improve the performance of the destination SSD. Confirm the operation and click “Proceed”.
Notes:
• If you tick “Sector by sector clone” in Step 5, Qiling Disk Master will clone every sector on the source HDD whether it is used or not. Do not enable it if the source disk is larger than the destination disk.
• After the cloning process is complete, you should restart your computer and set the SSD as the first boot device in BIOS. If Dell XPS 8910 boots successfully, you can wipe the old HDD for reuse.
Summary
You have learned the whole process of Dell XPS 8910 SSD upgrade. The same method applies to Dell XPS 8920 SSD upgrade as well. Additionally, Qiling Disk Master is superb backup and sync software for Windows 10/8/7. You can make Windows 10 manage backups automatically via it. Give it a try and you won’t be worried about data loss anymore!
Related Articles
- How to Clone Dell Laptop Hard Drive to SSD with Secure Boot?
With the help of the best Dell hard drive cloning software, you can successfully clone Dell hard drive to SSD in Windows 11, 10, 8, 7 and make it bootable. Get it right now and clone. - Replace Dell XPS SSD and Clone Data to Larger SSD
2 ways provided in this post to clone Dell XPS SSD to SSD with larger one to safely move everything. - Top Two Ways to Clone Dell Laptop Hard Drive
If you are planning to clone Dell laptop hard drive to an SSD or a larger HDD without reinstalling Windows and all your apps, read this article thoroughly to get the top two ways. - Fixed: Samsung Data Migration Not Working with Windows 11, 10, 8, 7
Samsung Data Migration not working during cloning disk to Samsung SSD? This article will tell you why and how to fix it effectively.