How to Format Bootable USB Flash Drive to Normal in Windows 7, 8, 10, 11?
Why Need to Format Bootable USB Drive?
Bootable USB drive is a kind of helpful assistant in many situations. If you cannot access Windows, the bootable USB drive you created before can help you enter into Windows PE or Linux environment for further operations. Sometimes, to backup hard drive or system, the bootable USB stick helps backup hard drive without booting Windows. What's more, USB drives are easy to carry and easy to save. One bootable USB stick can apply to different computers.
Well, with so many conveniences it brings to us, why would we want to format bootable USB stick? As we know, USB flash drive comes with larger capacity and reasonable price in recent years. As time goes by, the current bootable USB may not meet your computing requirements anymore. In that case, you can choose to copy bootable USB drive to another USB or to format bootable USB drive in Windows 7 and create another new bootable device. Also, when you no longer need the bootable USB, it is not a bad choice to reformat it to FAT32 for new files. Surely, other conditions might result in bootable USB drive formatting as well. The key point is to find out how to format bootable USB to normal.
Can We Format Bootable USB Drive in Windows 11/10/8/7/XP?
Obviously, the answer is positive. Bootable USB drive is no different than normal USB drive except for the starting programs and Windows pre-installed environment. Therefore, you can format bootable flash drive as usual in some cases. On Windows alone, there are two bootable USB drive format utilities: Disk Management and Diskpart in Command Prompt.
Plug in the bootable USB drive when you running Windows and then type "diskmgmt.msc" in Run box to start Disk Management. Right-click the bootable drive and select "Format". Then follow the wizard to complete the formatting.

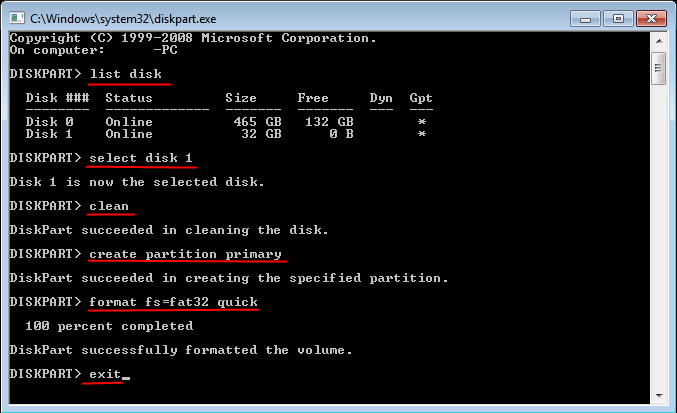
One can not only create bootable USB using Diskpart but also format bootable USB stick with this application. Steps are quite easy as well. First, type "diskpart" in Run box to start Command Prompt. Second, input following commands in turn and remember to press Enter after each move.
- list disk
- select disk X (X stands for the disk number of your bootable USB drive)
- clean
- create partition primary
- format fs=fat32 quick or format fs=ntfs quick (select one file system based on your own needs)
- exit
No cumbersome steps required can you format the bootable USB flash drive. Nevertheless, sometimes you cannot complete formatting using both methods. Besides, all operations take place immediately so that you cannot step back. No matter from which side, finding another powerful bootable USB drive formatter is recommendable.
How to Format Bootable USB Drive via Qiling Disk Master?
Qiling Disk Master Professional is a reliable and well-known disk partition manager that allows you to, for example, format SD card for 3DS in Windows 11, 10, 8.1, 8, 7, XP, and Vista. This bootable flash drive format utility can assist you in formatting USB drives to NTFS, FAT32, Ext 2, or Ext3 for different uses.
During the format process, you are allowed to change the cluster size of the file system. If you just want to wipe data on the USB drive like erasing files on SanDisk USB, it supports wiping partitions up to 100 times. It has a user-friendly interface and provides a demo version. You can download the demo version of Qiling Disk Master Professional to have a try.
1. Plug in the bootable USB drive when you running Windows. Install and launch Qiling Disk Master.
2. Right-click the bootable flash drive and select "Format Partition".

3. Set file system and cluster size and volume label.

4. This is the virtual result. Click "Proceed" to make it real.
Tips: If you want the USB drive to bootable again, try "Make Bootable Media" in this software to create a bootable device with Windows PE, and you can use this bootable USB to format hard drive in WinPE mode without booting Windows.
Except for formatting bootable USB drive, Qiling Disk Master is also an Intenso USB format tool, HP USB format tool and Lexar USB format utility. And you can try "Recover Data" function to retrive lost data after formatting. In addition, you are able to migrate OS from HDD to SSD while keeping files on HDD if the need ever arises. And if you need, you can also test disk speed for a disk check.
Related Articles
- How to Successfully Zero Fill Hard Drive from Bootable USB for Free?
Need to zero fill hard drive without booting system? You can download Qiling Disk Master to zero fill hard drive from a bootable USB. - How to Copy/Clone Bootable USB Drive to Another USB Drive?
A bootable USB drive can help you recover, repair and install an operating system. If you need to clone bootable USB drive to another USB drive, learn detailed steps from this page. - 3 Methods to Create Bootable USB Windows 10 [Full Guide]
Here, we collect three different methods to help you create bootable USB in Windows 10 easily and effectively. - How to Move Windows 10 Recovery Partition without Data Loss?
If Windows 10 Recovery partition is in the way of extending C: partition, you can move recovery partition in Windows 10 safely with a free tool.