[2 Ways]How to Burn ISO File to USB on Windows 11, 10, 8, 7
User Case
Learn how to burn an ISO file to a USB flash drive to create a bootable USB in Windows 10. This guide provides a step-by-step process to help you achieve this task.
Reasons for burning ISO files to USB flash drives
Learn why users choose to burn an ISO image file to a USB flash drive. This guide provides information on the reasons behind this process.
▶ Learn how to create a bootable Windows USB drive that can be used to boot any computer. This guide provides a step-by-step process for creating a portable Windows installation.
▶ Install Windows operating system more easily and convenient from the bootable USB drive than from original Windows installation CD.
▶ When your computer suffers from severe system boot issues, it can be frustrating and time-consuming to troubleshoot and recover. However, there are steps you can take to rescue your computer and get it up and running again.
How to burn ISO file to USB on Windows 11/10/8/7
Burn ISO files onto a USB flash drive? Just copy the ISO file and paste it onto the USB! See, how easy is it! Sadly, it is different from copying music, videos or pictures to your flash drive. That way is just copying the exact file, not the data stored in that ISO image file. So you cannot boot computer with that copied files. The data can only be read after it is burned onto a USB drive or Disc.
Therefore, you need to adopt some special ways to burn, not copy, the ISO files to USB flash drive. Here we list two great ways for your reference.
Way 1. Copy ISO to USB via Windows native tool
Windows To Go is a feature in Windows 10 Education/Enterprise/Pro and Windows 8/8.1 Enterprise that allows you to create a portable version of Windows on a USB drive. You can use this feature to burn an ISO file onto a USB flash drive.
Before proceeding:
▸To use Windows To Go, you need a certified USB drive that meets specific requirements.
▸Before creating a Windows To Go workspace, it's essential to back up any files or data on the destination USB drive. During the creation process, the entire USB drive will be wiped clean, and all data will be deleted.
Step 1. To create a Windows To Go workspace, you'll need to obtain the Windows ISO files from Microsoft's official website and prepare a certified USB drive for the installation.
Step 2. Open Control Panel on your computer, and search "Windows To Go" in that window. Click "Windows To Go" option to proceed.
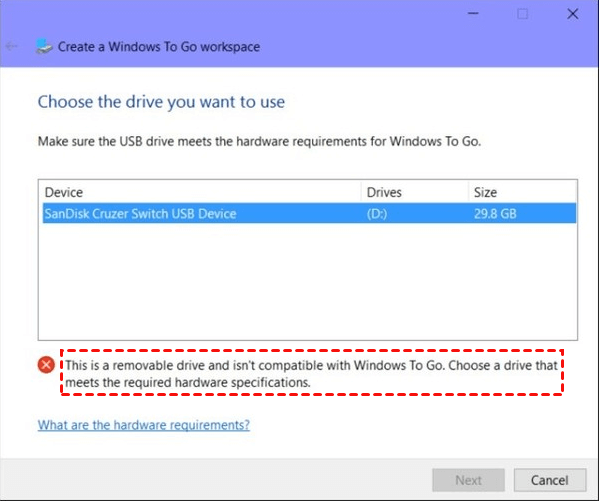
Step 3. In this window, it will automatically search for all inserted USB drives. Choose the USB drive you plan to burn ISO files onto and then "Next" to continue. It should be a qualified USB, otherwise, the "Next" button will be disabled.
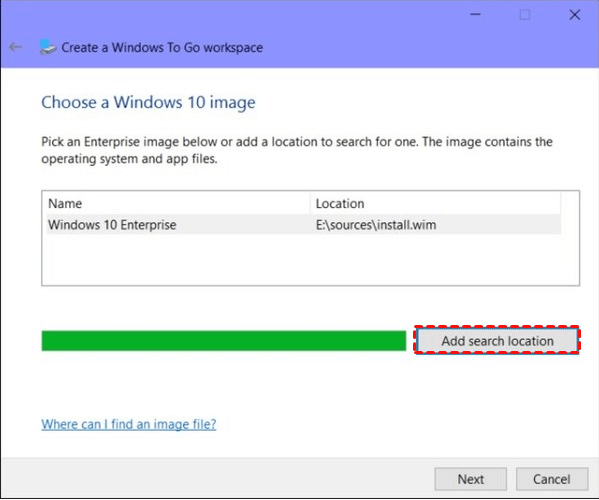
Step 4. Click "Add search location" to search for the Windows installation ISO file and choose the mounted ISO file.
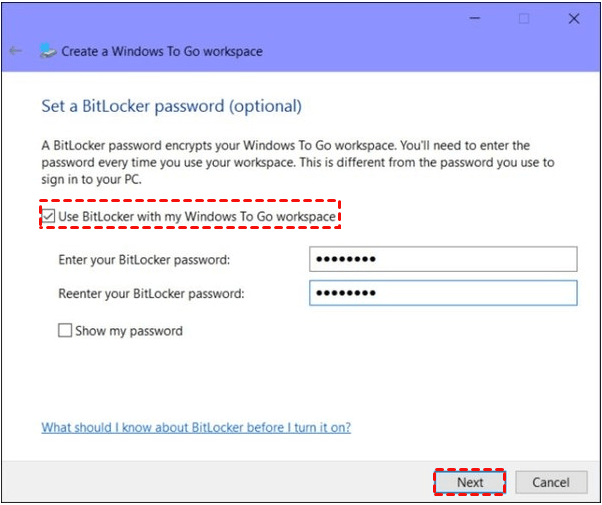
Step 5. Here, you can set a BitLocker password to encrypt your Windows To Go workplace.
Then it will start to burn the Windows ISO image files to the selected USB drive. Seems very simple and easy, but this native tool can only recognize and allow you to choose USB drives that are certified by Microsoft as compatible. Or you will get stuck in Step 3. It's the main reason that most users don't like to use this built-in feature.
Way 2. Burn ISO to USB with third-party software
If you're looking for an alternative tool to burn ISO files to a USB drive, particularly if you don't have a certified USB drive or are running a version of Windows that's not compatible with the native Windows To Go tool, Qiling Disk Master Professional is a viable option.
Burning an ISO file to a USB drive is a straightforward process that can be completed using the built-in Windows To Go tool. However, if you're looking for an alternative that offers more compatibility and flexibility, Qiling Disk Master Professional is a viable option.
Attention: If you have a USB 3.0 drive and a computer with a USB 3.0 port, you can use them to boot up the process of burning an ISO file to a USB drive. This can be a convenient option, especially if you need to work with large ISO files.
Install and run Qiling Disk Master Professional. Plug an empty USB drive in your Windows 10 computer via USB port. You can download the free Demo version.
FAQs about burn ISO file to USB
Q: Why would I want to burn an ISO file to a USB drive?
A: Burning an ISO file to a USB drive allows you to create a bootable USB device that can be used to install an operating system, run a live environment, or perform system recovery tasks. It's a convenient way to use the contents of an ISO file without needing a physical disc.
Q: What do I need to burn an ISO file to a USB drive?
A: To burn an ISO file to a USB drive, you'll need a USB flash drive with sufficient storage capacity to hold the ISO file, the ISO file itself, and a software tool capable of creating a bootable USB drive from an ISO image.
Q: Can I burn multiple ISO files to the same USB drive?
A: In most cases, you can only burn one ISO file to a USB drive at a time. This is because the ISO file will overwrite any existing data on the USB drive during the burning process. However, if you need to have multiple bootable ISO files on the same USB drive, you can use a multiboot tool like YUMI or XBoot.
Q: Can I use a DVD instead of a USB drive to burn the ISO file?
A: You can burn an ISO file to a DVD using appropriate software for burning discs. However, keep in mind that DVDs have limited storage capacity compared to USB drives, so make sure the ISO file fits on the DVD. Additionally, not all computers support booting from DVDs, so using a USB drive is often more versatile.
Wrap things up
You can burn an ISO file to a USB drive using appropriate software for burning discs. However, keep in mind that USB drives have limited storage capacity compared to DVDs, so make sure the ISO file fits on the USB drive. Additionally, not all computers support booting from USB drives, so using a DVD is often more versatile.
Related Articles
- How to Make/ Create a Bootable USB Stick on Windows 10/8/7?
If you need to create a bootable USB stick on Windows, you can read through this page. It explains how to create a bootable Windows USB via CMD or a piece of professional software. - Best WinToUSB Alternative- Qiling Disk Master
Here, we will share a free yet powerful WinToUSB alternative, which breaks the limitations of WinToUSB software and permits you to create portable Windows 11/10/8/7 more easily and flexibly! - Two Methods to Convert/Burn ISO to USB in Windows 10/8/7
On this page, we aim to tell how to burn ISO to USB in Windows 11, 10, 8, 7 via 2 free methods. And then you can get a bootable USB drive. - Best Software to Create Bootable USB for Windows and Mac
The best software to create bootable USB-Qiling Disk Master enables you to create a portable system device for Windows or Mac computer.


