How to Erase M.2 SSD on Windows 10/11 – Securely and Completely
What is M.2 SSD?
M.2 is a compact SSD form factor, resembling a stick of gum, that's ideal for thin laptops and tablets, taking up less space than traditional 2.5-inch SSDs or hard drives, and offering faster data processing than SATA or SAS SSDs.
M.2 SSDs are a type of solid-state drive (SSD) that are useful for people building or upgrading a personal computer or laptop, particularly for use cases such as gaming, video editing, and large file transfers, as they have no moving parts and do not break or spin up or down.
Why Do You Need to Erase an SSD?
To erase the M.2 SSD, try booting from a Linux live USB or CD, which can bypass the corrupted Windows installation and allow you to erase the drive. You can also try using a Windows installation media to boot from, which may also allow you to erase the drive. If you're unable to boot from anything else, you can try disconnecting the M.2 drive from the laptop and connecting it to another computer, then using the other computer to erase the drive. Alternatively, you can take the laptop to a repair shop or contact the manufacturer for assistance.
We often need to erase M.2 SSDs in our daily work or study due to various reasons. These include situations where we want to reset our computer to its original state, remove personal data, or simply because we're upgrading to a new SSD. Whatever the reason, erasing an M.
- Planning to sell/give away your old computer or just the drive inside. 1. Back up your files to an external drive or cloud storage to ensure they're safe.
- Want to restore your computer to factory settings. To completely erase an M.2 SSD, you can use a tool like DBAN (Darik's Boot and Nuke) or a Linux-based live USB. These tools will overwrite the entire drive with zeros, effectively erasing all data. Alternatively, you can also use a Windows-based tool like Disk Cleanup or a third-party software like CCleaner to securely erase the data.
- Reuse your M.2 SSD. If the data on your drive is currently unimportant and will not be used, you can reuse the SSD by erasing it.
How to Secure Erase SSD on Windows 10/11
Deleting a file on an M.2 SSD doesn't completely erase it, as the operating system only removes the file's pointer, leaving the actual data intact. The data remains until the drive needs the space to store new information, which may take years or never happen if there's ample free space.
Resetting Windows 10 or 11 and enabling the option to delete files may not delete all personal data, so a powerful �isk wiping software is needed to securely erase all data on Windows 10/11.disk wiping software is needed to securely erase all data on Windows 10/11.
Qiling Disk Master Professional is designed for all Windows PCs, including Windows 11, 10, 8.1, 8, 7, Vista, and XP. It allows you to:
💎 Erase entire discs, selected partitions, or unallocated space with this tool, rendering erased data unrecoverable.
💎 This tool erases hard drives, USB drives, and SD cards, supporting all brands, including Samsung, SanDisk, and WD.
💎 This software allows for easy backup and recovery of files, as well as cloning of disks, all with a simple and user-friendly interface.
To wipe an SSD on Windows 10, follow these steps: First, back up any important files and data to an external drive or cloud storage. Next, go to the Start menu and type in "Disk Cleanup" to run the built-in disk cleanup tool.
- To install the software, click the download button below, which will initiate the installation process on your computer.
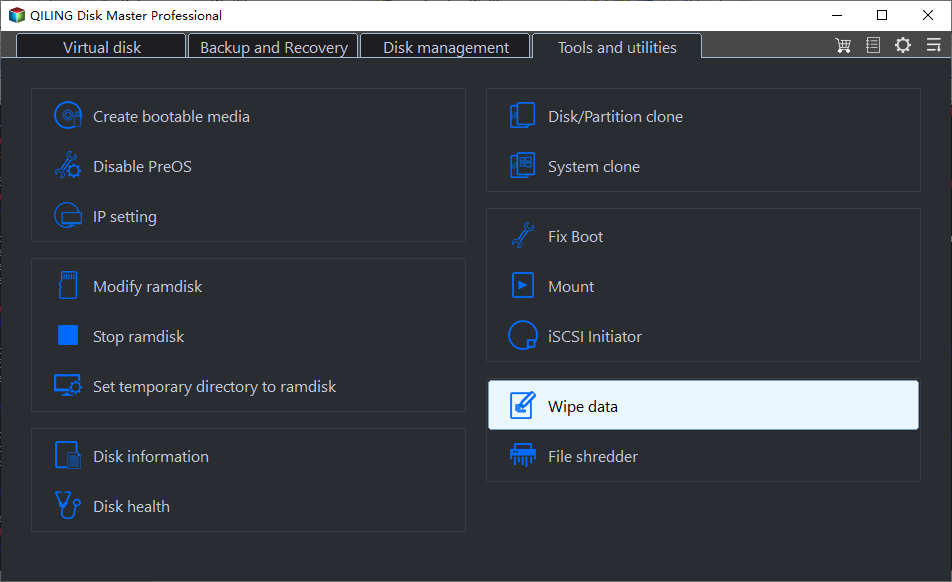
- To start the disk wipe process in Qiling Disk Master, go to the Tools tab page and select Disk Wipe on the right side. This will initiate the disk wipe process.
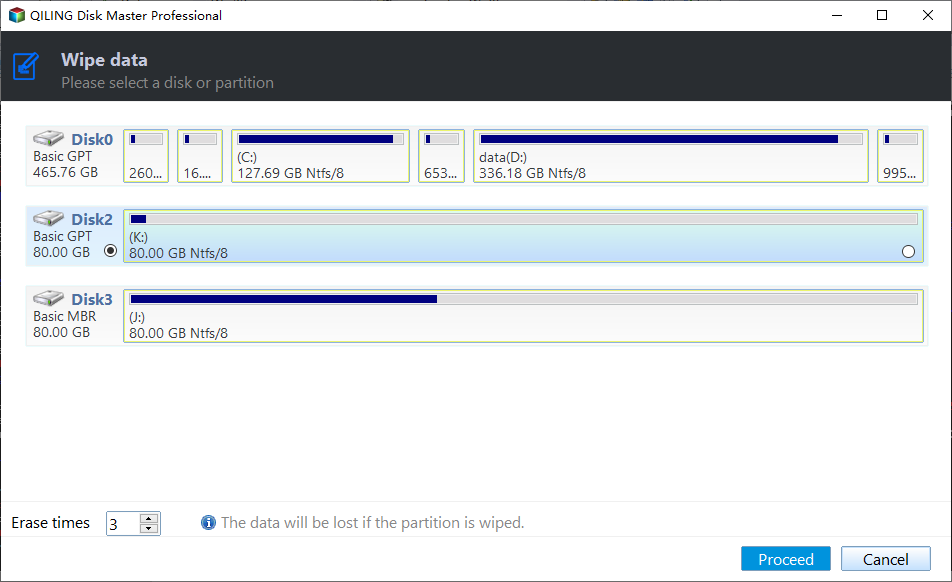
- Select the M.2 SSD you want to erase.
✨ Note: If you choose to erase the system disk, a pop-up window will appear, warning that the operation will run in reboot mode, prompting you to press OK to confirm.
- On the Wiping Method page, choose Fill sectors with Zero, then click Proceed to begin the zero filling process.
✨ Tip: You can also select three alternative wiping methods: Fill sectors with random data, DoD 5220.22-M, and Gutmann.
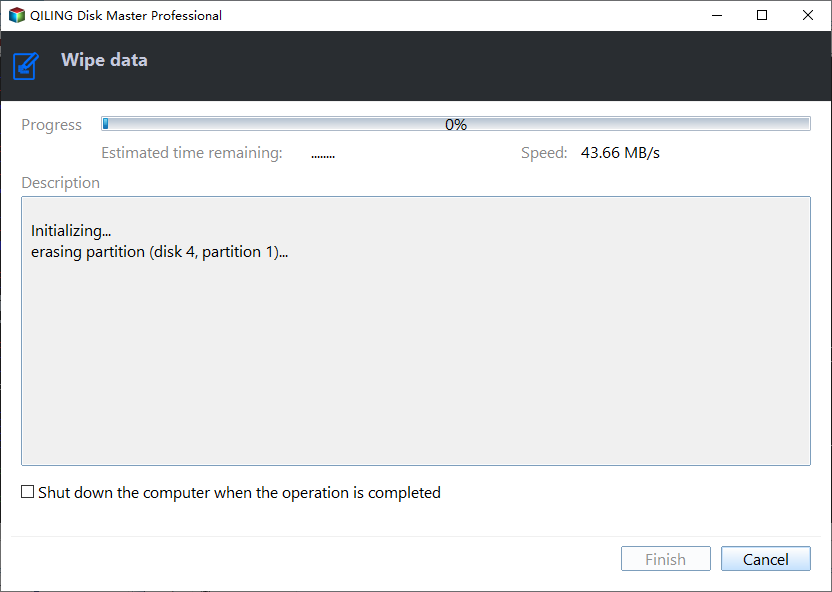
- Once the erase process starts, you will be taken to the page of the erase process. If you want to stop the process, you can click Cancel in the right corner.
Final Words
You can learn how to erase an M.2 SSD in this article to prevent personal information from being compromised or to reuse your drive. The process is surprisingly simple, even for a computer novice, and can be completed quickly through the step-by-step tutorial provided.
The software can assist in upgrading a computer's hard drive by migrating data from the old disk to a new one, allowing for a successful boot from the cloned disk without any data loss during the cloning process.
Related Articles
- Easy | Migrate Windows 11/10 to M.2 SSD without Reinstalling
M.2 SSD becomes more and more popular due to its amazing speed and mini size. If you want to transfer Windows 10/11 from HDD/SSD to M.2 SSD, you can't miss this article. - Do I Need to Format A New SSD Before Cloning? - Answered
Do I need to format SSD before cloning? In fact, there is no need to format the SSD as long as you use Qiling Disk Master. - How to Clone NVMe SSD to NVMe SSD in Windows 10, 11 (2 Ways)
You got two easy ways to clone NVMe SSD to NVMe SSD successfully in different situations, including cloning via only one slot. - How to Fix C Drive is Full Easily (6 Ways)
This article describes the reasons for the “C drive is full” problem and 6 ways to fix it. The stepwise tutorial will be included as well. Please read on.


