Install a Second Hard Drive in Windows 10 (One-Stop Wizard)
- Why Do You Need to Install a Second Hard Drive
- Which Kind of Hard Drive Is Right for Your Computer?
- How to Install a Second Hard Drive into Your Computer
- Install an External Hard Drive for Storage
- Install a Second Internal Hard Drive for Larger Capacity
- Install a Second internal SSD to a Windows 10 PC Host
- How to Make My Windows 10 Recognize a Second Internal Hard Drive
- How to Perform System or Data Migration After Installing a Second Hard Drive
- Easily Migrate System From HDD to SSD in Windows 10
- Transfer files from one hard drive to another in Windows 10
- FAQs and Solutions for Installing a Second Internal Hard Drive
- How Do I Get the BIOS to Recognize My Hard Drive?
- Will a Second Internal Hard Drive Slow Down My Computer?
- How to Fix the Second Hard Drive Not Showing Up in Windows 10
- Conclusion
Why Do You Need to Install a Second Hard Drive
To install Windows 10 on a second hard drive, you'll need to partition and format the new drive, then install Windows on it. Here's a simplified step-by-step guide: 1. Connect the new 1TB solid-state drive to your desktop computer. 2. Open the Disk Management tool in Windows (Press the Windows key + R, type "diskmgmt.msc", and press Enter). 3.
Many users want to install a second hard drive in Windows 10 when their computer runs out of space or they need to store more files, photos, or programs. This is especially true for those who use their computer for video editing, gaming, or other resource-intensive activities.
- You want to replace HDD with SSD for better performance and then install a second hard drive for storage.
- To avoid slowing down your computer's performance, it's recommended to install a second hard drive to store data, rather than relying solely on the smaller SSD disk provided. This will help maintain the computer's speed and efficiency.
Which Kind of Hard Drive Is Right for Your Computer?
Whether you can install a second hard drive depends on the type of hard drive in your computer. If you have a traditional hard disk drive (HDD), you can install a second one.
- Internal Hard Drive: The main thing to check is whether the motherboard has a spare interface, specifically a SATA interface and M.2 interface, to support two hard drives. The power supply is usually sufficient to support two hard drives under normal circumstances. You can check the motherboard's specifications to confirm.
- External Hard Drive: The compatibility of the external hard drive depends on the number of USB ports and whether the hard drive is compatible with your operating system, specifically Windows 7 and above. If you're using Windows XP, you may need to upgrade to Windows 10 or 11 for compatibility. An additional USB port can also be helpful for installing the external hard drive.
To choose the right hard drive, you need to consider the following factors: the type of data you want to store (e.g.
- Hard disk interface: The IDE interface has been phased out and replaced by more modern options, specifically SATA and M.2, which are now widely used in the market.
- Size: 2.5 inches and 3.5 inches floppy disk sizes are mainly used for notebook and desktop computers respectively.
- Thickness: 2.5-inch and 3.5-inch hard drives have significantly reduced in thickness, from 9.5mm to around 7mm, making them more compact and easier to fit into hard drive bays.
How to Install a Second Hard Drive into Your Computer
After understanding how to choose the right hard drive, I will introduce you to the installation methods of external and internal hard drives. I will start by showing you how to install an external hard drive, which is a straightforward process suitable for desktop computers, as the methods for desktops and laptops are essentially the same.
Install an External Hard Drive for Storage
Installing an external hard drive is a straightforward process. Simply connect it to your computer via a USB port and you're ready to store your photos, documents, and other files.
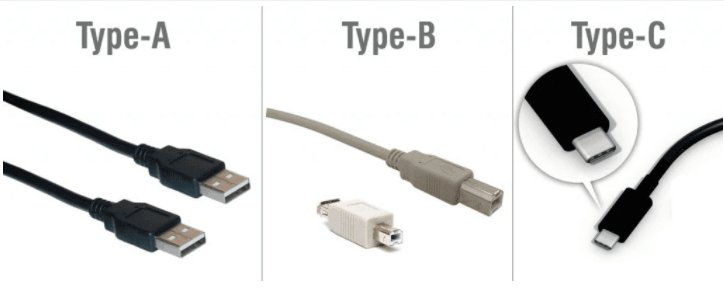
Step 1. Connect an external hard drive to a computer by locating the USB port, then plugging in the hard drive using its original USB cable and matching it to the correct type of USB port (USB-A, USB-B, or USB-C).
Step 2. Open This PC, right-click on your external hard drive and then select Format... from the drop-down menu.
Step 3. A small window will pop up. Choose the NTFS file system and uncheck the "Perform a quick format" option, then click "OK" to initiate the formatting process.
While external hard drives offer the convenience of portability, it's essential to acknowledge the trade-offs involved. If you're not willing to accept these limitations, consider installing a second internal hard drive instead.
- The motherboard may not be able to supply enough power to the USB ports, which could require additional power outlets.
- Installing an external hard drive will take up one USB port, which might be considered insufficient for some users.
- External hard drives have slower read and write speeds than internal hard drives, which can impact your experience.
Install a Second Internal Hard Drive for Larger Capacity
Compared to external hard drives, internal hard drives can compensate for the shortcomings of being less portable, except for that. They offer a more convenient and efficient way to expand storage, but the installation methods will vary depending on whether you're using a traditional hard disk drive (HDD) or a solid-state drive (SSD).
For traditional hard drive, The best thing about HDD (Hard Disk Drive) is its affordability and suitability for storing large amounts of data, such as games, movies, and files. This makes it an ideal choice for users who need to load and store a significant amount of content. Note that, as with any hardware, individual hosts may have slight variations in design.
For SSD disk A Solid State Disk (SSD) has several advantages, including fast read and write speeds, anti-shock and anti-drop properties, low energy consumption, and no noise. It also has a large operating temperature range and is lightweight compared to traditional Hard Disk Drives (HDDs). These benefits make SSDs suitable for installing systems to improve computer speed, although they are relatively expensive. I'll introduce more details about SSDs in the next part.
Installing a Second Hard Disk Drive to a Windows 10 PC Host
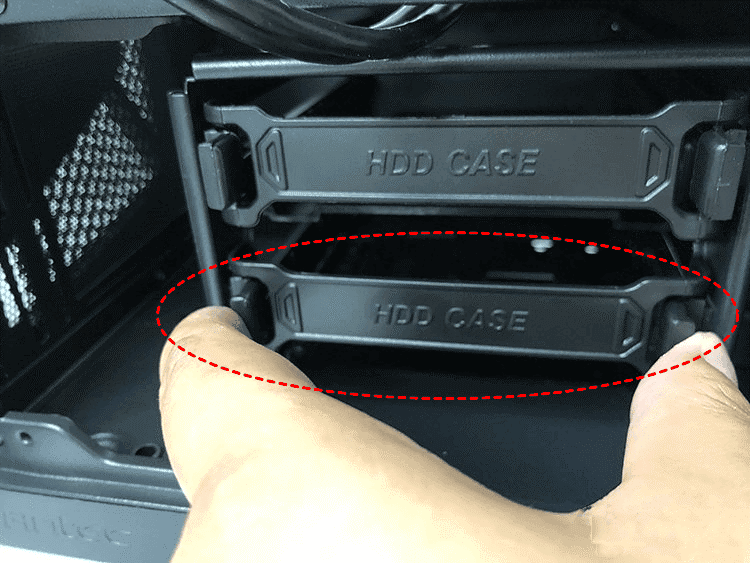
Step 1. Using my case as an example and take it out, the hard drive bay is a pull-out design.
- Turn off the computer and unplug it from power.
- Then open the side panel to find the hard drive.
- Press the clips on both sides of the bracket to remove the hard drive bay, which may require screws in some cases.
Step 2. Confirm the hard drive connector.
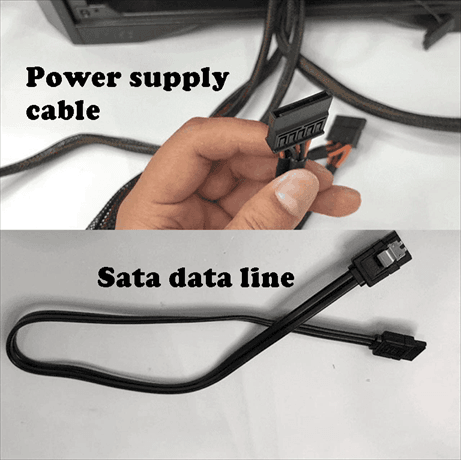
- Find the power supply section of your computer and then confirm SATA interface.
- Find the SATA data line. This line is usually included with the motherboard.
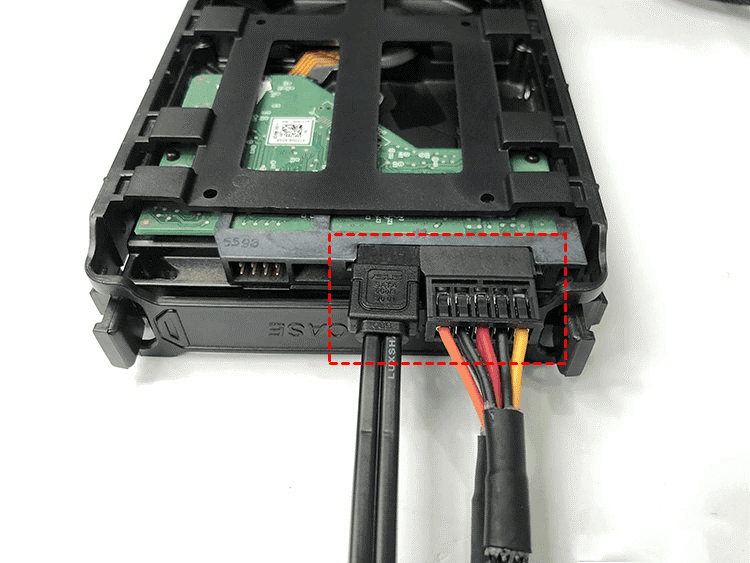
Step 3. Install the hard drive into the hard drive bracket and plug the SATA data cable and power interface into the HDD, which typically has a dummy-proof design preventing incorrect insertion.
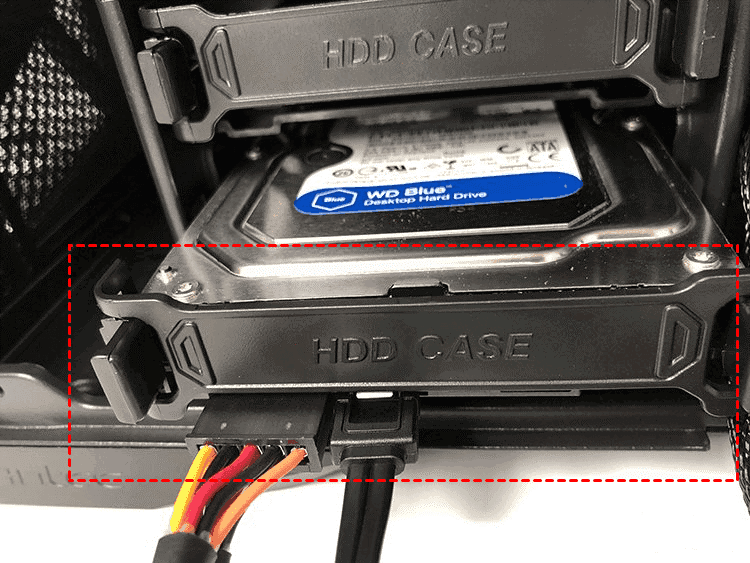
Step 4. Push the HDD with the bracket installed into the drive bay and make sure the clips are tight.
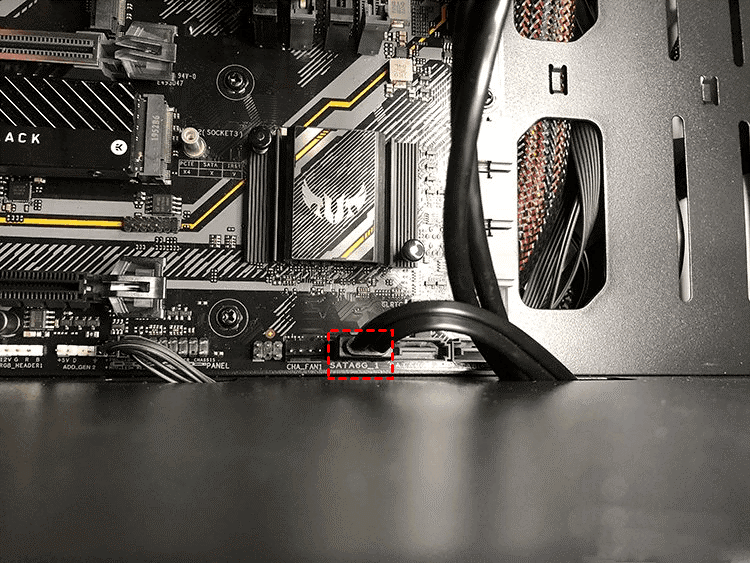
Step 5. Connect the drive to the motherboard using the other end of the SATA cable. Now the HDD is successfully installed
Install a Second internal SSD to a Windows 10 PC Host
SSDs have different physical interfaces, the most common being SATA and M.2 interfaces.
- SATA interface. The interface type of SSD is consistent with HDD, resulting in relatively slow read and write speeds. Additionally, an extra power supply is required, and the data transfer mode involves a sequence of SSD → memory → CPU → memory → SSD.
- M.2 interface. This type of SSD is compact and doesn't occupy much space, with M.2 NVMe providing fast read and write speeds that meet most users' needs, utilizing a direct SSD-to-CPU-to-SSD data transfer method.
Since SATA interface SSDs are the same as HDDs, I will focus on M.2 interface SSDs in the following tutorials, which have a different installation method.
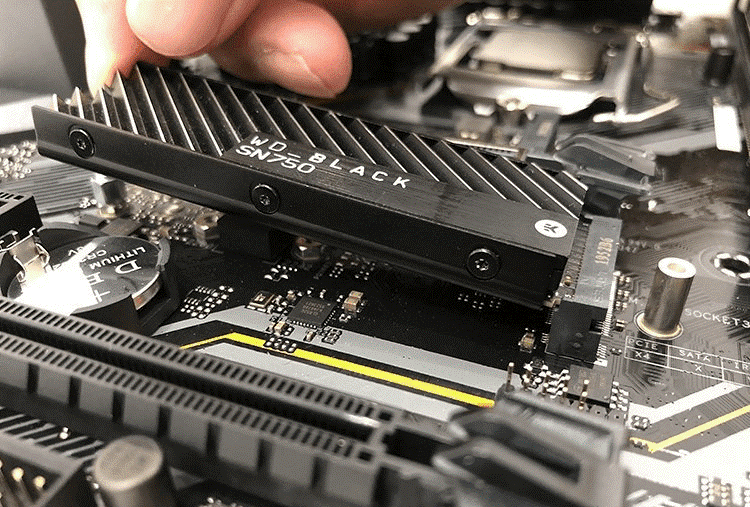
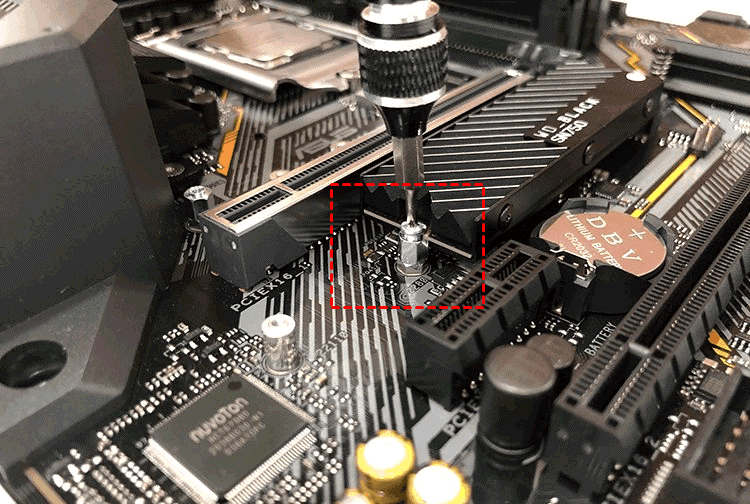
Step 1. Find M.2 slot location and fix the base screw.
- Turn off the computer and unplug it from power.
- Then, open the computer case and find the motherboard.
- The M.2 slot is usually located near the CPU on the motherboard and is designed for M.2 2280 SSDs, which are the mainstream size for consumer systems. This size is 22mm wide and 80mm long, making it a popular choice for storage upgrades.
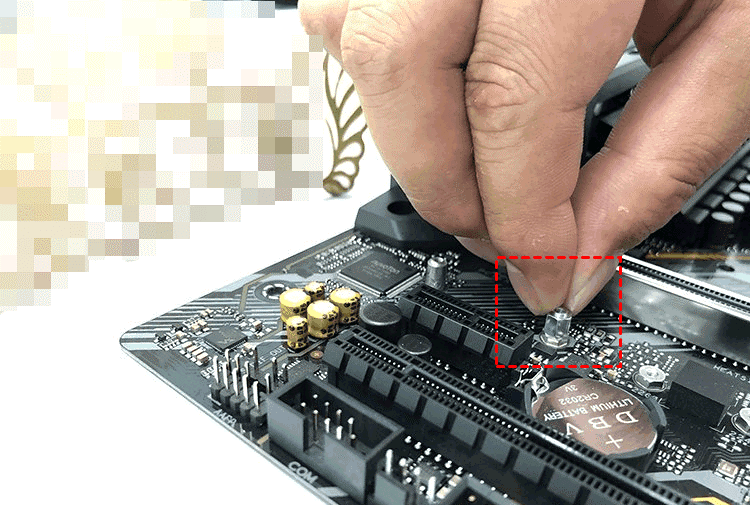
- Take out the copper studs and small screws.
- Screw the copper studs into the third hole and tighten it.
Step 2. Remove the M.2 SSD from the device by taking out the M.2 SSD. Align the gold finger on the M.2 SSD with the M.2 slot on the device, then gently push the M.
Step 3. Install the second M.2 SSD, tighten the screws, and fix the other end of the SSD, then plug it in and reboot your computer.
- ★Tips:
- If you're installing a second drive and it's an SSD with a SATA interface, plug it into the smallest serial number socket. This is usually labeled as SATA6G_1, SATA6G_2, etc., with the lowest number having the highest priority. This ensures proper boot order and prevents potential issues.
- If your system is stored on a SATA interface SSD, but the HDD is plugged into the lowest numbered SATA socket, it may prevent the operating system from loading correctly. To resolve this, plug the system disk into the lowest numbered SATA socket or change the boot drive to SSD in the BIOS settings.
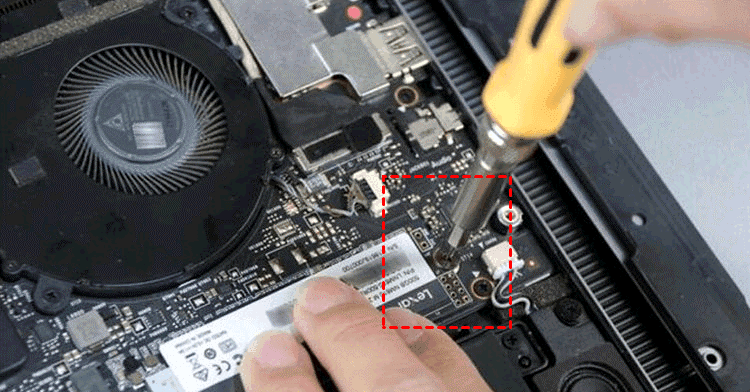
how to Install a second internal SSD in laptop:
To install an M.2 drive, the process is similar for laptops and PCs. For laptops, you remove the bottom cover to access the M.2 slot, insert the drive, and then tighten the screws to secure it in place. This straightforward method allows for easy installation of the M.
How to Make My Windows 10 Recognize a Second Internal Hard Drive
After installing a second hard drive, initialize the disk, set the correct partition format, and create partitions for Windows 10 to recognize it.
Recommended partition format:
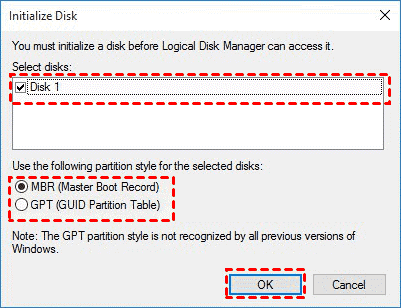
- If your hard drive space is 2TB and below, you can choose MBR.
- If your hard disk space is 2TB and above, choose GPT.
Initialize the Disk
Step 1. Open Disk management. Press Windows + R key and type diskmgmt.msc in the Run window, then press Enter.
Step 2. If it's a newly installed drive, the system will automatically prompt you to initialize it. You'll need to select either MBR or GPT, depending on the drive's size.
Format the Disk
To format and create a partition for your disk, follow these steps: right-click on the disk, select "Format", choose a file system, assign a label and allocation unit size, and click "
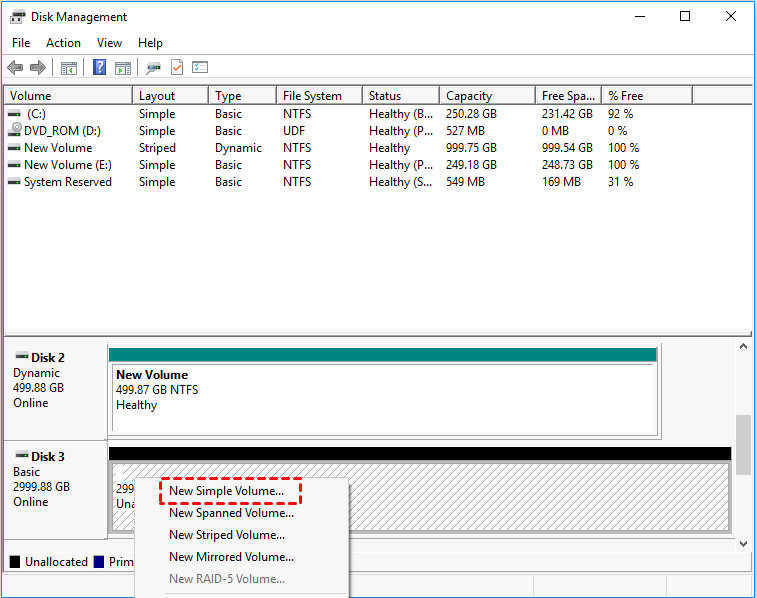
Step 1. Find the disk you install, right-click the black-marked unallocated space and select New Simple Volume.
Step 2. It will ask you for a specific size, file system, etc, just do as prompted.
Step 3. Wait until the process is complete, you will see a new partition. Right-click it and select Format in the drop-down menu, unchecking Perform a quick format to run a full format. This will check the hard disk and fix common errors.
How to Perform System or Data Migration After Installing a Second Hard Drive
After initializing and formatting a hard drive, you can use it normally. If it's an SSD, you can then perform a system migration to improve computer performance. If it's a traditional hard drive, you can transfer files to another drive, which may require a reliable migration software like Qiling Disk Master Professional.
- To migrate a system from a Hard Disk Drive (HDD) to a Solid State Drive (SSD), you can use the Clone feature, which enables you to clone the entire system or just the operating system, including features like MBR and GPT disks. This process can also enhance the SSD's performance, resize partitions, and convert disk types during the cloning process.
- To transfer files, use the Sync feature, which preserves the original file structure and allows syncing from source to destination or two-way syncing. This feature can also be scheduled for continuous data protection.
To get started, please download Qiling Disk Master Professional at first.
The clone feature can only be demonstrated in the trial version, so please upgrade to the pro trial version (with a 10% discount) to perform the cloning process.
Easily Migrate System From HDD to SSD in Windows 10
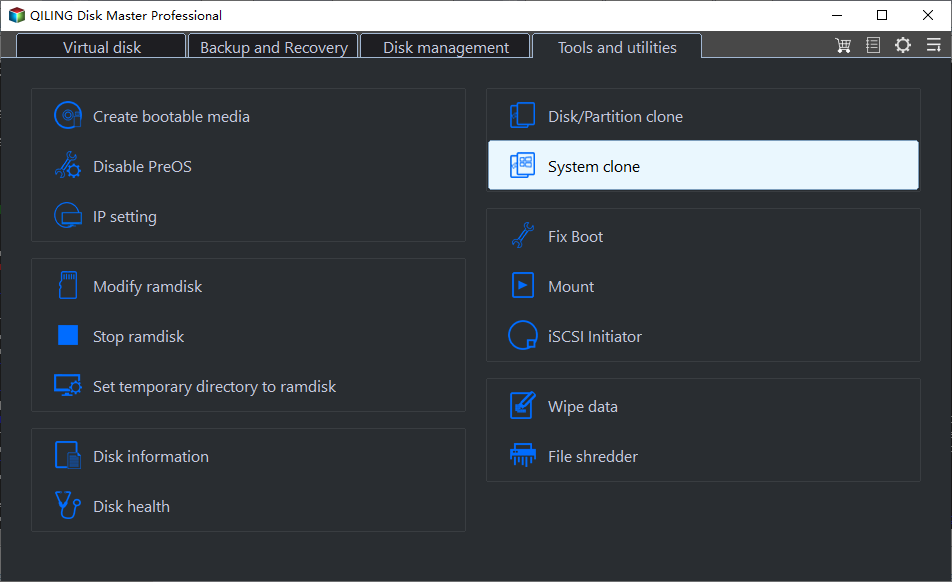
Step 1. To clone a disk, ensure the target disk has enough capacity to hold the data from the source disk. Check the used space on both disks and confirm the target disk is at least as large as the source disk. Then, use the software to clone the disk by selecting Clone, followed by System Clone in the interface.
- For MBR disks: The system partition and the system reserved partition will be transferred.
- For GPT disks: In addition to the system partition, the EFI system partition and the MSR partition will be transferred to the new hard drive simultaneously.
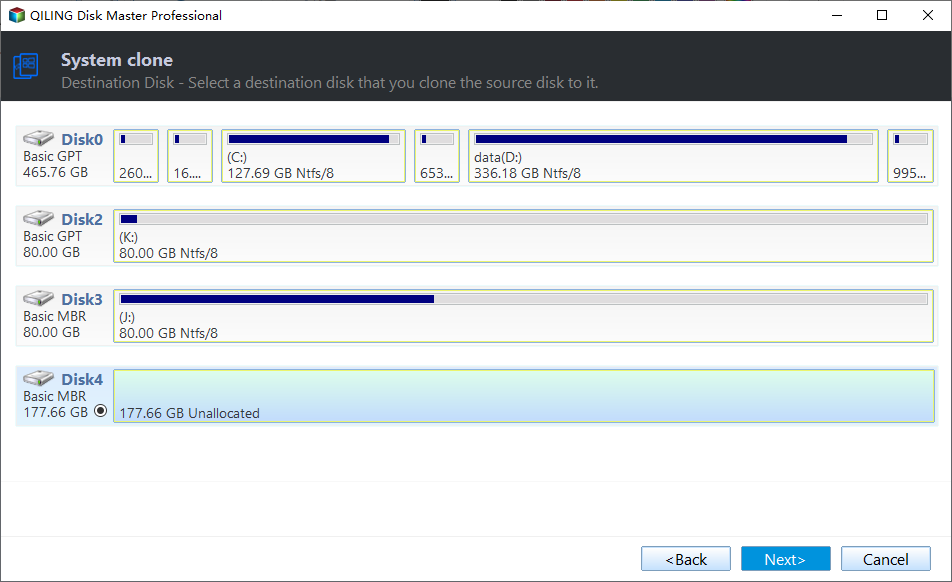
Step 2. Select the target SSD for system migration and then click Next.
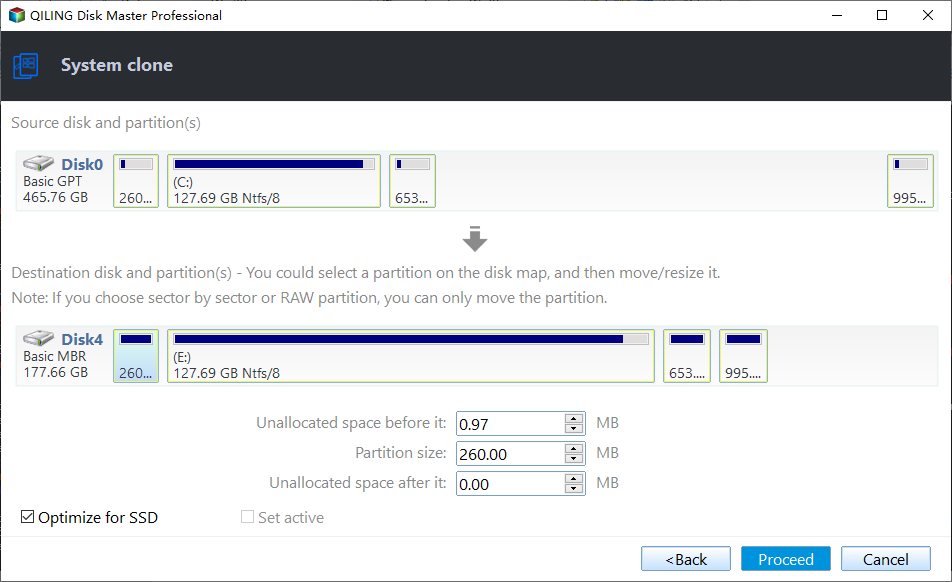
Step 3. After migrating the OS from a HDD to an SSD, it's recommended to check the SSD alignment to enhance reading and writing speed. Then, preview the operation and click Proceed to complete the system migration.
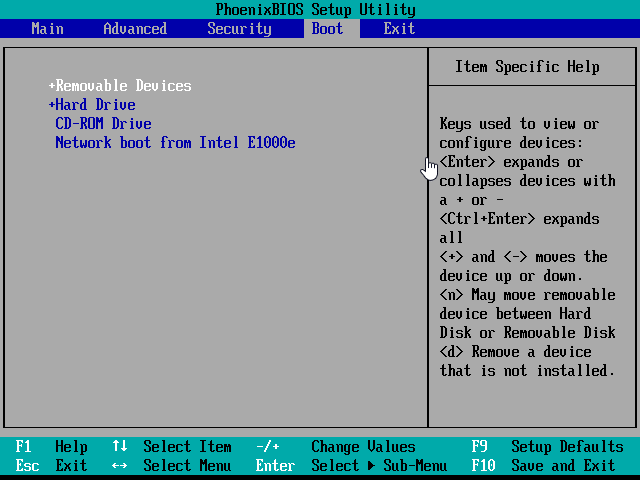
Step 4. After cloning is complete, simply reboot your computer. If it fails to boot correctly, you may need to change the startup sequence in the BIOS and reboot again.
- ★Tips:
- You can create a bootable USB to migrate your system without loading Windows.
- This version only supports Windows 11/10/8.1/8/7/XP/Vista, but can be migrated to Windows server 2022/2019/2016/2012 R2/2008 R2/2003 using Qiling Disk Master Server.
Transfer files from one hard drive to another in Windows 10
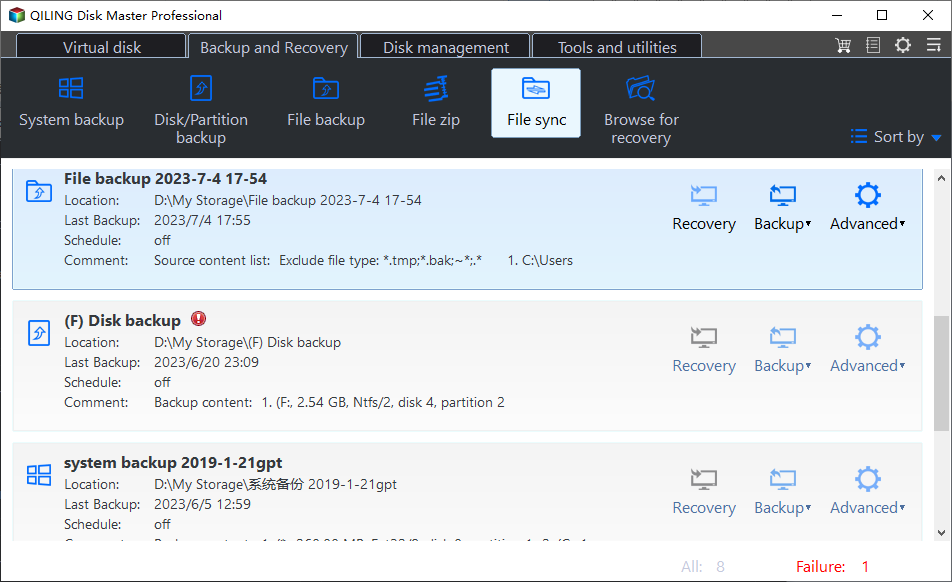
Step 1. Launch Qiling Disk Master Professional again. Then, switch to Sync and Basic Sync.
You can also use other sync modes:
- Real-Time Sync monitors and synchronizes files and their changes in real-time, ensuring that all data is up-to-date and consistent across all systems.
- Mirror Sync: The biggest advantage of mirroring a folder is to prevent others from arbitrarily adding, modifying, or deleting files.
- Any change in both the source and destination directory will be synced to the other side, ensuring that both locations have the same files and updates.
Step 2. Click Folder to select files on the old disk. Then, select the second hard drive in This PC.
Step 3. Confirm the source and destination directory, click Proceed to transfer files from one hard drive to another. In daily use or for long-term data protection, consider features such as automatic backups, versioning, and encryption to ensure the integrity and security of your data.
👍 Daily, Weekly, and Monthly Sync: In daily sync, the backup task can be run every hour.
👍 Event Triggers: You can sync files at specific events like system shutdown, startup, user logon, and user logoff.
👍 USB plug in: You can sync files to a USB drive automatically without needing to physically connect it every time.
👍 Wake up computers and reconfigure operation after sync: Cloudflare and Google Cloud's new feature allows users to sync files during off-peak hours, without human intervention, which can be beneficial for users who want to sync files during off-peak hours.
FAQs and Solutions for Installing a Second Internal Hard Drive
You may encounter some problems during installing a second internal hard drive, and you might urgently need solutions. In the following, I will list the common problems and provide some solutions.
How Do I Get the BIOS to Recognize My Hard Drive?
To verify if the BIOS detects a newly installed hard drive, check the BIOS settings by entering the BIOS setup during boot-up and look for the storage or hard drive section, where the newly installed drive should be listed. If it's not listed, try booting from a live USB or CD to access the drive.
Step 1. Power off the computer completely.
Step 2. Open the computer case and unplug the data cable from the hard drive and plug it in again.
Step 3. Turn on the computer and check that the hard drive is functioning properly.
Will a Second Internal Hard Drive Slow Down My Computer?
Of course not. The hard drive is connected to the motherboard via the SATA or M.2 interface, and its installation does not impact other computer components, allowing for multiple internal hard drives without affecting the computer's speed.
How to Fix the Second Hard Drive Not Showing Up in Windows 10
Many users face the issue of their computer or device not turning on, leaving them frustrated and at a loss. If you're one of them, don't worry - there are solutions. Two possible methods to try and resolve the problem are available, which may help you get your device up and running again.
Method 1. Check for Driver Updates
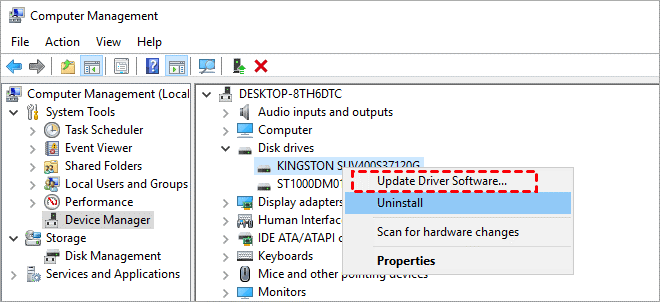
Step 1. To open the Device Manager, click the Magnifying Glass in the bottom left corner of the Taskbar, type "Device Manager" in the search box, and press Enter.
Step 2. Click Disk drives in the list, and find the newly installed drive, then right-click it and select Update Driver Software in the drop-down menu.
Step 3. If there are any updates, please follow the instructions to update accordingly.
Method 2. Change Drive Letter and Paths
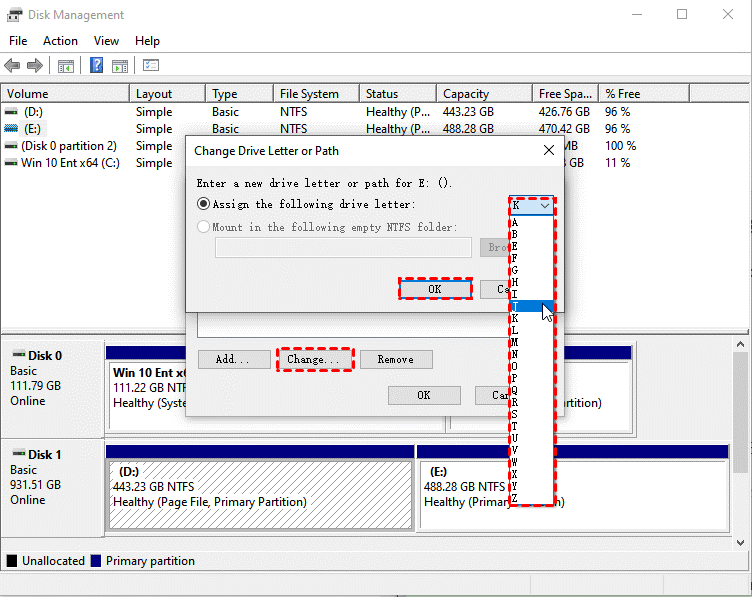
Step 1. To access the newly installed drive, right-click the Start button and select Disk Management, then open this window. Find the drive in the list, right-click on it, and select Change Drive Letter and Paths.
Step 2. Click the Change in the window and select the appropriate drive next to the Assign the following drive letter.
Step 3. Click OK again to restart your computer.
Conclusion
Installing an external hard drive is relatively easy, but it's not as stable, has relatively low performance, and will take up a usb port, making it suggested to install a internal second hard drive in Windows 10 based on your needs instead.
For larger capacity, consider installing a hard drive, while for better performance, an SSD is the way to go. After installation, ensure the new drive is recognized and perform system or data migration using the best migration software, Qiling Disk Master. For unlimited PC or server migrations, try Qiling Disk Master Technician or TechPlus edition.
Related Articles
- Move Windows 10 Installation to Another Drive (SSD/HDD) Easily
- Install Windows 10 on SSD Effortlessly and Securely | 2 Ways
- Safely Move a Windows 10, 11 Hard Drive to a New Computer
- How to Deal With a Bitlocker Partition
if you need to resize the partition which has been encrypted by Bitlocker, you need deciphering first.
