How to Make a Bootable USB for System Repair or Restore
Why make a bootable USB
During the process of using computer, all things may happen. For example: virus attack, hacker attack, delete files by mistake, old machine refuse to boot up one day, etc. In these cases, the computer may fail to boot normally, and you will need a bootable media for one of the following reasons:
Reinstallation: Reinstalling Windows is the most thorough way to solve system problems, but will also erase your settings, apps or some personal files, so this is more of a last resort when all else fails.
Troubleshooting: Windows do provide some troubleshooting options in Recovery Environment to repair the system, or run Command Prompt, enter Safe Mode, etc.
Perform system recovery: With backup created beforehand, you can also perform a full System Image Recovery using a bootable USB.
Copy important data: If your computer crashes without warning and fails to boot, you may want to save at least some of your important personal data without logging into Windows.
Now many light-weight laptops don’t have a DVD drive, and a USB stick is definitely more portable and compatible. Therefore, making a bootable USB becomes a more popular choice. Keep reading and I will introduce how to do it in Windows computers.
How to make a recovery USB in Windows 11/10/8
Since Windows 8, you can use the Recovery Drive tool to create a recovery USB. It can be used to reset or troubleshoot system problems. If you back up system files to this drive, you’ll also be able to reinstall Windows.
✤Preparations:
- To create a bootable USB with this tool, you need a USB drive that is at least 16 gigabytes.
- The data stored on USB drive will be erased in the process, so it’s better to use an empty USB. Otherwise you can backup the USB drive first.
How to make a recovery USB in Windows:
1. Connect the USB to your computer and make sure it can be detected.Then search for “recovery drive” on the taskbar and launch it.
2. Tick Backup system files to the recovery drive if you want the ability to reinstall Windows, then click Next to continue.

3. Wait for a while, and select the detected USB drive. Then click Next.

4. Then click Create to make the recovery drive. After finishing, eject the USB.

How to use the bootable USB created by Recovery Drive:
1. When your PC breaks down and fail to boot Windows, insert the USB and restart the computer. If it can’t boot into the recovery environment, then press the required key to enter BIOS and select the USB as the first boot option.
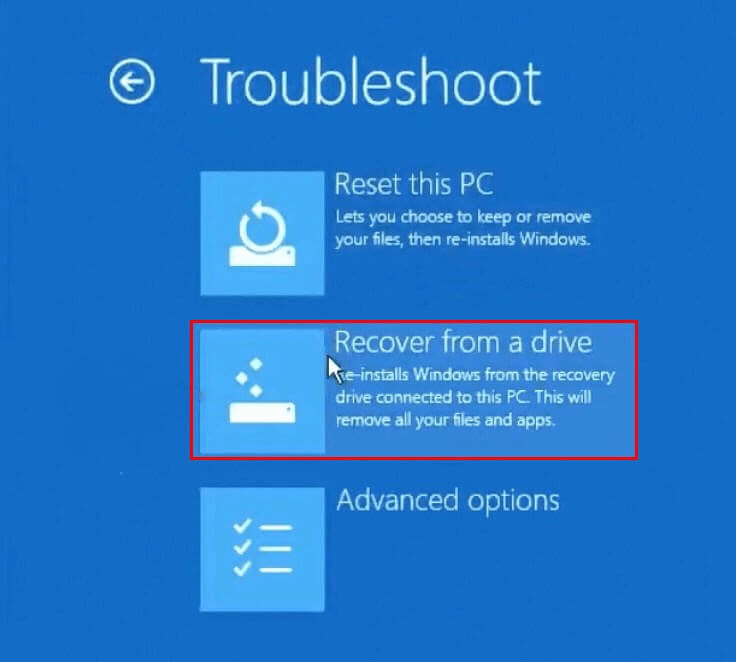
2. Choose the keyboard layout and choose Troubleshoot. Here are 2 options: Recover from a USB and Advanced options. Choosing the former will lead to Windows reinstallation, and the latter will lead you to normal recovery options.
This kind of recovery USB can help you fix system issues and make the computer work normally again. If needed, you can also perform System Restore or System Image Recovery to bring the computer back to an ealier state, but the whole process is quite complicated.
It may take much time to do all the preparations but fail for a small mistake, like unable to create recovery drive, unable to create system image backup, Windows cannot find system image on this computer, etc.
If you want to avoid these situations, and take a simpler approach to repair or restore system, you could try another free tool that is more complitable and powerful.
How to make a bootable USB with complete features in Windows
Qiling PE Builder is a freeware designed to build an easy and complete WinPE-based bootable media. It is more powerful than a recovery USB, because in the bootable environment based on Windows PE, you can do many things, such as recover files, anti virus, fix errors, etc, in a word, try to make your system boot well again.
👉How can this bootable USB created by PE Builder help you:
Computer breaks down suddenly - Rescue system with tools snap-in the Windows PE.
Infect virus - Transfer data and pack offline version of antivirus software to kill virus.
Maintain computer with tools snap-in the bootable USB created by Qiling PE Builder.
For better disk and partition management - Use Qiling Parititon Assistant snap-in the Windows PE.
Forget Administrator password - Change or remove login password with NTPWEdit tool.
If you've used Qiling Disk Master to backup system - Recover the system easily once your computer breaks down.
With Qiling PE Builder, you only need few steps to create a bootable media. Download the freeware and follow the concrete steps:
1. Download it from the official website, install and open. A cool and deep black main screen will be appeared to you:

2. In this step, you can embed some 3rd party portable tools and drivers for custom bootable media.

3. Qiling PE Builder supports Windows 10, 8.1/8, 7, Windows Server 2008 R2 and Windows Server 2012. Usually, there is no need to download and install WAIK or ADK.

4. Here, of course, choose the second option: USB boot device. Then click “Proceed” to commit.

5. Wait a moment, create USB boot disc will be succeed as above show. Click “Finish” to exit.
When you want to use the bootable USB. You should adjust boot order as USB device to enter Windows PE system. The remaining steps and notes please visit: PE Builder Help Guide
Summary
Using Qiling PE Builder to make a bootable USB is free and easy. The Windows PE made by Qiling PE Builder comes with Windows desktop, Explorer, start menu, taskbar and so on. So people can operate easily in the environment.
Related Articles
- (Free) Copy Bootable USB to another USB in Windows 7/8/10 Efficiently
- Create Windows PE or Linux Bootable Media with Qiling Disk Master
- Clone Hard Drive from Bootable USB with Easy & Free Way
- Best Ransomware Rescue Disk for Data Protection (Free)
To get encrypted files back after ransomware virus attack, you need to create a ransomware rescue disk. The stepwise guide are in the following.