Move Data from Windows 7 to Windows 10 | 5 Ways
- The Case: Windows 7 to Windows 10 Migration
- Why Move Data from Windows 7 to Windows 10 Computer?
- How to Transfer Data from Windows 7 to Windows 10?
- Solution 1: Move Data to OneDrive
- Solution 2: Copy and Paste to External Hard Drive
- Solution 3: Migrate Windows 7 to Windows 10 with Windows Backup and Restore
- Solution 4: Windows Easy Transfer Windows 7 to Windows 10
- Solution 5: Best Free Windows 7 to Windows 10 Migration Tool
- Conclusion
The Case: Windows 7 to Windows 10 Migration
"You can use the built-in Windows 10 feature called 'File History' to automatically back up your important files from your old Windows 7 PC. You can also use a cloud storage service like OneDrive to backup your files. Alternatively, you can use a third-party backup software to transfer your files to the new PC."
When upgrading from Windows 7 to Windows 10, you may encounter the issue of moving data from the old computer to the new one. This is a common situation that can be resolved by following a few simple steps. To transfer your files, programs, and settings, you can use the built-in Windows 10 feature called "Ease of Access" or third-party software like EaseUS Todo PCTrans or Acronis True Image.
Why Move Data from Windows 7 to Windows 10 Computer?
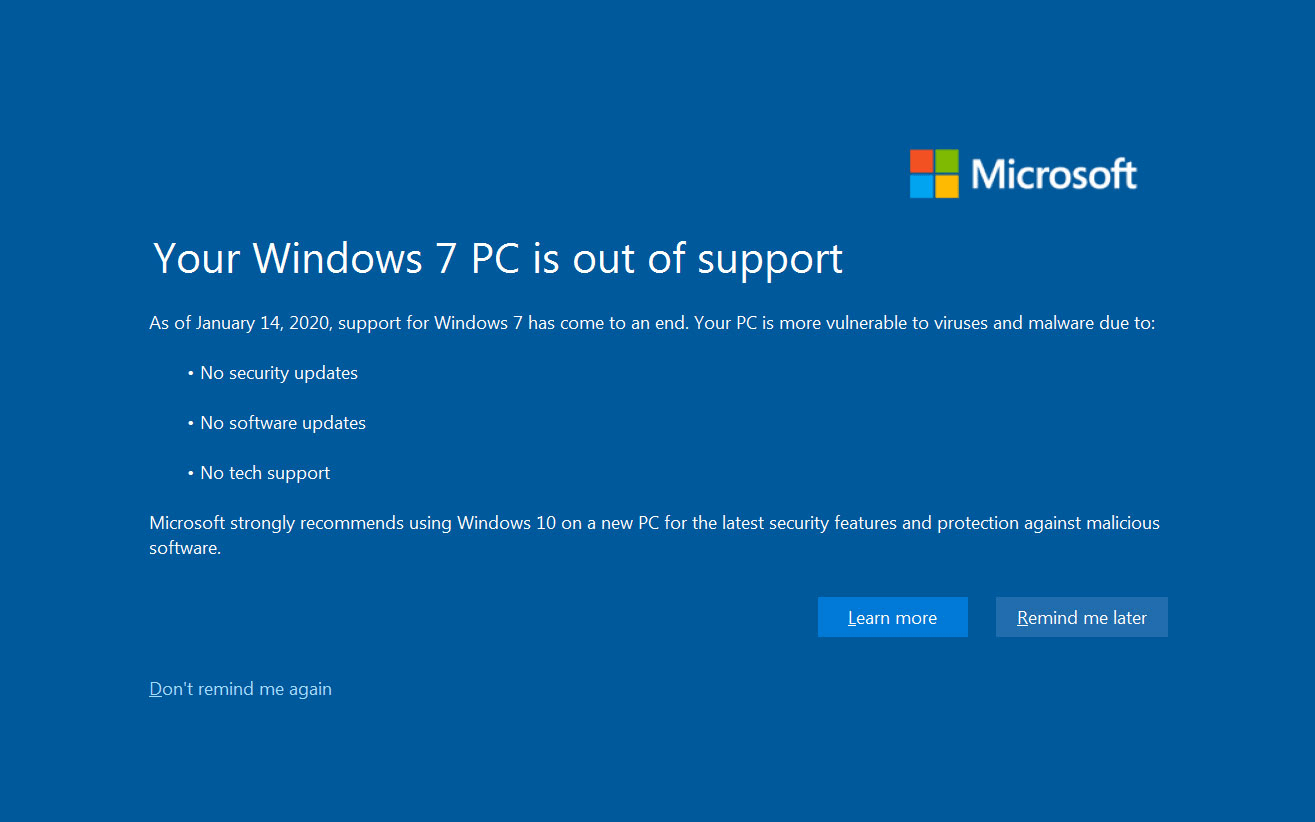
Windows 7 PCs are at risk due to the end of support on January 14, 2020, as Microsoft will no longer provide security updates, software updates, or technical assistance, making them vulnerable to security threats.
You can still use Windows 7, but only for a limited time and with a paid update, and it's recommended to switch to Windows 10 instead.
To move data from Windows 7 to Windows 10, you can use the built-in Windows Easy Transfer tool. This tool allows you to transfer files, settings, and other data from your old Windows 7 computer to your new Windows 10 computer. You can also use a USB drive or external hard drive to manually transfer files and settings.
How to Transfer Data from Windows 7 to Windows 10?
There are multiple ways to transfer files from Windows 7 to Windows 10, including using a USB drive, cloud services such as OneDrive or Google Drive, network sharing, and third-party file transfer software.
✍Copy and Paste to External Hard Drive
✍To migrate Windows 7 to Windows 10 using Windows Backup and Restore, create a system image of the Windows 7 installation on an external hard drive. This will capture the operating system, installed programs, and user data.
✍Windows Easy Transfer Windows 7 to Windows 10
✍The best free Windows 7 to Windows 10 migration tool is the easiest way to move volume data.
Solution 1: Move Data to OneDrive
If you have a OneDrive account, you can transfer files from Windows 7 to Windows 10 by moving your data to OneDrive, downloading it to your new Windows 10 PC, and then organizing them as desired.
Solution 2: Copy and Paste to External Hard Drive
To transfer data from Windows 7 to Windows 10, it's recommended to use an external storage device such as a USB flash drive, SSD, SD card, or external hard disk to copy and paste the data, and then connect it to the Windows 10 computer to move the data directly. This method can be time-consuming if there are a large amount of data to transfer.
Solution 3: Migrate Windows 7 to Windows 10 with Windows Backup and Restore
Windows Backup and Restore, a free built-in backup software in Microsoft Windows, allows you to backup all your files and folders, and then use the backup image file to restore data to Windows 10.
You may need to prepare an external storage device, such as a USB flash drive or external hard disk, to store and transfer data.
Backup your files in Windows 7 computer:
Connect the external USB flash drive or hard disk to your Windows 7 computer, and ensure it is detected by the system.
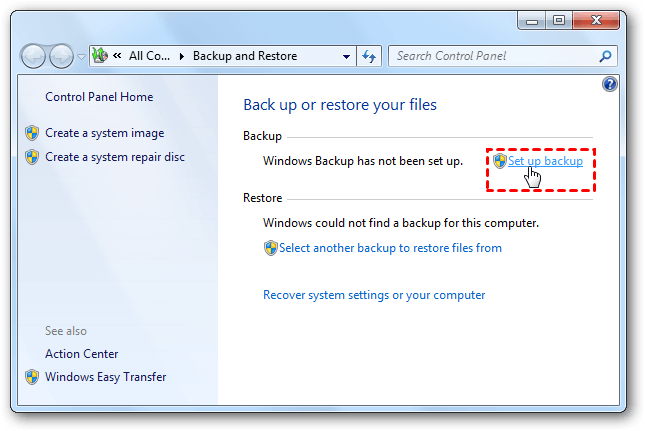
1. To backup and restore in Windows, type "Backup and Restore" in the Windows Search box, select "Backup and Restore" and hit enter.
2. To create a new backup task, click on the "Set up backup" or "Change settings" option.
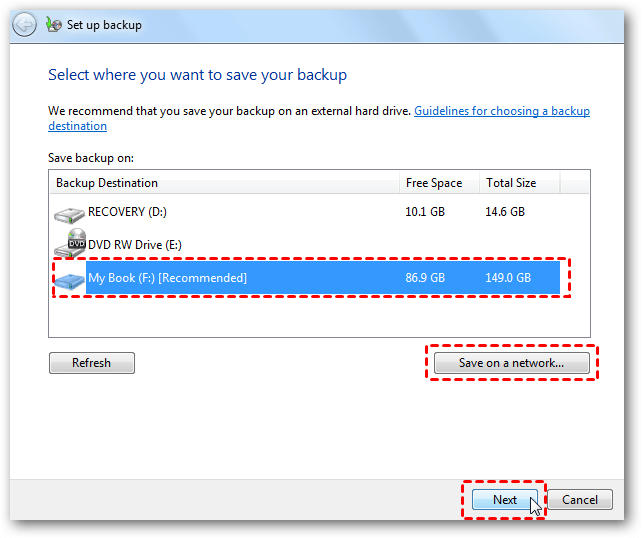
3. To save Windows 7 files, select an external storage device and click Next.
4. Tap Let me choose option, and click Next.
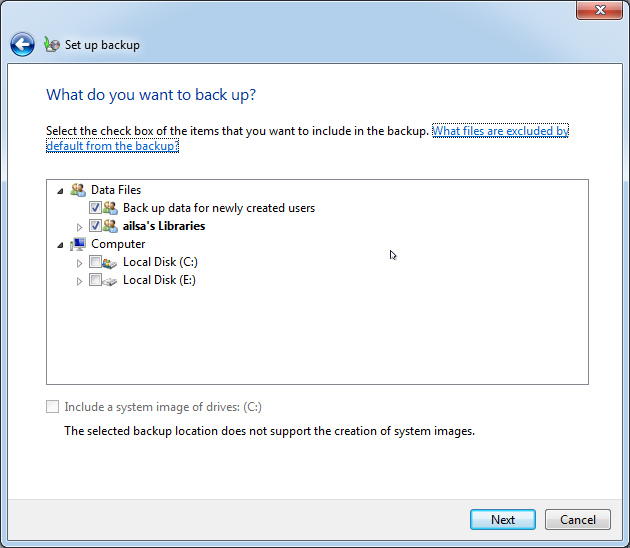
5. Select the desired data files to back up, deselect the option to include a system image of drives C: , and then proceed by clicking the Next button.
6. To disable the automatic backup schedule, click on the "Change schedule" option, uncheck the box next to "Run backup on a schedule (recommended)", and then press the "OK" button.
7. Click Save settings and run backup button.
Restore data to Windows 10 computer:
Connect the external storage device to your new Windows 10.
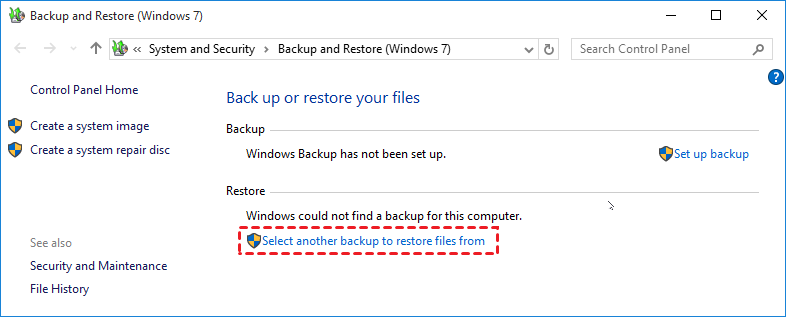
1. Open Backup and Restore (Windows 7).
2. Tap Select another backup to restore files from.
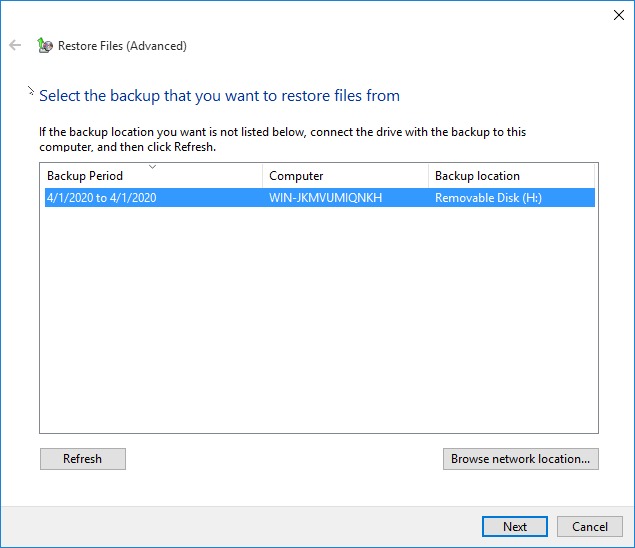
3. Choose the backup image from the external storage device and click Next.
4. Check the option to select all files from the backup, and then click the "Next" button.
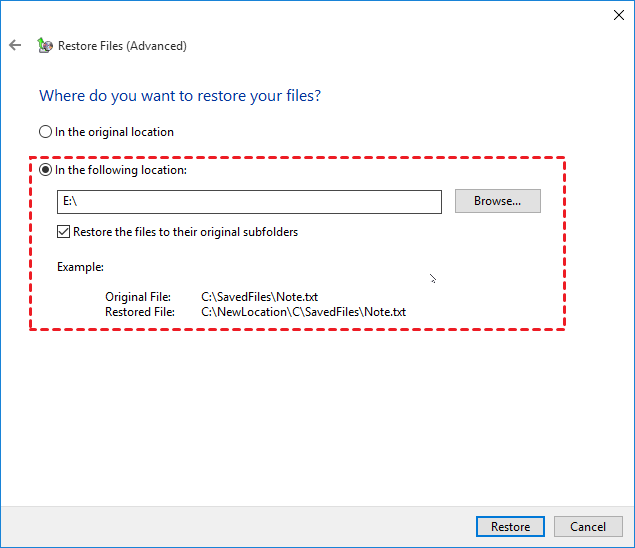
5. Click on "In the following location" and then select "Browse" to choose a destination to save the files.
6. Select Restore to move data from Windows 7 to Windows 10 computer. This will allow you to copy files, settings, and other data from your old Windows 7 computer to your new Windows 10 computer.
You can use your new Windows 10 PC as normal, but this method is a bit complex.
Solution 4: Windows Easy Transfer Windows 7 to Windows 10
Windows Easy Transfer is a built-in file transfer software that allows you to easily transfer files, photos, music, email, programs, settings, and more from an old computer to a new one with just a few clicks, but it does not support transferring from Windows 7 to Windows 10.
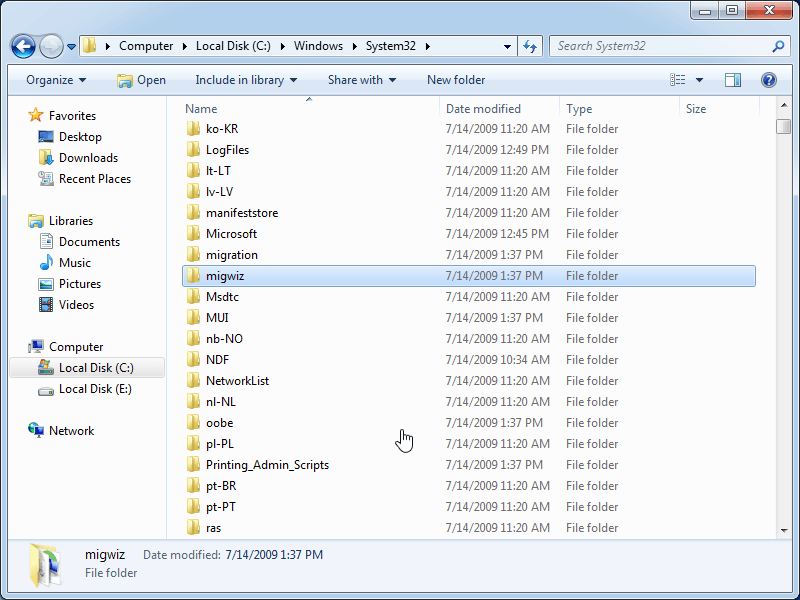
Unfortunately, you can't copy the migwiz folder from Windows 7 to Windows 10 and expect it to work seamlessly. The Windows Easy Transfer Wizard in Windows 7 is not compatible with Windows 10, and attempting to copy it may cause errors. To transfer data, you can use the built-in Settings app in Windows 10, or third-party software like AnyTrans or Wondershare, which can help you transfer files, settings, and other data from Windows 7 to Windows 10.
I've successfully tested the migration from Windows 7 x64 to Windows 10 Enterprise x64, and it was successful.
Note: A Windows Easy Transfer's migwiz folder taken from a 32-Bit PC will not run on a 64-Bit PC and vice versa.
Solution 5: Best Free Windows 7 to Windows 10 Migration Tool
You can also migrate Windows 7 to a new Windows 10 computer using the Qiling Disk Master Standard tool, which is highly recommended. This tool allows for easy transfer of files, folders, partitions, or even entire hard disks across all Windows versions, including XP, Vista, 7, 8, 8.1, and 10 (all editions and bit versions). To get started, download and install Qiling Disk Master Standard on the new Windows 10 computer.
Before migrating from Windows 7 to Windows 10, it's essential to prepare by taking care of a few things to make the process smoother. This includes ensuring that your system meets the minimum hardware requirements for Windows 10, backing up all your important files and data, and updating your drivers and software to be compatible with the new operating system.
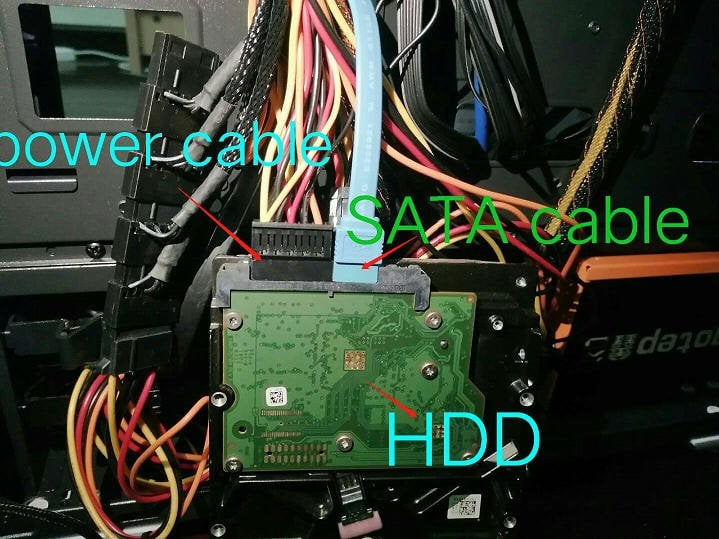
1. Screwdrivers are used to take out the HDD/SSD on your old Windows 7 computer carefully.
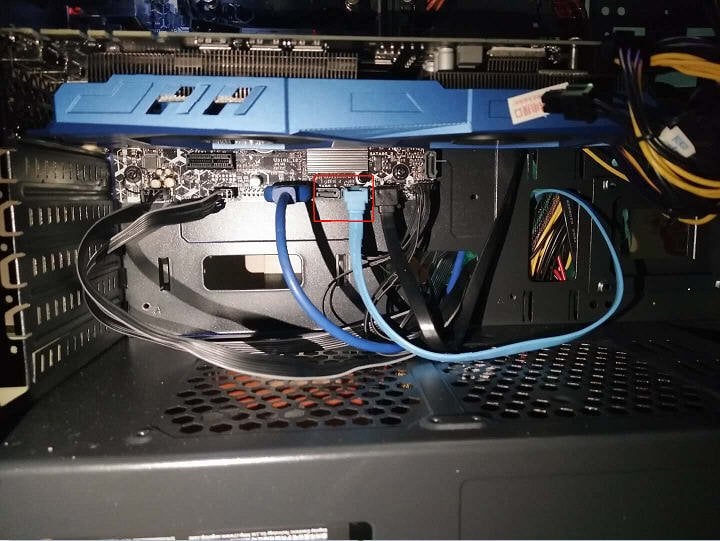
2. The SATA cable is used to connect the old Windows 7 HDD/SSD to the new Windows 10 machine, allowing for data transfer and potentially upgrading the old drive to work with the newer operating system.
3. Connect the power cable on the Windows 10 machine, and connect it to your old HDD/SSD.
The SATA cable should be connected to the motherboard's SATA port.
After upgrading to Windows 10, power on the new computer and transfer data from Windows 7 to Windows 10. Since the data partition is usually separate from the Windows system partition, you can use Partition Clone to clone each data partition individually. This will allow you to transfer all files from Windows 7 to Windows 10 with ease, following the steps outlined in the guide.
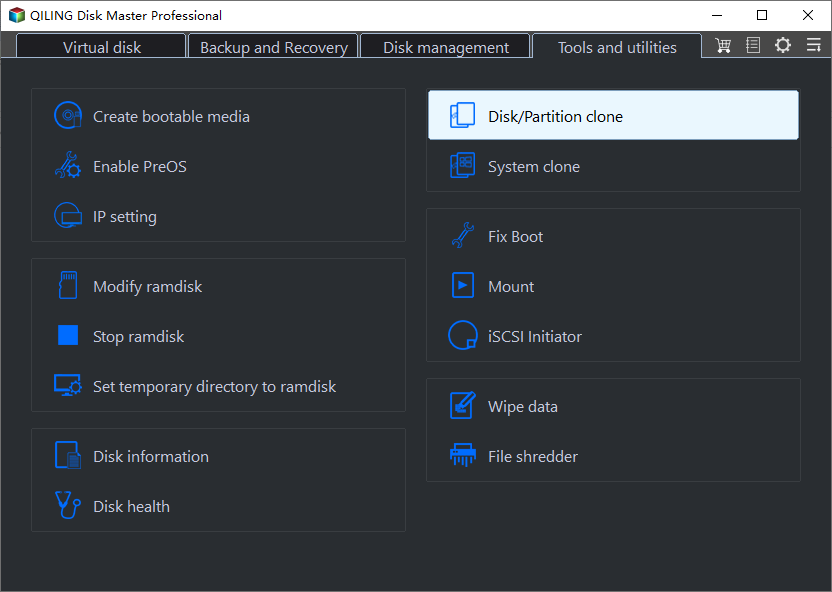
1. To clone a partition, click on the "Tools and utilities" tab, then select "Partition Clone" from the drop-down menu on the main interface.
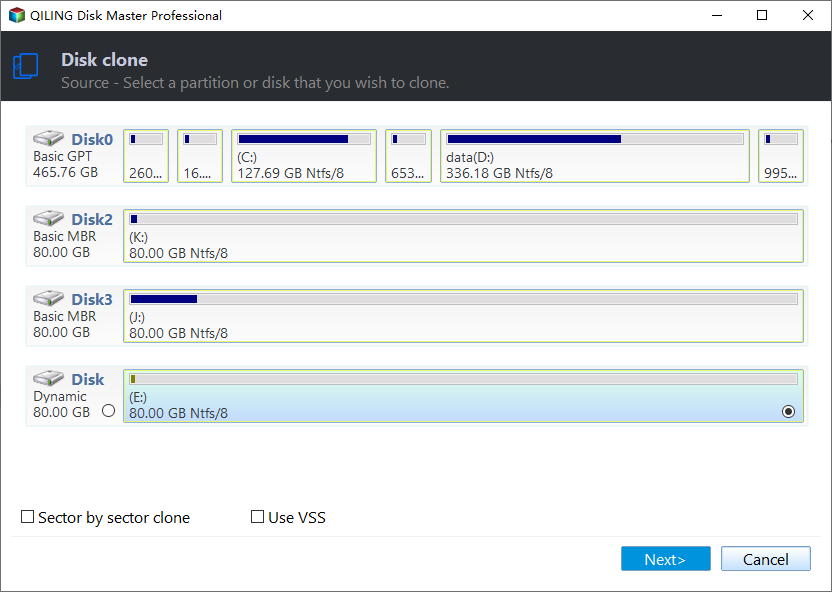
2. Select a Windows 7 source data partition to clone, and click Next.
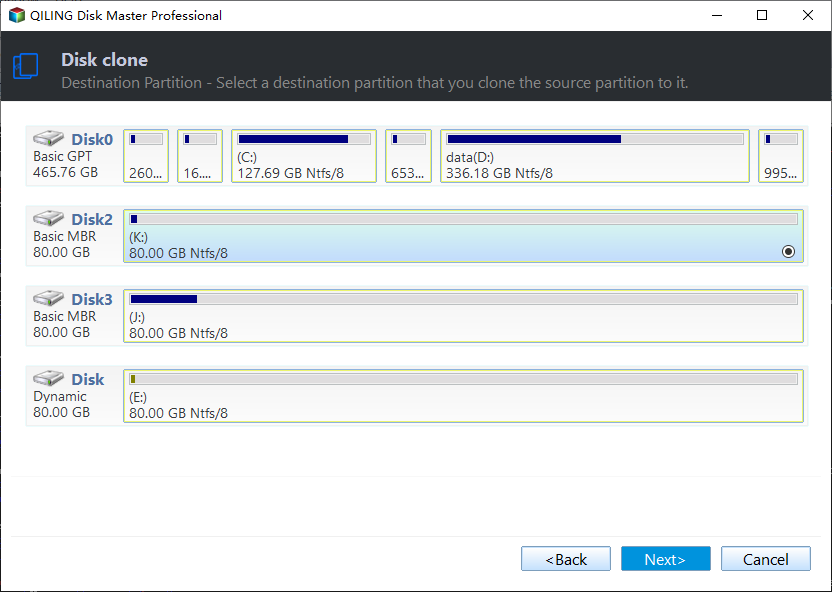
3. To transfer data from Windows 7 to Windows 10, choose a Windows 10 partition to save the data, and then click Next.
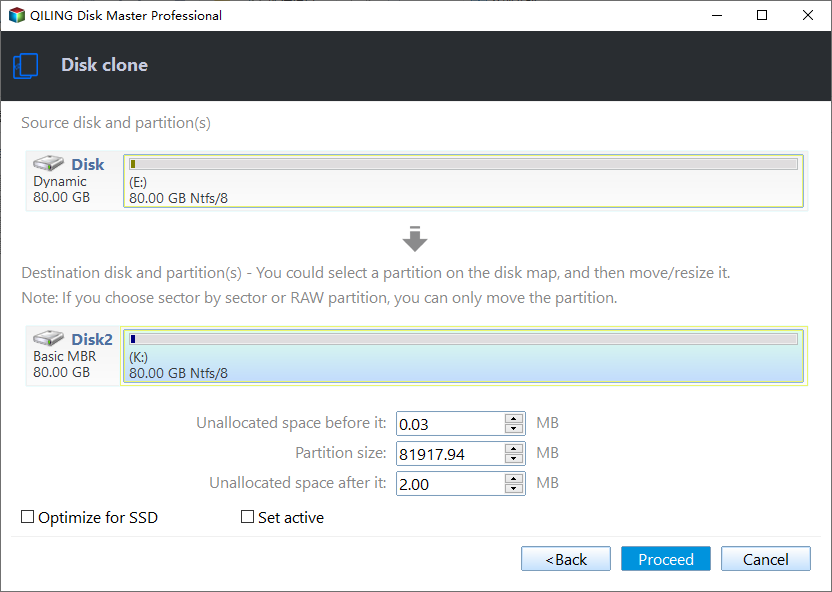
4. To move data from the Windows 7 partition to the Windows 10 partition, you can proceed with the process. This will involve copying the files and folders from the older Windows partition to the newer one, effectively transferring your data to the newer system.
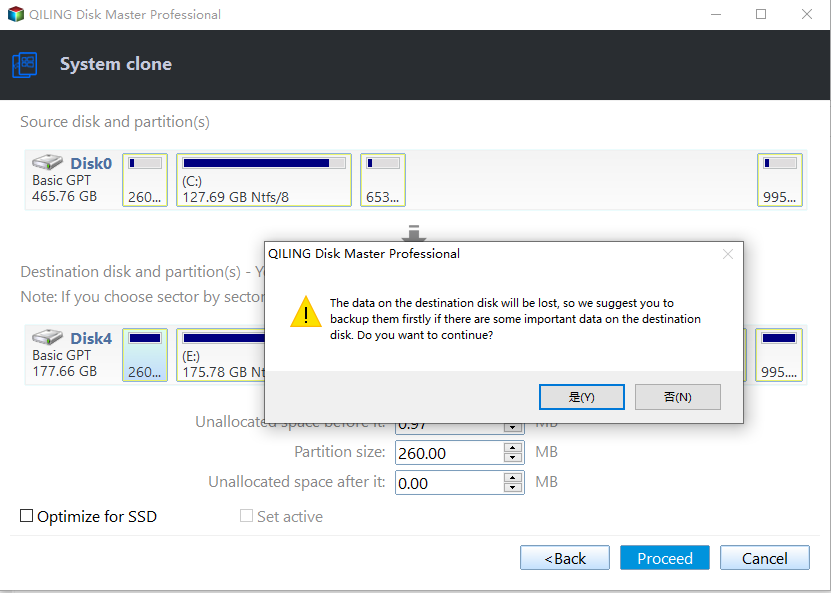
Click OK if prompted for the deletion of the destination partition.
Tips:
☝If the destination partition is on a solid-state drive (SSD), select the "SSD Alignment" option.
☝To clone a Windows 7 partition, select the "Sector by sector clone" option to clone all sectors on the partition, regardless of whether they're in use or not. However, do not enable this option when cloning a larger partition to a smaller one.
After cloning a Windows 7 system, you can get an exact copy of the data files. If you're cloning a smaller partition to a larger one, you'll have unallocated space left over, which can be merged with other partitions.
In Windows 7, you can back up multiple partitions to an external hard drive, and then restore them to Windows 10. Additionally, you can perform a disk clone, which copies all data, including the operating system, programs, settings, drivers, and files, from the source disk to the destination disk.
Conclusion
Moving data from Windows 7 to Windows 10 is a straightforward process with the right tool. Qiling Disk Master Standard is a suitable and free option that not only allows you to clone your data but also provides a backup feature. If you have a Qiling account, you can even backup your files to Qiling Cloud.
If you are running Windows 2003/2008/2012/2016/2019 (including R2) on your computer, upgrade to Qiling Disk Master Server.
Related Articles
- Full Guide to Upgrade to Windows 10 without Losing Files
- How to Transfer Files from Old PC to New PC on Windows 7/8/10
- Transfer Files from Windows 7 to Windows 10 over Network
- How to Deploy Window 11 Image via WinPE USB Disk
The tutorial teaches you how to deploy Windows 11 image by WinPE USB disk. And methods of creating Windows 11 WinPE USB drive are also provided. Please read on.
