(Solved) No Disks Are Available for Use as a Backup Storage Destination
- The issue: No disks are available for use as a backup storage destination
- How to fix Windows server backup drive not visible
- Solution 1: Use external hard disk as backup destination
- Solution 2: Use another hard disk as the backup destination
- Solution 3: Create VHD/VHDX to store backup image
- Solution 4: Schedule backup to network share with Task Scheduler
- Solution 5: Try Windows Server Backup best alternative
- Further Reading: Choose Suitable Destination Device for Windows Server Backup
- Summing up
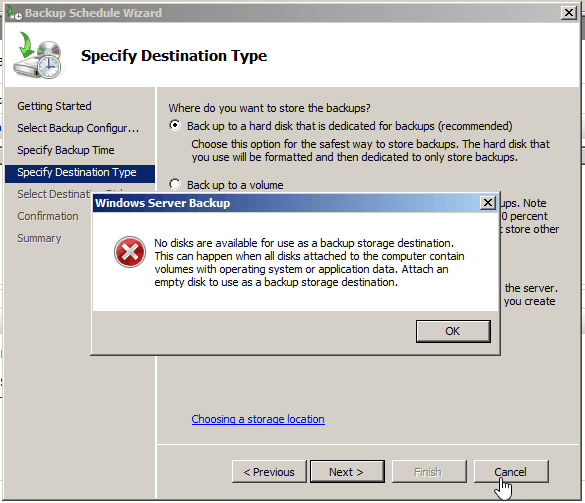
The issue: No disks are available for use as a backup storage destination
The backup process failed due to an error in the "Select destination disk" step. This error is typically caused by a permissions issue or a disk space issue. Can you check the permissions and disk space on the destination disk to see if that resolves the issue?
No disks are available for use as a backup destination, which can occur when all attached disks are hosting operating systems or application data. To resolve this, attach an empty disk to serve as a backup destination.
You're backing up to a network share and it works fine with the "Backup Once" option, but fails with the "Backup Schedule" option due to an error related to free volumes without operating system or application data.
Many users face the issue of Windows Server Backup being unable to create a backup due to a lack of available backup storage location. If you're experiencing this problem, don't worry - this article offers 5 effective solutions to help you resolve the issue and get your backups running smoothly again.
How to fix Windows server backup drive not visible
To resolve the issue of no disks being available for use as a backup storage destination, follow these steps:
Solution 1: Use external hard disk as backup destination
If your server is running Windows 2008, use an external disk as the backup storage destination instead of a network share, as the latter is not supported on this edition. Then, schedule a backup using Windows Server Backup. Note that the external disk may not always be recognized.
- If the external hard disk is not recognized, try reconnecting it to the computer and check if it's visible in Windows Explorer.
- If the external hard disk is not recognized, it may be due to compatibility issues with the Windows Server system. To resolve this, you can try updating the disk driver, checking the disk for errors, or using a different USB port. If the issue persists, consult the external hard disk manufacturer to confirm its compatibility with the Windows Server system.
Solution 2: Use another hard disk as the backup destination
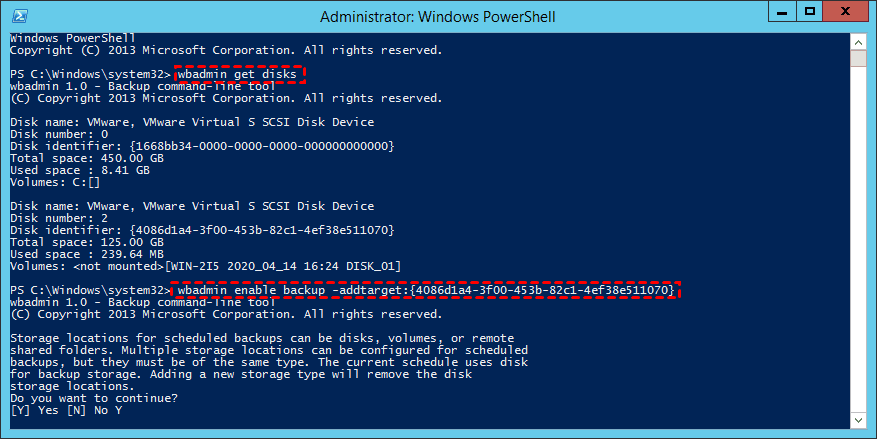
If the external disk isn't being recognized, you can use the wbadmin command to switch the backup destination to a different external hard drive or volume, and then back up again.
1. To run Windows PowerShell as an administrator, click on the "Start" button, then select "Windows PowerShell" from the list of installed applications. Right-click on the Windows PowerShell icon and choose "Run as administrator" from the context menu.
2. To get the disk identifier for your newly connected external hard disk, use the command `wbadmin get disks` in the command prompt.
3. Then input:
Wbadmin enable backup -addtarget:{4086d1a4-3f00-453b-82c1-4ef38e511070}
Tip: The {4086d1a4-3f00-453b-82c1-4ef38e511070} is your disk identifier.
4. Input Y to confirm the change.
Solution 3: Create VHD/VHDX to store backup image
To create a virtual hard drive (VHD) on your local drive or network share folder, you can follow these steps: first, create a new folder on your local drive or network share, then right-click on the folder and select "New" > "Virtual Hard Disk" to create a VHD file. Alternatively, you can use a tool like Disk Management or a third-party software to create a VHD. Once the VHD is created, you can specify it as the target disk for the Windows installation.
1. To open Disk Management, type `diskmgmt.msc` in the Run box and press Enter.
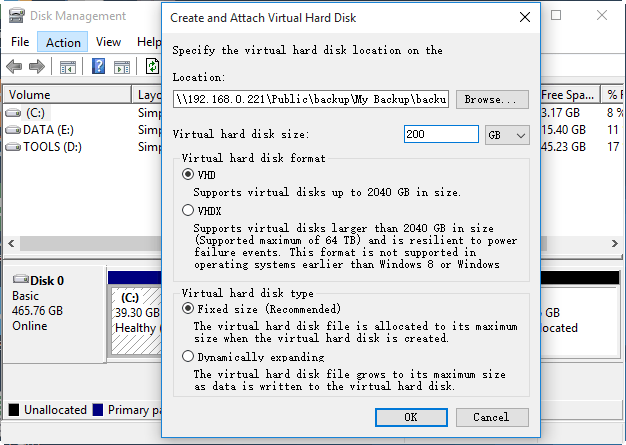
2. Click Action -> Create VHD option.
3. To create a virtual hard disk, click on "New" and select "Virtual Hard Disk" from the menu. Then, click on "Browse" to choose a location where you want to save the VHD file and select the desired disk size. Finally, click on "OK" to confirm your selections.
4. Then Initialize Disk, and select New Simple Volume.
To resolve the issue where the backup wizard cannot find any drives that are suitable for a backup destination, you can select a VHD as a backup target disk. If you need a virtual disk larger than 2TB, try creating a VHDX instead. This option is also applied if the wizard cannot find any suitable drives.
Solution 4: Schedule backup to network share with Task Scheduler
In Windows Server 2008, you can't create a scheduled backup to a network share or drive, resulting in the "no disks are available for use a backup destination" error. However, you can use Task Scheduler to achieve this.
1. Type the following command in a text file and save it as a .bat file.
Wbadmin Proceed -backupTarget:\\[Shared_Computer\dir\]\[Share name] -include:C: -vssFull -quiet
2. To run Task Scheduler in the Administrator Tools and select Create Basic Task, follow these steps: Run Task Scheduler in the Administrator Tools and select Create Basic Task.
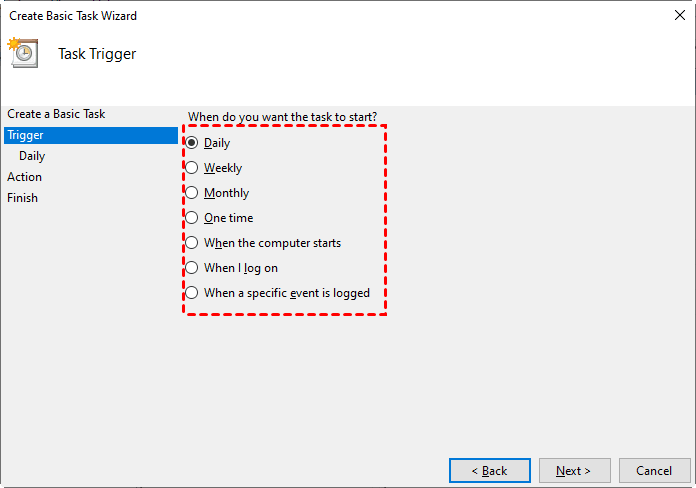
3. Create a task name and description, then choose the trigger (Daily, Weekly, Monthly, or others) to run a task.
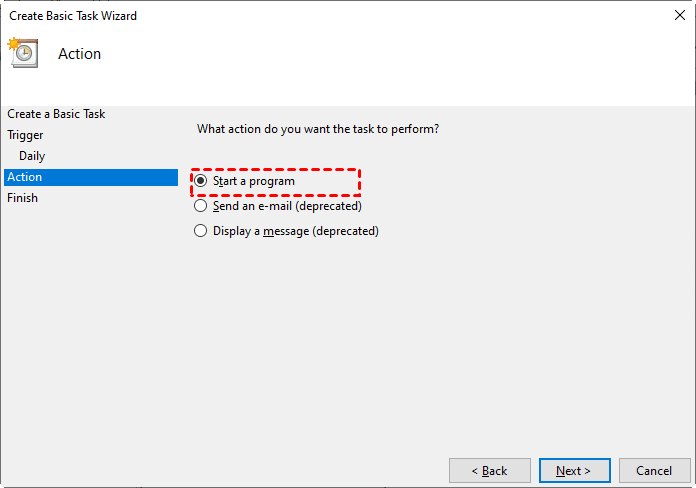
4. In the Action tab, select Start a program and browse the .bat file.
5. The scheduled task for the batch file was created, and the task will run at the specified time and frequency. The batch file will execute the specified command when triggered. Confirm and click Finish to complete the process.
Tip: For server 2008 R2 or later systems, you can directly backup to a network drive using Windows Server Backup, but keep in mind that scheduling backups to a network drive will only create one backup, overwriting the previous one.
Solution 5: Try Windows Server Backup best alternative
If the above solutions are not working or you want an easier way, try the best alternative to Windows Server Backup - Qiling Disk Master Server, which is more flexible and offers several advantages.
- The software enables automatic creation of backup images for various entities, such as the system, disk, partition, and files, which can then be saved to an external disk, USB drive, network drive, NAS, or cloud storage.
- The software supports a wide range of storage devices from various brands, including Seagate, Western Digital, Toshiba, Hitachi, Samsung, and Sandisk.
- It helps to manage disk space effectively with its backup and cleanup methods.
- The Windows Update for Business feature applies to various versions of Windows, including Windows Server 2003, 2008, 2011, 2012, 2016, 2019, 2022 (including R2), as well as Windows PCs, and also extends to Small Business Server 2003, 2008, and 2011.
To enjoy Qiling Disk Master Server, download the 30-day trial version and connect an external hard drive to your server computer, ensuring it is recognized by Windows.
Here are how to backup disk in Windows Server:
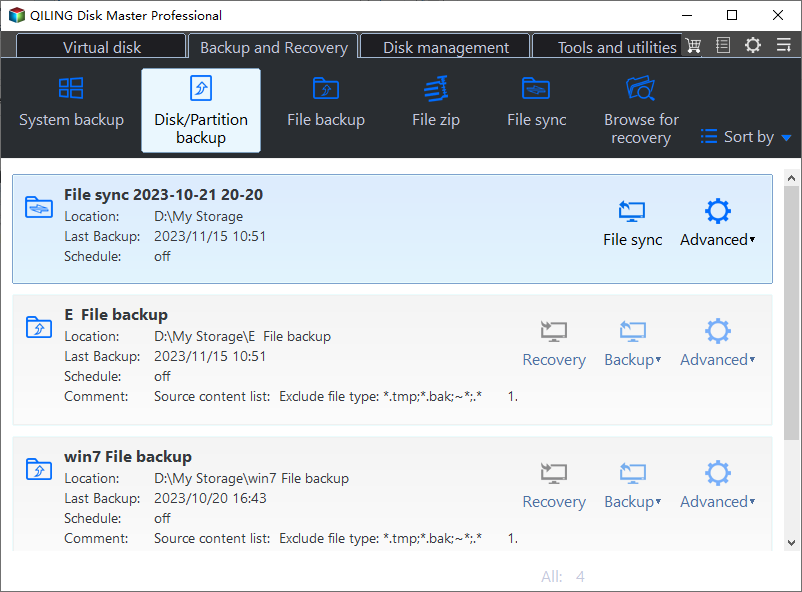
1. Run Qiling Disk Master Server, and select Backup -> Disk Backup.
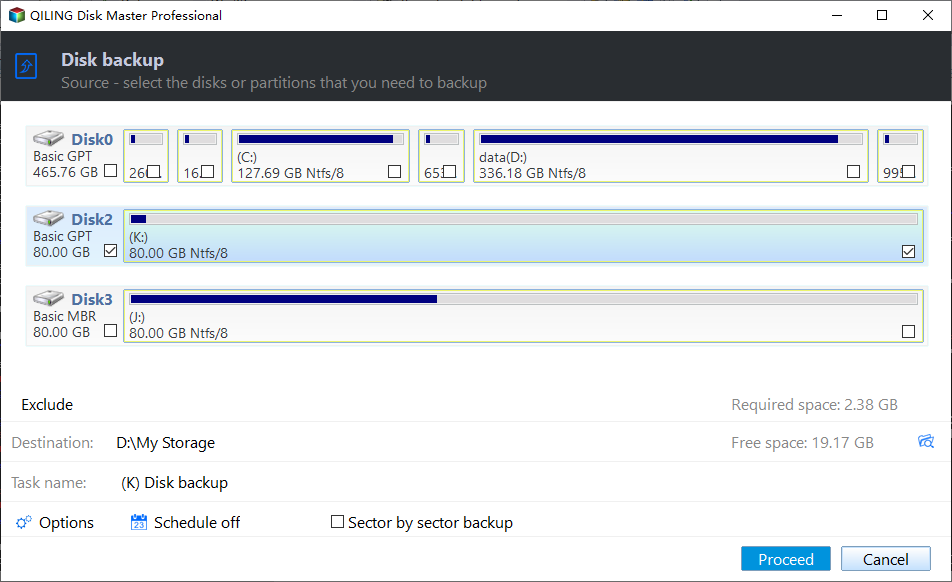
2. To begin the backup process, click the "+" button next to "Disks" and select the disk you want to backup.
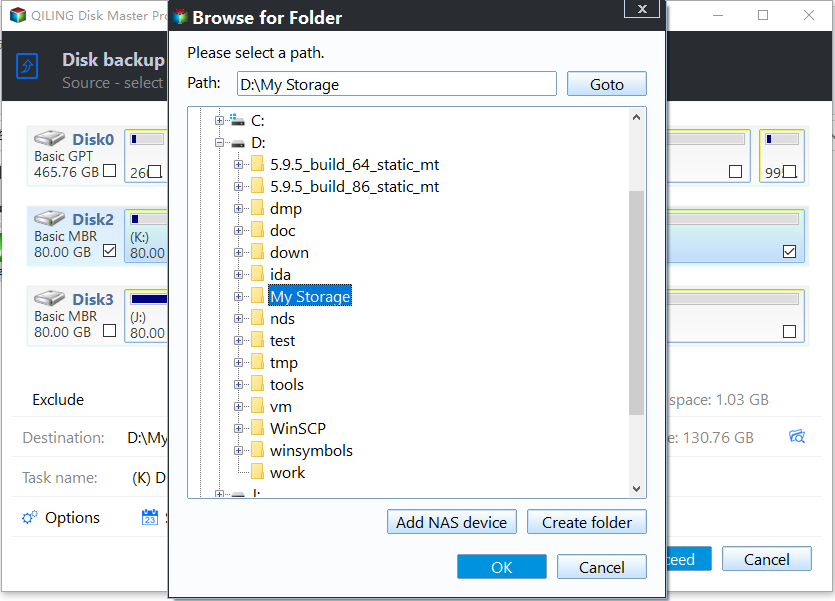
3. Select the connected external drive as backup storage destination, and you can also backup to USB drive, network drive, NAS, or cloud drive.
4. Tap the Schedule Backup option, and choose the option to run the Windows Server backup daily, weekly, monthly, or when an event trigger occurs, or when a USB drive is plugged in.
Other helpful settings you could set:
✍Schedule Backup: You can set hourly backups and schedule tasks to run automatically, even waking the computer if needed, to ensure you don't forget to backup.
✍Options: You could modify the backup image, for example, by compressing, splitting, or encrypting it, or using other options like sector-by-sector backup, intelligent sector backup, or VSS (Volume Snapshot Service) to create an exact backup.
✍Backup Scheme: You can select a backup method among full, incremental (default), and differential backup. This choice determines the cleanup methods available to you. If you opt for differential backup, you'll have access to 4 cleanup methods.
5. To backup Windows Server to an external hard drive, click on the "Proceed" button after selecting the external drive as the destination for the backup. This will initiate the backup process, which may take some time depending on the size of the data being backed up and the speed of the external drive.
After about 30 minutes or more, depending on your capacity of data, your data will be backed up successfully without issues like "no disks are available for use a backup destination".
Further Reading: Choose Suitable Destination Device for Windows Server Backup
The conditions you should be aware of when choosing the right destination device include the device's compatibility with your existing technology, its capacity to handle your data and workload, and its ability to meet your specific needs and requirements. Additionally, consider the device's security features, durability, and any additional features you may need, such as ports or connectivity options.
- The external disk is empty and shows as online in Disk Management.
- The external disk need to be sufficient space.\
- Ensure the external disk does not contain any system-critical data, such as the EFI system partition, operating system files, application data, or shared server folders, to avoid conflicts and potential data loss.
When trying to backup system state with Windows Server Backup or Wbadmin, you may receive an error message stating that the specified backup location could not be found or is not a supported backup storage location.
Summing up
You can either fix the problem by using Windows Server Backup as a backup destination, or leave it behind by using Windows Server Backup as a best alternative. This allows you to restore the image to a new hard drive or even a new server with different hardware.
For IT technicians, Qiling Disk Master Technician or TechPlus edition is recommended, as it allows simultaneous image restoration to multiple computers over a network and enables the creation of a portable version for backup and restore of Windows Server without the need for reinstalling.
If you're looking to manage backup tasks for all computers within a LAN from a single central management console, consider using Qiling Centralized Disk Master.
Related Articles
- (Fixed) Windows Server Backup Volumes Greater Than 2TB
If you don't know how to fix Windows Server Backup greater than 2TB, continue to read this article and learn the possible reasons as well as 6 effective methods. - Windows Server Backup Schedule to Remote Shared Folder-Overcome the Limitation
Learn how to use Windows Server Backup for schedule to remote shared folder in Windows Server 2008/2012/2016 and overcome the limitations. - Fix Windows Server Backup Failed Not Enough Space on the Disk
You may get the Windows Server Backup not enough space on the disk error after running a few versions of backup. Why Windows Server Backup failed? This article will explain it and provide solutions. Applied to Windows Server 2008, 2012, 2016, etc. - [Solved] Windows Server Backup 2012 (R2) Not Showing
If you are experiencing the Windows Server Backup 2012 not showing error, please continue to read this article and learn how to fix them easily and quickly.
