Partition WD External Portable Hard Drive in Windows 10/11
Western Digital (WD) is a leading provider of hard drives and storage solutions. Their external portable hard drives, such as WD Elements Portable and My Passport Ultra, are popular options. To answer your question, yes, you can partition your WD external hard drive. You can divide the drive into multiple partitions to organize your files and data, but be aware that this may void the warranty. It's also worth noting that some WD drives may have specific partitioning limitations or requirements.
You can easily and quickly partition a WD hard drive in Windows using two tools: Disk Management and Qiling Disk Master. This guide will show you how to use these tools to partition your WD hard drive.
- Qiling Disk Master is a third-A party tool for all Windows versions, this software is a professional partition manager that has been proven effective in various scenarios. It offers a wide range of partitioning options, including merging partitions and cloning disks, making it suitable for various needs.
- The Western Digital partition manager, Disk Management, is built into Windows but has limited advanced features and may not always recognize your hard drive. It can also leave your partition options grayed out, but fortunately, you don't need to download it.
How to Partition WD External Hard Drive without Data Loss?
Qiling Disk Master Standard is a freeware that simplifies disk and partition management, making it more reasonable and understandable. Unlike Disk Management, it allows users to move and merge partitions, and performs additional operations without data loss.
To create a new partition with Qiling Disk Master:
1. Download, install, and open this free software.
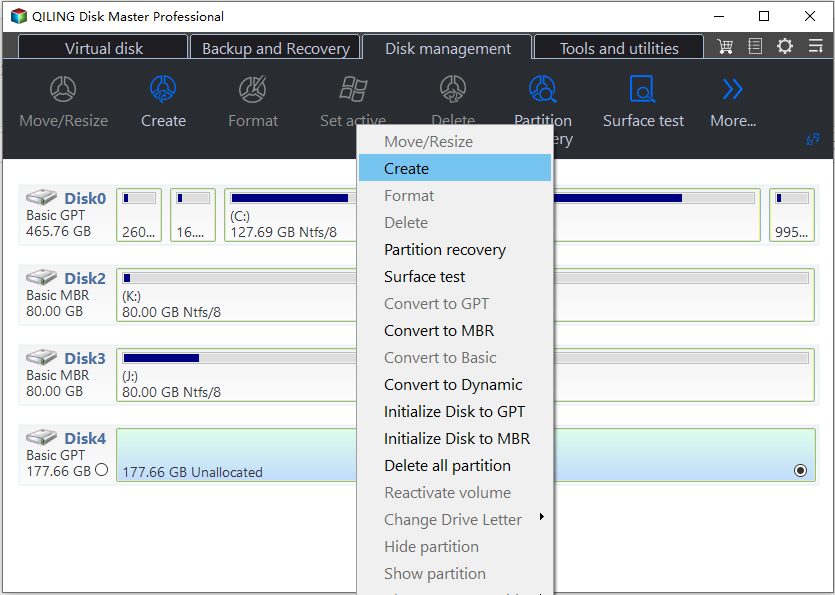
2. To create a new partition within the main interface, right-click on an existing partition or the unallocated space and select "Create Partition".
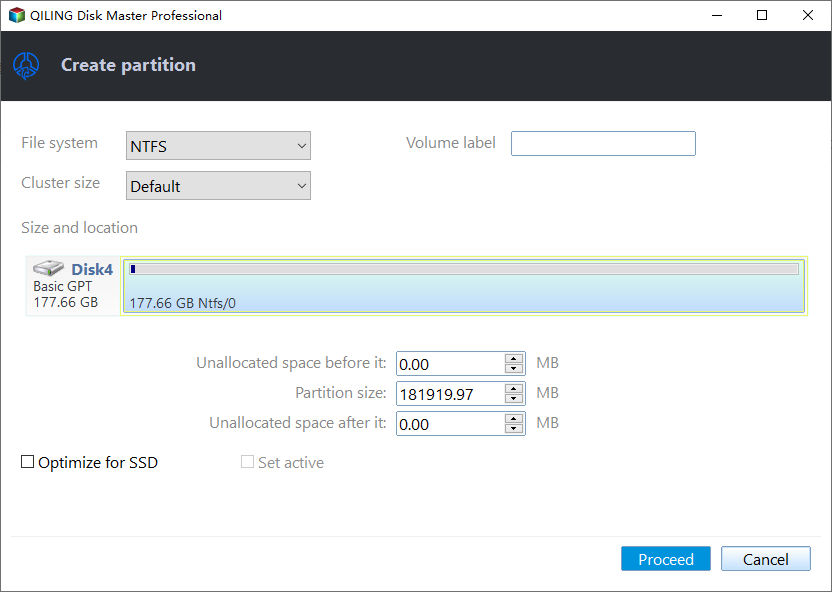
3. In the pop-out window, you can see a slider bar that allows you to adjust the size of the selected partition by dragging it left or right. Alternatively, you can specify the partition size by entering a number in the New Partition Size field. For more options, click the Advanced button.
4. If you want to see how the partition layout will be after the operation, you can click "Proceed" to apply the tasks. This will allow you to preview the new partition layout.
To manage your WD external portable hard drive, you can use Qiling Disk Master to create, delete, or resize partitions, merge contiguous or nonadjacent unallocated space, or convert to GPT partition style if the drive is over 2TB, all without data loss. When you're done making changes, simply click the "Apply" button to implement them. This tool allows you to partition your WD external hard drive effortlessly.
Partition WD hard drive with Disk Management
In Windows 10/8/7, Disk Management allows you to manage your disks and partitions with a simple interface. However, it can only shrink or extend partitions formatted with NTFS, meaning you'll need to reformat or convert FAT32 partitions to NTFS if you want to use Disk Management. Formatting a drive erases all data, so be sure to back up crucial files before making any changes.
To partition external hard drive:
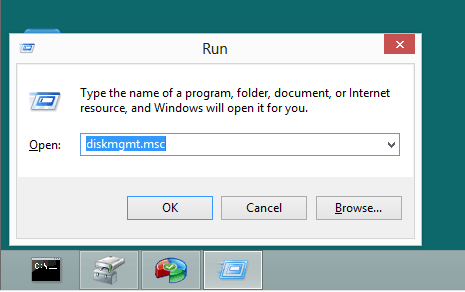
1. To connect your WD external hard drive to your computer, open Disk Management by typing "diskmgmt.msc" in the Search box or Run box and press Enter. This will allow you to view and manage the drive.
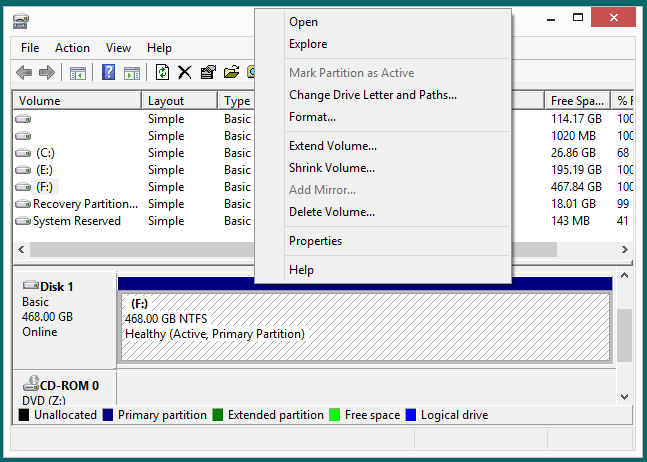
2. To free up space on a portable hard drive, right-click the existing volume and select "Shrink Volume" from the menu, then follow the Shrink Volume Wizard to shrink the partition and create unallocated or free space.
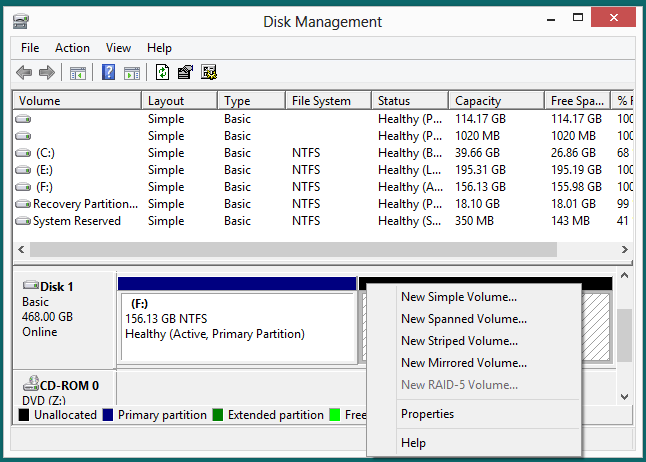
3. Right-click the unallocated space gained by shrinking a primary partition or free space gained by shrinking a logical partition on the WD portable drive and select "New Simple Volume."
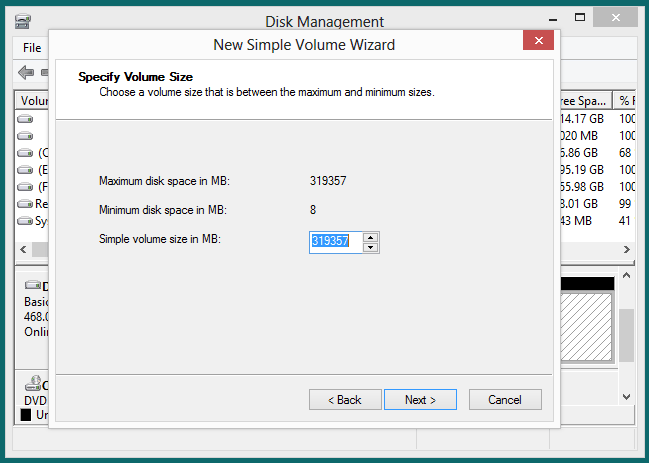
4. In the next screen, enter the volume size you desire and click "Next". If you only want to use the space to create a single partition, you can skip entering the volume size and simply click "Next", which will set the maximum size by default.
5. To assign a drive letter and file system, follow these steps: Assign a drive letter to the newly created partition, select the file system type (e.g. NTFS, FAT32), and click "Finish" to start the partitioning process.
You can create additional partitions on your external hard drive by repeating the process of formatting and creating a new partition. However, keep in mind that once a new partition is created, it cannot be merged back into the existing partition without losing data. For more flexibility in resizing the partition, consider using third-party partition manager software.
Why partition a hard drive?
Unlike internal hard drives, WD external portable hard drives come pre-partitioned and formatted, but you can still partition and organize them to make it easier to find specific files by creating separate sections.
Partitioning an external hard drive, such as a Western Digital (WD) drive, allows for multiple partitions to be created, each with its own separate storage space. This means if one partition becomes corrupted, it won't affect the other partitions. Additionally, existing partitions can be shrunk, extended, or new ones created, and the entire drive can be cleaned and repartitioned. Utilizing Windows' built-in Disk Management or third-party partition software can make this process relatively straightforward.
