How to Permanently Assign Drive Letter with Ease
Why to permanently assign drive letter?
Windows assigns drive letters to all drives on a computer, such as internal hard disks, optical drives, SD cards, and external USB drives, with each letter used only once per computer.
Some users experience frustration when their USB drive letter keeps changing each time they connect it to the same computer, especially when using multiple USB drives on one computer. This issue arises frequently, making it necessary to assign permanent drive letters to USB drives.
Some users perform regular backups between the USB drive and computer via a USB hidden copier, which requires a persistent drive letter to be assigned. This allows the backup task to be recognized and repeated smoothly by the backup utility.
How to permanently assign drive letter with ease?
Here are three efficient solutions to assign a static drive letter in Windows 10:
- Solution #1: assign a persistent drive letter with Disk Management
- Solution #2: assign a static drive letter by Command Prompt
- Solution #3: assign drive letter permanently with the best freeware
Solution #1: assign a persistent drive letter with Disk Management
1. To open the Disk Management tool, press the Windows key + X on your keyboard, and then select Disk Management from the menu.
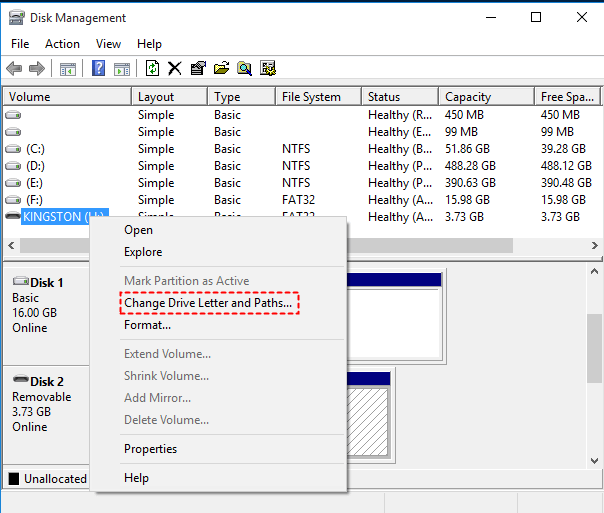
2. Right click the USB drive to which you want to assign a persistent drive letter and select "Change Drive Letter and Paths."
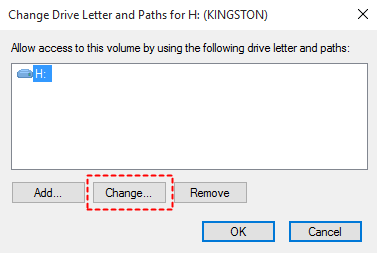
3. In the pop-up window, click "Change".
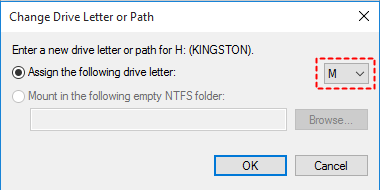
4. Choose a proper drive letter for your USB drive using the drop-down menu and click "OK" in the next window.
✐ Tips: You may choose a rarely-used drive letter like M-Z, thus avoiding possible drive letter conflicts.
5. You will get a prompt that some programs might rely on drive letters to run properly. Click "Yes" to continue as long as the drive letter you assign here is not occupied by another drive where the programs are installed. If the assigned drive letter is already used by another drive, the programs may not run correctly.
Solution #2: assign a static drive letter by Command Prompt
1. To open the Command Prompt as an administrator, tap the Search button on the taskbar, type "cmd" in the search box, and right-click on the "cmd" result, then select "Run as administrator".
2. Type diskpart and press Enter.
3. Type list volume and press Enter.
4. To select the USB drive, type the volume number (e.g. volume 7) and press Enter.
5. Type assign letter=# (ex: letter=M) and press Enter to assign a new drive letter.
6. To exit Diskpart and then the Command Prompt, simply type `exit` and press Enter twice. This will first exit the Diskpart utility and then exit the Command Prompt itself.
Solution #3: assign drive letter permanently with the best freeware
Qiling Disk Master Standard, the best partition manager, can help you assign a permanent drive letter to a USB drive. This tool is easy to use, requiring only mouse-clicking, and it's completely free. Simply follow the instructions to get started.
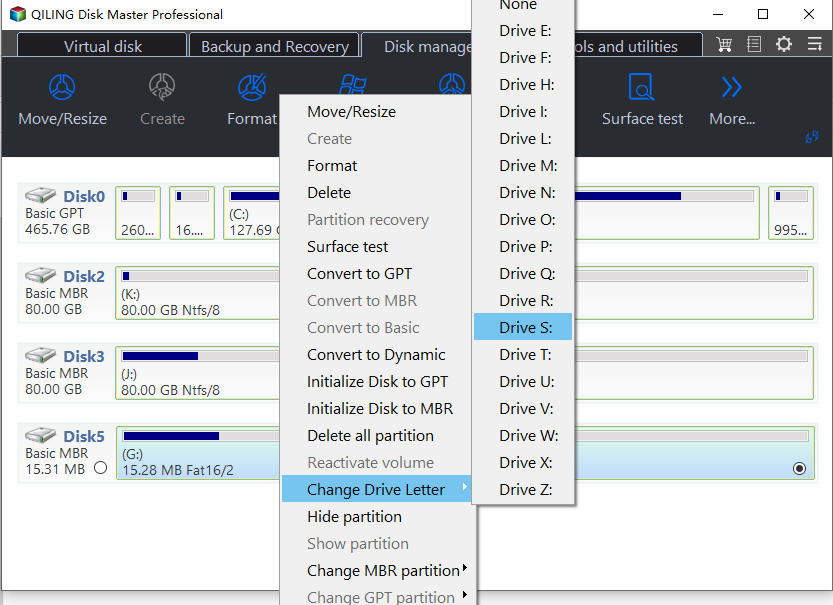
Step 1. To give a permanent drive letter to a USB drive, download, install and launch Qiling Disk Master. Then, right-click the USB drive, select "Change Drive Letter" from the context menu, and choose "Drive Letter" from the sub-menu.
Step 2. Waiting to finish the operations.
✍ Note: To change the partition type ID for MBR disk partitions and modify the serial number on a specific partition, you would need to upgrade to Qiling Disk Master Professional.
Verdict
You've learned three ways to permanently assign drive letters to USB drives, ensuring Windows 10 recognizes them correctly every time. Once committed, the same drive will always be assigned the same letter. However, if you insert the drive into another computer, it may get a different drive letter. Besides assigning a permanent drive letter, you can also use Qiling Disk Master to repair a pen drive not detected and fix a C drive that's RAW. This tool is a great solution for various disk-related issues.
Related Articles
- How to Format M.2 SSD in Windows 10 [Detailed Instruction]
If you don't know how to format your M.2 SSD in Windows 10, don't worry; we'll show you how to do that. Continue reading this article and format your SSD to your desired file system in no time. - How to Repair C Drive [5 Proven Ways]
Have you ever received a warning message that says 'Scanning and repairing drive C'? In this post, you will discover five practical ways to check and repair the C drive. - Lenovo SSD Upgrade: 2024 Step-by-Step Tutorial on How
This article introduces the process of upgrading the SSD in a Lenovo laptop. Discover step-by-step instructions and essential considerations for successfully performing a Lenovo SSD upgrade - 2 Ways to Partition C Drive in Windows 7 Without Formatting
If you want to partition the C drive on your Windows 7 PC without formatting but don't know how then you should read this article. We show you two easy ways to do that. Keep reading to learn more!


