How to Remove OEM Partition in Windows 10, 8, 7?
Scenario
When you open Disk Management on a Dell or Lenovo PC, you'll notice a "Healthy (OEM Partition)" or recovery partition. This partition, also known as the OEM partition, is a system partition created by the manufacturer to provide a recovery environment. It's safe to delete the OEM partition, but be aware that it may cause issues with the PC's ability to restore to its factory settings.
What is healthy (OEM Partition)?
The OEM partition is a special section on Dell and Lenovo computers that allows you to recover the system to its original settings. It can be used as a last resort in case of system failure, especially when you don't have a installation or recovery disk.
Deleting the OEM partition can free up disk space, but it's not always safe to do so. If you're experiencing issues with your system, deleting the OEM partition might prevent you from being able to recover or reinstall the operating system. However, if you're confident that you won't need to reinstall or recover the OS, deleting the OEM partition can help declutter your disk space. It's essential to weigh the potential benefits against the risks before making a decision.
● Can OEM Partition be deleted?
Removing the OEM partition from your PC can be a good idea, but it's essential to back it up first. This is because once the partition is gone, you can't restore your computer to its original state if issues arise without the backed-up partition. Therefore, before removing the OEM partition, it's recommended to clone it to another drive, such as a USB drive, to ensure you have a copy in case of unexpected errors. This way, if your PC experiences system errors, you can simply move the cloned partition back to your PC to run the OEM partition.
1. Boot from a Windows installation media, and then select the "Repair your computer" option. 2.
How to remove OEM Partition in Windows 10, 8, 7?
The first method is only suitable for PC experts who are familiar with command-line tools, while the second method is a more user-friendly alternative for those who are not comfortable with command-line interfaces.
Method 1. Remove OEM partition with DiskPart.
DiskPart is a command-line utility in Windows that allows advanced users to manage disk partitions, including deleting a partition by executing a series of commands.
To create a new user account, you can use the `useradd` command followed by the username you want to create. For example, to create a new user account named "john", you can use the command `useradd john`. This will create a new user account with the default settings.
Step 1. Press "Windows key + R" to open Run box, and type "cmd" on the box. Then press Enter.
Step 2. When the Command Prompt is open, type "diskpart" on it and press Enter to open "DiskPart" utility.
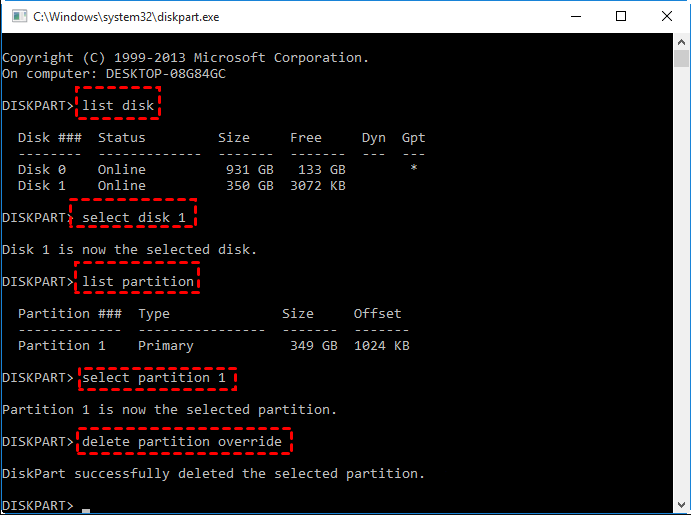
Step 3. Then run the following commands one by one:
●list disk
●select disk (choose the disk that contains the OEM partition)
●list partition
●select partition (select the OEM partition)
●delete partition override
Then wait for the utility to complete the removing process.
Easier way to remove OEM partition
If you're not comfortable with the command-line interface, the Qiling Disk Master Standard tool with a graphic interface is a better option. It allows you to easily remove OEM partition in Windows 10, 8, 7 within a few steps, and also offers other features like creating, formatting, hiding/unhiding, wiping partitions, and more.
To complete the task, download and install the tool, then follow the steps provided to finish the process.
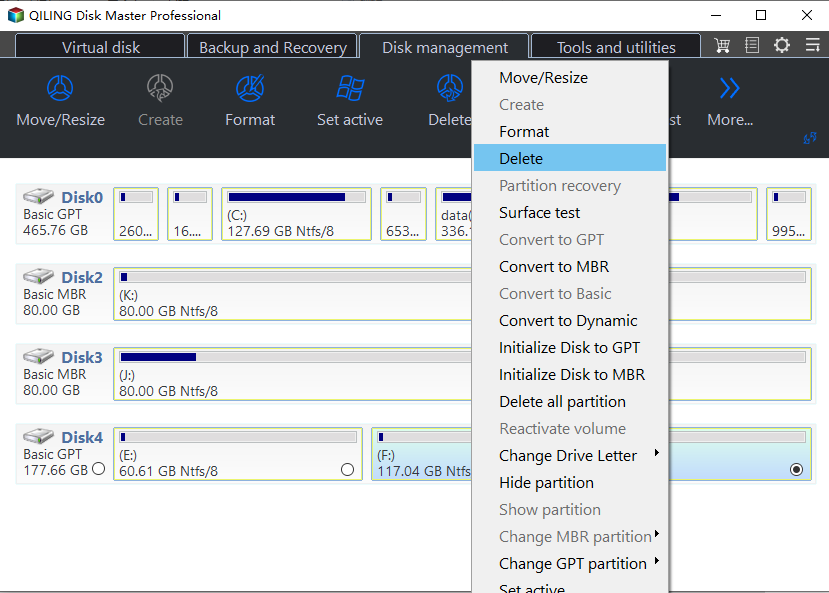
Step 1. Open Qiling Disk Master, right-click on the OEM partition on the main console, and click "Delete Partition".
Step 3. Then, click "Proceed" to commit deleting operation.
Wait for a while, the process will be completed. Then the deleted partition will be shown as unallocated, allowing you to create a new partition or merge the space with another partition.
Conclusion
Both DiskPart.exe and Qiling Disk Master are effective tools for removing OEM partitions, but Qiling Disk Master is a more user-friendly option for those who are unfamiliar with DiskPart.
Qiling Disk Master is a powerful tool that supports various disk partition management tasks, including formatting partitions, wiping data, and more. The Professional edition offers advanced features like converting dynamic disks to basic disks, changing serial numbers, and securely erasing SSDs.
Related Articles
- How Do You Format a Micro SD Card [Step-by-Step Guide on Each Way]
This article gives detailed guides on how do you format a Micro SD card and introduces a professional format tool to help. It elaborates on why format SD card and how to format an SD card. - How to Format External Hard Drive to FAT32 on Windows 10? [FAT32 Guide]
How to format external hard drive to FAT32 on Windows 10? You will see the five instructions in this article if you have tried to format an external hard drive to FAT32 in Windows. - How to Format Hard Drive from BIOS Windows 10
This guide will provide three complete guides to formatting the hard drives from BIOS Windows 10, including format via Qiling Disk Master, Command Prompt, and formatting the drive during Windows installation. - How to Format Raw Micro SD Card [Quick Guide]
This article provides quick and efficient ways to format raw Micro SD card and introduce a professional third-party tool to manage your Micro SD card


