Restore Windows 11, 10, 8, 7 Computer to Earlier Date | 5 Ways
- Why restore your computer to earlier date?
- How to restore computer to an earlier date with system restore
- Method 1: How to restore PC to a previous date when your computer is bootable
- Method 2: How to reset computer to earlier date in safe mode
- Method 3: How to restore computer to earlier date from start up
- Method 4: How to restore computer to earlier date using command prompt
- What if system restore failed?
- Secure way to restore computer to earlier state easily
- ◉ Preparations before performing system restore
- ◉ How to restore Windows 11/10/8/7 to a previous date
- Wrapping things up
Why restore your computer to earlier date?
In your daily life and work on a computer, you may encounter frustrating issues such as an error loading the operating system, the "Your PC ran into a problem and needs to restart" loop, or getting stuck on the restarting screen. These problems can be caused by a variety of factors and can be challenging to resolve.
While some computer issues can be resolved through conventional means, many system failures can cause the computer to malfunction or even fail to boot up, making it difficult to troubleshoot and resolve the problem.
In extreme cases, restoring the computer to an earlier date may be the only way to get it back to a normal state. To achieve this, it's essential to perform system restore correctly.
- If your computer is experiencing issues and you need to revert to a previous point in time, system restore can be a lifesaver. Here are four methods to help you restore your computer to an earlier date using system restore:
- What if system restore failed?
- Secure way to restore computer to earlier state easily
How to restore computer to an earlier date with system restore
Restoring your Dell, HP, or Lenovo computer to an earlier date can be a good idea if you've experienced issues or made changes that you'd like to undo. Here's a step-by-step guide to help you restore your computer system to an earlier time point:
To restore your computer to a previous date, it's essential to have created a system backup image or system restore point in advance. This way, you can easily revert to a previous state when needed. Fortunately, Windows operating systems, including Windows 11, 10, 8, 7, XP, and Vista, come equipped with a built-in tool called System Restore that allows you to create and utilize restore points for system recovery.
If you haven't enabled System Restore in Windows, don't worry! You can still use a third-party tool like Qiling Disk Master to restore your computer to an earlier date. This free backup and restore software offers a similar functionality to System Restore, allowing you to recover your system to a previous state. Below, we'll walk you through the detailed steps to use Qiling Disk Master for system restoration.
Method 1: How to restore PC to a previous date when your computer is bootable
Step 1. Type "create a restore point" in the search box and select it from the result list. When the System Properties window opens, click the System Restore button.
Step 2. Click Next on the first screen of the System Restore window.
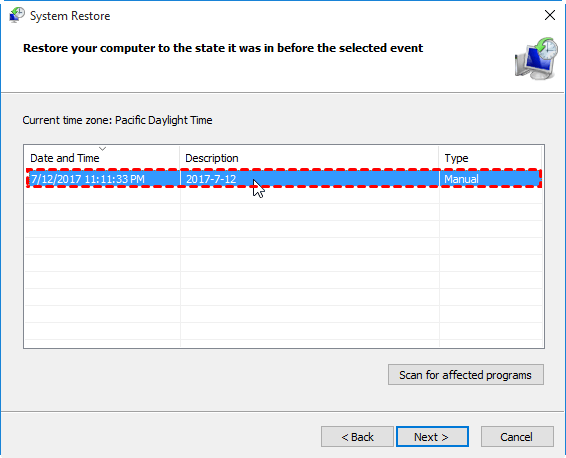
Step 3. Select the restore point on the following box and click Next.
Tip: If you're planning to use System Restore, it's a good idea to backup any recently installed programs that you don't want to lose. To do this, click on **Scan for affected programs** before proceeding with the restore process.
Step 4. Confirm you've selected the right restore point and click Finish to restore computer settings to previous date.
Method 2: How to reset computer to earlier date in safe mode
If your computer is unable to boot, you can try restoring Windows in safe mode first. This method is particularly useful for users who are unable to access their operating system.
Step 1. Go to safe mode.
👉 In Windows 7
Start your computer, and then press F8 repeatedly until the Windows logo appears.
👉 In Windows 8/8.1/10/11
- Boot your computer and interrupt the boot by holding the power button for 3 times.
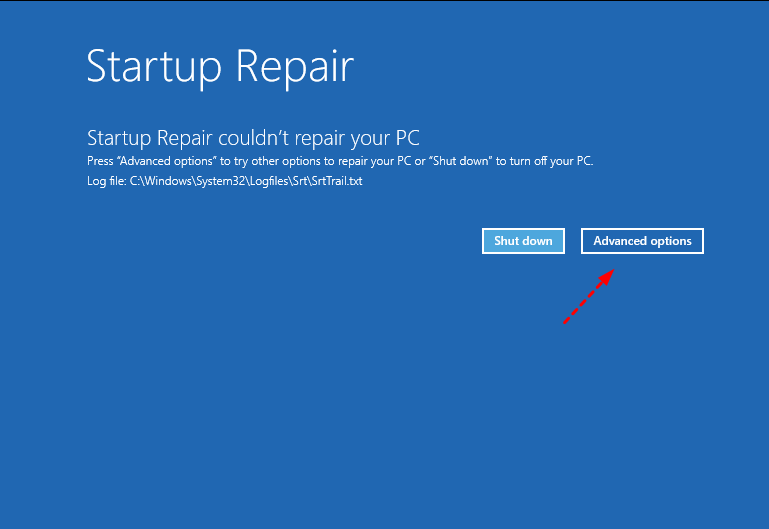
- Click Advanced options > Troubleshoot > Advanced options > Startup Settings > Restart to boot into safe mode.
Step 2. Repeat the steps of system restore in normal state.
Method 3: How to restore computer to earlier date from start up
If the system restore from safe mode does not work, you still can create a recovery drive or use an installation disc to restore your computer to earlier date from boot.
Step 1. Insert a recovery drive or installation disc into your computer.
Step 2. Boot your computer into BIOS and set the bootable drive as the first boot option. Then press F10 to save the changes and restart your computer.
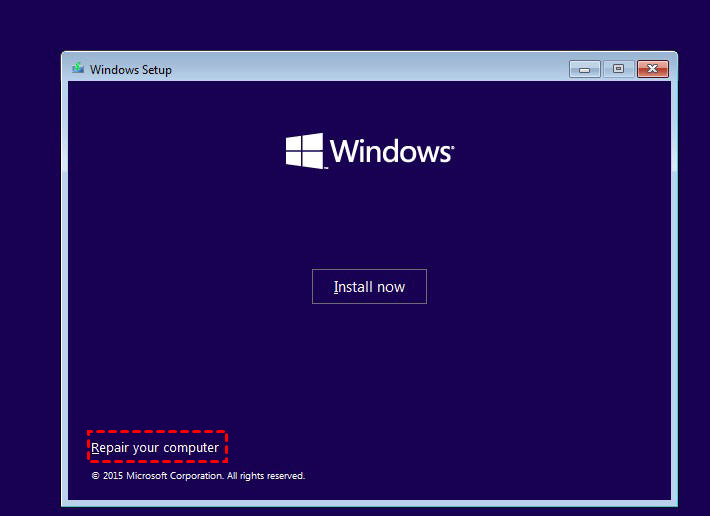
Step 3. Click Next until you see Repair your computer in the lower left corner.
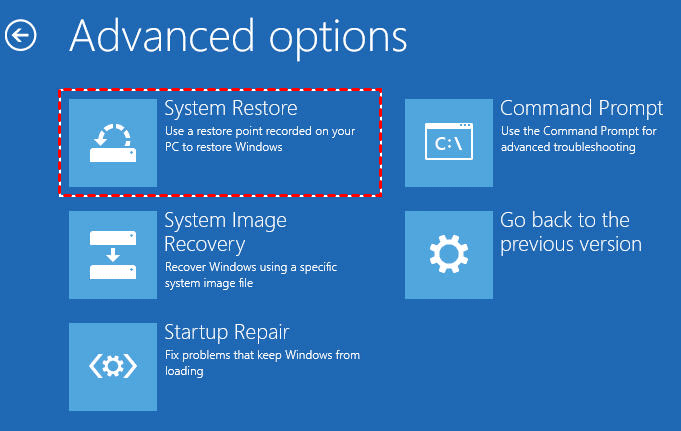
Step 4. Click Repair your computer, and then choose Windows 10 > Troubleshoot > Advanced options > System Restore.
Step 5. Then, the System Restore window will appear. Just click Next to move on.
Step 6. Repeat the steps in the normal state.
Method 4: How to restore computer to earlier date using command prompt
In addition to using a Windows 10 installation disc or recovery drive, you can also use the Command Prompt to restore your computer to an earlier date. This approach is similar, but utilizes a different recovery tool.
Step 1. Boot from recovery drive or installation disc. Then, go to Repair your computer, and click Windows 10 > Troubleshoot > Advanced options.
Step 2. Click Command Prompt in the Advanced options interface.
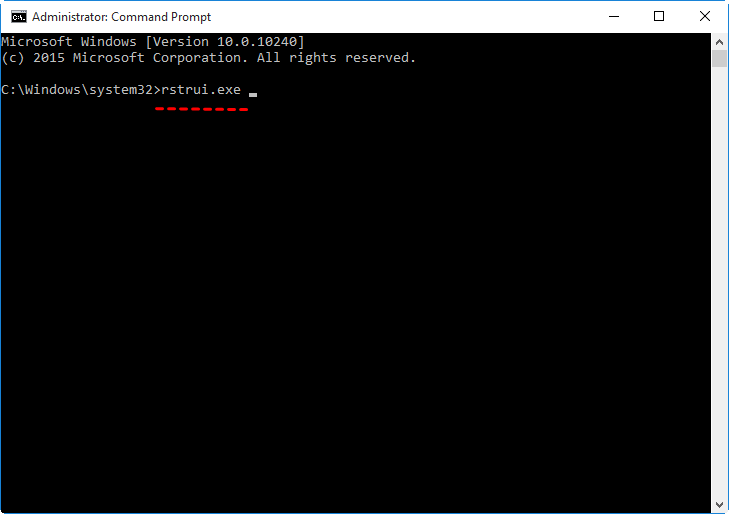
Step 3. Type "rstrui.exe" in the command prompt window and hit Enter.
Step 4. Once you've accessed the System Restore utility, you'll be presented with a graphical user interface (GUI) screen. To proceed, simply click the **Next** button. This will guide you through the remaining steps, which you'll need to follow in sequence to complete the System Restore process.
What if system restore failed?
When you try to restore system from a restore point, you may find that system restore points have gone owing to many reasons like Windows Update, corrupted files, etc. Even if there is a system restore point, you may receive errors during the restoration, such as System Restore did not complete successfully, 0x80070002, System Restore failed to extract the file, volume shadow copy service component encountered an unexpected error, etc.
To overcome the challenges associated with System Restore, you can consider using a specialized and reliable software solution, such as Qiling Disk Master. This tool offers an alternative system backup and restore mechanism, allowing you to create and manage backups more effectively.
Secure way to restore computer to earlier state easily
While Windows System Restore can effectively return your computer to a previous state, it's not uncommon to encounter issues such as the absence of restore points or failed restore attempts. To streamline and secure the system restore process, consider using Qiling Disk Master Standard. This software offers a more straightforward and reliable way to manage system backups and restores, helping you avoid the frustrations associated with System Restore.
|
💻 Supported OS |
It’s a complete and powerful backup and restore software supporting Windows 11/10/8.1/8/7/XP/Vista. |
|
🧲 Various Restore Types |
Not only operating system, it can also be used to restore partition, disk, or individual files & folders. |
|
📀 Bootable Media |
If you are worried your PC might not boot up due to a malfunction, you can also create a bootable media to restore system in WinPE. |
|
✅ Easy Operation |
Compared with Windows System Restore, it is much easier to operate and less error-prone. |
Want to see how Qiling Disk Master Standard can simplify your system restore process? Download the freeware today and explore its capabilities for yourself.
◉ Preparations before performing system restore
- Head to the **Backup** tab and select **System Backup** to create a comprehensive system image. This image serves as a safeguard, allowing you to restore your system to its previous state in case of any issues or data loss.
- Navigate to the **Tools** tab and utilize the **Create Bootable Media** tool to create a recovery media. This media serves as a crucial backup plan, enabling you to boot your system even if it encounters a boot failure.
- If the system has crashed without a backup or bootable media, there's an alternative solution. You can create the necessary backups and bootable media on another working PC, and then utilize the **Universal Restore** feature (available in the Professional edition) to restore the system to its previous state.
◉ How to restore Windows 11/10/8/7 to a previous date
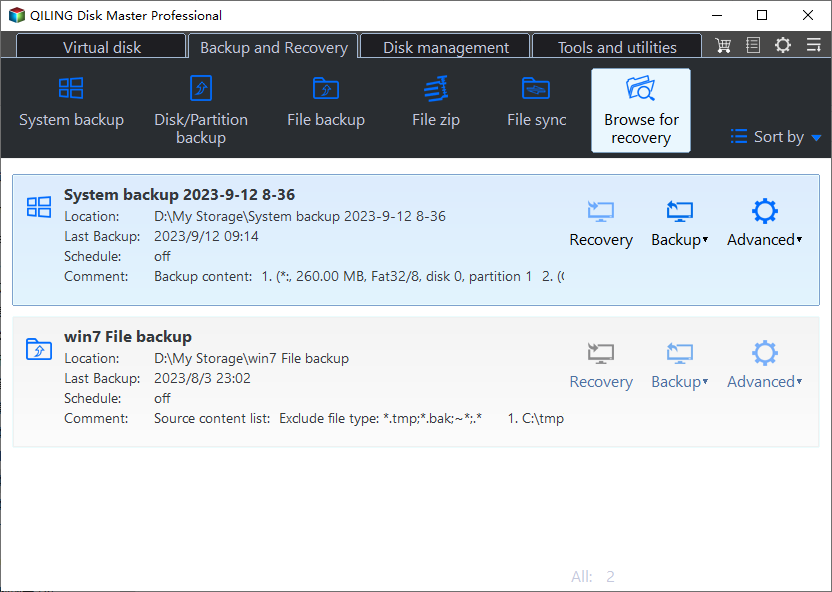
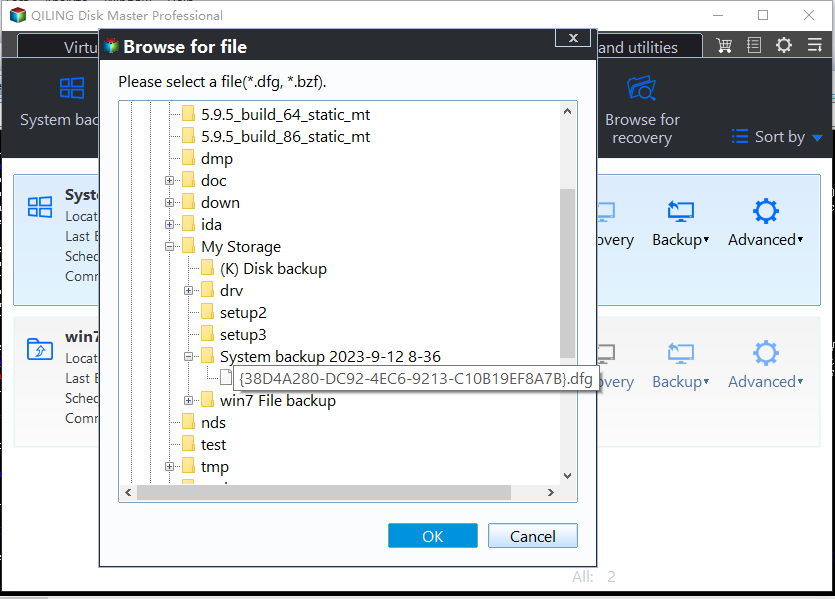
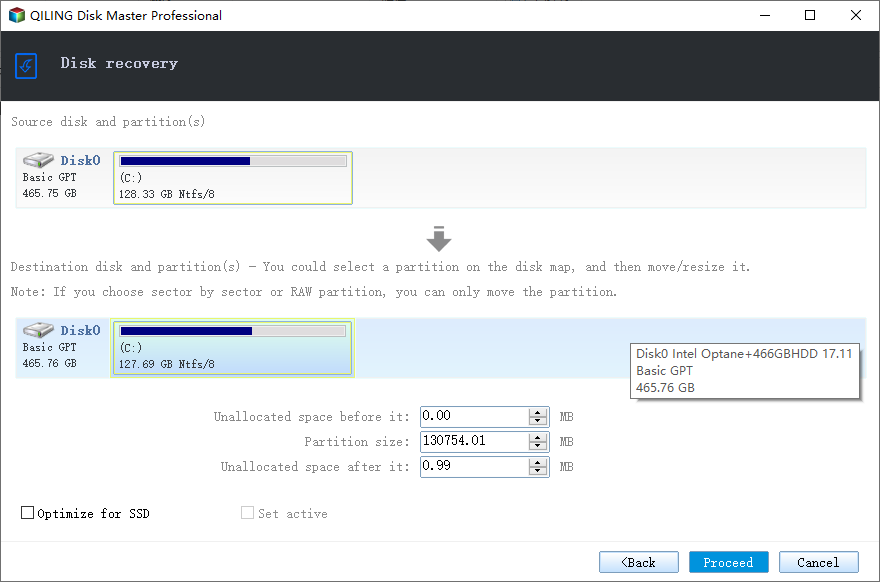
1. To initiate the recovery process, launch the freeware. Navigate to the Backup and recovery page. From there, click on Browse for recovery to locate the image file that contains the system's configuration and data. This image file serves as the foundation for the recovery process, allowing you to restore your system to its previous state.
2. If you wish to proceed with the recovery process, you can optionally select the system backup task. To do this, click on Select Task and navigate to the subsequent window.
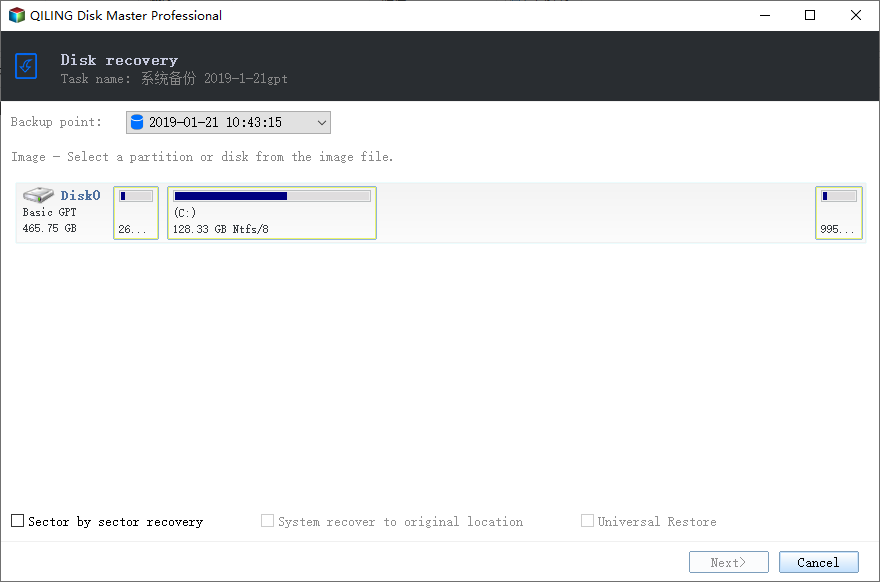
3. Next, you will be prompted to select the type of backup you want to restore. You have two options:
4. After selecting the backup to restore, click Proceed to initiate the recovery process. The system will then execute the recovery process, which may take some time depending on the size of the backup and the speed of your computer.
Video Tutorial: If you're interested in learning more about system restore, we recommend checking out our video guide on the topic. The video provides a detailed explanation of the system restore process, including how to use it to restore your system to an earlier point in time.
Wrapping things up
While System Restore can be a useful tool for reverting your Windows system to a previous point in time, it's not always reliable. In some cases, System Restore may not function as expected, leaving your computer in an unstable or unbootable state.
Given the limitations of System Restore, it's crucial to have a robust backup and restore solution in place to protect your computer. Don't wait – take proactive steps to safeguard your data and system.
If you want to use the powerful backup & restore features on multiple computers, you could pick Technician or Technician Plus edition, and create a portable version of Qiling Disk Master on removable device.
Related Articles
- Why and How to Restore Windows Server 2008 R2 to Previous Date
- (Fixed) System Restore Not Working in Windows 10
- There Was a Problem Resetting Your PC [7 Quick Ways]
- How to Run System Restore via Command Prompt in Windows 10?

