The Best Way for Samsung Data Migration to Clone OS Only
User Case
The Samsung Data Migration software is designed to clone your data and OS from the old HDD to the new Samsung EVO 250GB SSD, and it should work seamlessly without any issues. The software will migrate your entire OS, including the operating system, settings, and applications, to the new SSD, allowing you to boot up as you normally would. You won't need to change the BIOS settings or the main boot order, as the software will handle the cloning process automatically. Just run the software, follow the prompts, and it will do the rest. However, it's always a good idea to back up your data and OS before starting the cloning process, just in case.
The Samsung Data Migration software transfers all existing files, programs, and the operating system from an existing HDD or SSD to a new Samsung SSD, automatically cloning the first two partitions, which contain the OS and neighboring partition. After cloning, the boot drive needs to be changed to the new Samsung SSD to enable booting from it.
Why Do People Want Samsung Data Migration OS Only?
People want to clone their systems to SSD only because it provides a significant performance boost, reduces loading times, and improves overall system responsiveness. Cloning to an SSD allows for faster data access, lower latency, and increased durability, making it an attractive option for those seeking to upgrade their computer's speed and efficiency.
- Improve boot speed: Solid-state drives (SSDs) offer faster boot speeds compared to traditional hard disk drives (HDDs). Cloning your operating system to an SSD and booting from it can result in lightning-fast system startup times.
- Save drive space: When your SSD is much smaller than the old HDD, you can migrate only your operating system to the SSD, which will save lots of space on the SSD. This approach allows you to utilize the smaller SSD for the OS, freeing up space on the larger HDD for other files and programs.
- Combine SSD and HDD: Many people use an SSD as the boot drive and an HDD as the data storage device to improve performance and allocate disk space wisely.
How to Use Samsung Data Migration Tool to Clone OS
Samsung Data Migration is an application that allows users to transfer files and folders from an old hard drive disk (HDD) to a Samsung solid-state drive (SSD), and also migrate the operating system to the new SSD. This application can be used to clone the system to a Samsung SSD, such as the 850 EVO or 840 Pro, and then boot the computer from the SSD. The process involves following a series of steps to complete the cloning process.
Preparations:
- Connect the Samsung SSD to your computer using the provided USB-to-SATA cable, making sure it's properly seated and recognized by your system. This will allow you to access and organize the contents of the SSD.
- To prepare for the cloning process, back up your important files in advance, as the data on the destination disk will be erased during the cloning process. Note that Samsung Data Migration does not have a built-in backup feature, so you'll need to use another software to create a backup before proceeding.
- Download Samsung Data Migration from its official website.
After completing the preparation work, you can use the Samsung OS migration tool to clone the system drive to your Samsung SSD.
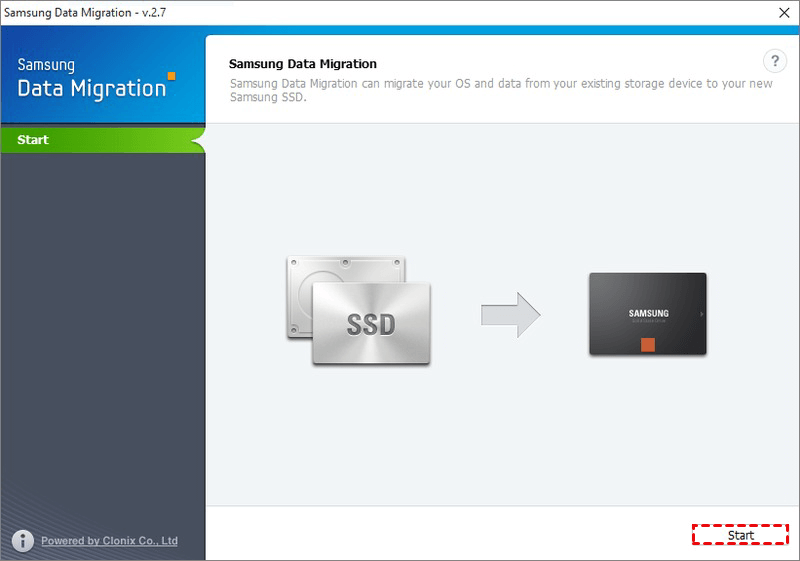
Step 1. Open Samsung Data Migration and click Start.
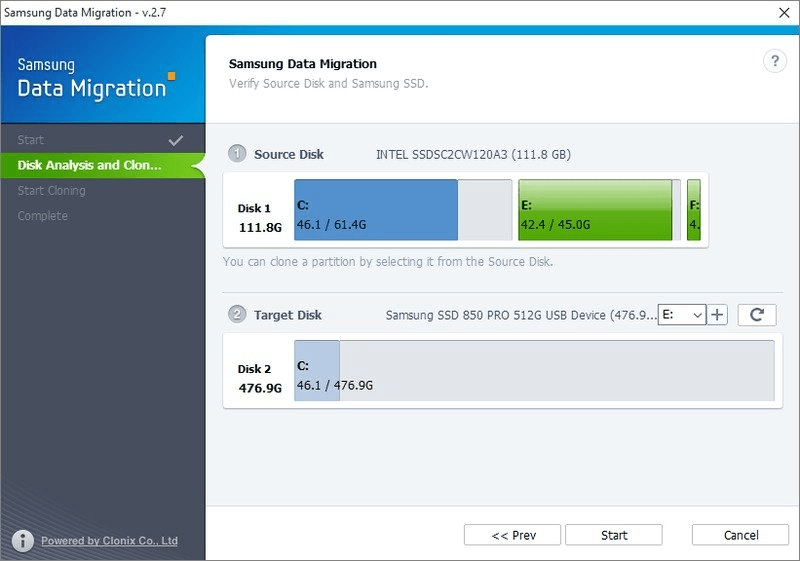
Step 2. Select the source disk containing the OS and the target Samsung SSD, then click Start.
Step 3. Click Quite to exit the software.
Something Else You Should Know About Samsung Data Migration
The software can clone a system to a new disk, specifically a Samsung SSD, but it doesn't allow for selective data partition cloning and doesn't support cloning the OS separately.
When using Samsung Data Migration Software, many users encounter the situation of cloning failure, which is often caused by the software being unable to clone the data from the old hard drive to the new one due to various reasons such as incorrect settings, insufficient disk space, or hardware issues.
- The source disk has bad sectors.
- During the cloning process, you can continue to use your computer normally, but it's recommended to avoid any intense or resource-intensive activities that might interfere with the cloning process. This includes tasks like video editing, gaming, or running multiple resource-hungry applications simultaneously.
- The source disk is converted into a dynamic disk.
- The source drive is encrypted with BitLocker or other encryption software.
- If you choose a Samsung NVMe SSD as the target disk without installing the Samsung NVMe Driver, the system may not be able to recognize the SSD, resulting in a failed installation or boot issues. This is because the Samsung NVMe Driver is required to communicate with the SSD and ensure proper operation.
The Best Way to Clone OS Only to Samsung SSD
To avoid Samsung Data Migration not working, consider using a professional and reliable third-party cloning software like Qiling Disk Master Professional, which supports multiple cloning types, including System Clone, Disk Clone, and Partition Clone, making it easy to clone only the operating system to the Samsung SSD. This software also offers several advantages.
✪ Secure Boot: Once you have cloned the system, you can securely boot the system from the cloned disk, ensuring the integrity and security of your data.
✪ Intelligent Clone: This feature will only clone the used sectors by default, skipping any bad sectors automatically.
✪ Live Clone: The software supports running clone tasks in the background, allowing users to multitask while the cloning process is underway, without having to suspend their computer activities.
✪ Clone dynamic and encrypted disk: You can use Qiling Disk Master to clone dynamic disk and Bitlocker encrypted disk easily.
✪ SSD Alignment: This feature can help you to accelerate the reading and writing speed of the target SSD.
✪ Different SSD types and brands: It supports various SSD types and brands, including SATA, M.2, PCI-E, Samsung, Crucial, Intel, and WD.
To clone OS only to your Samsung SSD easily, follow these steps. First, download and install the Samsung Magician software, which is a free tool provided by Samsung for managing and maintaining their SSDs.
Preparations:
- 1. Connect the Samsung SSD to the computer using a USB-C cable.
- You can use Qiling Disk Master to backup important files before cloning, as it will erase data on the destination disk.
- Download Qiling Disk Master Professional and install it.
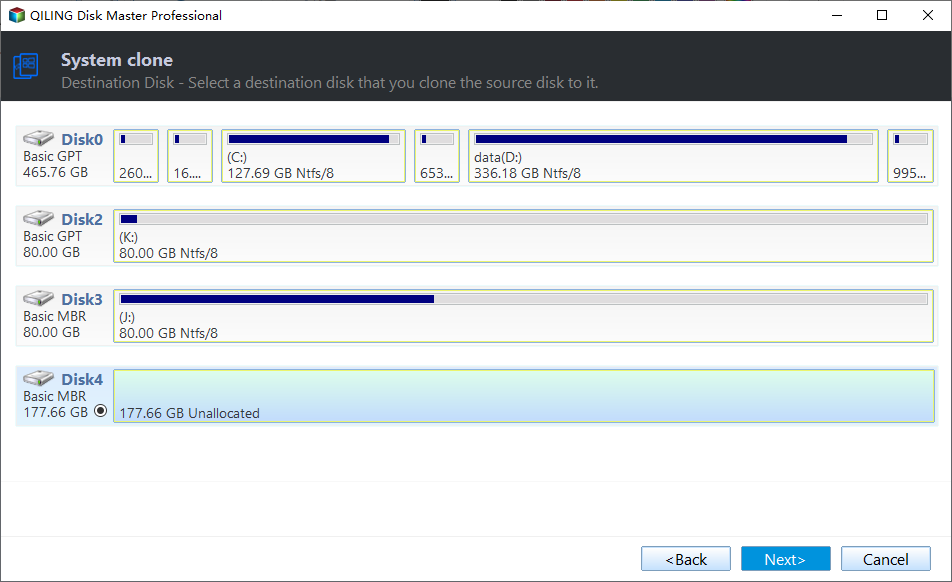
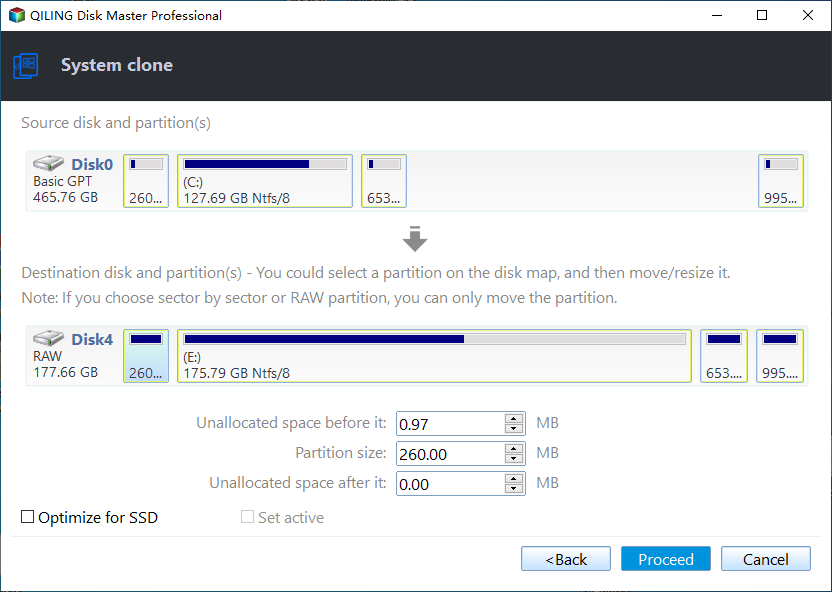
Step 1. Open Qiling Disk Master Professional. Select Clone > System Clone.

Step 2. Since the source drive is selected by default, you just need to choose the Samsung SSD as the destination disk.
Step 3. Tick SSD Alignment to make the reading and writing speed faster. Confirm your operations and click Proceed.
Notes:
- If the target disk is the same size or larger than the source disk, you can choose this option. It will clone all sectors, whether used or not.
- If you are a Windows server user, you can turn to the Qiling Disk Master Server to enjoy the feature.
FAQs about Samsung Data Migration OS Only
1. How long does Samsung data migration take?
Some migrations can take up to three hours, but the average time is 30 minutes. You can close the tab while a migration is in progress and it will complete independently.
2. Does Samsung Data Migration Work with other?
If Samsung Data Migration software isn't working on a non-Samsung SSD, a free alternative called Qiling Disk Master can be used instead. This alternative supports cloning to HDDs or SSDs of nearly all common brands, including system disks and non-system disks, making it a viable option for those who need to clone their data.
3. Should I use Samsung Data Migration?
If you're a Samsung user, the answer is yes. Samsung Data Migration is a handy tool for those with Samsung SSDs, allowing them to quickly create a backup of their operating system by cloning the OS drive to an external disk.
Summary
Samsung Data Migration can't clone only the system to the target disk, but instead clones the whole disk, which may lead to cloning failure due to various reasons.
The Qiling Disk Master Professional cloning software is a better choice for solving cloning problems, including booting the disk directly after cloning, and supporting GPT to GPT, MBR to GPT, or vice versa cloning.
Related Articles
- Best Way to Transfer OS to Samsung SSD without Reinstalling
- Samsung Data Migration Cannot Change Source Disk [Solution]
- Samsung Data Migration Software for Windows 7/8/10 | Free Download
- How to Fix My Documents Folder Missing in Windows 7?
If you don't know how to fix the My Documents folder missing problem in Windows 7/8/10/11, please continue to read this article and learn the reasons and different solutions to it.