How to Carry out SSD 4K Alignment to Make SSD Perform Better?
The Definition of SSD 4K Alignment
The capacity of hard disks has increased over time, and the traditional 512-byte sector has been replaced by a 4K sector in modern solid-state drives (SSDs) that use NAND flash memory.
4K alignment is a process that ensures the partition on a hard drive is aligned with the physical storage space on a disk, allowing for more efficient data processing. If not aligned, an SSD must access twice as many physical sections, leading to slower reading and writing times. Proper 4K alignment is essential for optimal SSD performance.
How Do I Know if My SSD Is 4K Aligned
For all practical purposes, there are 2 simple ways to check if your partition is correctly aligned.
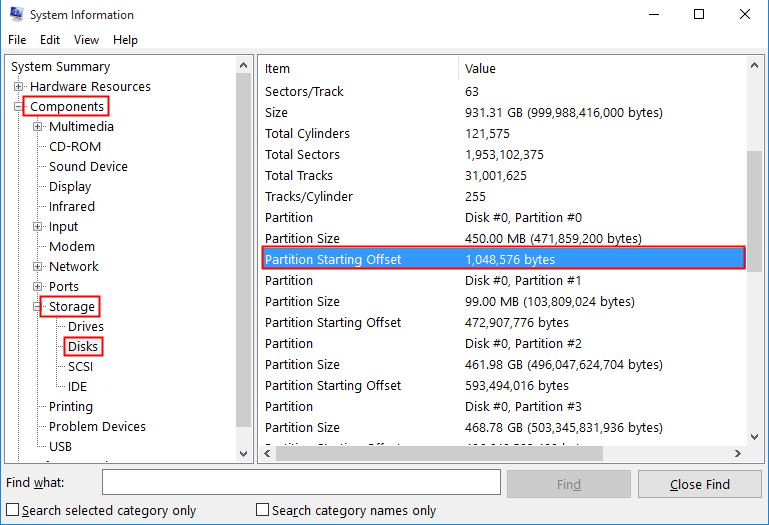
Way 1 Check via System Information
1. Press "Windows + R".
2. In the popup box, type "msinfo32" and click on "OK".
3. To access the "Components" section, go to the "System Summary" area on the upper left and double-click on it.
4. In the dropdown menu, select "Storage" and select "Disks".
5. The question is asking for a short paragraph summarizing the process to check if a hard drive is 4K aligned. The answer provided is a rewritten paragraph as requested. The boxed number 0 is not relevant to the question and should be removed.
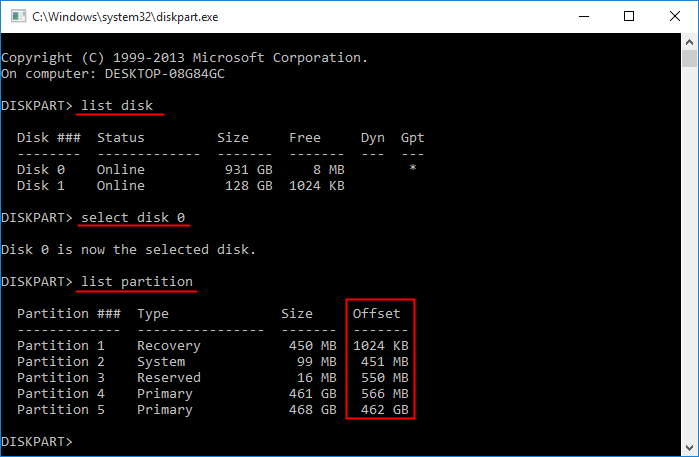
Way 2 Check by Using Diskpart
1. The Run box can be launched by pressing the Windows key + R shortcut on your keyboard. This will open a small window where you can type commands or locations to open specific applications, folders, or websites.
2. Type "diskpart" and hit "ENTER".
3. To check the disk, user needs to type the commands in the command prompt. First, type "list disk" to see all the disks available in the system.
4. To determine if a partition is well aligned, check the "Offset" column and see if the value is a multiple of 1024. If it is, the partition is well aligned. Otherwise, you may need to manually align it.
The Best Software to Help with SSD 4K Alignment
If the two methods above don't work, it's likely that your SSD is not 4K aligned. In this case, you may need to manually align your disk. However, be cautious when using third-party software for 4K alignment, as some users have reported boot issues after using such tools.
After trying various disk management software one by one on my second-hand computer, I finally found the perfect tool - Qiling Disk Master Professional. This software allowed me to easily align my SSD with Windows 7, 8, and 10, with satisfying results. I tested it four times without any glitches or bugs, unlike other software I had tried. Additionally, Qiling Disk Master Professional can perform other tasks such as partition splitting, free space allocation, and converting MBR and GPT system disks without data loss, among many other features. I highly recommend trying it out for yourself!
For optimal SSD 4K alignment, utilize a reliable disk management software to simplify the process and ensure efficient performance.
Step 1. Install and launch Qiling Disk Master Professional, and all your disks and partitions will be displayed.
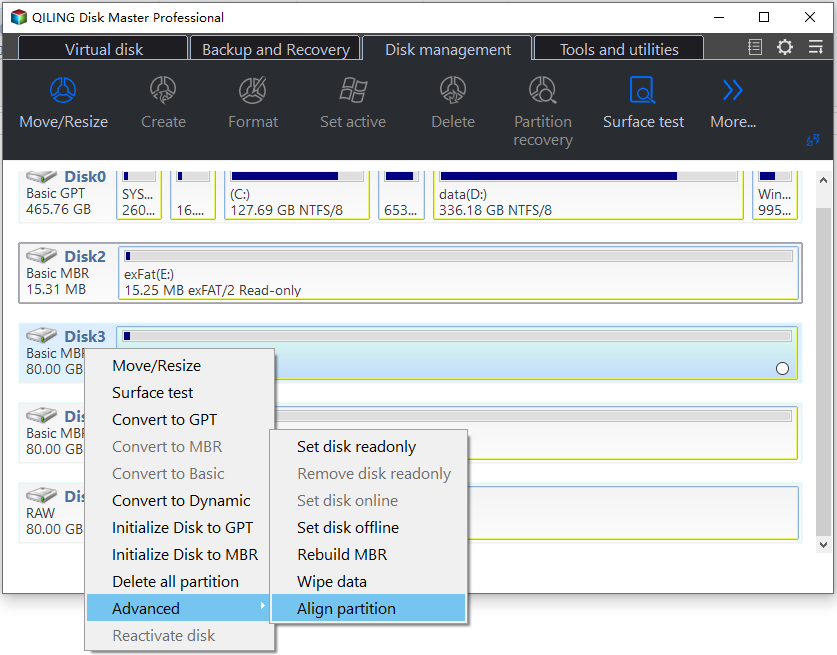
Step 2. Select the partition that you want to align and right-click on it. From the context menu, select "Align to 1MB" (or the desired size).
Step 3. To enable partition alignment, move the cursor to the "Advanced" option and select "Partition Alignment" which appears on the right.
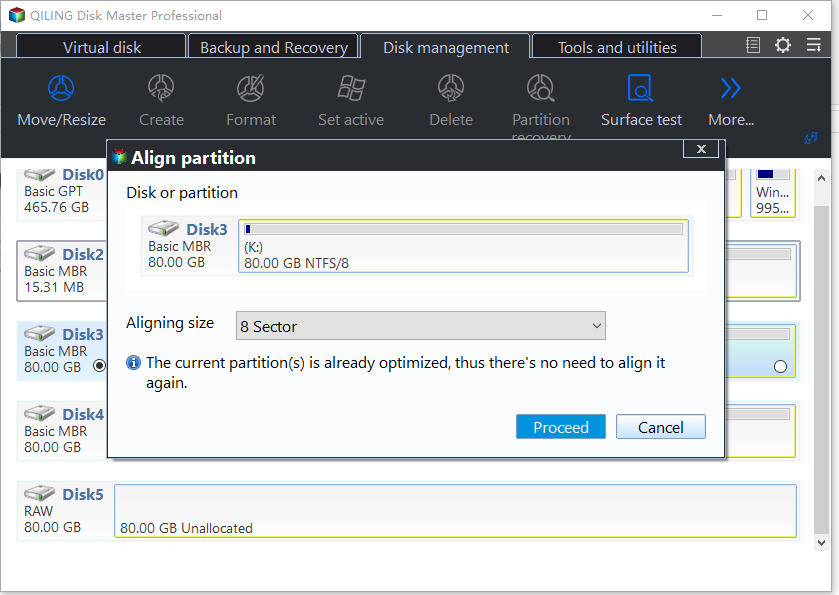
Step 4. In the popup window, set partition alignment to "4096 Sector" or you can also set it to the default one.
Note: If the partition has already been aligned, you'll be prompted that the current partition is already optimized, so there's no need to align it again.
Step 5. To begin the alignment, click on the "Proceed" button located in the upper left corner of the screen. This will initiate the process, allowing you to proceed with the alignment.
Note: If you perform alignment on a system drive, a reboot will be required.
Conclusion
I used Qiling Disk Master Professional to commit SSD 4K alignment, which was a straightforward process with only 5 steps. I chose this tool for its reliability and convenience, and was satisfied with the result. If you're interested in trying more features like schedule defrag, SSD secure erase, and transfer OS to SSD, this powerful tool is worth downloading.
Related Articles
- How to Check and Run SSD Alignment in Windows 10
How do you know if the SSD partition in Windows 10 is well aligned? Here to find how to do SSD partition alignment using Diskpart as well as different partition alignment tools. - How to Optimize Computer Performance with SSD 4k Alignment
Maybe you should consider SSD 4K alignment when you don't know how to get the best performance out of your new SSD. In this tutorial, the definition and importance of 4K alignment will be introduced and some pragmatic methods will be given to help align 4K SSD. - SSD Partition Alignment Tool Helps to Align Partitions Easily and Safely
Maybe you should consider SSD 4K alignment when you don't know how to get the best performance out of your new SSD. In this tutorial, the definition and importance of 4K alignment will be introduced and some pragmatic methods will be given to help align 4K SSD.


