Solved: System Image Restore Fails Because of EFI/BIOS
The symptom
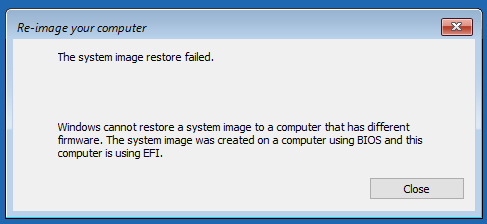
Windows cannot restore a system image that has different firmware
I use the Win8 repair disc to start my computer and it allows me to access the recovery tools for system image restore. At that point I thought great, it works, but I get this error: 'Windows cannot restore a system image to a computer that has different firmware. The system image was created on a computer using BIOS and this computer is using EFI.' I don't understand what's going on as it's THE SAME COMPUTER! I just want to restore the computer, why is it so hard to do?
- Question from Microsoft Community
Many users report that they receive the system image restore failed error while using Windows system repair disc or installation disc to restore computer from BIOS. Some common situations are listed in the following.
- This error is particularly likely to occur when attempting to restore a full system to a computer with significantly different hardware.
- You may encounter an error when trying to restore a system image that was created on a computer with a different boot firmware configuration (EFI/BIOS) on a system that uses the opposite configuration (BIOS/EFI).
- You cannot restore a system image in Windows 7, 8, or 10 if the repair disc and system image were created on a different computer, particularly if the computers have different firmware configurations.
- In addition to the issue with system images created on different computers, another reason for this error is that the old disk and new disk have different partition styles. Specifically, if the old disk uses the Master Boot Record (MBR) partition style, you will not be able to restore a system image created on a disk with the GUID Partition Table (GPT) partition style to it.
The cause for system image restore failed EFI/BIOS
In computing, there are two primary boot modes: Legacy BIOS-based and Unified Extensible Firmware Interface (UEFI). While Legacy BIOS-based systems are primarily used in older computers, UEFI has become the standard booting mechanism in modern systems. A key difference between the two is the type of disk partitioning required for each. UEFI systems necessitate a GUID Partition Table (GPT) disk, whereas Legacy BIOS-based systems rely on a Master Boot Record (MBR) disk.
Windows prohibits restoring a system from a UEFI-based computer to a BIOS-based computer, and vice versa. Some UEFI-based computers do support both UEFI boot mode and Legacy BIOS-compatibility mode, which can lead to this error even when restoring a system backup to the original computer where it was created.
The solutions to system image restore failing because of EFI/BIOS
If you're experiencing a "system image failed" error, don't worry - I've got you covered. There are three common solutions to try, and I'll walk you through each one. Before we begin, it's essential to check if both computers have the same firmware and if both disks use the same partition style. If they do, you can try methods 1 and 2. However, if this isn't the case, method 3 is a viable alternative.
Solution 1: Make sure both computers are using the same firmware
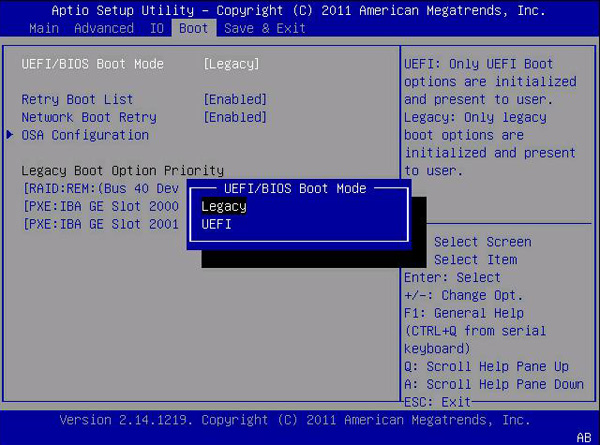
One of the most common reasons for the "system restore not working" error is that the computer being restored and the computer that was backed up are using different firmware. To verify whether your computer is using UEFI or BIOS, you can follow these steps:
To determine whether your computer is using UEFI or BIOS mode, you can use the Disk Management tool. Here's how:
Detailed steps: Boot the computer into boot menu by pressing a specific key (eg: Esc, F2, F9, F12, etc) during bootup. On the boot menu, select UEFI or Legacy.
Solution 2: Check if both disks are with the same partition style
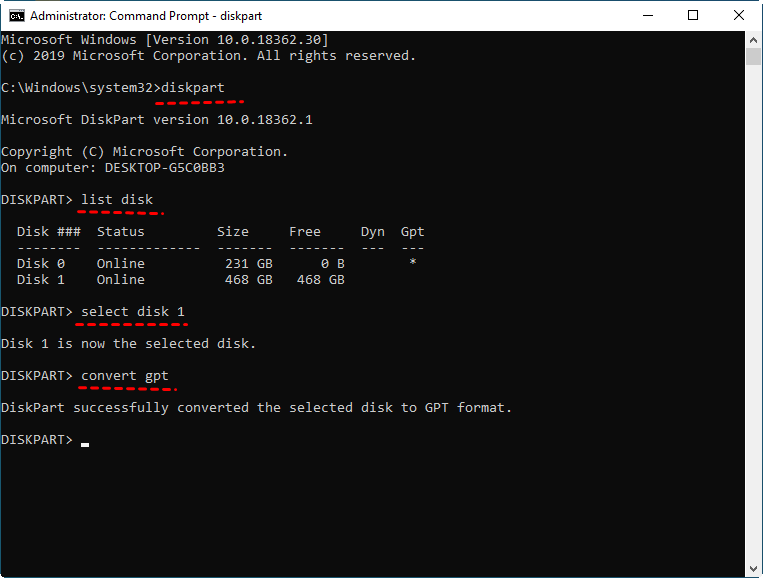
Here are the detailed steps to ensure that the disk containing the image and the destination disk are in the same mode (MBR or GPT):
Detailed steps: Type cmd in the search box and run as administrator, then input the following commands one by one.
- diskpart
- list disk
- select disk n (n is the number of destination disk.)
- convert gpt (or convert mbr)
Solutions 3: Delete the original partitions and create a new one
Here are the detailed steps to recreate a new partition using the built-in Disk Management tool in Windows 10:
Note: Before proceeding, ensure that you have connected an external hard drive or USB drive that contains a system backup image to the target computer. This backup image should be in the same mode as the target computer's system, as the restore process will overwrite the existing system.
1. To proceed, navigate to the BIOS settings on the target computer. Within the BIOS settings, ensure that the boot mode is set to UEFI. This is a crucial step to guarantee a successful restore process.
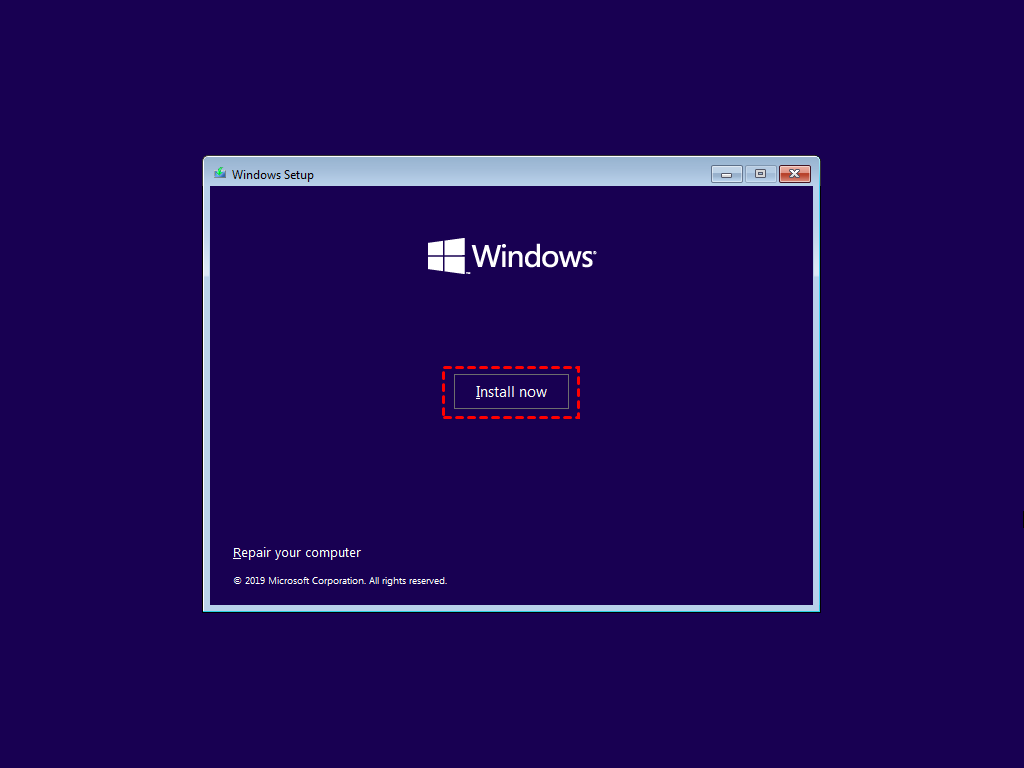
2. Restart your computer with installation disc provided by Windows.
3. Click Next and Install Now.
4. Click "I don't have a product key".
5. To proceed with the installation process, navigate to the section where you can select the operating system you wish to install. Once you have made your selection, click the "Next" button to continue with the installation process.
6. Tick "I accept the license terms" and click Next.
7. Select Custom.
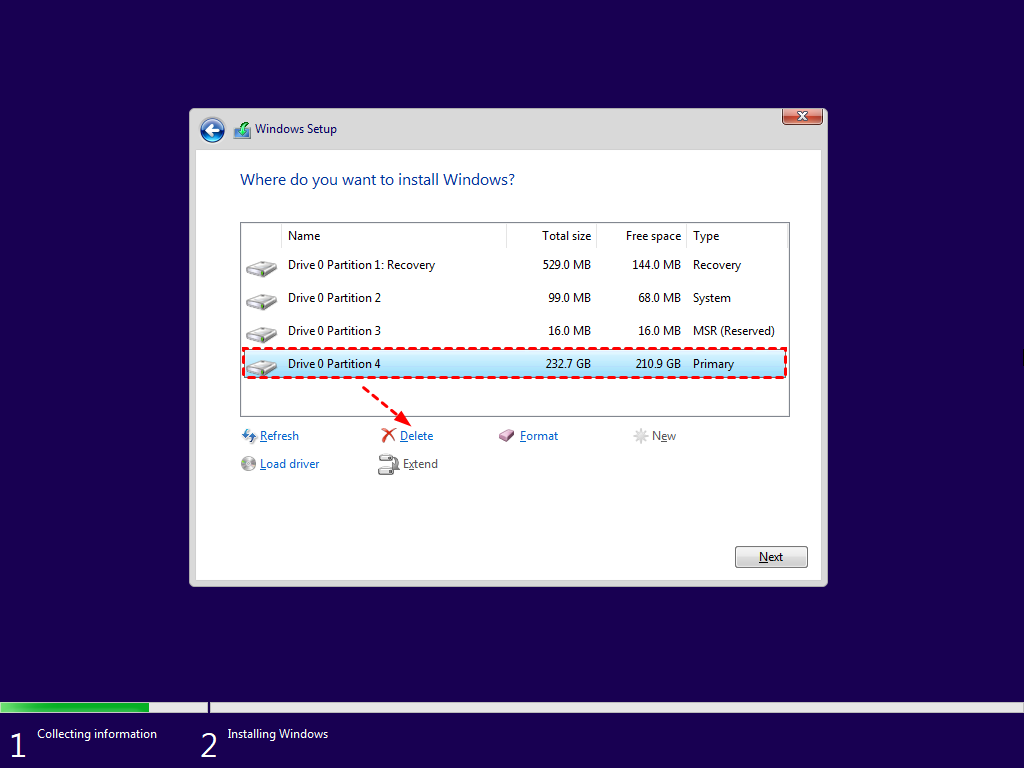
8. To proceed with the deletion process, navigate to the section where you can select the partition on the original disk. Click the "Delete" button to initiate the deletion process. If there are multiple partitions, you will need to select each one individually and delete them all in order to complete the deletion process.
9. To proceed with the creation of a new partition, select the original disk. Then, click the "New" button to initiate the partition creation process.
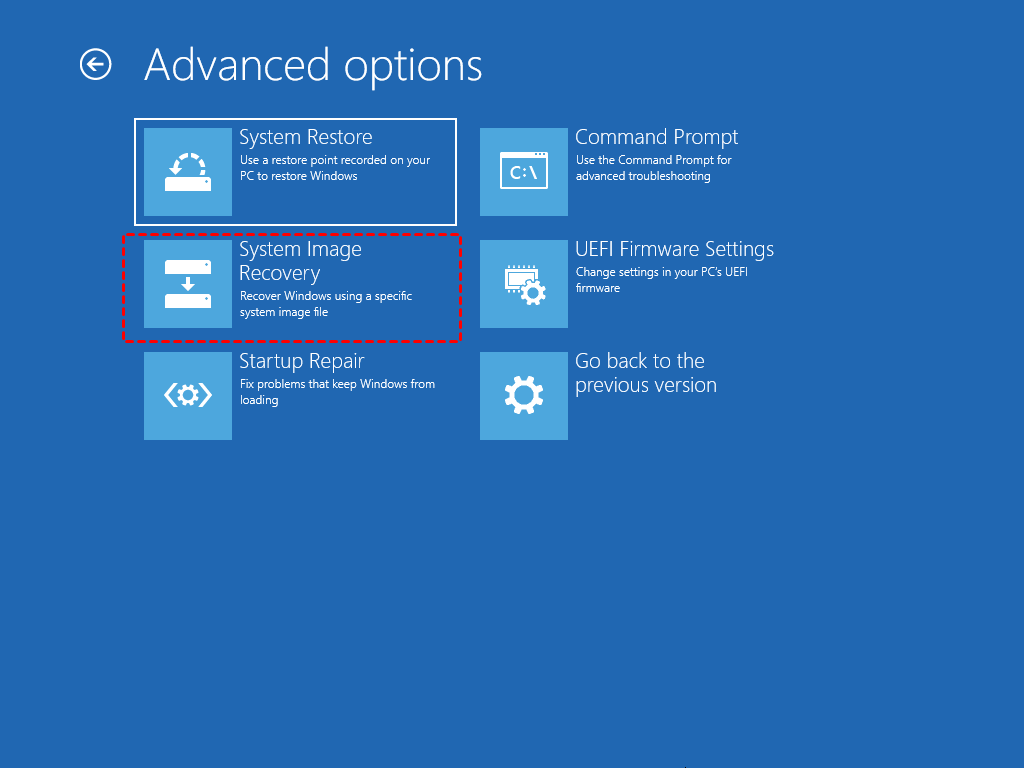
10. To complete the process, click the "X" button to close the window. Next, navigate to the "Troubleshoot" section and select "Advanced options." From there, choose "System Image Recovery" to restore your system to its previous state. This will allow you to recover your system as if nothing was ever done.
Advanced solution to system image restore failed
If you're looking for a more versatile solution to restore your system, you might want to consider using specialized backup and restore software, such as Qiling Disk Master Professional. This tool allows you to easily restore your system from a BIOS-based computer (MBR disk) to a UEFI computer (GPT disk) and vice versa, providing a convenient solution for transitioning between different firmware types. This can be particularly useful if you need to switch between different types of computers or if you're upgrading your system and want to preserve your existing setup.
- You can easily restore your system without converting the partition style. The process just works seamlessly. However, if you want to restore your system from a GPT disk to an MBR disk, it's essential to ensure that your system supports UEFI boot mode. In Windows 8 and later versions, both 32-bit and 64-bit systems support UEFI boot mode.
- This software empowers you to create a bootable media, which serves as a rescue tool to start your computer when it's unable to boot normally. If you don't have a USB drive or CD/DVD available, you can alternatively �reate a recovery environment, allowing you to run backup and restore operations without the need to load the operating system. This feature is particularly useful in situations where your computer is unable to boot, and you need to perform critical tasks such as data recovery or system restoration.create a recovery environment, allowing you to run backup and restore operations without the need to load the operating system. This feature is particularly useful in situations where your computer is unable to boot, and you need to perform critical tasks such as data recovery or system restoration.
- This software is compatible with all Windows PC operating systems, covering Windows 7, 8, 8.1, 10, and 11, including both 32-bit and 64-bit versions.
To proceed, download and install Qiling Disk Master on the source computer.
To restore a system image to a computer with different firmware, you will need to install Qiling Disk Master on the target computer. This software allows you to run backup and restore operations without loading the operating system.
1. To restore a system image to a computer with different firmware, you will need to create a bootable USB drive using Qiling Disk Master on the source computer. This will allow you to boot the target computer from the USB drive and run the restore operation.
2. To ensure a complete and reliable system backup, use Qiling Disk Master to create a full system image. This will capture the entire system, including the operating system, applications, and data. Store the system image on a bootable USB drive, if possible, or a network location, such as a NAS or a cloud storage service, to free up space on the source computer.
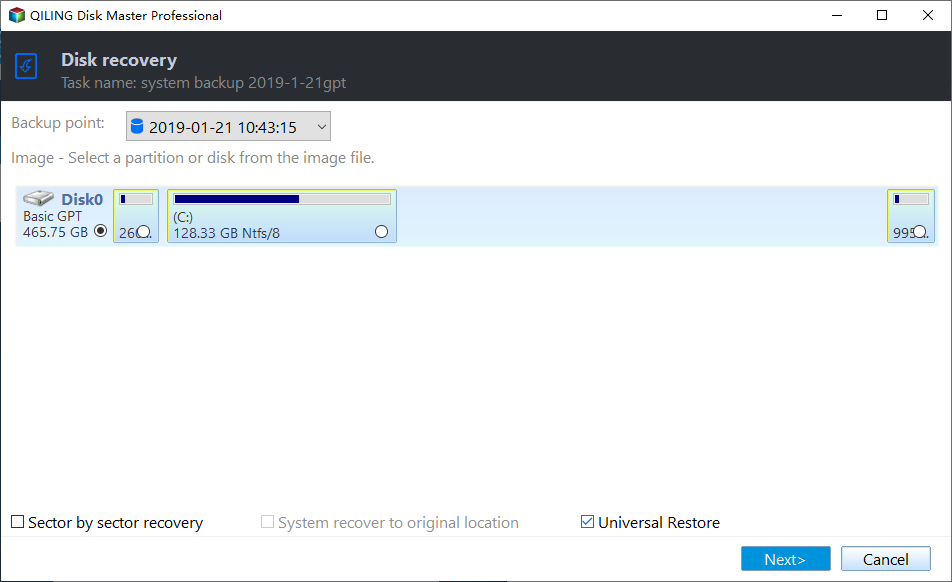
3. To initiate the restoration process, boot the computer from the bootable USB stick. Qiling Disk Master will automatically load up. Once it's running, navigate to the "Restore" tab and click on "Select Image File". This will allow you to choose the system image you created earlier, which will then be used to restore the computer to its previous state.
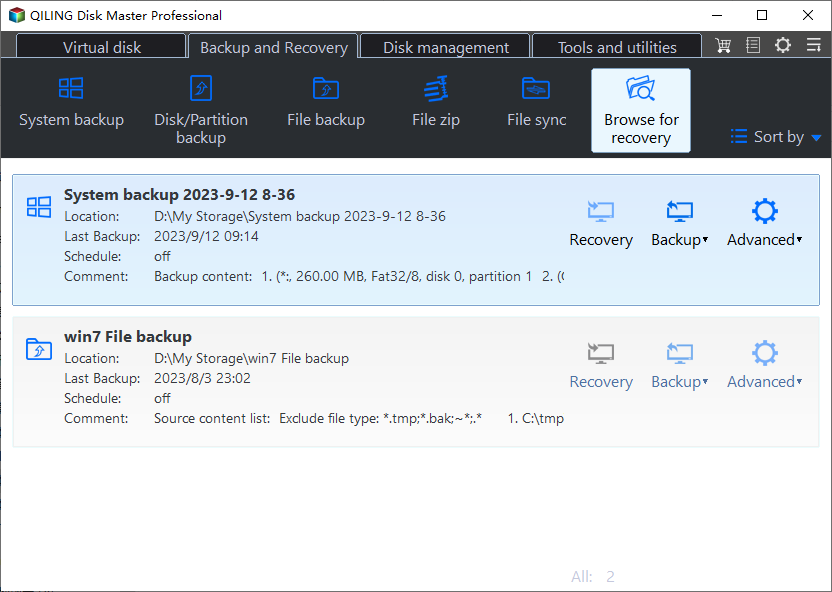
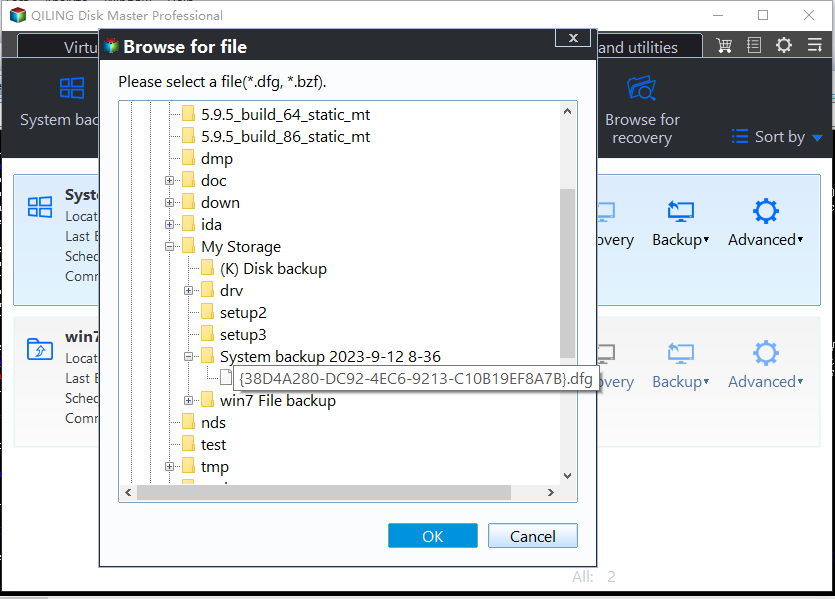
4. To proceed with the restoration process, you need to select the backup image that was previously created. This image should be located on the connected USB drive or a network location.
5. Tick "Universal restore". Then click "Next".
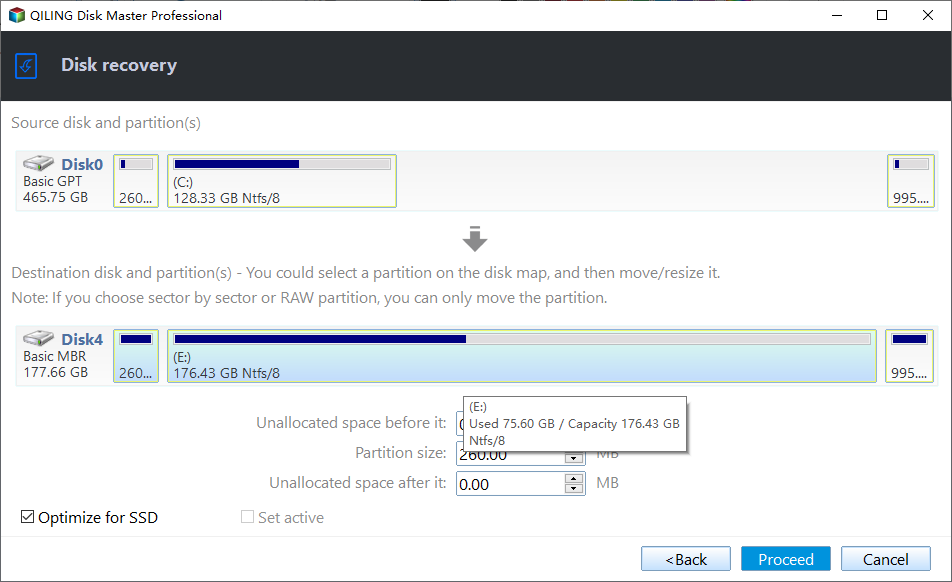
6. To proceed with the restoration process, you need to specify a partition as the destination for the restored system. This step is only necessary if your original system path is not recognized by the software. If you're restoring the system to its original location, this step will be skipped. However, if the software is unable to locate the original system path, you'll need to manually select a partition to serve as the destination for the restored system.
Note: Before proceeding, please note that the selected partition will be completely erased and reinitialized. This means that any data, files, or operating systems currently residing on this partition will be permanently deleted.
7. To confirm the successful completion of the recovery process, navigate to the "Operation Summary" page. Ensure that the option for "Universal Restore" is selected, which will guarantee that the recovered system is bootable. If everything appears to be in order, proceed by clicking the "Proceed" button. This will initiate the final stages of the recovery process.
With Qiling Disk Master, you can confidently restore system images without encountering issues related to EFI/BIOS, ensuring a smooth and successful recovery process. Additionally, this powerful tool serves as a reliable cloning software, enabling you to clone large hard drives to smaller SSDs, convert GPT disks to MBR formats, and vice versa, making it an indispensable asset for managing and maintaining your computer's storage. to make the text more polished and professional.
To safeguard an unlimited number of computers within your organization, consider opting for Qiling Disk Master Technician. This powerful tool comes equipped with the Qiling Image Deploy feature, enabling you to deploy or restore system image files not only on the server-side computer but also on multiple client-side computers simultaneously, all from a network-based setup. This streamlined process simplifies the management and maintenance of your company's computer fleet, ensuring that all devices are running smoothly and efficiently.
Related Articles
- How to Backup and Restore EFI System Partition in Windows 7/8/10?
- Restore BIOS Based System Recovery Points to UEFI Based Computer
- Top 3 Solutions to Repair Winload.efi Missing After Clone
- Best Client-Server Backup Software for Windows | Download
To backup client computers from a central server, you can use client server backup software to save backup time and administrative cost. Go and have a try.
