Perform Task Scheduler Log Off User or Schedule Backup
Task scheduler log off user or run a scheduled backup:
- How do I perform Task Scheduler log off
- How to perform Task scheduler log off user easily
- How to schedule log off user without task scheduler
- How to run a scheduled log off backup
How do I perform Task Scheduler log off
You have a group of users sharing 3 machines across multiple shifts, but they often forget to log off after their shift, leading to locked or slow computers. You're looking for a way to automatically log off users after a certain period of inactivity. Unfortunately, there isn't a straightforward way to do this using Task Scheduler. However, you can consider using a third-party tool or script that can monitor user activity and log off users after a specified idle time. Some options include using a Group Policy Object (GPO) to configure a script that runs at startup to log off inactive users, or using a tool like AutoIt or PowerShell to create a script that can monitor user activity and log off users after a specified period.
The Task Scheduler can be a helpful tool for performing unattended tasks or reminders, but it's limited in its ability to automate tasks that require user interaction, such as logging off a user, as this feature is only available in earlier versions of Windows and has been removed in the latest versions.
To set Task Scheduler to log off a user, you can use the "On disconnect from user session" trigger, but ensure it's set to run as the system account. This will ensure it triggers reliably on user logout. Additionally, you can also use the "At startup" trigger and the "On workstation unlock" trigger to achieve the same goal.
Is there really no way? No, it is not true. We find some working ways in diffrent forums, such as, using shutdown.exe in the task scheduler or the event ID 4647, set shutdown scripts in the group policy. They are will be introduced in the next part.
Users may want to run a scheduled backup task, such as logging off users to prevent computer slowdowns, and can use a professional backup software integrated with log off event trigger to achieve this.
Unfortunately, Windows Vista does not have the Group Policy Editor (gpedit.msc) which makes it harder to achieve this. However, you can use a batch file to run the backup at logoff and then shut down the computer. Here's a possible solution: create a batch file that runs the backup and then uses the "shutdown" command with the "/t" option to specify a timeout. The "/t" option will wait for the specified time before shutting down the computer, allowing the backup to complete. For example, you can use the following batch file: ```shutdown /t 300``` This will wait for 5 minutes (300 seconds) before shutting down the computer. You can adjust the timeout time as needed. To run this batch file at logoff, you can use the "shutdown" command with the "/l" option, like this: ```shutdown /l /t 300``` This will run the batch file at logoff and then shut down the computer after 5 minutes. Note that this solution relies on the user running the shutdown command, so it may not work if the user closes the lid or presses the power button.
How to perform Task scheduler log off user easily
Here you will learn two ways in Task Scheduler, namely using shutdown.exe and event ID, to schedule a task to automatically shut down the computer after a specific period of inactivity.
Method 1: Set Task Scheduler log off user using shutdown.exe
To perform Task Scheduler log off users, start by selecting "Create Task" from the Task Scheduler Library, then click "Create Task". In the "General" tab, give the task a name and description. In the "Triggers" tab, click "New" and select "At log on" as the trigger type. In the "Actions" tab, click "New" and select "log off" as the action type.
Step 1. Press Win + S and type task scheduler in the search box. Then, select it.
Step 2. Select Create Task under the Actions tab.
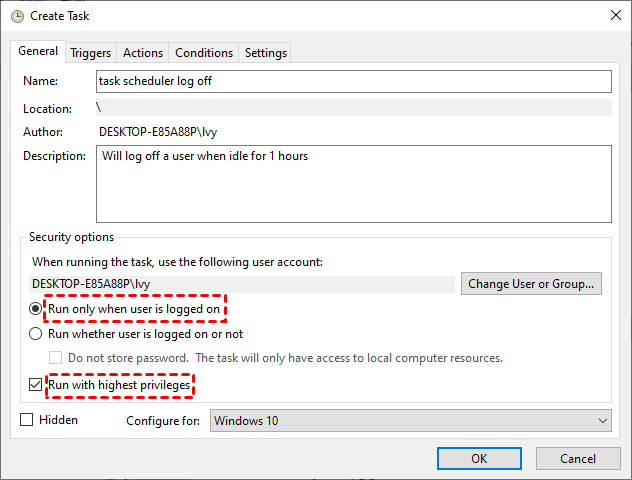
Step 3. The log off user task is: **Idle User Logoff**. Description: **Will log off a user when idle for 1 hour**. Security Options: **Run only when user is logged on** and **Run with highest privileges**.
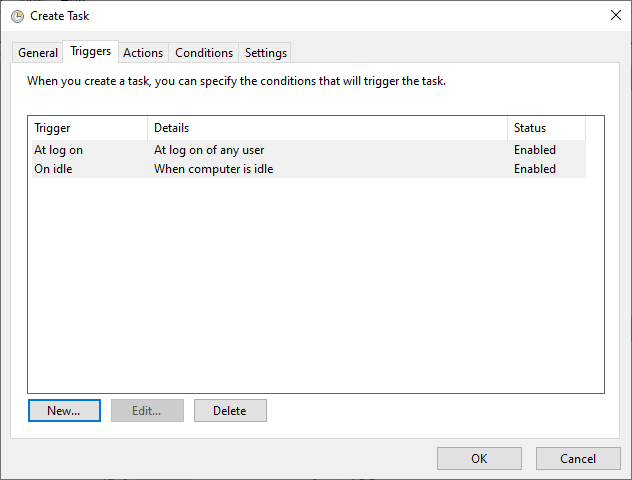
Step 4. To set up an automated task to run at log on or on idle, click on the Triggers tab, then select New, and from the dropdown menu, choose At log on or On idle. For the At log on trigger, keep the default settings to run the task for any user.
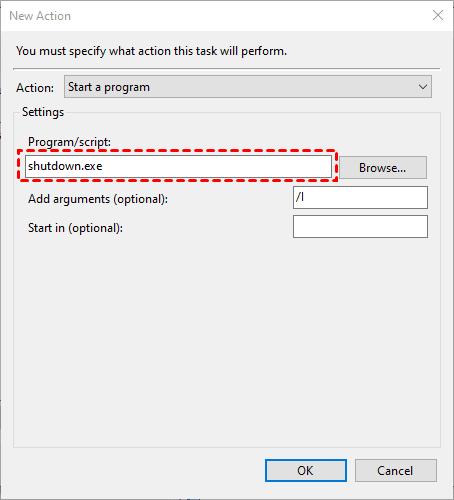
Step 5. Click Actions > New > Start a program. Then, type shutdown.exe at the Program/script box and add /I agreement.
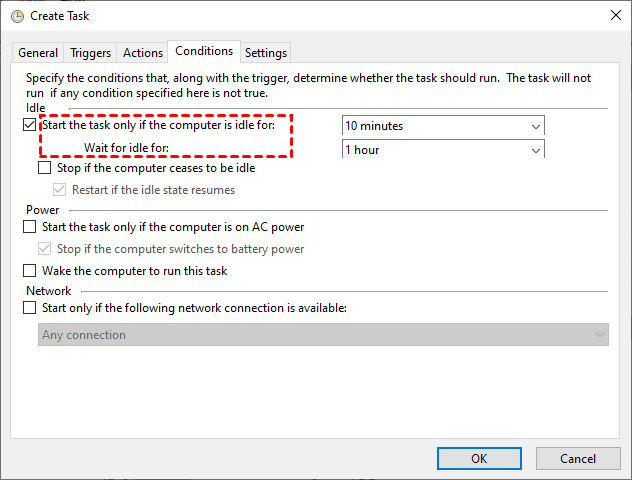
Step 6. To set up the task to start only when the computer is idle, click on the "Conditions" option, then check the box next to "Start the task only if the computer is idle for" and enter the desired idle time in minutes. This will ensure the task starts when the computer has been inactive for the specified period.
Step 7. To set up the task, click on "Settings", then select the three options: "If the task fails, restart every", "Stop the task if it runs longer than", and "If the running task does not end when requested, force it to stop". Next, set the desired time for each option.
If a user logs off while having open files, those files will not be saved.
Method 2: Set Windows 10 log off using event ID
To create a task in the Task Scheduler, you can either use the "Create Task" action or the "Create Basic Task" option, depending on your specific requirements.
Step 1. Open task scheduler. Then, click Create Task to enter its window.
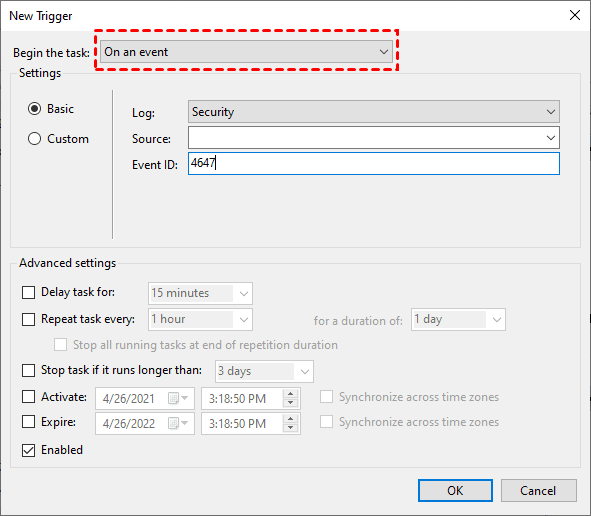
Step 2. To set up an alert, go to Triggers, click New, then select On an event. In the Settings section, choose Security and enter the Event ID 4647.
Step 3. Set other advanced setings per your needs. Then, click OK to save this task.
Note: This trigger is ideal for fast executions, as it doesn't pause or delay the logout process technically.
How to schedule log off user without task scheduler
Here are two ways to schedule log off user without using Task Scheduler:
Method 1: Set GPO scheduled task log off
You can use Group Policy to perform this task, except for Task Scheduler. The steps are below.
Step 1. Open group policy by typing gpedit.msc in the search box.
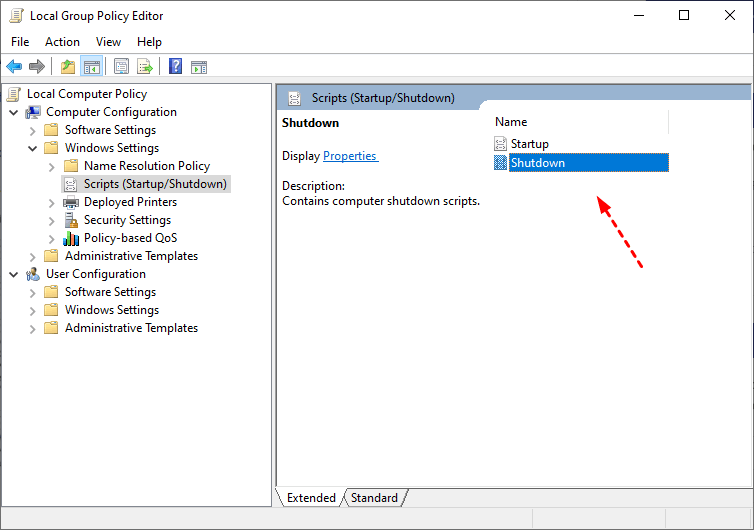
Step 2. Go to Computer Configuration > Windows Settings > Scripts (Startup/Shutdown) and then select Shutdown.
Step 3. Go to User Configuration > Windows Settings > Scripts (Logon/Logoff) and then select logoff.
Method 2: Set Windows task scheduler log off event using registry
If your computer doesn't support Group Policy, you can use Registry as an alternative. To create registry entries, follow these steps: note that this will modify the registry, so it's essential to create a backup in advance.
Step 1. Type notepad in the search box and then open it.
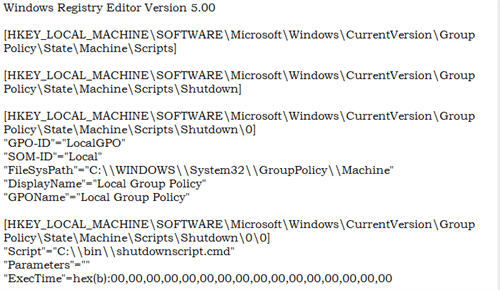
Step 2. Copy the following code and save it.
How to run a scheduled log off backup
To perform a scheduled backup with log off event, use a professional backup software like Qiling Disk Master Professional, which supports 4 event triggers, including user logon, user logoff, system shutdown, and system startup, and can be used in various backup solutions.
In addition to the basic backup settings, you can also utilize other features such as scheduling backups daily, weekly, or monthly, setting the computer to wake up to run scheduled tasks, and using incremental or differential backup methods, among others. For a more comprehensive understanding of these features, you can download the software to explore them yourself.
To create a schedule log off backup, first prepare a storage device such as an HDD, SSD, USB flash drive, network drive, or cloud drive like OneDrive, and connect it to your computer. Then, launch the software and follow the steps to set up the backup schedule.
Step 1. At the main console, click Backup and then System Backup.
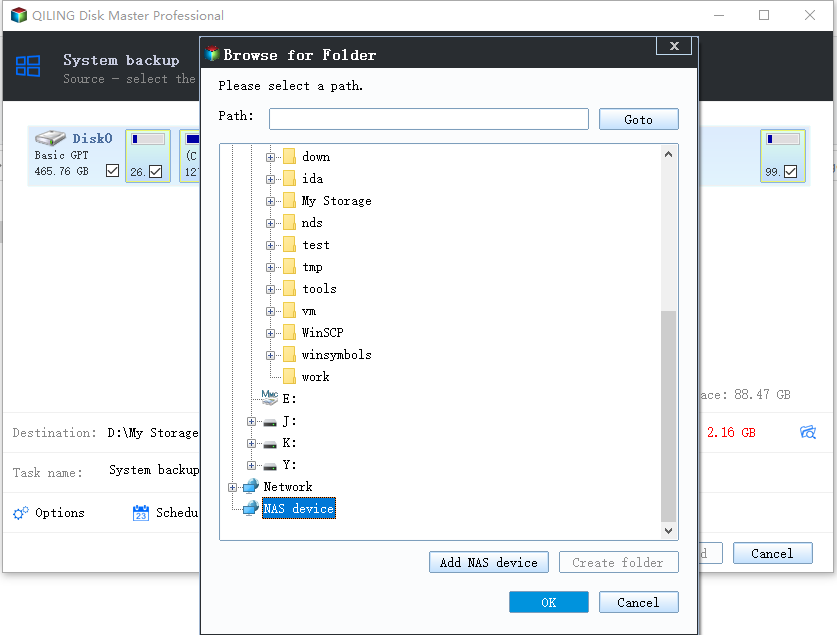
Step 2. System drive and System Reserved Partition are selected automatically. Click the folder shapped button to choose destination backup location.
✎Tip:
You can edit name of this task for better identification.
Step 3. Click Schedule at the lower left corner and then select Event triggers from the drop-down list.
To trigger the event, choose the User logoff option and click OK.
You can also enjoy these features:
This tool allows you to comment on the task, compress or encrypt the backup image, split the image, and other functionalities.
Protect data continuously using a daily/weekly/monthly schedule backup, and the option to wake the computer 2 minutes before the task start time is available.
This option will help manage backup storage by deleting old backup images, saving disk space.
Step 4. To start the backup task automatically when you log off your computer, click "Proceed" to add this task or backup system immediately. This will initiate the backup process without requiring user intervention when you shut down your computer at the next opportunity.
The way forward
Whether you want to use the task scheduler to log off a user or run a scheduled backup with a user log off event, this article can help. A scheduled backup can protect your data continuously, allowing you to restore your computer to an earlier date in the event of a disaster, making it a crucial step if you don't already have one.
Qiling Disk Master offers a range of backup solutions, including backup settings, sync, and clone features. It allows users to sync files between their computer and drive, clone hard drives of different sizes, and clone large HDDs to smaller SSDs.
Related Articles
- How to Automatically Backup File Using Task Scheduler?
Task Scheduler is a built-in Windows features with multiple options to trigger a task. Learn 3 ways to backup file using Task Scheduler. - How to Schedule SyncToy to Run Automatically in Windows 10?
Wanna schedule SyncToy in Windows 10 but don't know how to do it? Read this article to get the answer and find the best free alternative to SyncToy. - Best Toshiba Hard Drive Backup Software
We all know that finding a good Toshiba hard drive backup software is very important. It makes the backup task simple and efficient. Click to learn more about backup software and its use steps. - Use Toshiba Restore Point to Do Toshiba Factory Reset Easily
The Toshiba restore point helps to restore your computer to a previous date. If the system or disk is damaged, you can also factory reset it or restore from system backup.


