Fix The System Cannot Find the File Specified | 10 Solutions
- Symptom: The System Cannot Find the File Specified in Windows 7/8/10/11
- Causes to The System Cannot Find the File Specified Error
- How to Fix The System Cannot Find the File Specified in Windows
- Solution 1. Create RunOnce Registry Key
- Solution 2. Delete ProfilemagePath Key
- Solution 3. Open the Libraries Folder
- Solution 4. Run Antivirus Software
- Solution 5. Run System File Checker
- Solution 6. Run CHKDSK Scan
- Solution 7. Install Windows Update
- Solution 8. Uninstall and Reinstall the Drives
- Solution 9. Format the USB
- Solution 10. Use WinRAR
- How to protect your system and data in a powerful way
- Conclusion
Symptom: The System Cannot Find the File Specified in Windows 7/8/10/11
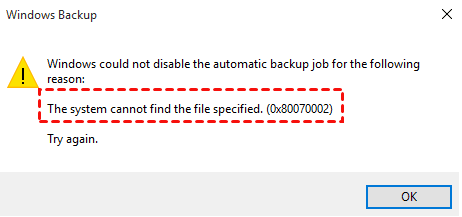
When creating a system image backup or performing other tasks like accessing files or connecting USB devices, Windows users may encounter the error "Windows backup failed: the system cannot find the file specified", often accompanied by error code 0x80070002. This issue is commonly experienced by users of Windows 10 or 11.
Causes to The System Cannot Find the File Specified Error
The "The system cannot find the file specified" error in Windows can occur due to various reasons, including incorrect file paths, missing or corrupted system files, faulty disk drivers, or issues with the Windows registry. These factors can cause the operating system to fail to locate or access specific files, resulting in the error message.
- System files are missing or corrupted.
- Connection problems.
- Missing driver file.
- Abnormal registry keys.
- Missing files in drivers.
- Required files for the specific software are missing or corrupted.
- Incorrect file permission settings.
- ...
How to Fix The System Cannot Find the File Specified in Windows
While the exact cause of the issue is unclear, there are several common reasons that may be contributing to the problem. Fortunately, there are 10 potential solutions that can be tried to resolve the issue. Keep reading to explore these options.
Solution 1. Create RunOnce Registry Key
To resolve the "The system cannot find the file specified" error, try restarting your computer, checking the file path and name for typos or incorrect formatting, ensuring the file is not corrupted, and verifying the file exists in the specified location. If the issue persists, consider reinstalling the application or seeking further assistance from the software developer or a technical expert.
1. To open the Run box in Windows, press the Windows key and the R key simultaneously. This will open the Run dialog box, where you can type commands or execute applications directly.
2. Type regedit and press Enter.
Tip: Before modifying the registry, create a backup by exporting it. To do this, go to the registry editor, click on "File", then select "Export". This will create a copy of your current registry settings, which you can use to restore your system if something goes wrong.
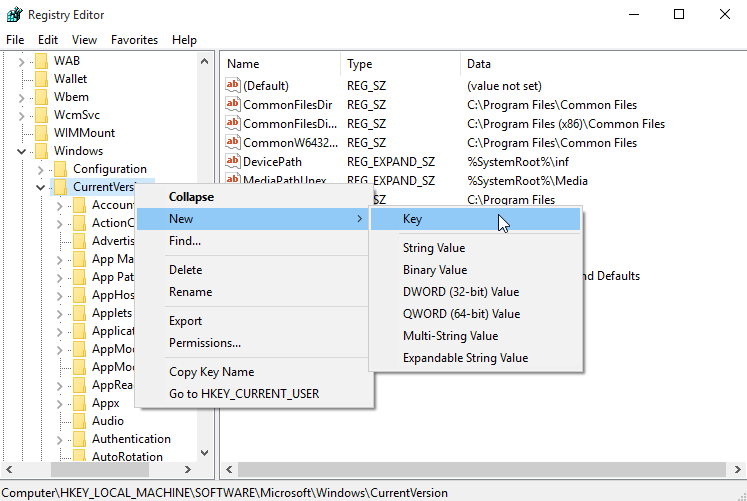
3. After you have backed up the registry, navigate to HKEY_LOCAL_MACHINE\SOFTWARE\Microsoft\Windows\CurrentVersion.
4. To create the RunOnce key, expand the key and look for the RunOnce key. If it doesn't exist, create it. Click on the CurrentVersion key, then choose New > Key from the menu.
5. Type RunOnce as the name of the new key.
6. Navigate to HKEY_CURRENT_USER\Software\Microsoft\Windows\CurrentVersion.
7. Check if the RunOnce key exists. If it doesn't, recreate it by following the same steps to create it.
8. Exit Registry Editor and restart your PC.
Solution 2. Delete ProfilemagePath Key
When you are trying to create a backup using the Windows backup utility, backup error 0x80070002 occurs and prevent you from creating your backup. You can delete certain values from your registry to fix the problem. Below are the steps:
1. Press the Windows key and R key together to open the Run box.
2. Type regedit and press Enter.
Tip: To create a backup, go to "File" and select "Export", then choose a location to save the backup.
3. Navigate to HKEY_LOCAL_MACHINE\SOFTWARE\Microsoft\WindowsNT\CurrentVersion\ProfileList.
4. Expand the ProfileList key, navigate through each subkey, and verify that each one has a ProfileImagePath value available in the right pane.
5. If a subkey is missing the ProfileImagePath value or has empty Data, click it and select Delete to remove it from the menu.
Solution 3. Open the Libraries Folder
To access the hidden Libraries folder in Windows 10, follow these steps: the Libraries folder is hidden by default, but you can reveal it by clicking on the "View" tab in File Explorer, then selecting "Show" and finally "Libraries" from the dropdown menu. Alternatively, you can type "%userprofile%\Library" in the File Explorer address bar to directly access the Libraries folder. This may help resolve the system cannot find the file specified error.
1. Open This PC.
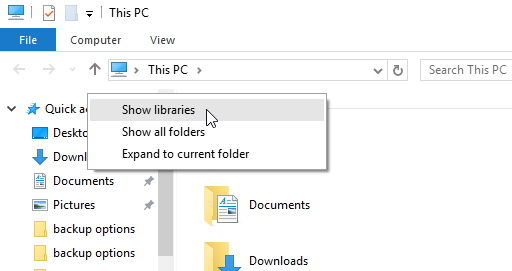
2. To access the libraries in the left pane, right-click an empty space and select the option to show libraries.
3. In the left pane, you can find the Libraries folder.
Solution 4. Run Antivirus Software
In Windows 11/10/8/7, a "The system cannot find the file specified" error can be caused by a virus, cyber threats, or malicious attacks. To resolve this issue, running antivirus software and scanning your system is a recommended solution.
Solution 5. Run System File Checker
If the file is missing or corrupted, you may encounter a "cannot find the file specified" error when trying to access or backup files. You can run a System File Checker (SFC) scan to repair the missing files.
1. To run the Command Prompt as an administrator, type "Command Prompt" in the search box, right-click on its name that appears, and select "Run as administrator" from the context menu.
2. To start the System File Checker, type "sfc /scannow" into the Command Prompt window and press Enter. This will initiate a scan of the system files and automatically replace any corrupted files with a cached copy.
3. When the process is done, type 'exit' and press Enter to leave this command.
Solution 6. Run CHKDSK Scan
When a file is damaged or corrupted, you may encounter the error "The system cannot find the file specified". To resolve this issue, running the CHKDSK utility can help scan the file and potentially fix any problems.
1. Type "Command Prompt" in the search box, right-click its name, and select "Run as administrator".
2. To run a check on a specific partition, type `chkdsk X: /f` (replace X with the actual drive letter of the partition you want to scan) and press Enter to initiate the scan.
Solution 7. Install Windows Update
Windows updates can help resolve hardware and software issues, so it's a good idea to check and update your Windows to the latest version.
1. Press Windows key and I key together to open Settings.
2. Choose Update & security > click Check for updates button.
3. If updates are available, download and install all the updates.
Solution 8. Uninstall and Reinstall the Drives
If you're experiencing issues with the driver download from the manufacturer's website, resulting in the error "The system cannot find the file specified," you can try the following solution. You can try checking your browser settings, ensuring that the file is downloaded correctly, and that the file is not blocked by your antivirus software.
1. Right-click This PC > choose Manage > Device Manager.
2. To uninstall a device in Windows, first, you need to expand the "Devices" category in the Device Manager. You can do this by clicking on the arrow next to "Devices" in the left-hand menu.
3. Right-click the device and choose Uninstall.
4. 1. Go to Device Manager.
5. Finally, install the driver again.
Solution 9. Format the USB
The system cannot find the file specified error may occur when inserting a USB flash drive, which can often be resolved by formatting the drive.
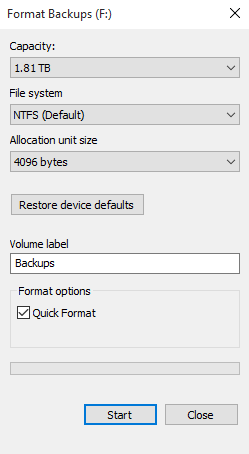
1. To format a USB flash drive, open "This PC" and right-click on the drive, then select "Format..." from the context menu.
2. Check Quick Format option when the format window opens.
3. Click Start to make it.
Tip: Be sure to backup your data on the USB flash drive before using the formatting tool, as it will completely erase all existing data. This will prevent any loss of important files.
Solution 10. Use WinRAR
If you're encountering the error "The system cannot find the file specified" when attempting to delete a specific file or folder, you can try the following approach. First, open the Command Prompt as an administrator.
1. Right-click the problematic file > choose Add to archive...
2. Check Delete files after archiving > click the OK button.
Now you are able to delete the file completely.
How to protect your system and data in a powerful way
When encountering the "system cannot find the file specified" issue, it's often due to missing or corrupted system files, abnormal registry keys, or other reasons. To prevent data loss in the future, creating a system image regularly with a reliable backup software is highly recommended. I suggest using Qiling Disk Master Standard, a trusted tool for Windows PCs.
Creating a system image backup will include every file, folder, system, installed program, and even changes made later in a backup. This way, if something bad happens or the error occurs again, you can easily restore your computer to an earlier date, including all the files. This can be especially useful in case of a system failure or data loss, as it allows you to recover your computer to a previous state with all your files intact.
- Backup system regularly: With the feature, you can schedule backups to occur daily, weekly, or monthly, depending on how frequently files are changed on the system partition. You can also customize the backup date, time, and intervals separately.
- Backup only changed fileThis software uses incremental backup as its default method, which only saves changed files since the last backup, but requires all previous backups to be intact when restoring a system image to a new hard drive or computer.
- Multiple backup destinations: You can use it to backup to external hard drive, local disk, NAS network shared folder, or other locations.
You can try downloading this free backup software to see how it works. For server users, you might want to check out Qiling Disk Master Server.
1. To backup your system, click on the "Backup" tab in the software and select "System Backup". This will automatically include the necessary partitions for a full system restore.
2. To specify the backup target location, click on the circled place and select it from the computer or network location.
4. Confirm the information and then click Proceed to start the backup process.
To complete a system backup in Windows 10 or other systems, start by clicking on the "Backup" option, then select the backup location and choose what to back up. Next, click on "Next" and then "Save on a network" or "Save on a hard disk". After that, select the backup drive and click on "Next". Finally, click on "Finish" to complete the backup process.
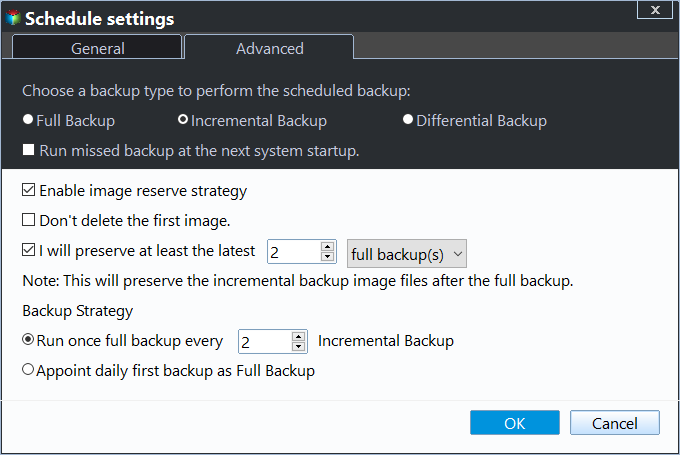
In the short term, everything will be fine, but in the long run, this may lead to backup disk full due to increasing backups. To completely avoid this problem, you can delete old backups regularly based on quantity or backup cycle.
To set up a backup scheme, click on "Backup Scheme" under the "Schedule Backup" tab, then enable automatic backup cleanup by selecting one of the available methods: "By quantity", "By time", or "By daily/weekly/monthly".
Conclusion
If you're experiencing the "The system cannot find the file specified" error in Windows 11/10/8/7, there are several methods you can try to resolve the issue. One possible solution is to restart your computer in Safe Mode and see if the error persists. You can also try running the System File Checker (SFC) tool to scan and replace any corrupted system files. Additionally, checking for any malware or viruses using an antivirus software can also help.
If you're concerned about your computer failing, you can create a bootable media in advance, allowing you to restore your system even when it's not functioning.
Related Articles
- Fix Windows Cannot Find a System Image on This Computer Issue
This passage will analyze reasons for "Windows cannot find a system image on this computer" and provide easy ways to solve this issue. - Windows Backup Did Not Complete Successfully-Explained
What can you do when Windows backup did not complete successfully? This article will break it down to you and provide a solution. - Fix The Request Failed Due to a Fatal Device Hardware Error
"The request failed due to a fatal device hardware error" occurs on external hard drive, SSD or SD card? Anyway, you will get the causes and corresponding solutions below. - Windows 11 Virus & Threat Protection Not Working (2024 Fixes)
Many users have reported Windows 11 virus and threat protection not working. We have wrapped up a few solutions here in this blog for our readers to let them get rid of this issue.
