How to Transfer Files from Windows 7 to 10 over Network
When run file sharing between Windows 7 and Windows 10?
File transfer is a common operation for computer users, often needed to move files between folders, drives, and computers to backup or share files across different locations. This may involve transferring files from Windows 7 to Windows 10 over a network in situations such as backing up files or sharing files between different computers.
- To transfer files from your old Windows 7 computer to your new Windows 10 computer without a specified transfer cable, you can use a USB drive or cloud storage. You can copy the files you want to transfer to the USB drive on your old computer, then plug the USB drive into your new computer and copy the files to the new computer. Alternatively, you can use cloud storage services like OneDrive or Google Drive to upload your files to the cloud, then access them from your new computer.
- To share files between Windows 7 and Windows 10 computers on the same network, you can use the built-in feature called "HomeGroup" in Windows 7, and the "File Explorer" in Windows 10. In Windows 7, go to Start, then "Control Panel", then "System and Security", and click on "Add features to Windows 7 from a HomeGroup".
Then, how to realize Windows 7 to Windows 10 file sharing over network? Please move on to the next part.
2 easy ways to transfer files from Windows 7 to Windows 10 over network
To share a network between Windows 7 and Windows 10, ensure that both computers are connected to the same wireless or wired network. You can share files and printers between the two operating systems using the built-in features of Windows, such as HomeGroup or by enabling file and printer sharing on the Windows 7 computer and accessing it from the Windows 10 computer. Alternatively, you can use a third-party software or app to facilitate file transfer and sharing between the two operating systems.
- Method 1: file sharing over network with Windows built-in tool
- Method 2: file sharing over network by a handy freeware
Method 1: file sharing over network with Windows built-in tool
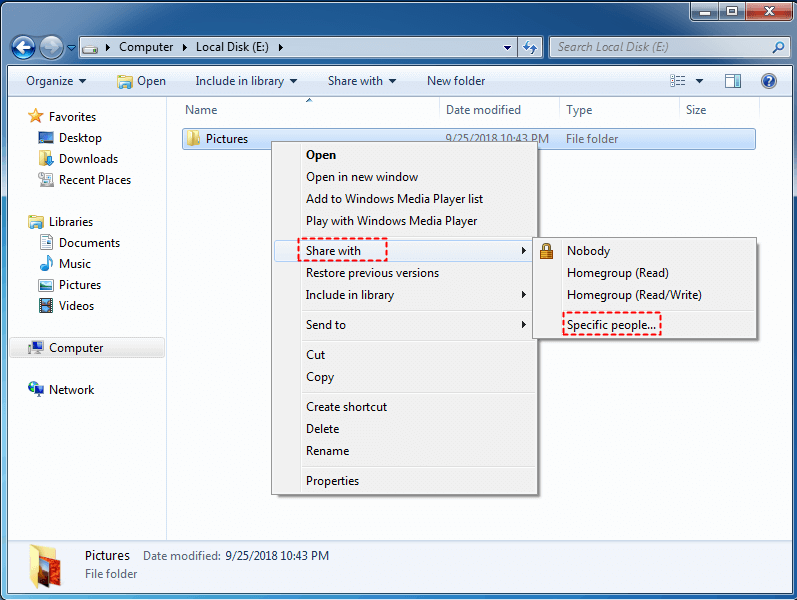
1. To share a folder on a Windows 7 computer, locate the folder you want to share, right-click on it, and choose "Share with" followed by "Specific people...".
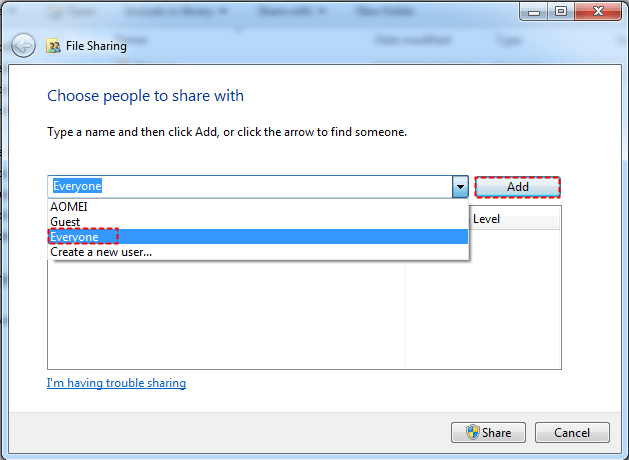
2. In the file sharing window, select users to share with using the drop-down menu and click "Add". You can choose to share with "Everyone", which means the files will be accessible on your local network to anyone, even if they don't have a password.
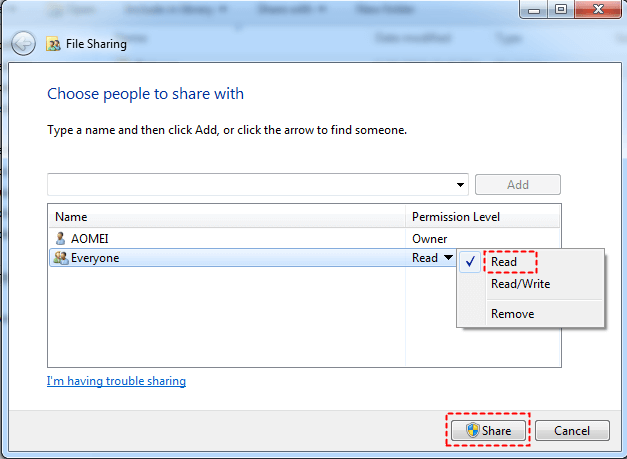
3. To share your folder, click on the user you just added to the list, set permissions for it, and then click "Share". Once you see the message "Your folder is shared", click "Done".
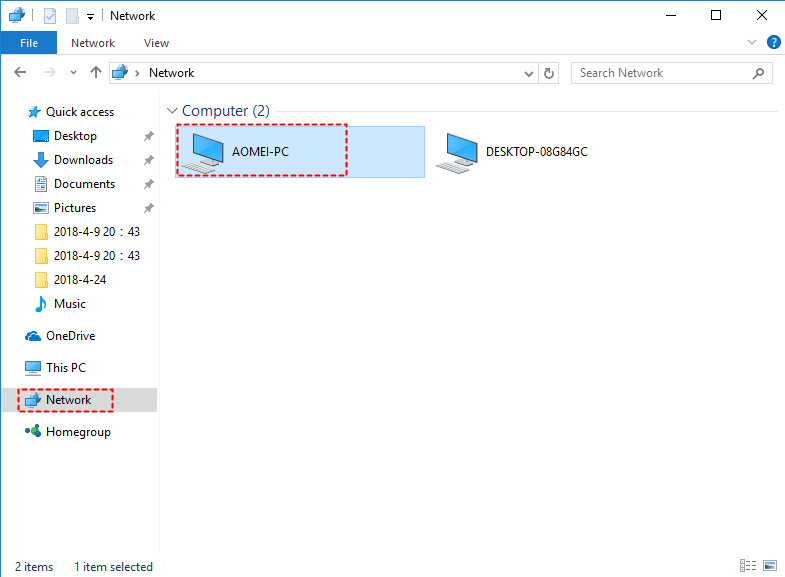
4. To access the shared folder on the Windows 10 computer from the Windows 7 computer, keep the Windows 7 computer on and access the shared folder on the Windows 10 computer by finding the Windows 7 computer's name in the Network section on the Windows 10 computer, double clicking it to open it, and locating the shared folder there, then copying it to anywhere else as needed.
✍ Notes:
① Shared items will be inaccessible when the Windows 7 computer is asleep. This is because shared items are stored on the computer and when the computer is asleep, the shared items are not accessible.
② If you're having trouble accessing shared items on your Windows 10 computer, try adjusting the sharing settings. Go to the Network and Sharing Center, then click on "Change advanced sharing settings" and make the necessary changes for both systems.
- Turn on network discovery
- Turn on file and printer sharing
- Turn on sharing so anyone with network access can read and write files in the Public folders
- Turn off password protected sharing
You're right, sharing multiple folders at once can be tedious. A better tool to simplify the process is a cloud-based file transfer service like pCloud or Google Drive, which allows you to share multiple folders and files with a single link. This way, you can easily transfer and share multiple files from different folders without having to manually upload and share each one individually.
Method 2: file sharing over network by a handy freeware
Qiling Disk Master Standard is the best free file sync software for Windows, allowing for fast file transfer between different Windows versions, including 11/10/8.1/8/7/Vista/XP. Its Sync feature enables seamless file synchronization, making it an ideal tool for transferring files from Windows 7 to Windows 10 over a network.
- File transfer allows you to move files from one location to another, such as between folders, disks, or computers. It also enables syncing local folders to cloud storage services like OneDrive, Google Drive, and Dropbox.
- This software allows for the simultaneous transfer of multiple folders, eliminating the need for repetitive file transfers.
- The Schedule feature allows you to create automatic sync tasks, making it easier to keep your data up-to-date and organized.
To share a network in Windows 7 using Qiling Disk Master, follow these steps. First, you need to install Qiling Disk Master on your computer.
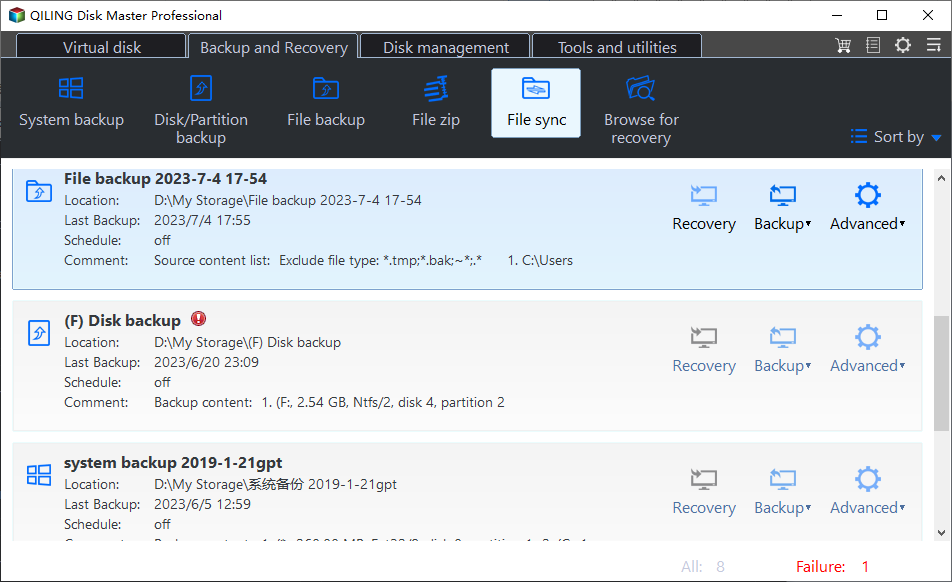
1. Download, install and launch Qiling Disk Master on the Windows 7 computer, then navigate to the "Backup and recovery" page and select the "File Sync" option.
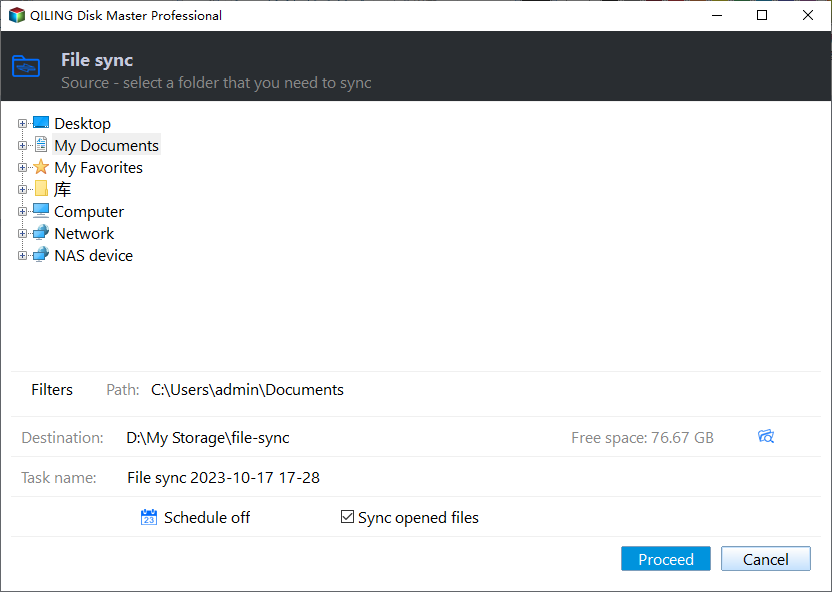
2. To accomplish this task, I will create a task called "Sync Personal Files" to distinguish it from other sync tasks. I will then select the folder that contains the files I want to transfer, which in this case is the "Personal Files" folder. This will ensure that I am only syncing the files from this specific folder, rather than the entire computer or other folders.
✎ Tips:
● To add more folders, you can click the "+" icon after adding the first folder.
● To exclude certain file types from selected folders, upgrade to Qiling Disk Master Professional and use "Filter settings".
3. To add a NAS device, click the inverted triangle in the destination box and select "Add Share or NAS Devices" from the drop-down menu.
4. In the Add Share or NAS Devices window, type the IP address of the Windows 7 computer and click the blue button at the right, then enter the username and password if prompted.
5. After adding the IP address, all network-shared folders under it will be listed. Choose one folder as the destination path and click "OK" to proceed.
6. Click on "Proceed" button to perform the operation.
7. Access the shared folder(s) on the Windows 10 computer as mentioned in Method 1.
Besides transferring files from Windows 7 to Windows 10 over the network, you can also perform cloud backup.
Summary
When transferring files from Windows 7 to Windows 10 over a network, you can use either the built-in Windows tool or Qiling Disk Master. However, Qiling Disk Master offers more benefits, including the ability to clone a Navigation SD card and perform �ystem restore from BIOS in Windows 7. This tool can be a valuable asset in your file transfer process.system restore from BIOS in Windows 7. This tool can be a valuable asset in your file transfer process.
Related Articles
- How to Transfer Files from PC to PC with an Ethernet Cable
- Transfer Files from One Computer to Another in Windows 10/8/7
- How to Move Data from Windows 7 to Windows 10
- How to Make Partition in Windows 7/8/10 After Installation?
Making partition can separate your OS from your data. In this post, you'll learn how to make partitions in Windows 7 in 2 ways.
