Turn On or Off Device Encryption on Windows 11
Overview of device encryption
Device encryption is a process that uses mathematical techniques to protect your data from unauthorized access, making it unreadable to anyone who doesn't have the decryption key. This helps safeguard your information against theft or prying eyes.
The BitLocker feature is available in various modern security systems on Windows computers, except for some Windows 11 editions. To use it, your computer must meet specific requirements. If BitLocker is not available on your device, you may consider using the standard BitLocker instead.
- TPM 2.0 with support for Modern Standby.
- TPM must be enabled on UEFI/BIOS mode.
Microsoft's encryption method for OneDrive and OneDrive for Business stores encrypted data on the device, but the encryption key is stored in the user's Microsoft account. If the account is deleted or the user's Microsoft account is compromised, the encrypted data may be lost, as the key is not stored on the device. However, this does not necessarily mean that the data will be lost when the system crashes or the disk is corrupted, as the encryption key is stored securely and is not directly related to the device's hardware. The data is still accessible as long as the user has access to their Microsoft account.
To protect your data, you can choose to turn on device encryption for added security, or turn it off to ensure data recoverability in case of system failure. You can also stop Microsoft's Auto-Encryption process in Windows 11 to maintain data recoverability.
How do I know if my computer supports Device encryption?
If you're unsure if your computer supports Device encryption, you may need to check if it meets the previous requirements I mentioned. To confirm, please follow the steps I provided earlier.
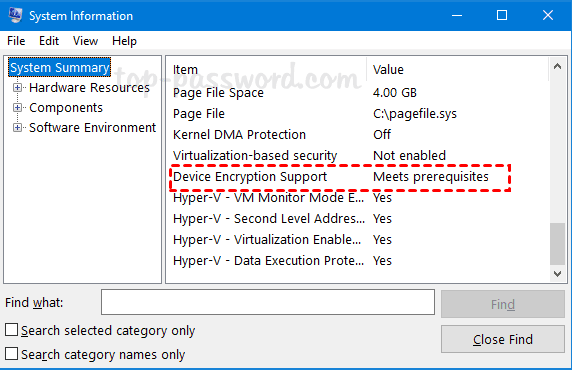
Step 1. Type system information in the search box, select the top result and Run as administrator.
Step 2. In the System Information window, select System Summary at the left.
Step 3. Go to the right side, find out the Device Encryption Support item and check its Status.
If your computer shows "Meet prerequisites" for Device encryption, it means your computer supports this feature.
If your PC shows "Reason for failed device encryption", it means device encryption is not supported. You can use Bitlocker instead, unless you have Windows 11 Home edition.
How to turn on or off Device encryption in Windows 11
To turn on or off Device encryption in Windows 11, follow these steps:
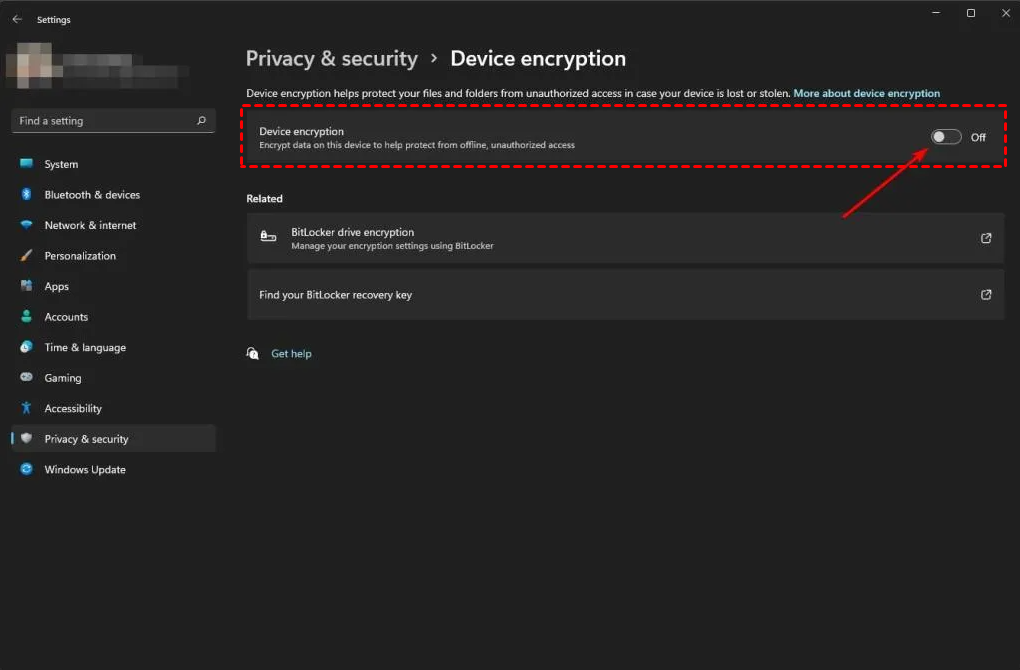
Step 1. Go to the Device encryption window.
- To open Settings, press the Windows key + I on your keyboard, and then select the "Privacy & Security" option from the menu.
- Click on Device Encryption on the right panel.
Step 2. Slide the Off button next to Device encryption and it will start to encrypt your device until completed.
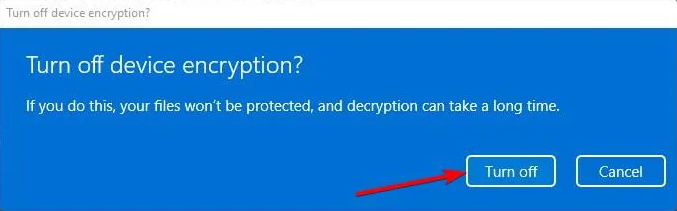
To disable device encryption in Windows 11, slide the encryption button to the left and click Turn off. This will remove the encryption protection from your files.
Helpful Tip:
To enable Device encryption in Windows 11, you need to backup the Bitlocker recovery key, which is required to decrypt your data.
- Open the Device encryption window.
- Scroll down to the Related section and click Bitlocker drive encryption.
- Go to the Operating system drive section, click Back up your recovery key, and select Save to a file.
- Select external drive to save this file and click Save.
How to turn on or off Bitlocker Device encryption in Windows 11
If the Device encryption option isn't available, your computer may not support it. In that case, you can use BitLocker to encrypt your data, which uses AES encryption with 128 or 256-bit keys and still requires a password or recovery key for decryption.
There are two types of encryption you can use in Windows 11:
- BitLocker Drive Encryption: BitLocker requires a password or key to unlock the system drive, which is used to encrypt the drive and protect the data. If you don't input the password or key at startup, you won't be able to access Windows and the data on the drive.
- BitLocker To Go: External drive encryption tools, like those for USB flash drives and external hard drives, require a password or key to unlock the device before access on a computer. These tools can be unlocked on any Windows or macOS computer, providing a secure way to access encrypted data.
Then, see below and learn to enable or disable Bitlocker device encryption.
Step 1. Open Bitlocker drive encryption window, you have 2 ways in the following.
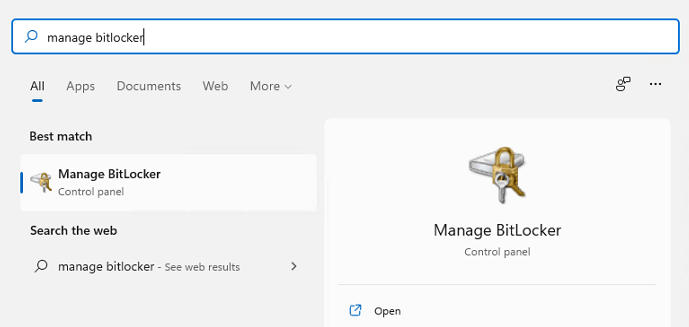
#1: Through Bitlocker Manager. To access the BitLocker management feature, type "Manage BitLocker" in the search box and click "Open" at the right panel.
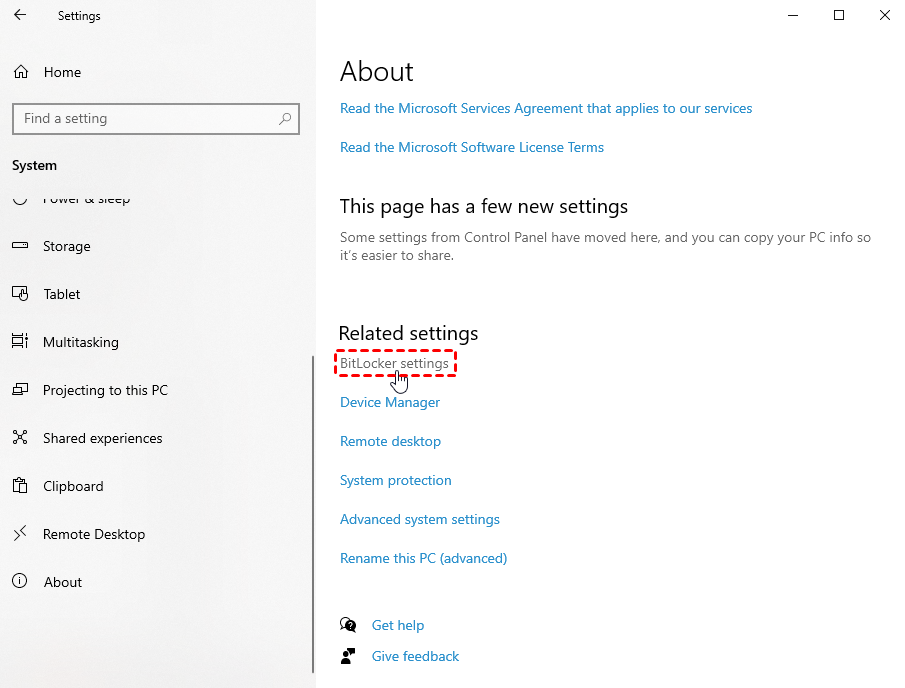
#2: Through Windows Settings. To access BitLocker settings, go to Settings, click on System, then navigate to About and click on BitLocker settings.
Step 2. In the Bitlocker Drive Encryption window, go to the Operating system drive and click Turn On BitLocker to enable it, or click Turn Off BitLocker to disable it.

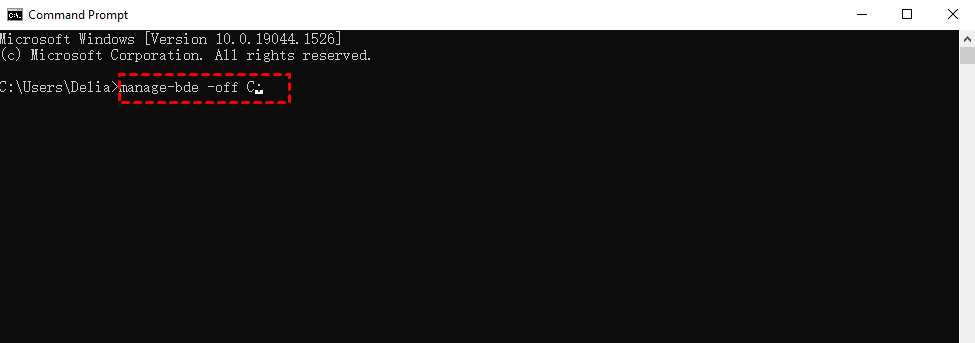
You can still turn on or off BitLocker using the command prompt. To do this, press the "cmd" key in the search box, click "Run as administrator", and then use the command "manage-bde -on C:" or "manage-bde -off C:" to unlock or lock the C: drive, respectively.
To enable Bitlocker encryption, type `manage-bde -on C:` and hit Enter in the Command Prompt.
a computer screen with a command prompt window open, showing the command "manage-bde -off C:" being typed in. | Image: a computer screen with a command prompt window open, showing the command "manage-bde -off C:" being typed in. | Image: a computer screen with a command prompt window open, showing the command "manage-bde -off C:" being typed in.
Flexible way to password protect your data
To protect data and ensure it's recoverable in the event of a system failure, consider using a combination of device encryption and a reliable backup solution, such as an external hard drive or cloud storage service. This way, even if the system crashes or the disk is corrupted, your data will still be preserved and can be recovered. Additionally, consider implementing a RAID (Redundant Array of Independent Disks) setup or using a solid-state drive (SSD) with built-in redundancy, which can help prevent data loss in the event of a hardware failure.
You're considering using Qiling Disk Master Professional for reliable file backup, which allows you to encrypt only the backed up files, giving you the flexibility to customize a password that you can easily remember, and enjoy benefits such as secure data protection and peace of mind.
- Password protect files or folders automaticaly, With the USB plug in feature, you can easily integrate the device into your daily, weekly, or monthly routine. Simply plug it in and set up the desired triggers, whether it's a daily reminder to take medication, a weekly review of your schedule, or a monthly check-in with a financial advisor.
- Backup only changed files with incremental backup or different backup.
- Always keep enough space for new backups To resolve the backup disk full issue, delete old backup images using one of the automatic backup cleanup methods. This is the most thorough way to resolve the problem.
- Backup files without booting into Windows: The tool allows you to create bootable media or a recovery environment, which enables you to boot your computer and, if needed, back up files in the recovery environment.
Download this software now! It supports various Windows versions, including Windows 11/10/8.1/8/7/XP and Vista. Server users may want to try Qiling Disk Master Server instead.
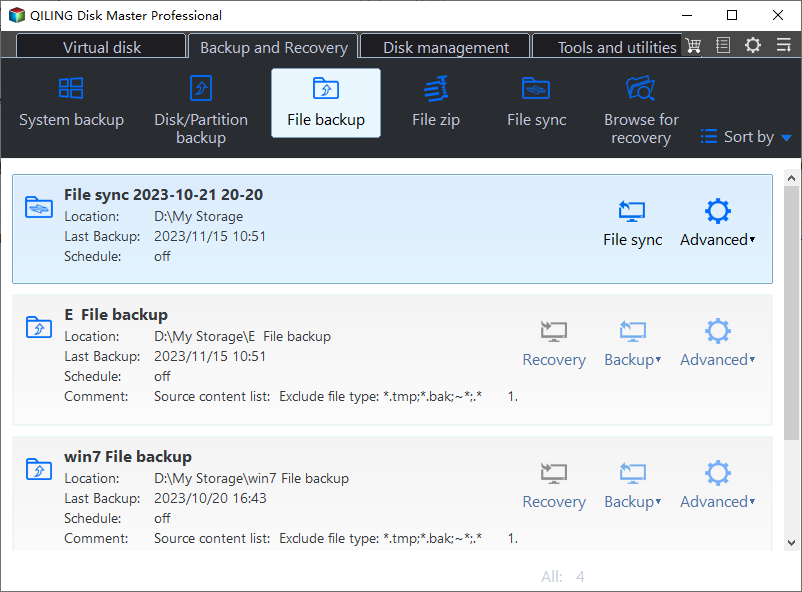
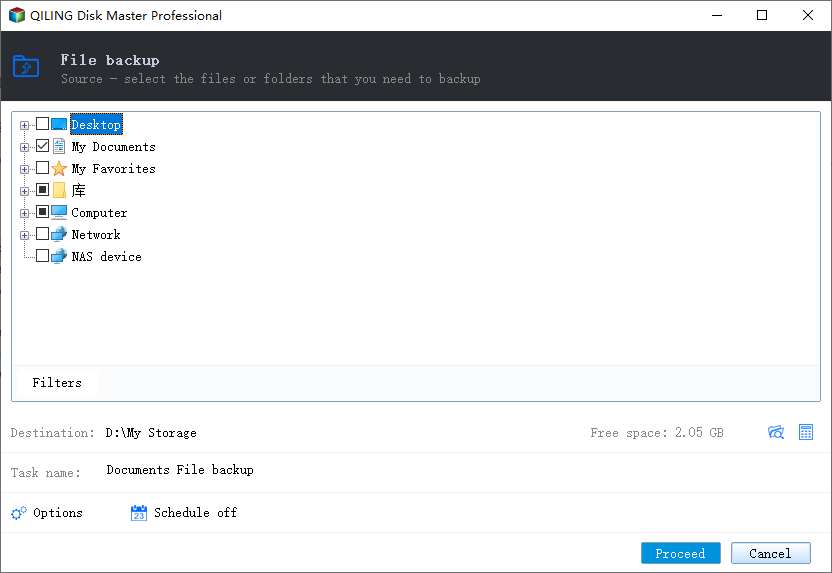
Step 1. Launch Qiling Disk Master Professional and click Backup > File Backup.
Step 2. To backup files, first click on "Files or Folder" to select the files you want to backup, and then choose a destination path to store your files.
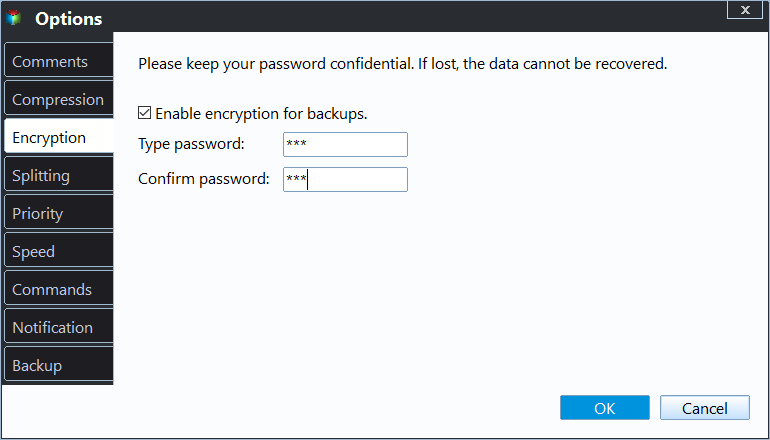
Step 3. Click on Options, then select Enable encryption for backups, enter your password, and confirm it.
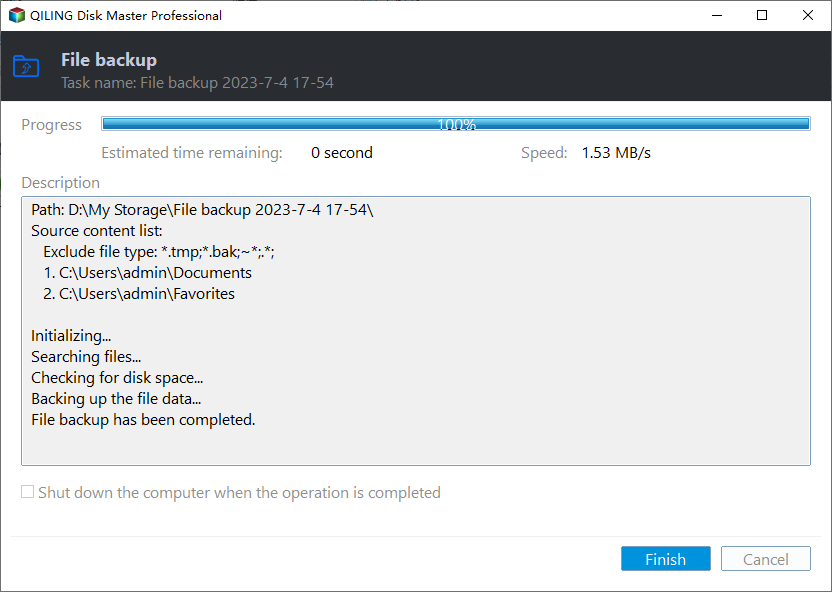
Step 4. Confirm all your settings and click Proceed to run the operation.
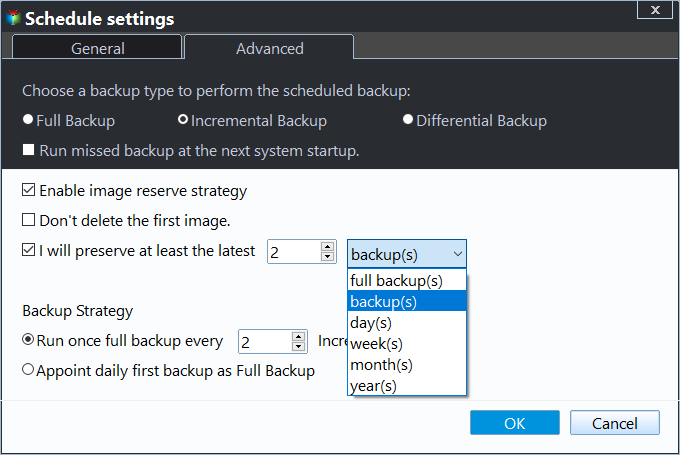
To ensure that all files on the disk are backed up, including changes made later, it's recommended to enable scheduled backups and a backup scheme. This allows for automatic backups of files and helps manage disk space.
For schedule backup, you have 5 options: Daily, Weekly, Monthly, Event Triggers, and USB plug in, with the last one being strongly recommended for those backing up to an external hard drive but not wanting it always connected.

For a backup scheme, you can choose between incremental and differential backup methods, which save disk space by only backing up changed files. However, incremental backups have a higher requirement for file recovery.
Conclusion
In Windows 11, device encryption and Bitlocker can safeguard your data, but it's crucial to back up the encryption key promptly after encryption to avoid potential system problems and data loss in case of forgotten password or lost recovery key.
For a flexible method of protecting your files, consider using file backup software like Qiling Disk Master Professional. This tool not only allows you to password-protect your files but also enables automatic and intelligent backups with features such as incremental or differential backup, USB plug-in, and automatic cleanup. With these capabilities, it's a worthwhile investment for long-term data protection.
Related Articles
- How to Easily Disable Bitlocker Encryption in Windows 11 (8 Ways)
You can learn what is Bitlocker encryption and how to disable Bitlocker encryption in Windows 11 as well as a better way to password your file. Please read on.