Best UEFI Disk Imaging and Cloning Software for Windows
What is UEFI, do you need specialized imaging and cloning software?
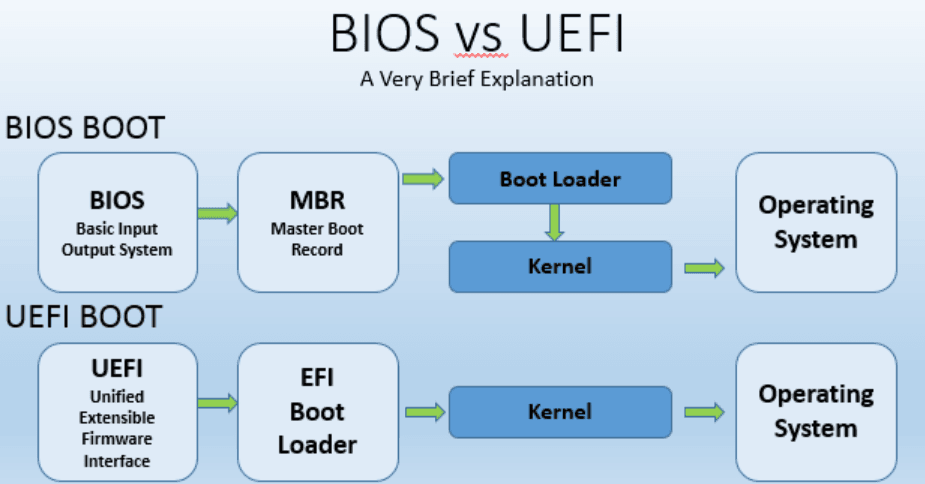
Unified Extensible Firmware Interface (UEFI) UEFI (Unified Extensible Firmware Interface) is a modern specification that's revolutionizing the way computers boot up. As a replacement to the traditional BIOS (Basic Input/Output System), UEFI offers a range of advanced features that make it a game-changer for modern hardware.
UEFI (Unified Extensible Firmware Interface) is a modern specification designed to improve the booting process of computers. While it offers several advantages, including faster boot times and support for larger hard drives, it's not compatible with all operating systems and software.
When working with UEFI systems, it's not uncommon to encounter issues with backup and cloning software. This is because UEFI requires a different approach than traditional BIOS-based systems.
Easy-to-use imaging and cloning software with full UEFI supports
As a user who values data security, you're likely familiar with the importance of image backup and clone. These concepts are essential for ensuring the integrity and availability of your data.
Imaging, Image backup is a crucial concept in data security, involving the creation of a compressed image file of your source data. This backup file is smaller in size compared to an exact copy, making it ideal for data archiving. With image backup, you can establish an automated backup system, which can be scheduled or based on specific schemes. However, it's essential to note that the backed-up data cannot be used without restoration.
Cloning, Disk cloning is a process of copying the complete content of a hard drive to another drive. This process creates an exact duplicate of the original data, ensuring that the cloned data remains intact and available. However, it's essential to note that disk cloning results in a larger disk space being occupied by the cloned data.
While Windows offers the Backup and Restore utility to help you back up computer data and create system images, there's still no built-in cloning feature. This means that, even with Windows, you'll need a specialized and professional tool to clone your hard drive.
Are you looking for a reliable and efficient disk imaging and cloning software that supports UEFI? Look no further than Qiling Disk Master Professional. This powerful tool is designed to work seamlessly with Windows 11/10/8.1/8/7/Vista/XP, providing a range of advanced features to help you protect your computer data.
>> When it comes to backing up your computer data, Qiling Disk Master Professional offers a range of advanced features to help you protect your system. This powerful tool allows you to backup system, partitions, disks, files, and folders to any location that your computer can recognize.
>> Cloning a UEFI GPT disk can be a daunting task, but Qiling Disk Master Professional makes it a breeze. With its advanced features, you can easily transfer your system disk to another storage device, ensuring that your data and operating system are preserved.
Cloning or restoring a disk can be a complex process, especially when it comes to firmware compatibility. However, Qiling Disk Master Professional makes it easy to clone or restore a disk from MBR/Legacy BIOS to GPT/UEFI or vice versa, without the need to convert disks.
Simply download the free demo to experience the powerful functionality:
Practice: How to clone UEFI drive with its firmware
As you know, UEFI and BIOS are supported on different types of disks. You can only use a GPT disk to boot with UEFI mode, and MBR disk with Legacy BIOS mode. If you want to clone GPT to MBR disk, make sure the source disk has no more than 4 partitions, because MBR disks only support at most 4 primary partitions. If you want to clone MBR disk to GPT disk, make sure your system and hardware support UEFI.
👉Make the partition style compatible with the boot mode:
The partition style (MBR/GPT) of a disk should be compatible with the boot mode of the computer (MBR for Legacy BIOS and GPT for UEFI).
Before cloning, please confirm what partition style you should use for the target disk. Qiling Disk Master supports cloning MBR to GPT/GPT to MBR without conversion, but depending on the circumstances, you may need to convert the partition style of the target drive to make it the same as the source drive.
To check the current partition style of a disk, just press Win + R to open the Run window -> type "diskmgmt.msc" and hit OK to open disk management -> right-click the disk you want to check and click "Properties" -> then, select "Volume" tab to check the "Partition style".
👉Step-by-step to clone UEFI GPT disk:
1. Install and run the UEFI imaging software. Click Clone on the main interface, and then select Disk Clone.
If you want to clone or migrate only the operating system, you can choose System Clone instead of Disk Clone. This option allows you to clone or migrate the operating system, applications, and settings from the source disk to the destination disk, without cloning the entire disk.
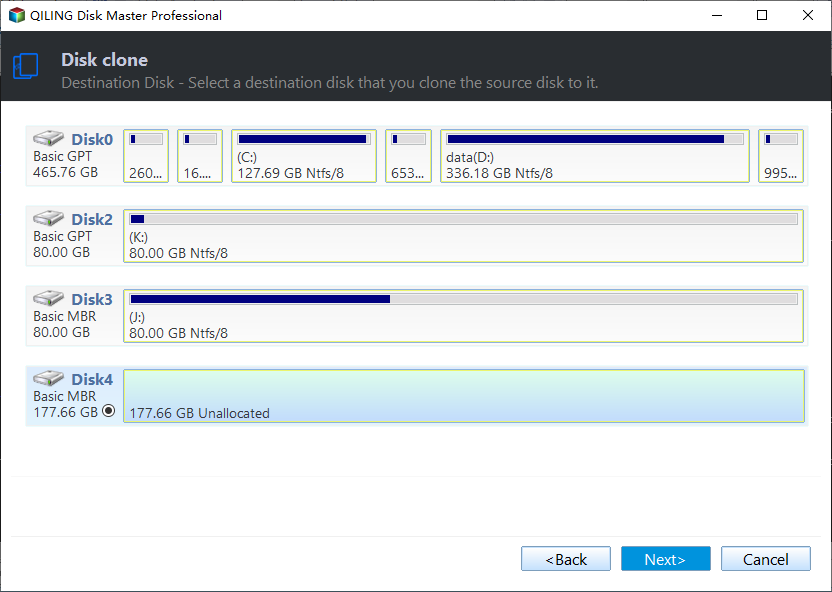
2. Before proceeding with the cloning process, you need to select the source disk and target disk respectively. The source disk is the disk that contains the data you want to clone, and the target disk is the disk where you want to clone the data.
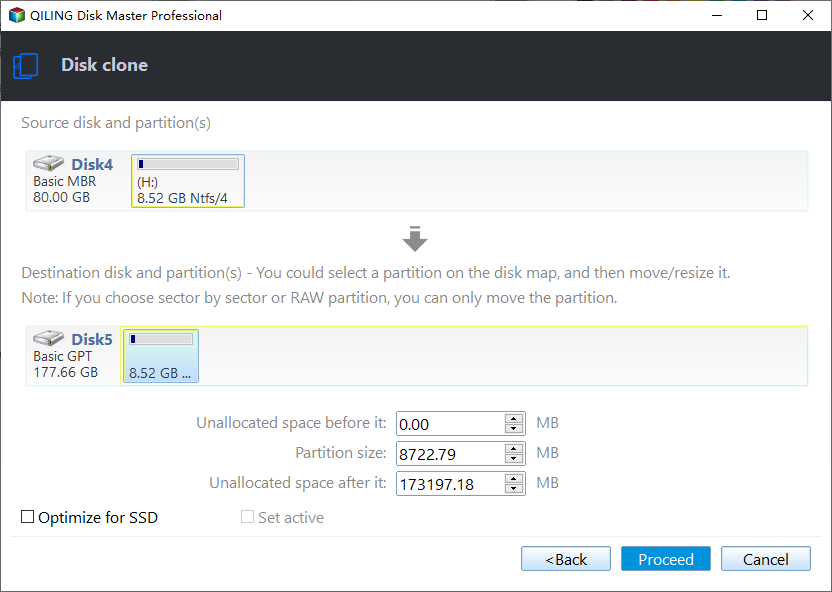
3. Then it will bring you to the Operation Summary screen. If you want to clone UEFI disk to SSD, check the SSD Alignment option to accelerate its read & write speed, and then click Proceed to execute the UEFI disk cloning.
👉Other helpful features:
To clone a UEFI disk to an SSD, you can use the **Sector By Sector Clone** option. This feature allows you to clone all sectors, including blank and logically bad sectors. This is particularly useful when cloning a disk to a larger one, as it ensures that all data is preserved.
Edit Partitions: Adjust the partition size of the destination disk.
- Copy without resizing partitions: It will not resize the partition size.
- Add unused space to all partitions: When cloning a disk, you may encounter unallocated space on the target disk. To utilize this space, you can reallocate it to each partition of the target disk.
- Manually adjust partition size: The feature to extend unallocated space to any partition allows you to utilize the unallocated space on your disk to the fullest. This means you can allocate the unallocated space to any partition you want, ensuring that your disk is fully utilized and making the most of its capacity.
- Convert the destination disk... The **Convert Partition Style (MBR/GPT)** option allows you to change the partition style of the target disk to match the source disk. This means you can convert the partition style from MBR to GPT or vice versa, ensuring that the target disk is compatible with the source disk.
👉How to boot from cloned drive:
When the cloning is done, you can shut down the PC, replace the old drive with the cloned drive and boot from it.
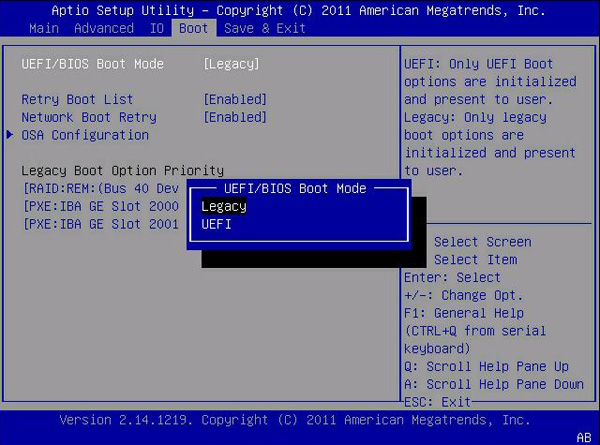
If you have more than one slot, you can also keep the old drive connected as a secondary drive. Just press the BIOS key (depends on make and model) at startup, and select the cloned new drive as the first boot option. If it can boot into Windows normally, then your cloning is successful, and you can decide what to do with the old drive. For example, you can wipe the old hard drive and keep it for storage.
If your old drive is partitioned with MBR, and your new drive is an GPT, then you should also change the boot mode from Legacy BIOS to UEFI. Conversely, if your source disk is GPT and you want to clone it to an MBR, then you should change the boot mode from UEFI to Legacy BIOS accordingly.
Final words
Qiling Disk Master is a powerful UEFI disk imaging and cloning software that allows you to restore a system to a UEFI-based computer, regardless of its original firmware. With this software, you can easily restore a BIOS-based system to a UEFI-based computer without the need to manually change any settings.
If you're looking for a solution to protect unlimited computers within your company, Qiling Disk Master Technician is the perfect choice. This powerful tool allows you to protect an unlimited number of computers, making it ideal for large-scale deployments.
Related Articles
- How to Perform UEFI System Restore on GPT Disk?
- Restoring MBR System Image to GPT/UEFI
- Top Two Easy Ways to Ghost UEFI in Windows 10
- How to Unlock SD Card Without Switch [6 Methods]
Are you having trouble writing to a locked SD card? This post offers 6 ways to gain access to an SD card so you can use it without restrictions. Additionally, it describes how to retrieve data from an encrypted SD card. Deep Data Recovery is a one-stop software to recover different data types from a locked SD card.


