The USMT Alternative and User Profile Migration Wizard
- What is Microsoft USMT?
- How to use Windows user profile migration tool - USMT
- Step 1: Download and install USMT tools (included in Windows ADK).
- Step 2: Gather data in Windows XP/Vista/7/8/8.1 using the USMT ScanState tool.
- Step 3: Install Windows 10 and all applications.
- Step 4: Restore files and settings in Windows 10 using the LoadState tool.
- Need the best USMT alternative software - Qiling Disk Master
- The user profile migration wizard - how to use USMT alternative
- The Epilogue
What is Microsoft USMT?
The User State Migration Tool (USMT) is a free Microsoft command line tool that helps migrate user accounts, files, settings, and registry keys between Windows computers, making it a useful tool for upgrading hardware or operating systems for multiple computers.
Microsoft's User State Migration Tool (USMT) replaced the deprecated Windows Easy Transfer in various Windows versions, utilizing the same underlying engine as the latter. To use USMT, ensure you install the Windows Assessment and Deployment Kit (Windows ADK) first, which is necessary for migrating user data from a 32-bit to a 64-bit computer.
How to use Windows user profile migration tool - USMT
1. USMT .xml files are used to define the migration of user state data. 2. They can be modified to automate and precisely define the migration.
- MigApp.XML. (migrate application settings)
- MigDocs.XML. (migrate user documents)
- MigUser.XML. (migrate user profiles and user data)
To migrate files and settings from Windows XP, Vista, 7, 8, or 8.1 to Windows 10, follow these 4 steps: first, ensure the source and destination computers are connected to the same network; next, go to the source computer and open the Settings app, then click on "Update & Security" and select "Backup" to create a backup of your files and settings; after that, go to the destination computer and restore the backup from the source computer; finally, once the restore process is complete, you can log in to Windows 10 and access your files and settings.
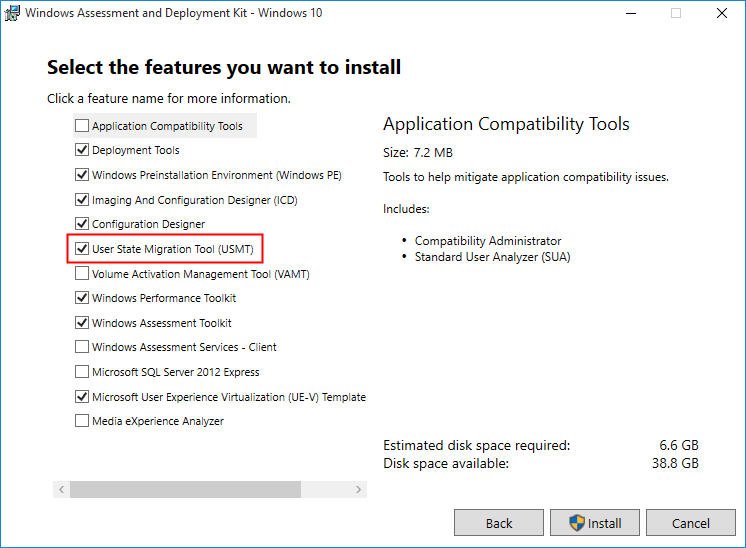
Step 1: Download and install USMT tools (included in Windows ADK).
You can download the Windows Assessment and Deployment Kit (Windows ADK) for your current OS, install it, and ensure the User State Migration Tool (USMT) option is checked.
Step 2: Gather data in Windows XP/Vista/7/8/8.1 using the USMT ScanState tool.
After installing Windows ADK features, please migrate user profiles and settings from Windows XP, Vista, 7, 8, or 8.1 to Windows 10.
You need to back up the source computer, close all applications, and then run the ScanState command to migrate data using USMT. This ensures that all specified data is migrated successfully.
1. To run the Command Prompt as Administrator, type "cmd" in the search dialog box on your desktop, right-click on the "Command Prompt" option that appears, and select "Run As Administrator" from the context menu.
2. Then run the following command to collect files and settings.
- To collect all files and settings, type:
scanstate \\server\share\migration\mystore /i:migdocs.xml /i:migapp.xml /o
- To exclude certain operating-system settings, you need to create and modify a `Config.xml` file in the current directory. This can be done using the command `touch Config.xml` followed by `echo` statements to add specific settings.
scanstate /i:migapp.xml /i:migdocs.xml /genconfig:config.xml /v:13
3. Run the USMTUtils command with the /Verify option to ensure the migration store is intact. For example: `USMTUtils /Verify`
usmtutils /verify D:\MyMigrationStore\store.mig
Step 3: Install Windows 10 and all applications.
To migrate user settings and applications from an older Windows version to a new Windows 10 installation, first install Windows 10 on the destination computer. Ensure that the same version of applications installed on the source computer are also installed on the new Windows 10. The User State Migration Tool (USMT) does not support migrating settings from an older version to a newer version, so the same version of applications must be installed on both systems.
Step 4: Restore files and settings in Windows 10 using the LoadState tool.
Before restoring, close all the applications.
1. To execute a command in the Command Prompt, first, type "cmd" in the search dialog box on your desktop. Right-click on the "Command Prompt" that appears in the search results, and select "Run As Administrator" from the context menu.
2. Run LoadState command to apply files and settings.
- If you are migrating domain accounts, input:
loadstate \\server\share\migration\mystore /i:migdocs.xml /i:migapp.xml
- If you're migrating local accounts along with domain accounts, you can use the same script to update both types of accounts. The script will automatically detect whether an account is local or domain-based and update it accordingly.
loadstate \\server\share\migration\mystore /i:migdocs.xml /i:migapp.xml /lac /lae
Tip: Some settings will take effect while the user logs on again.
Need the best USMT alternative software - Qiling Disk Master
USMT (User State Migration Tool) is effective for transferring profiles and settings between Windows versions (XP, Vista, 7, 8, 8.1, 10, and 11), but its complexity makes it less user-friendly. Additionally, the current Windows 11 version no longer supports migrating custom background images, and printer settings in user profiles are not being transferred, unlike in previous versions.
There is USMT GUI software called Qiling Disk Master Server, which is a powerful alternative to USMT, allowing for easy migration of user profiles.
The Sync feature allows users to easily migrate their files and settings across different systems, making it a friendly and user-friendly option. It supports various Windows versions, including XP, Vista, 7, 8, 8.1, 10, and 11, as well as Windows Server 2003(R2), 2008(R2), 2012(R2), 2016, 2019, 2022, and SBS 2003, 2008, 2011.
The user profile migration wizard - how to use USMT alternative
To migrate user profiles from Windows 7 to Windows 10, follow the steps below. Qiling Disk Master Server, a USMT alternative, can be used as a user profile migration wizard to help with the process.
To migrate user profiles in multiple computers, download this software on a Windows 7 computer. You can also try Qiling Disk Master Technician or TechPlus edition.
1. To prepare for the migration process, ensure that you have a shared folder set up on your Windows 10 system. If you don't have one, create it immediately. This shared folder will play a crucial role in the migration process, so it's essential to have it in place before proceeding.
- Right-To store user profiles, click on the folder you want to use, select Properties, and then click on Share under Network File and Folder Sharing.
- In the Network Share window, type "everyone" and click "Add" to share with everyone.
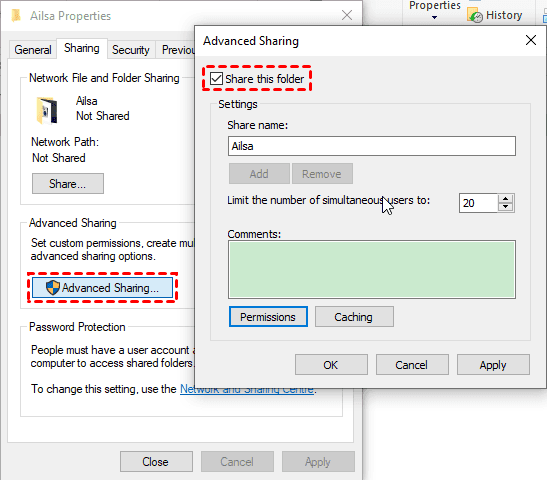
- Go back to the Properties window, and click the Advanced Sharing... button.
- To share a folder, click on the "Share this folder" option, and then set the share name, specify the number of users who can access it, add comments, and configure the permissions for the shared folder.
- Finally, click Apply and then press OK.
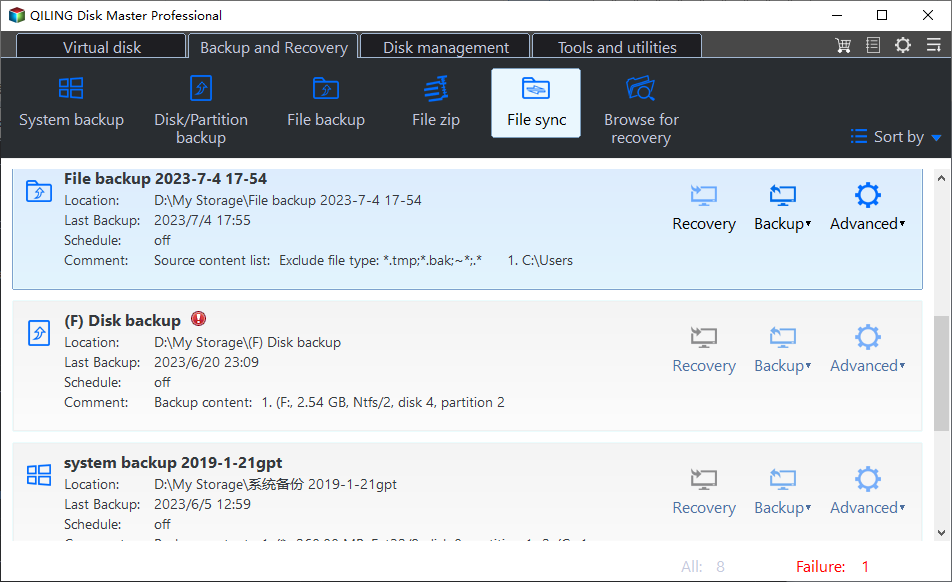
2. On a Windows 7 computer, open the Qiling Disk Master Server, which is an alternative to USMT, and go to Backup and Recovery -> File Sync.
3. To choose user profiles in Windows 7 as the source, click the "Folder" button and select the desired profiles, then optionally rename the task name.
4. To add a shared folder from your Windows 10 computer, click the inverted triangle icon, then select "Add Share or NAS Devices". Enter the network path (Windows 10 IP address), choose the shared folder as the destination, and click OK to confirm.
5. Click Options to comment on the user profile migration task, enable email or SMS notification after the sync finished, etc. Press Proceed to migrate user profiles from Windows 7 to Windows 10 safely.
The user profile migration wizard has been completed, and Qiling Disk Master Server, a USMT alternative, offers additional features such as file sync, two-way sync, and scheduled tasks, making it a useful tool for various tasks.
- File Sync: The real-time sync method syncs all files and changes, including modified, deleted, or newly added files, in real-time, unlike the File Sync method which syncs at set intervals such as daily, weekly, or monthly.
- File Sync: By syncing files and folders changed in the source, if you modify, delete, or add any files in the destination, it will undo the changes in the next scheduled sync.
- Two-Way Sync: Unlike the previous three sync methods, this one will sync files and changes made in both the source and destination, and can be set to run automatically.
If you want to backup files into an image file, you could try to create a file backup or directly backup files to Qiling Cloud.
The Epilogue
As the best USMT alternative - Qiling Disk Master Server allows you to migrate user profiles from Windows 7 to Windows 10, and also between Windows 10 computers, and even clones Windows 10 to a new SSD without reinstalling.
For IT professionals, the software offers various features such as migrating user profiles, deploying system images to multiple computers over a network, and creating backups for all computers from a single management console, among others.
Related Articles
- Migrate User Profile to New Computer with Best Software
You will get 3 Windows 10 profile migration tools and stepwise guide to migrating user profile to new computers. - How to Transfer Everything from One Computer to Another
Try the 5 practical ways to transfer everything from one computer to another, not only personal files, but also the operating system, installed programs, settings, etc. - Best Free Windows 7 to Windows 10 Migration Tool
This article describes the top 4 Windows 7 migration tools, such as USMT, Windows Easy Transfer, PC mover Express, and Qiling Disk Master. Please read the following content carefully and select the one suitable for you most. - Free Download Windows Easy Transfer Alternative in Windows 7/8/10
Try the best free Windows 10 Easy Transfer alternative to perform Windows 7 to Windows 10 migration easily.


