Create Scheduled Backups with Wbadmin or an Easier Tool
Why Schedule Backups with Wbadmin?
Today, computer networks are advancing rapidly, with nearly every household owning at least one computer. In addition, medium and small-sized enterprises are increasingly using computers with server systems to manage their official business.
With a growing collection of files such as Excel sheets, Word documents, TXT files, and PDFs, or even data from various applications, it's natural to feel concerned about data safety. To alleviate this worry, creating scheduled backups to a network share using Wbadmin is a sensible approach to ensure the security and integrity of your data.
Wbadmin is a built-in backup tool in Windows Vista/7/8/10 and Windows Server 2008 (R2)/2012 (R2)/2016/2019. It offers various command lines, including options for backup, recovery, and other tasks.
👉 Wbadmin enable backup
👉 Wbadmin Proceed
👉 Wbadmin stop job
👉 Wbadmin get versions
👉 Wbadmin start recovery
👉 Wbadmin get status...
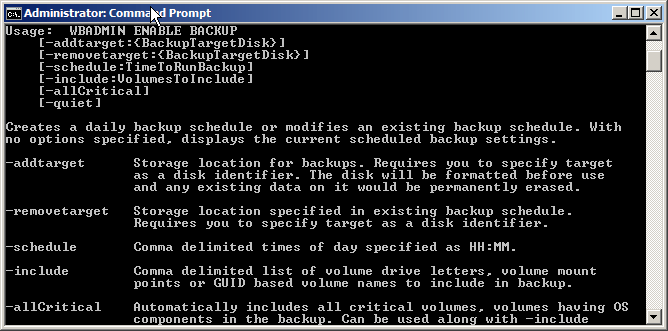
The Wbadmin command can be used on your PC or server with different operating system versions, and you can run "wbadmin /?" in a command window to check out the options. For scheduled backups, use "Wbadmin enable backup" instead of "Wbadmin Proceed" for one-time backups. Some parameters of the "Wbadmin enable backup" command include specifying the backup type, frequency, and duration, and running "wbadmin enable backup /?" for more information.
How to Use Wbadmin to Schedule Backups to a Network Share
To run the Wbadmin command, you must be a member of the Backup Operators group or the Administrators group, and it should be run from an elevated Command Prompt. You can use the "Wbadmin enable backup" command to schedule backups to a network share, including files, folders, volumes, system state, and applications, on a regular basis.
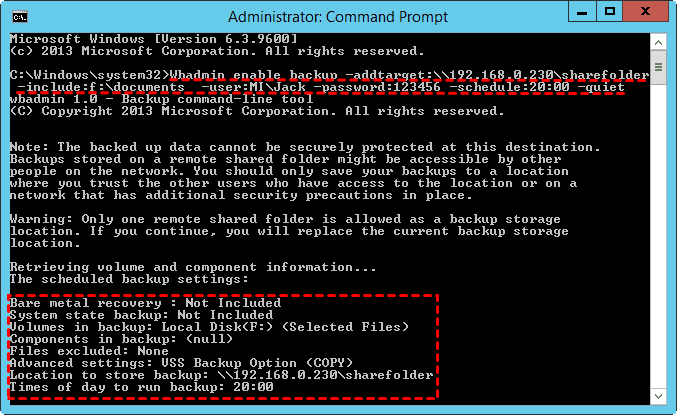
Wbadmin enable backup -addtarget:\\192.168.0.230\sharefolder -include:f:\documents -user:MI\Jack -password:123456 -schedule:20:00 -quiet
The script will automatically back up the documents folder in volume F to the network location \\192.168.0.230\sharefolder every 8:00 PM, without prompting the user, and grant access to the network share to Jack, a member of the MI group, with a password of 123456.
✍ Tips:
- If there is a space in the name of the source or destination folder, you should omit it in the Wbadmin command.
- To backup to a remote shared folder, you must specify a user with write permission to the shared location, and the user needs to be a member of the Administrators or Backup Operators group on the computer getting backed up.
- On Windows Server 2008, system state backups to a network share are not supported, but this capability is available in the R2 version.
You may find the current method of creating scheduled backups to be a bit cumbersome and prone to errors. Furthermore, it has a significant flaw: if you've previously backed up data to a shared folder and now want to back up the same computer to the same folder, the previous backup will be overwritten, which can be frustrating and potentially lead to data loss.
You can schedule backups to a network share without worrying about the older backup being overwritten by creating sub-folders in the remote shared folder to organize your backups. This way, each backup operation creates a new sub-folder with the current date and time, ensuring that older backups are preserved and not overwritten.
Easier Way to Create Scheduled Backups in Windows🔥
Considering the drawbacks of Wbadmin schedule backup, it's recommended to opt for third-party software to complete backup tasks. A suitable alternative is Qiling Disk Master Server, which can provide assistance.
☺ All-around data protection
The software supports various backup types, including file/folder backup, system backup, disk and partition backup, as well as incremental and differential backup.
☺ Set-and-forget backup
You can schedule automatic backups using the "Schedule Backup" feature, choosing daily, weekly, or monthly frequency based on data change frequency, or trigger backups on special events like user logon and system shutdown.
☺ Wide compatibility
This software supports both personal and server-based Windows operating systems, including Windows 11/10/8.1/8/7/Vista/XP for PCs and Windows Server 2022/2019/2016/2012/2008/2003 and other server versions.
To create a scheduled backup to a network share via Qiling Disk Master, simply follow these steps:
Step 1. Download, install, and launch Qiling Disk Master on your PC or server. From there, click the Backup button and select System Backup to create a system state backup, or choose other backup types based on your needs.
Step 2. The source data (system-related partitions) are automatically selected. Click the drop-down menu of the second bar and choose "Add Share or NAS Devices".
Tip: To backup to an external or internal device, USB drive, DVD/CD, you can choose Select a local path from the drop-down menu.
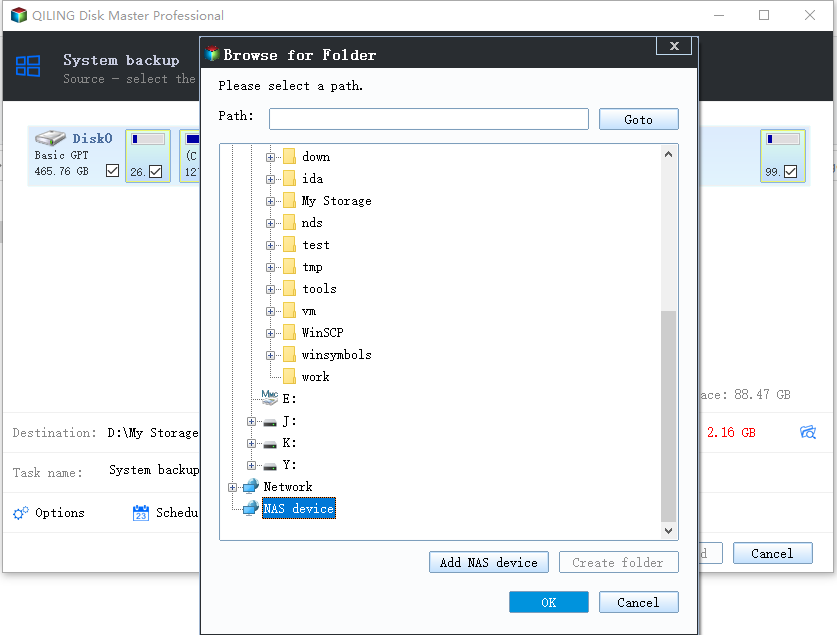
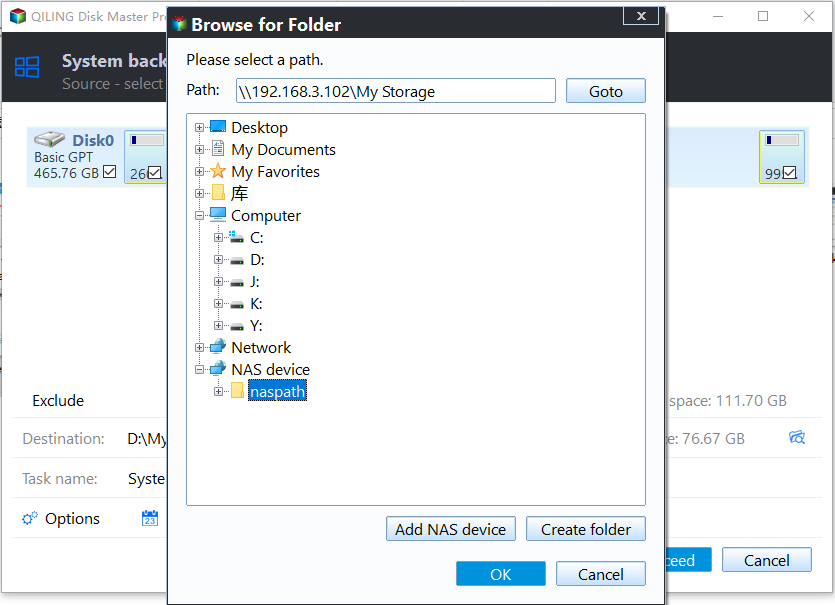
Step 3. In the pop-up window, enter the network path and click the blue button on the right.
Step 4. To save the backup image, select a shared folder on the network path where you want to store it. This will allow you to access the backup from any device on the network.
Step 5. Click Schedule Backup to choose an appropriate backup frequency.
★ Advanced settings you may need:
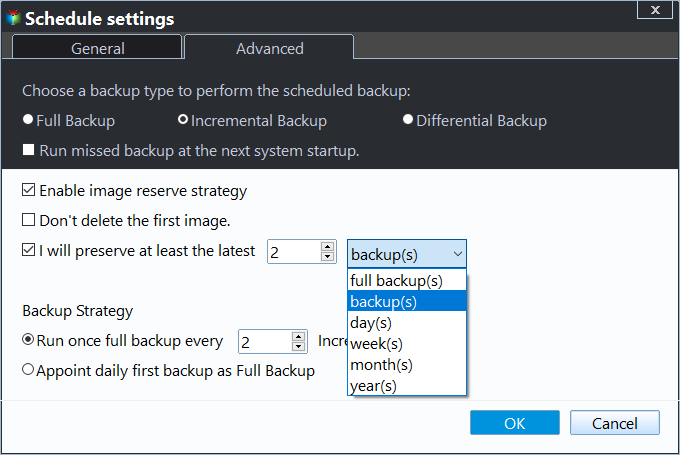
◉ The scheduled backup will run in incremental mode by default, but you can change it to full or differential backup by modifying the backup scheme under Backup Method.
◉ All backup images will be kept until there is not enough space in the backup destination path. To manage backup disk space, you can switch on Enable Automatic Backup Cleanup.
Step 6. Confirm all your settings and click Proceed > Add the schedule and Proceed now to run your first backup.
Wrapping Things up
You can use Wbadmin to schedule backups to a network share, but be aware that the older backup may be overwritten if you're backing up the same computer to the same shared folder.
Qiling Disk Master is a powerful server cloning software that allows you to keep multiple backup versions in the same shared folder, making up for the limitations of Windows built-in backup feature. It also enables you to clone hard drives in various operating systems, including Server 2016.
Related Articles
- Create Scheduled Backups Using Wbadmin Enable Backup
Learn how to configure scheduled backups with Wbadmin enable backup from command line. Workarounds to run daily, weekly or even less frequent scheduled backup to shared folder over NAS. - How to Schedule Windows Server Backup Once a Week?
If you don't want to set daily backups, you can schedule Windows Server Backup once a week with Task Scheduler or the all-around backup utility. - Step-by-step to Create Incremental Backup with WBADMIN Tool
If you don't clearly know Wbadmin incremental backup, keep reading this article, it helps you save much time and disk space, especially in a scheduled task. - Top 3 Ways to Fix Invalid Partition Table in Windows 7/8/10 Dell PC
An error message "Invalid Partition Table" occurs to your Windows 11/10/8/7 Dell computer without any signs? This article will give you the best 3 ways to fix Dell invalid partition table.
