What's Taking Up Space on My Hard Drive in Windows 10? Here are 14 Fixes!
- User Case: how to know what is taking up disk space in Windows 10
- How can I see what's taking up space on my hard drive in Windows 10?
- 14 Ways to Free Up Disk Space on Windows 10
- Method 1. emptying the Recycle Bin
- Method 2. Perform Windows Disk Cleanup
- Method 3. Uninstall unwanted applications
- Method 4. Clear browsing data
- Method 5. Clean up files using Storage Space
- Method 6. Use the OneDrive File On Demand feature
- Method 7. transferring local files to an external hard drive or the cloud
- Method 8: Use NTFS to compress the file
- Method 9. disable hibernation
- Method 10. Use Compact OS to compress the space used by Windows 10
- Method 11: Rebuilding the search index
- Method 12: Remove users who are no longer sharing devices
- Method 13. Disable reserved storage on Windows 10
- Method 14. Sync files to another disk - Qiling Disk Master Standard
- Conclusion
User Case: how to know what is taking up disk space in Windows 10
"I have a long-
Having a full hard drive is a serious problem that can cause significant issues, including slowing down your computer, preventing file downloads, and failing Windows system updates. It can also lead to frequent restarts, slower file and application openings, and pop-up messages from malfunctioning applications. To fix this issue, the first step is to identify the actual situation of the occupied hard disk space.
How can I see what's taking up space on my hard drive in Windows 10?
To determine what's taking up disk space on Windows 10, first, you need to show hidden files, then check the space usage of the selected drive. This will allow you to see all files, including hidden ones, and identify which ones are consuming the most space.
Show hidden files
To show hidden files on a Windows computer, open Windows Explorer by pressing Windows + E, select the disk you want to view hidden files on, switch to the View tab at the top, and check the Hidden items checkbox. This will allow you to see files and folders that are normally hidden.
See how much space is actually taken up on your hard drive in Windows 10
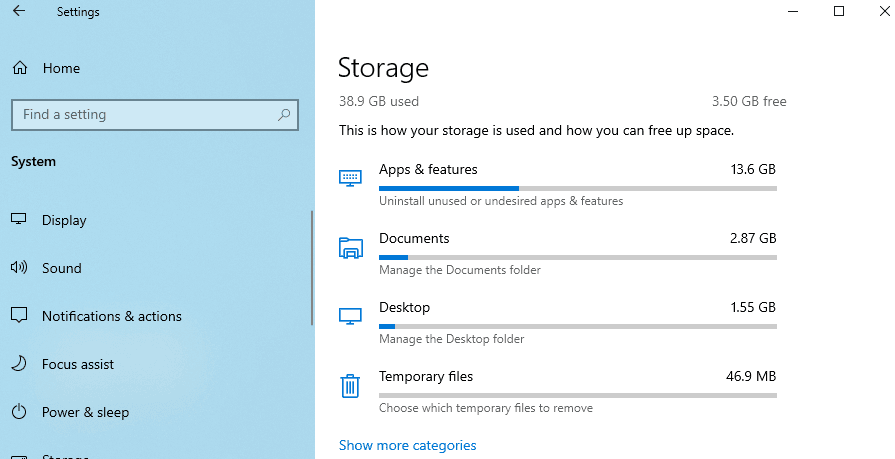
To check what's using your disk space, open Windows Settings by pressing Windows + I, then go to System, and select Storage in the left panel. From there, choose the disk with the least space left and see the breakdown of what's occupying that space. This will give you an idea of what's using your disk space.
14 Ways to Free Up Disk Space on Windows 10
You can follow these 14 ways to fix low disk space in Windows 10 to free up more storage space.
- Emptying the Recycle Bin
- Performing Windows Disk Cleanup
- Uninstall unwanted applications
- Clear browsing data
- Clean up files with Storage Space Aware
- Free up space with the OneDrive Files on Demand feature
- To transfer local files to an external drive or to the cloud, you can use a USB drive or an external hard drive to physically move files to the drive, or use cloud storage services like Google Drive, Dropbox, or OneDrive to upload files directly to the cloud. You can also use file transfer software like FileZilla or WinSCP to transfer files between computers or to a cloud storage service.
- Use NTFS to compress file cases to free up space
- Disable hibernation
- Compressing Windows 10 usage space with Compact OS
- Rebuilding the search index
- Remove users who are no longer sharing devices
- Disable Reserved Storage on Windows 10
- Synchronize files to another disk - Qiling Disk Master Standard
Method 1. emptying the Recycle Bin
The Recycle Bin stores deleted files temporarily, allowing for easy retrieval, but occupying space on your computer's hard drive. To free up space, empty the Recycle Bin.
- To delete files from the Recycle Bin, find and open the Recycle Bin on your desktop, then press Ctrl + A to select all files and folders, and finally empty the Recycle Bin.
- Right-Click on any of these files or folders and select "Delete" in the expanded menu.
- Confirm the permanent deletion by tapping Yes in the pop-up window.
Method 2. Perform Windows Disk Cleanup
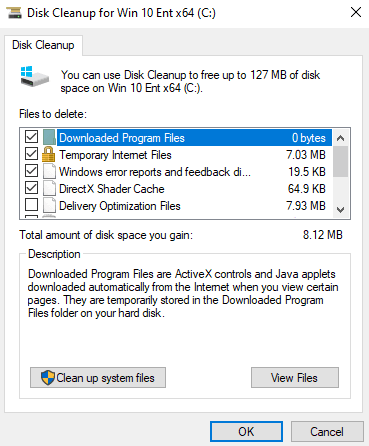
Disk Cleanup is a tool in Windows 10 that cleans up temporary files and unimportant data on a specific disk to free up disk space. To use it, select the disk you want to clean up, such as the local disk (C:), and follow the prompts to delete unnecessary files, system files, and other data. This process helps to recover disk space and improve system performance.
- To clean up your computer's disk, use the Windows key + E shortcut to open Windows Explorer, and then select the disk you want to clean up.
- Right-click it and select Properties in the expanded menu.
- Go to the General tab and click on Disk Cleanup. Tap on the Disk Cleanup button.
- In the Disk Cleanup window, select the files you want to delete, such as Download Program Files, Windows error reports and feedback, DirectX Shader Cache, etc and tap the OK button at the bottom.
Note: You can also clean up more system files by tapping the Clean up system files button at the bottom left.
Method 3. Uninstall unwanted applications
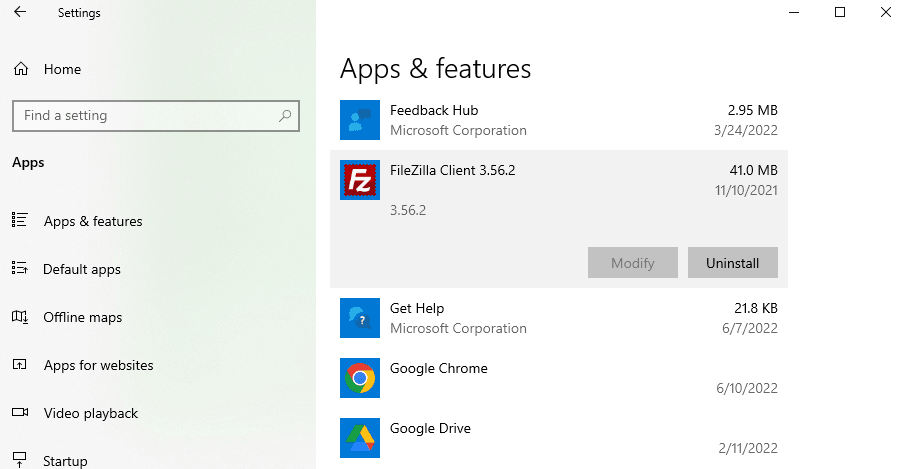
To free up disk space, consider uninstalling applications that are rarely used or no longer needed, such as previously downloaded games and other software.
- To open Windows Settings, press the Windows key + I on your keyboard, and then navigate to the Apps section.
- In the Apps & features list, check the apps you no longer need or rarely use, tap the Uninstall button, and tap the Uninstall button again in the confirmation pop-up.
Note: To free up storage space on your computer, you can remove unnecessary language packs by going to Time & Language, delete offline maps in Applications, and uninstall optional features in Applications & Features.
Method 4. Clear browsing data
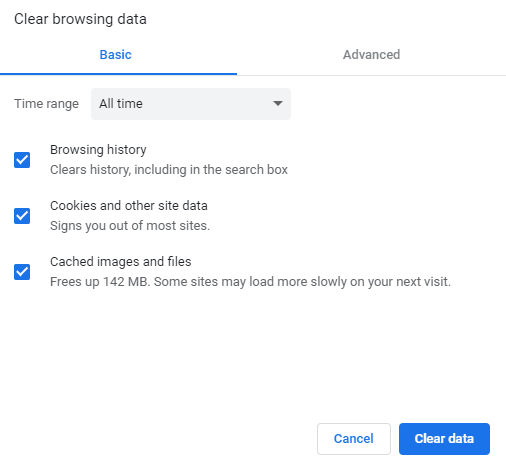
To free up storage space, you can clear browsing data in popular browsers like Google Chrome. You can do this by opening Chrome, clicking on the three vertical dots in the top right corner, then clicking on "More tools" and selecting "Clear browsing data". From there, you can choose what type of data to delete and set a time range for the deletion. Similarly, you can follow the same steps in the built-in Windows Edge browser.
- Open Google Chrome and tap the ⋮ icon in the upper right corner.
- In the expanded menu, select Settings.
- Select Privacy and security from the menu on the left.
- Under Privacy and security, find and tap Clear browsing data.
- Set the time range to all time, check browsing history, cookies and other site data, cached images and files, and click clear data.
Method 5. Clean up files using Storage Space
Storage Space Aware in Windows 10 helps quickly clean junk files, including installation and temporary files from Windows upgrades, freeing up storage space for additional applications.
- To open Windows Settings, use the keyboard shortcut Windows + I, then navigate to the System section.
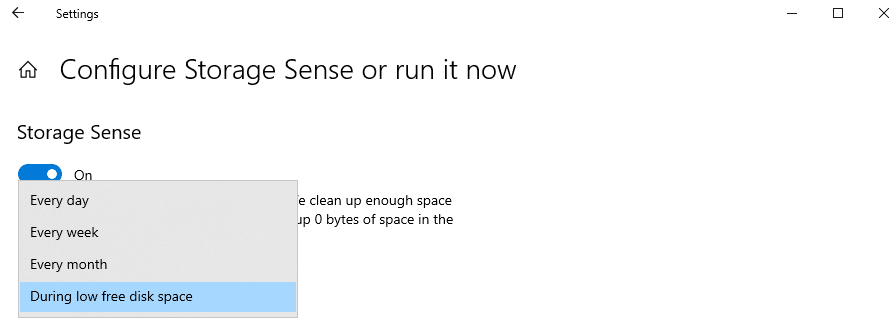
- In the left panel, select the Storage tab and tap on the Configure Storage Sense or run it now button in the right panel.
- To optimize your Windows device's storage, enable Storage Sense and choose the most suitable option from the Run Storage Sense dropdown menu. This menu offers four options: Every day, Every week, Every month, and During low free disk space, allowing you to schedule automatic cleanup and organization of your device's storage based on your preferences.
When your computer is running low on storage space, you can find "Free up space now" at the bottom and tap "Clean now".
Note: You can also set how long you want to keep temporary files and how long OneDrive is accessible online in the Set or Execute Now Storage Space Sense window.
Method 6. Use the OneDrive File On Demand feature
OneDrive is a Windows 10 feature that saves computer storage space by storing files in the cloud, and also allows for the Files on Demand feature to free up space by converting locally available files to online use.
Turn on the document-on-demand feature
1. To open OneDrive, look for the OneDrive icon in the notification area on the right side of the taskbar, click on it to open the OneDrive window, and then select the files you want to upload or access.
2. To access settings, tap the "Help and Settings" icon, which is typically represented by a question mark or a gear, and select "Settings" from the expanded menu.
3. At the top of the Microsoft OneDrive window, switch to the Settings tab.
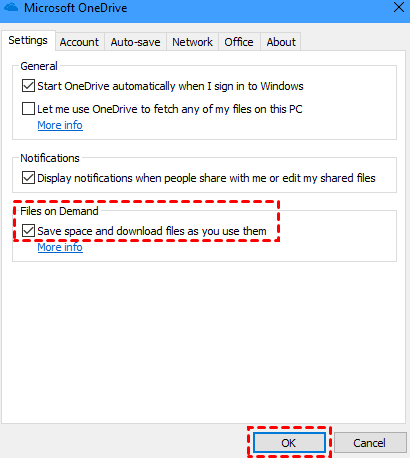
To enable Files On Demand, check the "Save space and download files as you use them" checkbox and click the "OK" button.
Convert local files to be available online
- To open Windows Explorer and access OneDrive, press the Windows key + E on your keyboard. This will open the File Explorer window.
- Locate and check the locally available files. The file's availability can be determined by the icon in the status bar table, where a blue cloud indicates online-only availability and a green tick signifies local availability.
- Select Free up space in the expanded menu.
Method 7. transferring local files to an external hard drive or the cloud
To save computer storage space, you can transfer some files to an external hard drive or save them to the cloud (OneDrive), freeing up space on your local computer.
Transferring to an external drive
- To ensure the external drive is recognized by the computer, insert the drive into the computer's USB port. The computer should automatically detect and recognize the drive.
- To free up space on a Windows computer, open Windows Explorer by pressing the Windows key + E on your keyboard. This will open a window showing all the drives and folders on your computer.
- Right-click on the local file you want to transfer, select "Copy" from the menu.
- To transfer files, go to the external drive, right-click on a blank area, select "Paste" from the menu, and wait for the process to finish.
Moving to the cloud (OneDrive)
Select the local files you want to transfer, copy them, paste them into OneDrive, and set them to be available online to free up space on the disk.
Method 8: Use NTFS to compress the file
NTFS is a main file system of Windows that reduces file size and ensures accessibility. It also allows for compressing files, folders, or the entire disk, effectively reducing space occupied by files.
Note: Using NTFS compressed files can dynamically compress and decompress data, potentially slowing down system performance, and should be used with powerful hardware.
- 1. Open Windows Explorer and find the folder you want to compress.
- Right-click it and select Properties in the expanded menu.
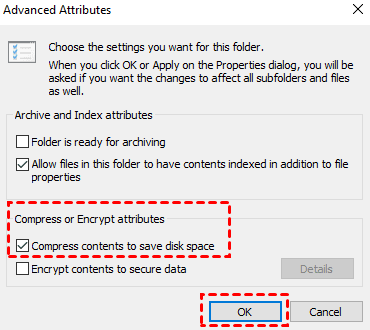
- Switch to the General tab and tap the Advanced button.
- In the "Compress or Encrypt attributes" section, select the "Compress contents to save disk space" checkbox, then click "OK".
-
Method 9. disable hibernation
Windows' hibernation feature saves the computer state and can take up space if used for a long time, but can be disabled to free up storage space.
- To open the Command Prompt as an administrator in Windows, press the Windows key + S to open the search box, type 'cmd', and select 'Run as administrator' from the search results. This will open the Command Prompt with elevated privileges.
- To disable hibernation in Windows, open the Command Prompt window, type "powercfg /hibernate off" and press Enter.
Method 10. Use Compact OS to compress the space used by Windows 10
Compact OS is a feature in Windows 10 that compresses the operating system files to free up space on the computer.
Note: Modifying system files can be risky and may cause irreversible damage to your computer if done improperly, so it's recommended to perform a system backup before starting this method.
1. To open the Command Prompt as an administrator on Windows, press Windows+S to open the search box, type 'cmd' and select 'Run as administrator'.
2. In the Command Prompt window, type compact.exe /compactOS:always and press Enter to execute this command, and wait for the process to complete.
Note: To disable the compacting of free space on your hard drive, open the Command Prompt window, type `compact.exe /compactOS:never`, and press Enter.
Method 11: Rebuilding the search index
Sometimes Windows search can malfunction and cause the search database to take up too much space, so you may need to rebuild the search index to free up storage space on your computer.
- To open Windows Settings, press the Windows key + I on your keyboard. This will open the Settings app.
- In the left panel, switch to the "Searching Windows" tab and find the "More Search Indexer Settings" section. Tap the "Advanced Search Indexer Settings" button.
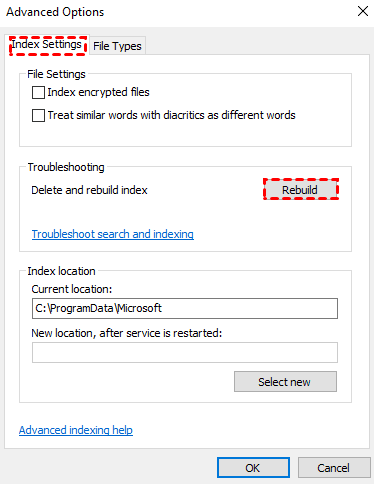
- In the Indexing Options window, tap the Advanced button.
- In the Index Settings tab, find the Troubleshooting section, tap the Rebuild button and tap OK in the confirmation pop-up.
Note: You can also minimize database space usage by preventing Windows from searching for specific locations in the index, which can be done by clicking on the "Modify" button in the Indexing Options window, ultimately saving computer storage space.
Method 12: Remove users who are no longer sharing devices
When you no longer need to share your device with other users, you can delete the previous users to save computer storage space.
- Open Windows Settings, find and tap Accounts.
- To delete an unused account, go to the left panel and select "Other users", then in the right panel, choose the account you no longer use and tap "Remove".
- To delete your account and data, tap the "Delete account and data" button in the pop-up window.
Method 13. Disable reserved storage on Windows 10
Windows' reserved storage feature takes up storage space, typically several GB, and can be disabled to free up space.
Note: Disabling a specific Windows feature may expose users to increased risk when updating the operating system, making it a crucial consideration when deciding whether to disable it.
- Right-To start Windows PowerShell, click the Start button and select the Windows PowerShell (Run as administrator) option from the expanded menu.
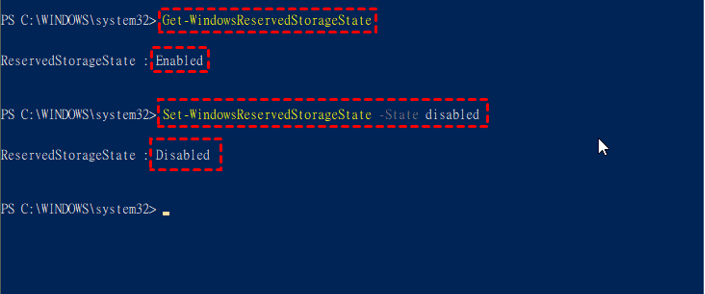
- Type Get-To verify that Windows Reserved Storage (WRS) is enabled, open Command Prompt as Administrator and type `fsutil behavior set WRS 1` and press Enter. This command enables the WRS feature.
- If you confirm that the feature is enabled, enter the command "Set-WindowsReservedStorageState -State disabled" and press Enter to disable it.
Method 14. Sync files to another disk - Qiling Disk Master Standard
You can also use Qiling Disk Master Standard to solve the problem of having too many files on your disk by synchronizing files to another disk with its File Synchronization feature.
Qiling Disk Master Standard offers a free and professional file synchronization service that allows you to sync files or folders on Windows devices (including Windows 11/10/8.1/8/7/Vista/XP) to other disks, external hard drives, USB flash drives, NAS, or cloud storage like OneDrive, in just a few simple steps. This can help save space on a specific disk. To get started, simply download and install Qiling Disk Master Standard (or Qiling Disk Master Server for Windows Server users).
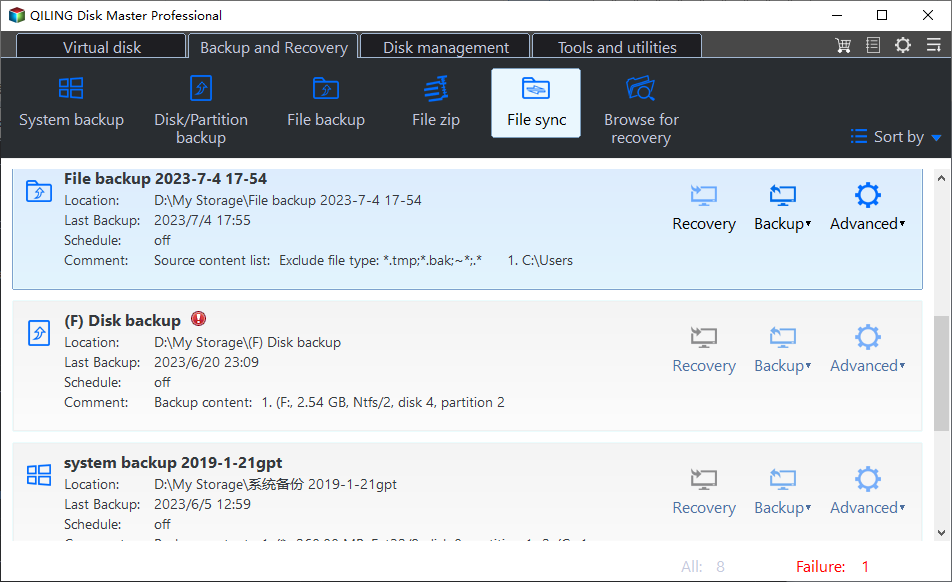
Step 1. Open this freeware and click Backup and recovery > File Sync.
Notes:
This software also provides other 3 sync features to meet your different needs. You can upgrade to the professional version or higher versions to enjoy them if you need.
- File Sync: The command will keep the destination directory the same as the source directory and delete any additional files in the target folder.
- Two-Way Sync: Two-Way SyncIt will sync the changes in the source directory to the destination directory and vice versa.
- File Sync: The folder on the computer will be synced to the destination as soon as it's changed.
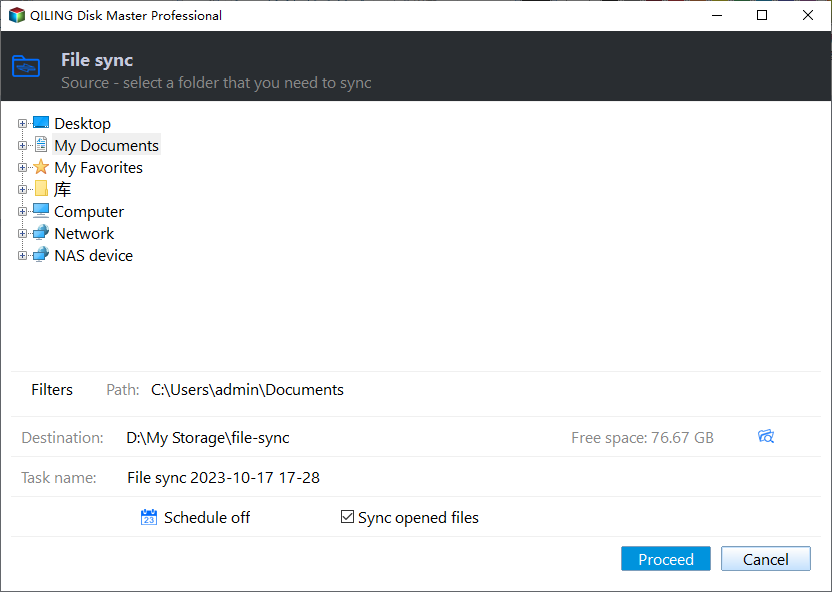
Step 2. To sync multiple folders, click the "Folder" button to select the folders you want to sync. You can add multiple folders by clicking the + icon repeatedly, adding all the folders that need to be synced.
Step 3. Click the inverted triangle at the right edge of the second bar and choose a destination.
Step 4. Confirm your operations and click Proceed.
Notes:
- Options: You can add comments to your synced files for easier identification and set up email notifications to inform you when the sync task is finished.
- Schedule: The app allows you to automatically sync your files, with options to set fixed frequencies such as Daily, Weekly, or Monthly, as well as more advanced features like Event trigger and USB plug in, which are available in the professional version.
💛A safer way to transfer files:
To prevent others from modifying your files, you can back up your files to Qiling Cloud using its Cloud Backup feature, which compresses all data into an image file, making it inaccessible until you restore files from the backup.
You can enjoy 1TB of free cloud storage for 15 days after registering a Qiling account, and you don't need to install a cloud drive desktop application for file backup.
Conclusion
If you're unsure what's taking up space on your Windows 10 hard drive, this article can help you check and learn how to free up space using 18 methods. Alternatively, you can use third-party software like Qiling Disk Master Standard to sync excess files to other hard drives, saving space in the process.
You can easily synchronize files with Qiling Disk Master Standard on Windows 10 or other Windows versions, and it also offers features like Disk Clone, Partition Clone, System Backup, and Disk Backup. This software can meet your various needs, and you can download it to explore more functions.
Related Articles
- How to Delete Backup Files in Windows 10 When Backup Disk Full
What to do if the backup disk is full? You can try the following methods to delete backup files created by Windows Backup and Restore, File History, etc. to free up disk space. - Cloned Hard Drive Shows Wrong Size - Quick Fix Once For All
If the cloned hard drive displays an incorrect size in Windows 11/10/8.1/8/7, it's possible that the cloning process was not executed correctly. To learn how to clone a hard drive to a larger drive without leaving unallocated space, follow the steps provided here. - Clone Hard Drive in Windows Server 2016 without Reinstalling Windows
Want to clone HDD with Windows Server 2016 to SSD? Learn the simplest way to clone hard drive in Windows Server 2016 without reinstalling operating system or installed programs. - Windows Server 2022 Recovery Disk Creator - Fastest and Safest
You can learn how to create a Windows Server 2022 recovery disk with the most reliable software in this article.

