3 Ways to Fix Windows Won't Install on SSD or HDD
Windows unable to install on SSD
Installing Windows 11/10/8/7 on a solid state drive (SSD) can significantly boost your computer's speed. However, if Windows won't install on your SSD, it can be frustrating. Fortunately, this article addresses three common situations and provides corresponding solutions to help you resolve the issue effectively.
- Situation 1. SSD not recognized by BIOS
- Situation 2. SSD not recognized by Windows 11/10/8/7 Setup
- Situation 3. Windows cannot be installed to this disk
Situation 1. SSD not recognized by BIOS
If your SSD is not showing in BIOS, you should check if it is properly seated and connected to the motherboard, and also check if the SSD is enabled in the BIOS settings. You can also try resetting the BIOS to its default settings to see if that resolves the issue. If none of these steps work, it may be worth checking the SSD's firmware and updating it if necessary.
1. Check the SSD cable connection by swapping the SATA cable with another one or connecting the SSD to an external USB adapter to see if it's a BIOS connection issue.
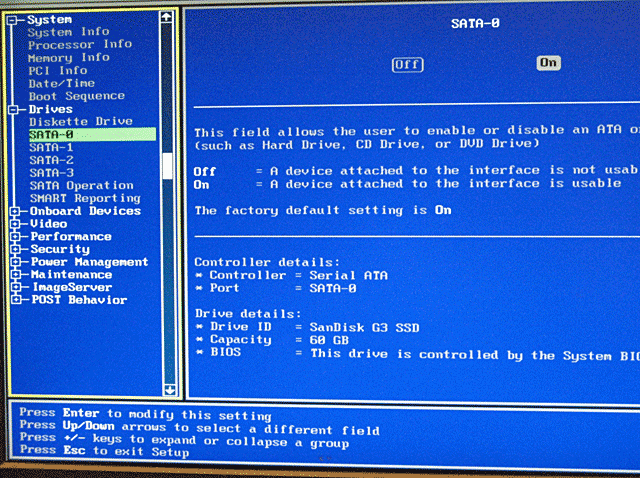
2. The SATA port may need to be manually enabled in System Setup (BIOS) if it's turned off, preventing the new SSD drive from being recognized.
3. If the SSD is damaged, it may not show up in the Disk Management console on the computer it's connected to. To check if the SSD is damaged, you can connect it to another working computer and see if it shows up in the Disk Management console or if it's recognized by the operating system.
Situation 2. SSD not recognized by Windows 11/10/8/7 Setup
1. Enter the BIOS settings by pressing F2, F12, or Del key, depending on your PC manufacturer's settings.
If your computer is detected with a BIOS issue, you can try the following steps to resolve it. First, save all your work and shut down your computer.
1. To prepare your computer for installing Windows 8/10/11, first boot into the BIOS settings and change the SATA mode to AHCI. Additionally, if your system has Secure Boot enabled, make sure to keep it on as it's required for the installation process. Note that installing Windows on an SSD is not supported, so you'll need to install it on a traditional hard drive instead.
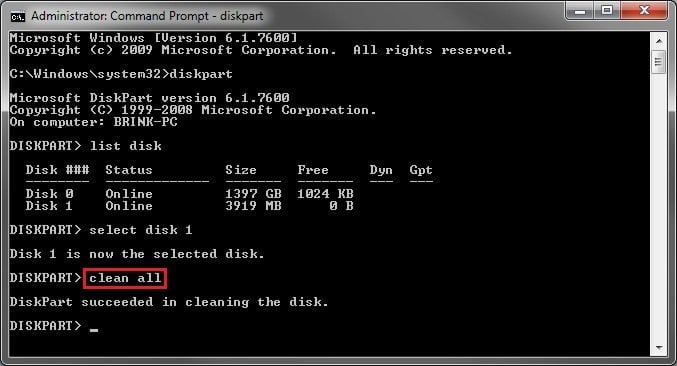
2. If your SSD still is not showing at Windows Setup, press SHIFT+F10 to open a Command Prompt window. In the window, type `diskpart` and press Enter.
3. Type "diskpart"
4. To display all the disks connected to your computer, you can type "list disk" in the command prompt.
5. To proceed, type "select disk [disk number]" in the command prompt, where [disk number] is the number of the disk you want to access. For example, if you have inserted one drive into your system, you would type "select disk 0".
6. Be cautious when wiping data from an SSD. Make sure the selected disk has no valuable data. Type "clean all" and press Enter to wipe out all data from the SSD.
7. When the process is complete, type "exit" to close this window and go back to the Windows Setup screen.
If you're using a Solid-State Drive (SSD) on your computer, you can use the built-in Disk Cleanup tool to free up space on your drive. To do this, go to the Start menu, type "Disk Cleanup" in the search bar, and select the tool from the results. This will open a window where you can select the files you want to delete, such as temporary files, system files, and other items you don't need.
Situation 3. Windows cannot be installed to this disk
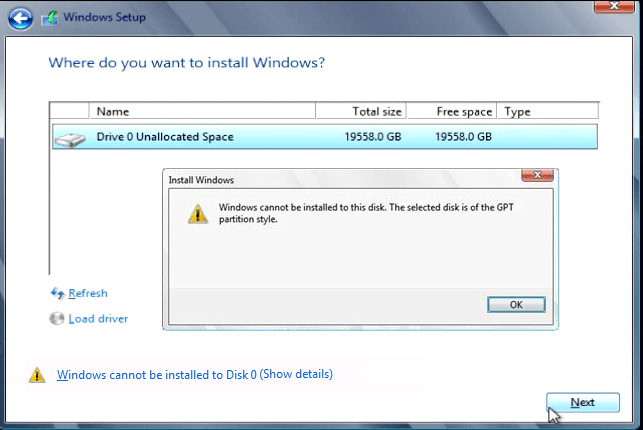
If Windows recognizes the SSD drive but can't install Windows on it due to the "Windows cannot be installed to this disk. The selected disk is of the GPT partition style" error, the issue can be resolved by adjusting the BIOS settings or converting the disk to the MBR partition style.
If your computer supports UEFI boot, you can enable UEFI mode in BIOS settings. If you only see Legacy boot mode, you can convert the SSD to MBR disk.
1. Press Shift+F10 to bring out a command prompt.
2. Type the following:
● diskpart
● list disk
● select disk [disk number]
● clean
● convert mbr
3. Wait for the process to complete. Once done, return to the Windows installation screen, where you should be able to proceed with installing Windows.
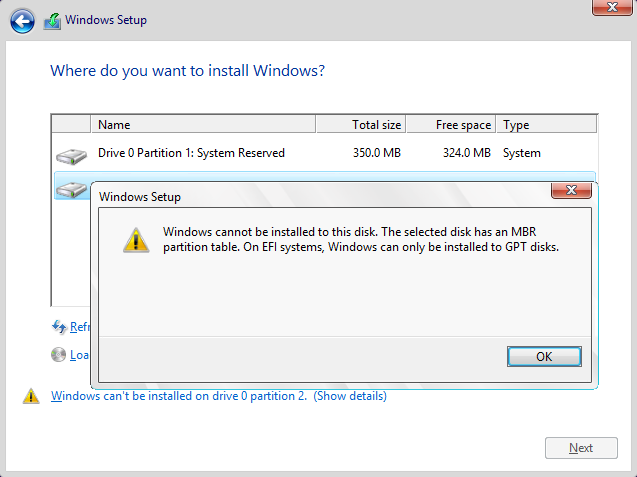
If you're getting the error "Windows cannot be installed to this disk. The selected disk has an MBR partition table. On EFI systems, Windows can only be installed to GPT disks", you can resolve the issue by either disabling UEFI mode and enabling Legacy mode, or by converting the SSD to a GPT disk.
Using diskpart.exe to convert a disk to MBR or GPT will completely wipe out all data on the disk. If you want to avoid this, third-party software like Qiling Disk Master Standard can be used to convert the disk without deleting partitions or data.
You can download the free version of Qiling Disk Master on a working computer, then connect your SSD as a second drive. This allows you to convert the drive to either GPT or MBR format using the software.
1. Open this software.
2. Right click on the SSD and select Convert to GPT, if it's MBR, select Convert to GPT.
3. Confirm the task and waiting it to apply this change.
Tip: You need to upgrade to the Professional version if you need to convert the system disk between MBR and GPT.
This software allows you to create a bootable media to install Windows on a computer without a Windows system, and can also be used to clone a hard drive to an SSD, eliminating the need for a fresh install. If you're experiencing issues with Windows not installing on your SSD, don't panic - simply follow the steps tailored to your situation, and this software can help you resolve the problem.
Related Articles
- How to Backup Windows 10 for Fresh Install
Do you need to fresh install Windows 10 but do not want to lose all data? This article will show you how to backup Windows 10 for fresh install step by step. - Easily Create Windows Server 2012 Incremental Backup | 2 Ways
You will learn 3 backup types and find the 2 ways to make Windows Server 2012 incremental backup, try the best way to do incremental backups in Windows Server 2012 (R2), 2016, 2019. - [Fixed] Windows Server Backup Reading data please wait
This article offer several solutions to Windows Server Backup 'Reading data; Please wait...' issue, as well as one powerful backup software to create backup image. - Best Windows Server 2012 R2 Backup Software
In this article, you will get the best 2 Windows Server 2012 R2 backup software & practices to backup Windows Server 2012 R2 to external hard drive effortlessly.


