Useful Software to Write Zeros to Hard Drive Safely
Content of this article:
- What does write zeros to hard drive mean?
- Why zero fill a hard drive?
- 4 useful zero fill hard drive utilities to wipe disk
- To write zeros to a hard drive in Windows 7/8/10/11 safely, you can use one of the following methods:
- Write all zeros to hard drive FAQs:
- Wrapping things up
What does write zeros to hard drive mean?
Before understanding the meaning of writing zeros to a hard drive, it's helpful to know how a hard drive stores and reads files. This basic understanding will make the write zero method clearer.
The hard drive stores data on magnetic platters that spin and read data by detecting magnetic polarities, which are represented as binary code (0s and 1s), allowing the computer to locate the data.
To write zeros to a hard drive in Windows 7/8/10/11, you need to replace the original data with new data, specifically zeros, to prevent recovery methods from extracting information. This process, also known as single overwrite, zero-fill erase, or zero-fill, involves overwriting the binary data with zeros, making it unreadable and unrecoverable.
Why zero fill a hard drive?
Many users are searching online for how to zero fill a hard drive, and a user on the Superuser forum shared their case. They were looking for a method to securely erase a hard drive, effectively making it impossible to recover any data.
Windows 7: does formatting a disk actually write zeros to it?
I need to write zeros to hard drive in Windows 7 and ensure all personal files are securely erased before selling out or donating to others.
Microsoft's article states that formatting a disk in Windows Vista and newer versions of Windows (excluding Windows 7) results in zeros being written to the entire disk, unless the quick format option is used. However, the article does not mention Windows 7, leaving uncertainty about its formatting behavior.
Microsoft's article does not specifically mention Windows 7, but it is likely that the security update also applies to Windows 7, as it is a later version of the operating system. However, to confirm, you should check the "Applies to" section of the article or contact Microsoft support for more information.
- Question from superuser
One of the main reasons to erase data on a hard drive is to prevent privacy leakage, ensuring that sensitive information is protected. Additionally, people may want to upgrade to a larger hard drive and repurpose the old one as a secondary storage device.
4 useful zero fill hard drive utilities to wipe disk
To zero fill a hard drive, use a software that securely erases all personal data, preventing recovery with data recovery software, ensuring complete and permanent deletion of all data on the drive.
Here I will introduce you 4 zero fill hard drive utilities, just choose one of them per your situations.
✿ The command is a full format command that can write zeros to the whole disk, and it is available in Windows Vista and later versions, including Windows 7, 8, 8.1, 10, and 11.
✿ Using the "clean all" command in DiskPart can thoroughly wipe a hard drive, zeroing out every sector with zeros. However, it's essential to note that the "clean" command functions similarly to "delete", making data invisible on the current disk rather than erasing it completely.
✿ The system repair disc is used to write zeros to the primary drive (usually C: drive) of any Windows computer, or Windows XP and earlier versions.
✿ The fourth one is third-Qiling Disk Master Professional is a party software that offers a useful feature called �ipe Disk, which can be used on any system, including data disks and system disks. This feature also supports Peter Gutmann's method of filling sectors with random data, as well as the DoD 52220.22-M standard.Wipe Disk, which can be used on any system, including data disks and system disks. This feature also supports Peter Gutmann's method of filling sectors with random data, as well as the DoD 52220.22-M standard.
How to write zeros to hard drive in Windows 7/8/10/11 safely
To write all zeros to a hard drive, you can use various methods, but be aware that the process is irreversible and cannot recover the data. It's recommended to backup your files and system before proceeding. This approach can be useful in certain situations, but it's essential to take precautions to avoid data loss.
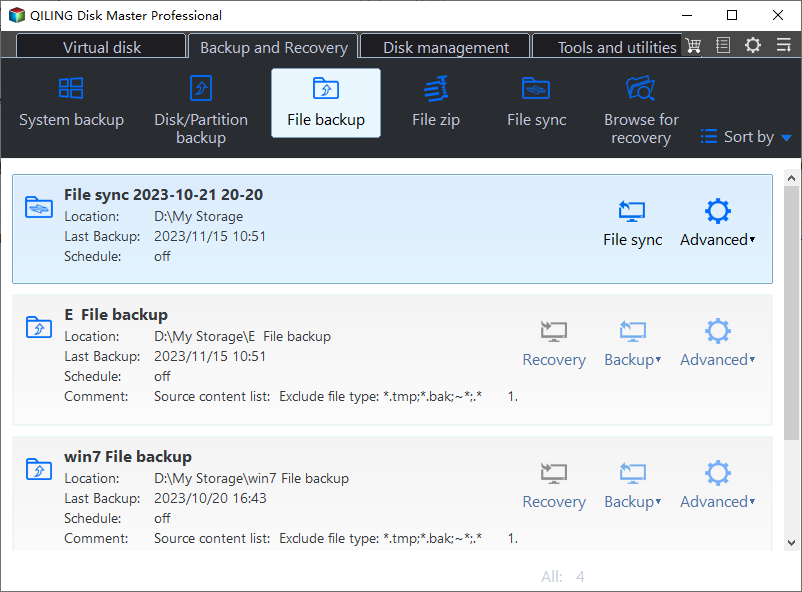
Qiling Disk Master can help create a backup image for your files or computer. It's a Windows backup software that allows you to not only do a single backup in case of disaster, but also schedule backup daily, weekly, or monthly to continuously protect your data or computer.
Backup files before writing all zeros to hard drive
Step 1. Download and install the backup software Qiling Disk Master, then launch it and select Backup and File Backup in sequence.
If the hard drive is a system disk, it's suggested to do a complete system backup, which includes the operating system, system settings, applications and personal data, allowing for a quick restoration of the system to a new hard drive and making the computer bootable again in a short time.
Step 2. Select what you want to backup.
Step 3. Click the folder shaped button and select a destination path to store the image file, choosing a backup location on an external hard drive, USB flash drive, network drive, or cloud drive.
Step 4. Then, in the confirmation windows, set up backup settings as needed and click Proceed.
It's suggested to create a bootable USB which can help you boot computer when it refuses to boot.
Method 1: Zero format hard drive with Format
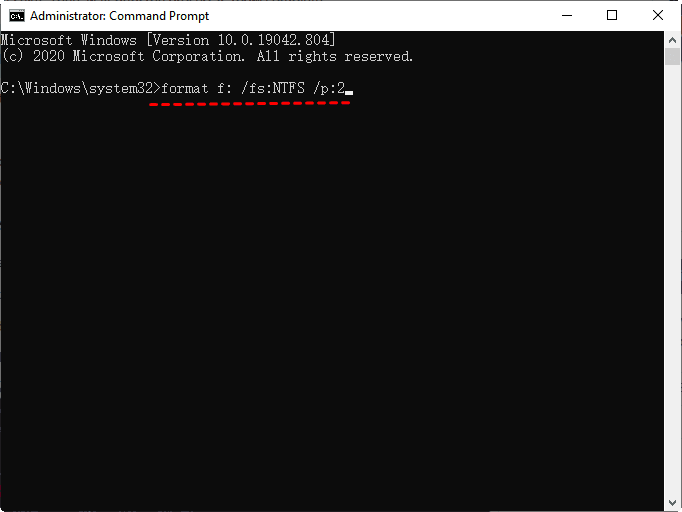
Step 1. Type cmd in the search box, right-click it and select Run as administrator.
Step 2. The command `format F: /fs:NTFS /p:2` formats the F drive with the NTFS file system and writes all zeros to every sector twice, ensuring maximum data security and integrity. This command is typically used in a Windows environment to securely erase data on a hard drive before reusing or repurposing it. The `/p:2` option specifies that the format process should write zeros to every sector twice, which is a more secure method than the default single pass.
A single pass of zeros to a hard drive in Windows Vista/7/8/8.1/10 can prevent software-based file recovery, but for added safety, doing 2 passes may be preferred.
Step 3. When prompted to type the volume label of the drive you are formatting, simply enter the desired name and press Enter. The volume label is not case sensitive, so you can use any combination of letters and characters you prefer. For example, if you want to name the drive "My Drive", you would simply type "My Drive" and press Enter.
If the drive you are formatting does not have a volume label, you will not be asked to enter one, so there's no need to worry about it.
Step 4. To format the non-removable disk drive F:, type Y and press Enter when prompted with the warning "all data on non-removable disk drive F: will be lost! Proceed with Format(Y/N)?" Wait until the formatting process is 100% complete.
The formatting process may take several seconds or even minutes if the drive is very large or multiple write-zero passes are used.
Step 5. After formatting , type a name for the drive as volume label, or don't, and press Enter.
Step 6. Wait until you see Creating file system structures on the command prompt window.
To destroy a hard drive using cmd, start by opening cmd as administrator, then type `diskpart` and press enter. Next, type `list disk` and press enter to list all the disks on the system, including the one you want to destroy.
Method 2: Zero fill hard drive with DiskPart
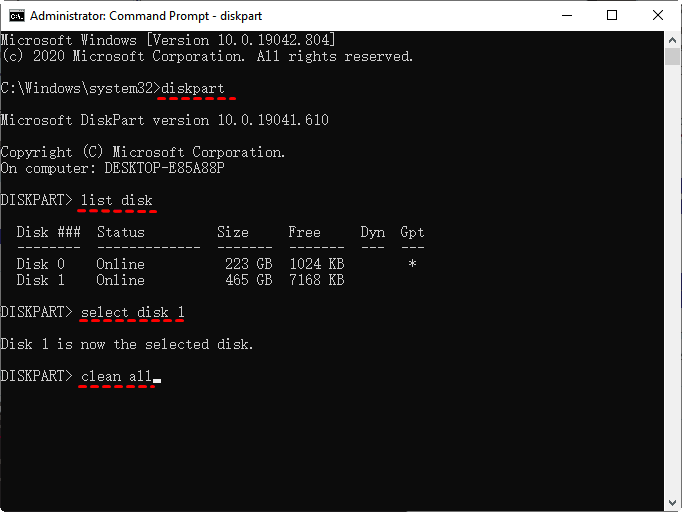
Step 1. Run cmd as administrator. Then, type diskpart in the command prompt window and press Enter to execute.
Step 2. Type list disk and press Enter. Then, you will see all the available disk on your computer.
Step 3. Type select disk 1 and press Enter. Note disk 1 is the number of disk you want to zero out.
Step 4. Type clean all and press Enter.
Step 5. Wait until the process finish and type exit.
Method 3: Write all zeros to hard drive using system repair disc
Step 1. To create a system repair disc in Windows 7, insert a blank CD or DVD into your computer's disc drive. Go to the Start menu, click on "Control Panel," and then click on "System and Security." Next, click on "Backup and Restore" and then click on "Create a system image." Click on "Save the backup in a network location" and then select the disc drive as the location. Click on "Next" and then "Create a system image." Wait for the process to complete.
Step 2. Wait for the Windows file loading process to complete, then set your preference language and keyboard input, and click Next in the System Recovery Options window.
Step 3. Choose Use recovery tools that can help fix problems starting windows. Select an operating system to repair and click Next.
The operating system on this computer does not need to be compatible with the operating system used to write zeros to the hard drive. This means that you can write zeros to the hard drive even if the computer is running an operating system like Windows XP, which is not listed here.
Step 4. Select Command Prompt in the System Recovery Options window.
You can use this command prompt to perform various tasks. It contains most of the commands you may need, allowing you to use the full format command or clean all command, among others.
Step 5. Repeat steps in Method 1 or Method 2 to fill sectors with zeros.
Method 4: Write zeros to hard drive with zero fill hard drive utility
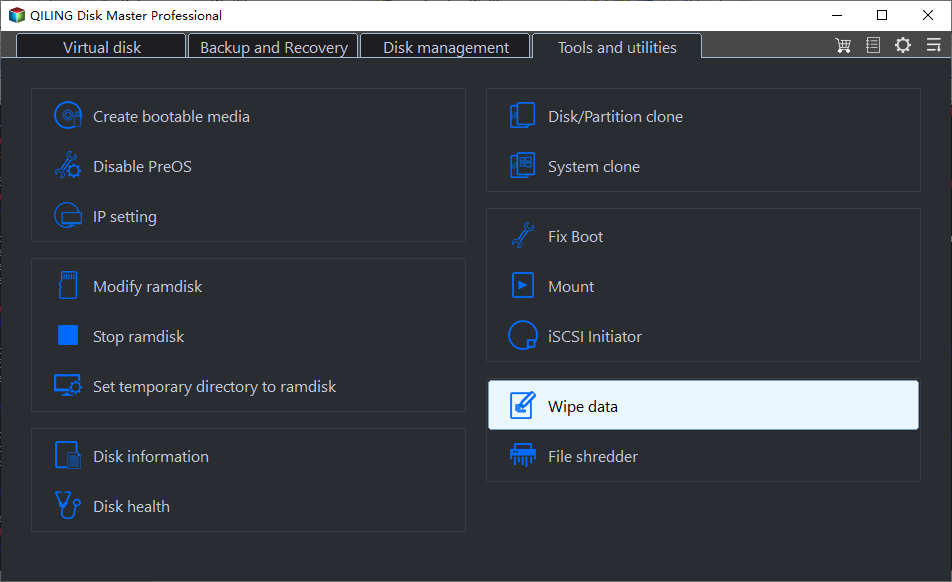
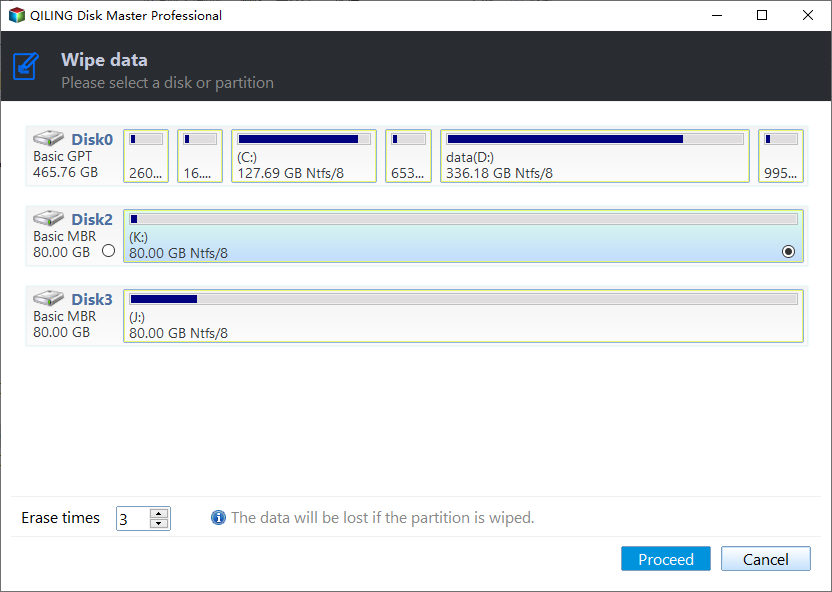
Step 1. Launch Qiling Disk Master Professional, go to Tools > Disk Wipe and click it.
Step 2. When using the wiping type window, you have two options: wiping selected partitions and unallocated space on the disk, or wiping the entire disk. To write all zeros to your hard drive, select the option to wipe the disk and click Next.
Notes:
Selected partitions & unallocated space on the disk: This option deletes the selected partition(s) or unallocated space.
Wipe disk: This option will completely erase all data on the hard drive by deleting all partitions and filling the sectors with zeros, eliminating the need to wipe each partition individually.
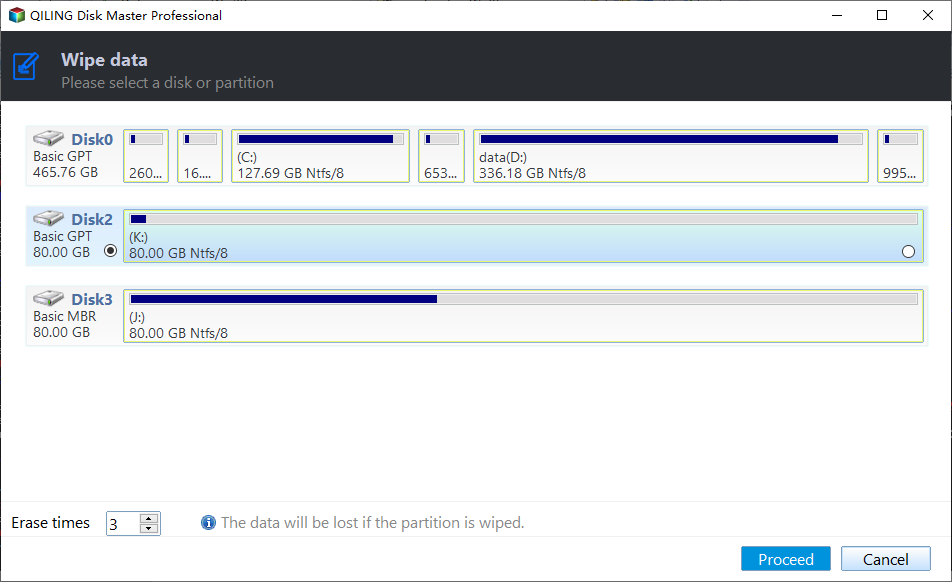
Step 3. Select the disk you want to wipe and click Next.
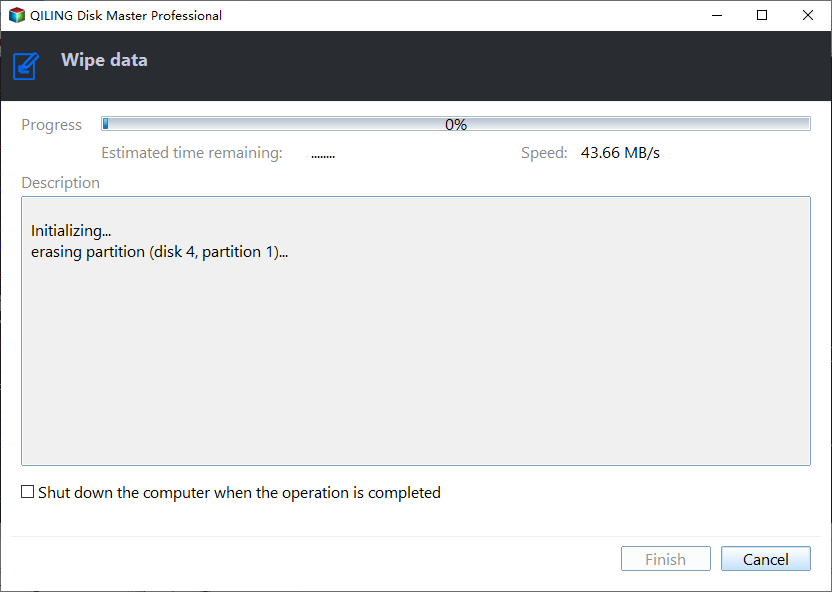
Step 4. In the wiping method window, select Fill sectors with zero and click Proceed.
Notes:
❤ This method is used to write zeros to a USB flash drive, which can be useful for preparing the drive for use with a specific operating system or for formatting purposes. The process typically involves using a command-line tool, such as `dd` on Linux or `cipher` on Windows, to write a file of zeros to the entire drive.
❤ If you're wiping the system disk on your current computer, this software will complete the zero filling process under a Windows PE environment, so don't stop it even if your computer restarts.
Tips:
❤ For a safer choice, consider using methods like Gutmann, filling sectors with random data, or DoD 52220.22-M, which are more secure than the first option.
❤ I will rewrite it in one paragraph shortly. If you have any further questions, you could click the Help button at the left-bottom corner and learn more about Disk Wipe.
Write all zeros to hard drive FAQs:
Does a quick format erase all data?
In Windows XP and earlier versions, a full format was equivalent to a quick format, including a disk scan for bad sectors, but not writing zeros to the entire disk. However, in Windows Vista and newer versions, the full format command has been updated to write zeros to the whole disk, making it a more thorough and secure formatting process.
Does writing zeros to hard drive fix bad sectors?
The zero format method before Windows Vista has the ability to scan the bad sectors, but it likely zeros them out instead.
In newer versions of Windows, the disk scan for bad sectors is replaced by filling sectors with zeros, which can reveal any bad sectors that couldn't be written to, but won't fix them.
Unfortunately, this method still does not address the issue of bad sectors in any Windows system, leaving the problem unresolved.
Is zeroing a hard drive secure?
The zero fill hard drive utility offers various methods to wipe a disk, including Peter Gutmann, fill sectors with random data, DoD 52220.22-M, and fill sectors with zero. However, the write zeros method is slightly less destructive than the others.
Wrapping things up
Before wiping a hard drive, make sure to back up your files and system, as writing zeros to the drive will permanently delete all data and make it unrecoverable. In Windows 7, 8, 10, 11, XP, or Vista, you can easily write zeros to a hard drive, which can then be sold, discarded, or donated to others.
Among the 4 methods, Qiling Disk Master Professional is the easiest one. It allows you to delete all partitions at once and supports more wiping methods, making it a convenient and secure option for data protection.
Related Articles
- How to Write Zeros to Seagate Hard Drive Easily (2 Ways Included)
- Write Zeros to Toshiba Hard Drive with Freeware
- How to Securely Wipe or Cleanup a Hard Drive in Windows 10
- 2 Free WD Zero Fill Utilities for Windows 10/8/7 | Try It Now!
- How to Wipe C Drive Securely in Windows 10 | 3 Methods
