How to Automatically Backup File Using Task Scheduler?
The schedule settings in Windows Backup is not adequate
There are various reasons for data loss, such as system crashes, hard drive failures, virus infections, theft, etc. Windows offers multiple backup and recovery options to safeguard your data.
In Windows 7, you can create System Restore Points to protect your system state and previous versions of files, and Backup and Restore to create image backup including system image and files. In later versions, Microsoft introduced File History in Windows 8 to backup multiple versions of personal files and OneDrive in Windows 10 to backup data to the cloud.
Some backup options have limited schedule options, but you can use the Task Scheduler to run scheduled backups in a more flexible way.
Configure auto backup folder with Task Scheduler
Task Scheduler allows you to run a backup at specific times (daily, weekly, monthly) and also initiate a task when a chosen trigger is met, such as system events, idle state, system load, or user login.
To set up a scheduled backup to backup the full system, follow these steps:
- To access Task Scheduler, press Windows + R, type "taskschd.msc" in the Run box, and press Enter, or go to Control Panel -> System and Security -> Administrative Tools.
- Click Create Task to begin the settings.
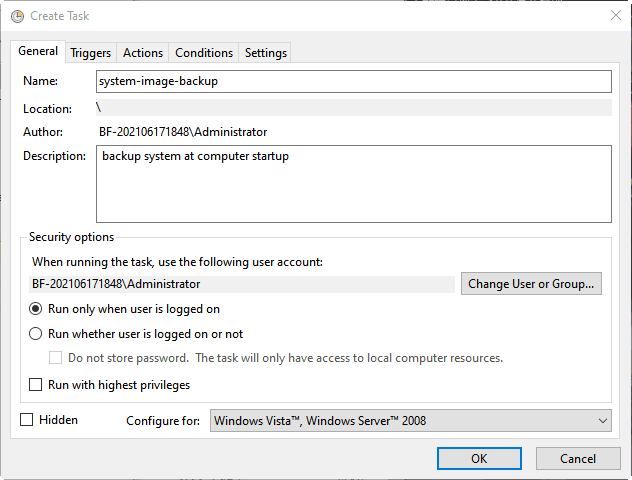
- In General, set a task name and write a description.Check the option Run whether user is logged on if needed.
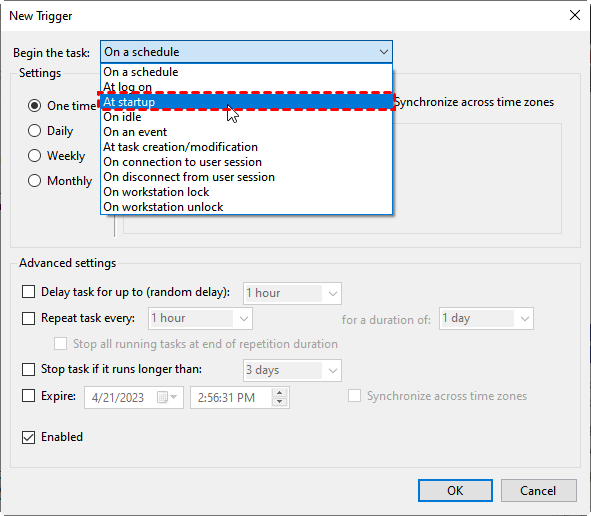
- To create a new trigger, go to the Triggers tab, click New, and select At startup to trigger the backup at computer startup.
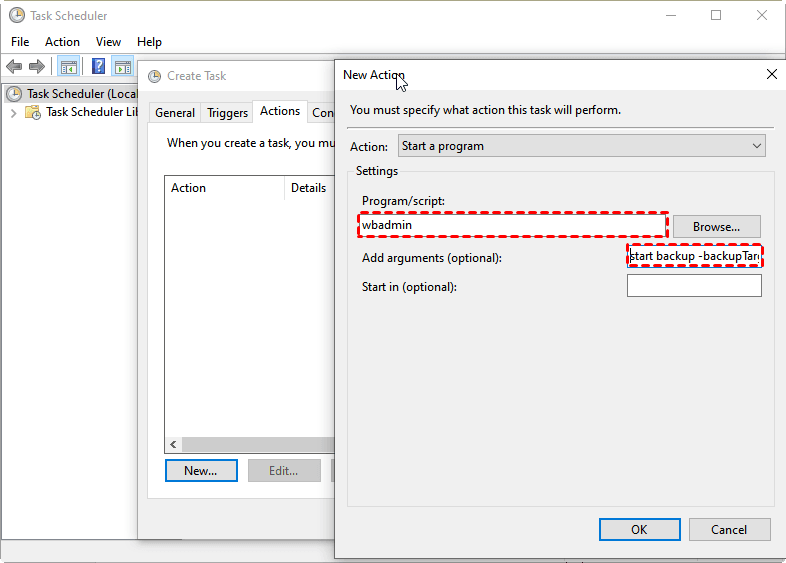
- To add a new task in the Task Scheduler, go to the Actions tab, click New, and fill in the Program/script box with "wbadmin" and the Add argument (optional) box with "Proceed -backupTarget:F: –include:C:\Users\My documents". This will add the specified files to the backup. If you want to include other files, simply modify the WBadmin backup command parameter. For example, to add a system image, add the switch "-allcritical".
- 1. Click OK and enter your user password. 2.
In addition to system image backups, it's also essential to protect your files. In Windows 10/8/7, System Restore Points not only save system state backups but also preserve file versions, allowing you to restore them to a previous state if needed.
If you think the time gap between each restore point is too long, you can use Task Scheduler to take system restore points more frequently.
Customize previous versions frequency with task scheduler
To edit the System Restore task in Task Scheduler, find the task named "SR" in the Task Scheduler Library under Microsoft > Windows > SystemRestore, then double-click it to make changes, allowing you to alter the trigger or add new triggers.
Advanced way to automatically backup files with Task Scheduler
Although Windows provides many backup and restore features, they have limitations. For example, Windows Backup can only protect volumes formatted with NTFS. If you prefer the built-in backup features, ree backup software Qiling Disk Master Standard is recommended.free backup software Qiling Disk Master Standard is recommended.
Qiling Disk Master allows you to backup files, system and entire hard drive or SSD drive into a compressed image file, with options to schedule custom backups, and also integrates with Task Scheduler to run backups.
To set up an auto backup folder in Windows 7/8/10, download a free backup software first.
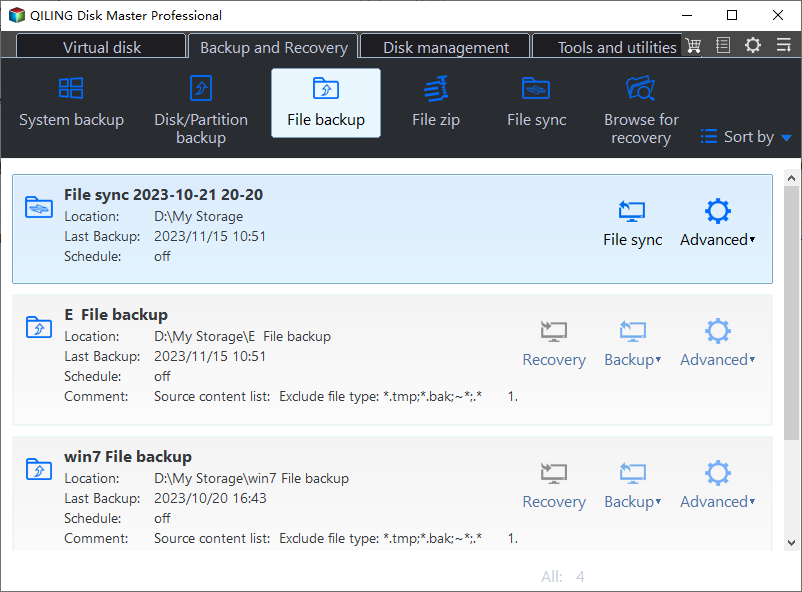
- Install Qiling Disk Master on your computer and select "File Backup" under the "Backup" tab.
- To include files or folders in the backup, click on the "Files" or "Folder" option, respectively.
- To receive the image backup file, click on a location to select it, which will then allow you to access the file.
- To create a scheduled backup task, click on "Schedule" and configure the settings in the Schedule Settings section, where you can choose from daily, weekly, or monthly backups, as well as advanced options such as event triggers and USB plug-in (available in the Professional version).
✍ Note: If you like to use this freeware to handle the scheduled backup, you can just click "OK" and proceed to the next step. If you want to use Task Scheduler to run the backup, click on the "Advanced" tab and select the option to use Task Scheduler to run the backup.
- Click "Proceed" to start this file backup.
- To resolve the issue, go to the Task Scheduler, find the task that is causing the problem, and edit it to fix any issues.
- The software allows you to create a backup and restore point, and also enables you to create a bootable media under Tools, which can be used to restore files when Windows is unable to boot. Additionally, the advanced version of the software offers features such as creating a File Sync task, scheduling backups to cloud drives, and cloning hard drives to another one, providing comprehensive data protection.
- This software offers Qiling Cloud, a cloud storage device for users, allowing for cloud backup to secure data and save disk space. Upon signing up for a Qiling account, users receive 1TB of free storage for 15 days.
Final words
To automate file backups, three methods can be used with Task Scheduler: creating a batch file, using the Windows Backup tool, or scripting with PowerShell. Each method has its own advantages, and users can choose the one that suits their needs best. Additionally, other tools and methods, such as using cloud storage services like Google Drive or Dropbox, or third-party backup software, can also be used to automatically backup files. Users can share their preferred methods or recommendations in the comments section.
The free backup software mentioned can assist in regularly backing up files, as well as facilitating data and operating system migration when upgrading a computer's hard drive.
Related Articles
- Best Free Task Scheduler Alternative - Qiling Disk Master
If you are looking for a better Task Scheduler alternative, Qiling Disk Master Standard is worth trying. Read this article carefully and learn the operating steps below. - How to Schedule SyncToy in Windows 10 to Run Automatically
Wanna schedule SyncToy in Windows 10 but don't know how to do it? Read this article to get the answer and find the best free alternative to SyncToy. - How to Schedule Windows 10 Wake from Sleep
This article is written for users like you who want to schedule sleep and wake in Windows 10 at a certain time, then run scheduled backup task. Scroll down to learn more. - Set Task Schedule Log Off and Backup Windows on Log Off
You can learn how to easily log off user with or without task scheduler. Also, with the help of a professional backup software, a user logoff schedule backup is supported.


