How to Do Complete PC Backup in Windows 11/10/8/7 [Free]
- What does complete PC backup refer to
- How to perform complete PC Backup in Windows 11/10/8/7
- Method 1. Create a full PC backup with Windows Backup and Restore
- Method 2. Use WBAdmin command lines to create complete PC backup
- Method 3. Free alternative to quickly and completely backup the PC
- Supplement: Other Windows PC backup means you may concern
- Conclusion
What does complete PC backup refer to
A complete PC backup refers to backing up the entire computer, including the operating system, programs, settings, and personal files, allowing for a full restoration to an earlier state in case of a serious problem.
In Windows Vista, Complete PC Backup was a built-in utility for Business, Enterprise, and Ultimate editions. However, it was removed from later OS versions. To create a complete computer backup in Windows 11/10/8/7, you need to find an alternative to create a full computer image.
How to perform complete PC Backup in Windows 11/10/8/7
Windows 7, 8, and 10/11 have a built-in feature called Backup and Restore, which includes a creating system image option, allowing users to create a complete PC backup, similar to Complete PC Backup in Windows XP.
WBAdmin is another tool to create system image, which can be used through command lines to back up the PC.
If neither approach satisfies you, there's a freeware allowing you to back up the entire computer for free.
Now I will introduce the three methods in detail.
- To create a full PC backup with Windows Backup and Restore, go to Control Panel, then System and Security, and click on Backup and Restore (Windows 7). Select "Set up a backup" and choose the drive where you want to save the backup. Select the files and folders you want to back up, or choose the option to back up everything.
- To create a complete PC backup using the WBAdmin command line, follow these steps: Open Command Prompt as an administrator. Type the command "wbadmin get versions -vsystem" and press Enter. This will display the list of available backups.
- 3. Use a free alternative to quickly and completely backup the PC, such as Windows Backup and Restore, EaseUS Todo Backup Free, or Macrium Reflect Free, to create a full system image and save it to an external drive or cloud storage. This will allow you to restore your PC to its original state in case of a system failure or data loss.
Method 1. Create a full PC backup with Windows Backup and Restore
Backup and Restore, first introduced in Windows 7, has been adopted in subsequent Windows versions, including Windows 8, 10, and 11. It is now known as Backup and Restore (Windows 7) in recent OS, with its interface and operation remaining largely unchanged.
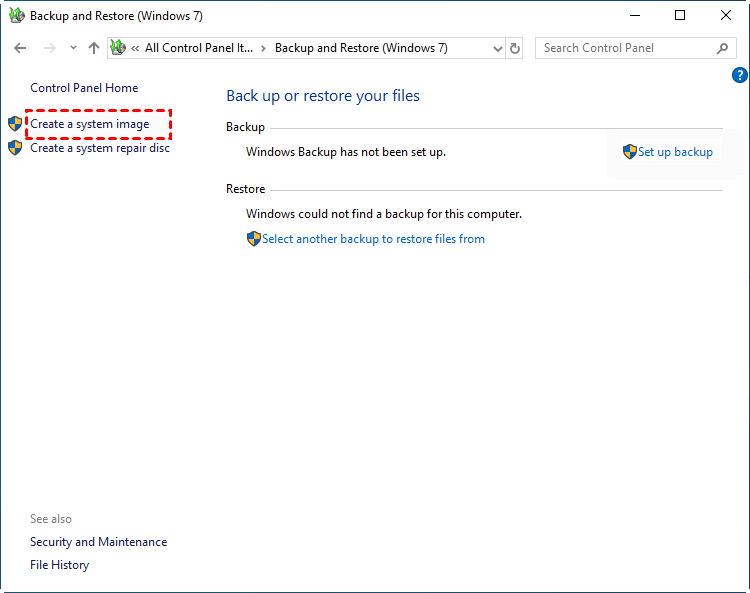
This utility allows you to create a system image, which is a backup of your entire system, including all installed programs, settings, and data. The option to create a system image is located at the top-left corner of the utility.
A system image is a copy of the required drives for Windows to run, which can also include additional drives. This allows you to back up your entire hard drive and restore your PC when needed.
Backing up a Windows computer using the built-in tool is the most common method, but it's essential to be prepared for situations where it might not work or take too long to create a system image.
The steps to use it are roughly the same in Windows 10/8/7, and here's a quick guide: [insert guide here].
How to perform complete PC backup with system image:
1. To access Backup and Restore, search for it in the Start menu or search box, or locate it in the Control Panel.
2. Click Create a system image on the left pane.
3. Choose the destination for the image. It's recommended to store the image file on an external drive, such as an external hard drive, USB drive, or DVD, to keep it separate from your system drive. Once you've selected the destination, click the "Next" button. This will begin the backup process.
Note: the destination disk must be formatted to NTFS.
4. To create a complete PC backup, select the drives you want to include in the backup and click Next to proceed.
5. Confirm the settings and click Proceed to create the system image.
How to restore the system image in Windows:
-
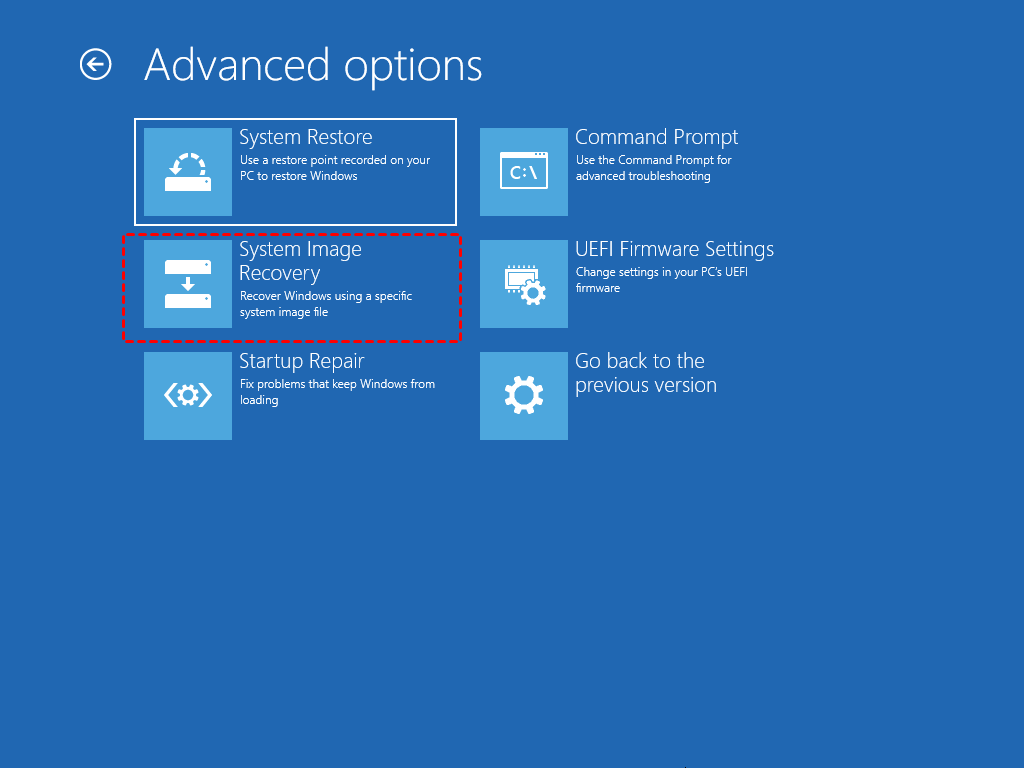
In Windows 11/10/8.1/8: Insert the installation disc or recovery drive, select your language and region in Windows Setup, click Next > Repair your computer to enter Windows recovery environment, then choose Troubleshoot > Advanced options > System Image Recovery.
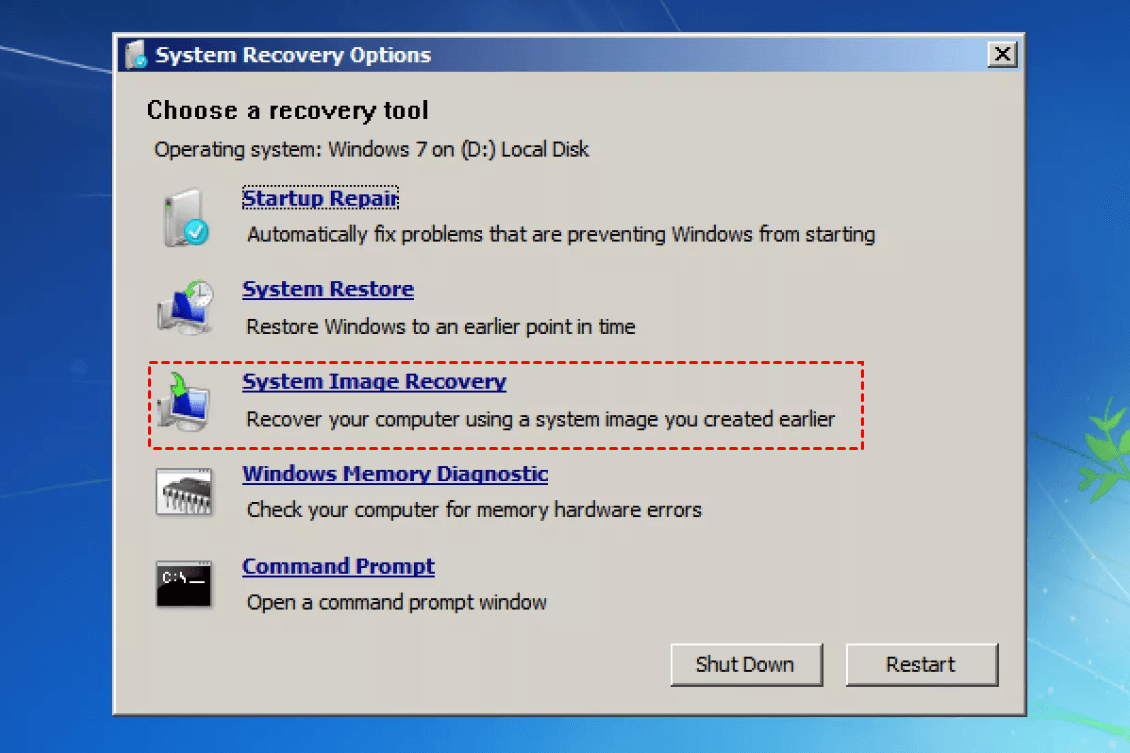
- In Windows 7: When the Windows logo appears during startup, press F8 to enter advanced boot options and click "Repair your computer". If you can't find this option, try inserting the installation disc. Then, choose "System Image Recovery" in the recovery options, and for more detailed steps, refer to the article "How to Use Windows 7 System Image Recovery".
Related tips:
- You can also create a repair disc of Windows in case of system failures.
- For conventional files and folders backup, you can directly use Set up backup in Backup and Restore (Windows 7).
Method 2. Use WBAdmin command lines to create complete PC backup
WBAdmin allows you to backup and restore your OS, partitions, files, folders, etc. with relatively simple commands to learn.
WBAdmin can be used to backup files in Safe Mode, providing an option to backup important files when Windows fails to boot properly, allowing for file backup before reinstallation.
The WBAdmin command line has limitations, including only being able to back up NTFS-formatted partitions, not being able to back up to critical volumes, and only allowing one scheduled backup and one image file, unless the user changes the file name each time.
"If you're okay with the imperfections, go ahead and try it out."
How to backup your PC with Windows WBAdmin:
1. To run the Command Prompt as an administrator in Windows, search for "Command Prompt" in the Start menu, right-click it, and select "Run as administrator".
You can also use Windows PowerShell, a more powerful command-line shell and scripting language, which can run many Command Prompt commands.
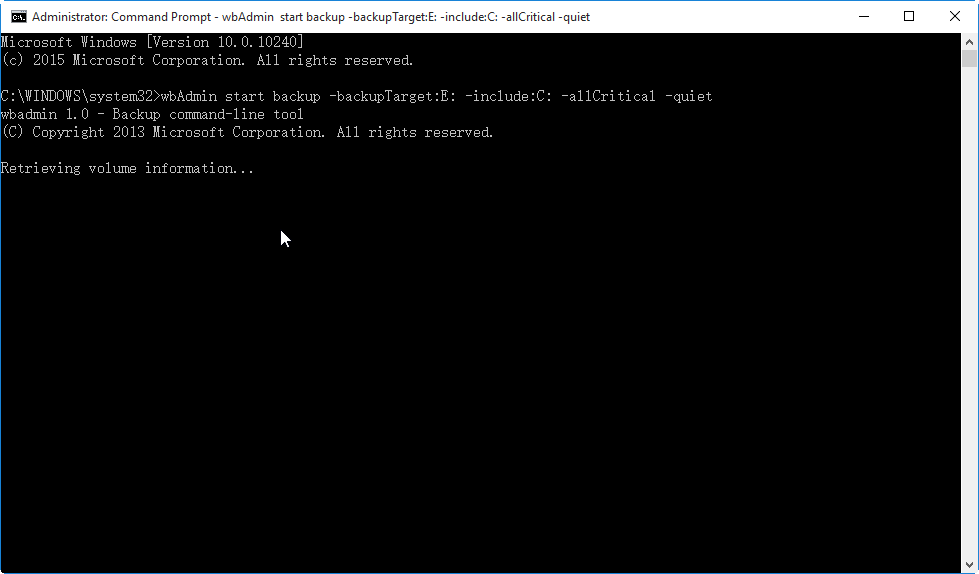
2. Enter the backup command and press Enter to implement it.
The basic syntax for wbAdmin is: `wbAdmin Proceed -backupTarget:E: -include:C: -allCritical -quiet`, which can be used to perform a backup operation.
E: behind -The backupTarget field refers to the destination drive where backups will be stored. If you're using an external hard drive, for example, you'd replace E with the actual drive letter of the hard drive, such as F. If you want to include multiple drives in the backup, you can separate their drive letters with commas.
For example: wbAdmin Proceed -backupTarget:F: -include:C:,D:,E: -allCritical –quiet
The command will backup drives C, D, and E to drive F, allowing for a complete PC backup.
There are other available parameters that allow you to further customize the backup. You can click here to learn about them and then adjust the command according to your needs.
3. To restore from a full backup created with WBAdmin, use system image recovery from boot.
Method 3. Free alternative to quickly and completely backup the PC
A complete PC backup can be time-consuming and storage-intensive, making it unnecessary to do so frequently unless specific needs arise. In my opinion, the best option is a user-friendly tool that offers various backup modes and plans, enabling you to backup files, volumes, OS, hard drives, and more with high speed and success rate.
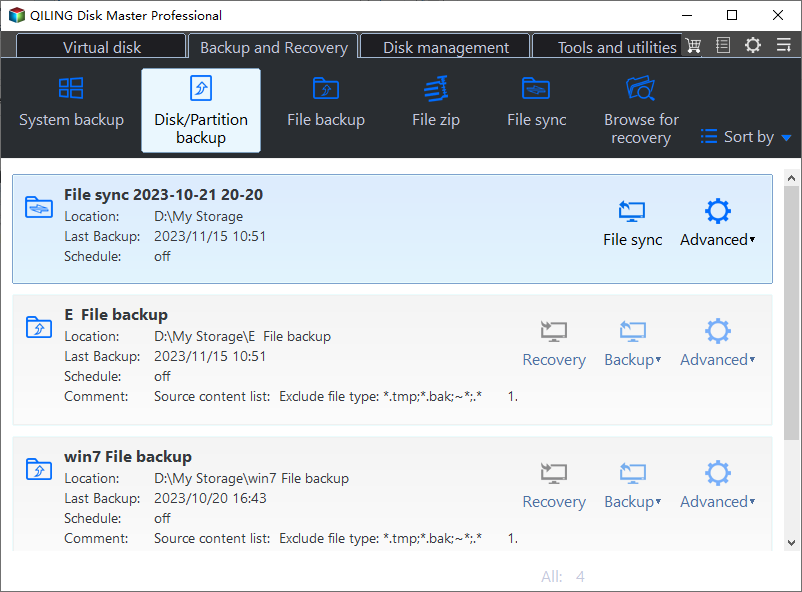
Qiling Disk Master Standard, a freeware, offers a backup function that is divided into four categories: File Backup, Partition Backup, System Backup, and Disk Backup.
- To complete a PC backup, you can run Disk Backup, which will back up all data stored on the hard drive, including the system and personal files, programs, etc.
- You can use System Backup to back up the Windows operating system, including system files, boot files, and data on system partitions.
- To keep an existing backup task up to date without running full backups every time, you can perform incremental or differential backups instead, which are less time-consuming and space-occupying.
You can optionally set up a schedule for automatic backup, which runs in incremental mode by default, but can be changed if needed.
To complete a disk backup, simply follow a few easy steps. For example, with Disk Backup, you can complete the process within just a few clicks.
How to do complete PC backup in Windows 11/10/8/7 with freeware:
1. To back up your hard disk, choose "Backup" on the left pane of this tool and select "Disk Backup" to create an image file of your hard disk.
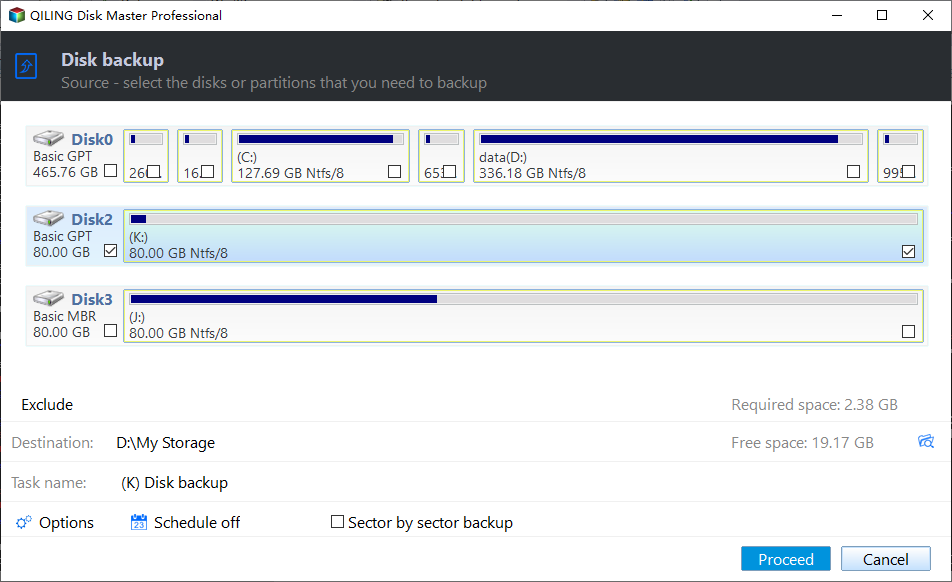
2. To select the disk you want to backup, click on the "Disk" option. You can also add multiple disks to the backup by continuing to select them in this way.
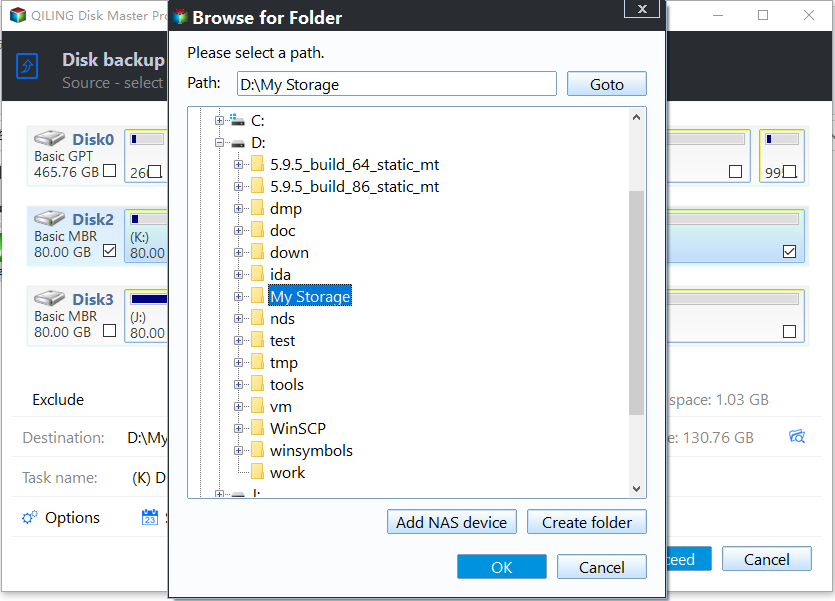
3. To back up your PC, select a destination with sufficient space, such as an external hard drive, USB, cloud drive, or NAS, to safely store your files and data.
4. To create a backup of your computer, select the desired backup option from the three provided, which are a full backup, a differential backup, or an incremental backup. After choosing your preferred backup type, click the "Proceed" button to initiate the backup process. This will create an image of your disk, capturing all the data and settings on your computer.
- Options: Here, you can find some auxiliary functions like image compression, splitting, and encryption, which can be managed according to your needs. For instance, if storage space is limited, a higher compression level can be chosen to get a smaller image file, but it will also take longer to backup.
- Schedule Backup: It allows for automatic backup setup based on daily, weekly, monthly, or event triggers, with USB plug-in availability in professional and higher editions.
- In advanced editions, a backup scheme is available that automatically deletes older backups to save storage space.
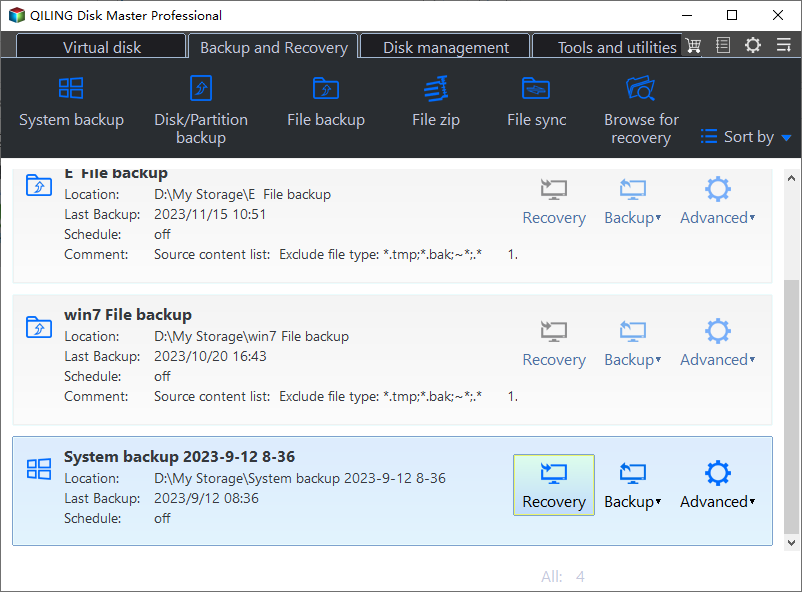
5. To restore a backup image, go to the Home tab and expand the menu of the backup task, or navigate to the Restore tab and select the image to perform recovery.
Related tips:
- With Qiling Disk Master, you can back up your system and restore it to another computer. To ensure the destination computer boots successfully after recovery, you should enable the Universal Restore feature, specifically designed for restoring to dissimilar hardware, and supported by advanced editions.
- If you're creating a complete PC backup to migrate data to a new SSD or computer, it's easier to use Disk Clone rather than backup, as you can directly use the cloned data without the need to restore it.
Supplement: Other Windows PC backup means you may concern
In addition to the methods mentioned, Windows offers other utilities for backing up and restoring important data, but they are not designed for a complete computer backup.
▶ Restore Point
In Windows 10, you can create a restore point when system changes are detected, which is a snapshot of your system configuration and settings in the Windows Registry, allowing you to restore the computer to an earlier point to fix system problems without losing data.
▶ File History
Windows 8.1 and higher editions use File History to back up files to another drive, automatically saving versions from libraries, desktop, contacts, and favorites at a default frequency. This allows users to view and restore all file versions by clicking File History within the backup folder.
Conclusion
In Windows Vista, Complete PC Backup was a built-in feature, but in later versions like Windows 10, 8, and 7, it's no longer available. If you still want to back up your entire computer, you'll need to find an alternative method.
You can create a system image using Backup and Restore, WBAdmin, or Disk Backup in Qiling Disk Master. The latter offers flexible backup and restore plans, as well as utility tools like creating a bootable disc or USB to rescue your crashed computer.
Related Articles
- 2 Free Methods to Backup Entire Computer to USB Flash Drive
- Create Full Backup in Windows 10/8/7 with Best Free Way
- Quick Guide to Windows Complete PC Restore in Windows Vista
- Best Free Way to Backup PC to Cloud in Windows 10/8/7
