Solved | File is too Large to Copy to External Hard Drive (4 Ways)
Why can't I copy large files to external hard drive?
You may encounter issues when trying to copy large files to an external hard drive or USB due to various reasons such as file system limitations, compatibility issues, or even physical constraints. To successfully transfer large files, consider using a file transfer software that supports large file sizes, or breaking down the file into smaller chunks before copying. Additionally, check the file system and compatibility of your external device to ensure it can handle the file size.
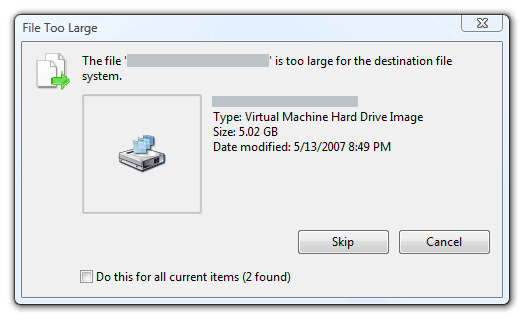
The file is too large for the destination file system, likely due to insufficient space on the external hard drive.
The issue arises from each file system's own size limitation, where FAT (FAT16) only supports files up to 2 GB, FAT32 up to 4 GB, and NTFS up to 16 TB. This means you can't transfer a file that exceeds the limit of the destination drive, even if it has plenty of spare space. To resolve this problem and copy large files smoothly, you can take the following measures.
How to fix the problem that a file too large for external hard drive
If you're unable to copy large files to an external hard drive or USB, first check the available space and file system of the destination drive. Depending on the issue, you may need to free up space, format the drive, or use a different transfer method such as a cloud service or a different USB port.
- Method 1. Use a proper external hard drive or USB
- Method 2. Convert the FAT/FAT32 file system to NTFS
- Method 3. Re-connect the external hard drive or USB
- Method 4. Backup a large file into multiple smaller images
Method 1. Check your external hard drive or USB
First, ensure your device is properly connected and has more available space than the file you want to copy. If not, prepare an external hard drive or USB flash drive with sufficient space, or refer to Method 4 if you don't have a large device.
Method 2. Convert the file system to NTFS
If you get the message "file too large for the destination file system" when transferring a file to an external hard drive that has enough space, it might be because the destination drive is formatted to FAT or FAT32, which have maximum file size limits of 2 GB or 4 GB. You can't transfer files larger than these limits unless you reformat the drive to NTFS.
★ Check the file system information: To view the file system of an external hard drive, open File Explorer, right-click the external hard drive, and select Properties. Then, go to the General tab and find the File system option.
★ Convert file system without losing data:
If you've stored some files on an external hard drive, converting the file system without losing any data may be the best approach. This method allows you to preserve all your files and folders while changing the file system format, which can be useful for various reasons such as changing the file system type or upgrading your computer's operating system.
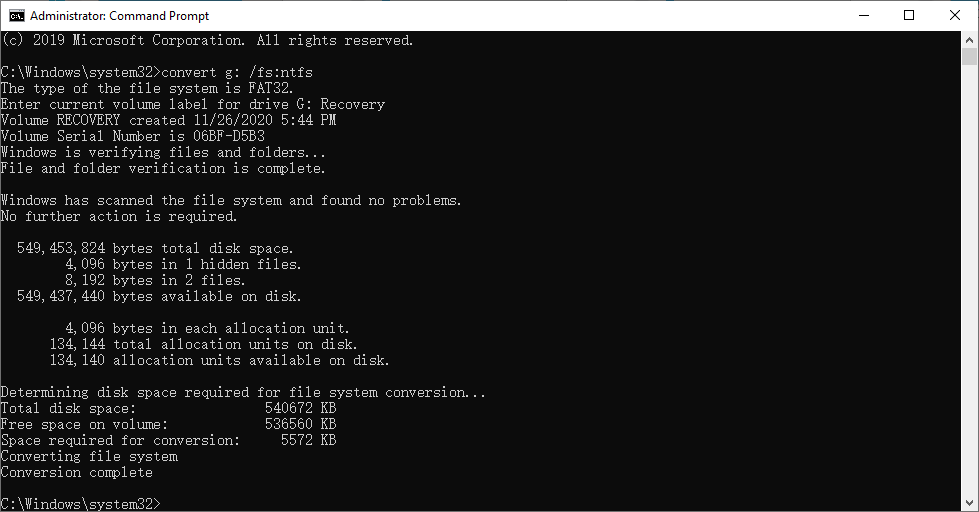
1. Press the Windows logo key and R at the same time. Type cmd in the box and click OK. This will open the Command Prompt.
2. The command to convert the file system of an external hard drive to NTFS is `convert n: /fs:ntfs`, where "n" represents the drive letter of the external hard drive. This command is used to change the file system from a different format, such as FAT32, to NTFS, which supports larger file sizes and more features.
3. To convert a FAT32 formatted external hard drive to NTFS, simply press the Enter key to run the command, and enter the volume label (name) if prompted. This process will take a few minutes, after which the FAT32 formatted external hard drive will be successfully converted to NTFS, allowing you to copy large files to it as usual.
Note: If you're unable to convert your file system to NTFS due to low disk space, non-standard cluster, non-continuous volume, or other issues, you can consider Method 4 as an alternative solution.
★ Re-format the drive directly:
This solution can help convert FAT/FAT32 to NTFS or vice versa, but it will erase all data on the drive, so it's recommended to backup external hard drive before formatting.
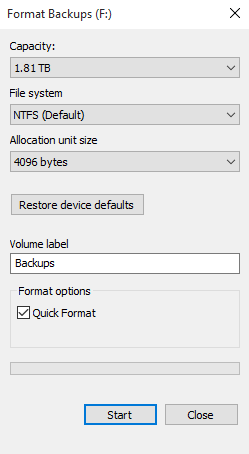
1. Open File Explorer, right-click the drive and choose Format...
2. Select the "File system" dropdown menu and choose "NTFS" from the options.
3. To confirm the operation, click Start and then OK. Wait for a while for the external hard drive to be successfully converted to NTFS.
Tip: Alternatively, you can right-click the drive in Disk Management and format it.
Method 3. Re-connect the external hard drive or USB
If the drive is already NTFS formatted but still identified as FAT/FAT32, try reconnecting it without physically unplugging it to resolve the issue of the file being too large for the destination file system.
1. To access Device Manager, right-click the Start button and select Device Manager from the context menu, or simply search for Device Manager in the Start menu.
2. To disable a device in the list, find the external hard drive or USB drive, right-click it, and select the "Disable" option.
3. Wait for a while and then Enable it.
To remove an external drive, you can either right-click on it in File Explorer and choose "Eject" or open Disk Management, right-click on the drive and select "Eject". To reconnect it, change its status to "Online" in Disk Management.
Method 4. Backup a large file to external hard drive directly
You can also directly backup larger files to an external hard drive using software like Qiling Disk Master Standard, which splits the backup file to 4GB or 2GB if the target drive is formatted as FAT32 or FAT, and copies files without converting the file system.
- Backup large files automatically: This tool enables daily, weekly, and monthly backups of larger files, ensuring that data is safely stored and reducing the risk of loss due to forgotten backups.
- Backup only changed files: This software will only backup changes made to files, not the entire file set, using incremental backup if a scheduled task is set.
- Greatly reduce the size of backup image: Besides splitting large images into smaller files, you can still apply normal compression and intelligent sector backup to minimize backup size.
If you're using Windows 11/10/8/7/XP/Vista, you can download Qiling Disk Master to try it out. For server users, you can try Qiling Disk Master Server instead.
You can use this software for continuous data protection, and it will automatically split image files into 4GB or 2GB chunks if they're too large to transfer to a USB or external hard drive. This way, you can copy large files to a FAT32 external hard drive without needing to convert the file system.
Preparations: Install the software on your computer and ensure the external hard drive is securely connected.
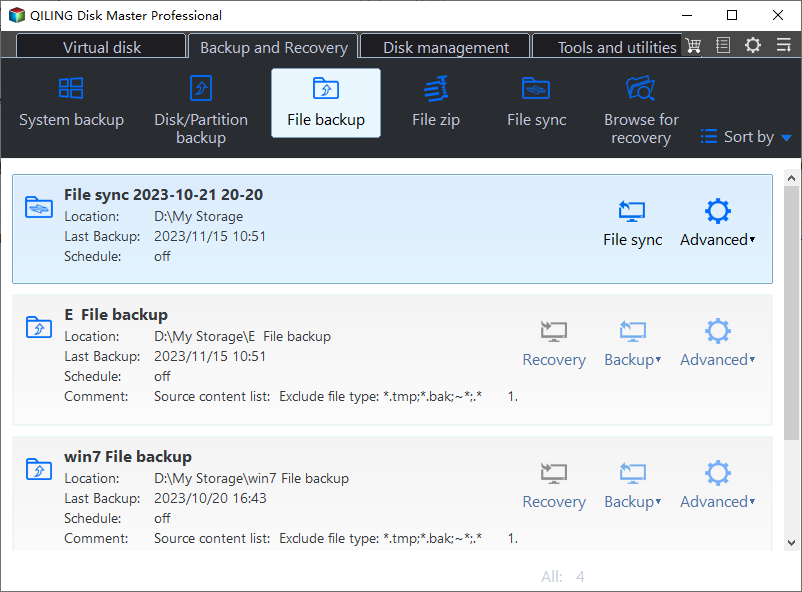
1. To backup your Qiling Disk Master data, go to the Backup tab and select File Backup.
2. Click on either the "Folders" or "Files" tab to navigate to the desired folders or files you want to back up to your external hard drive.
3. Select the connected external hard drive as the destination.
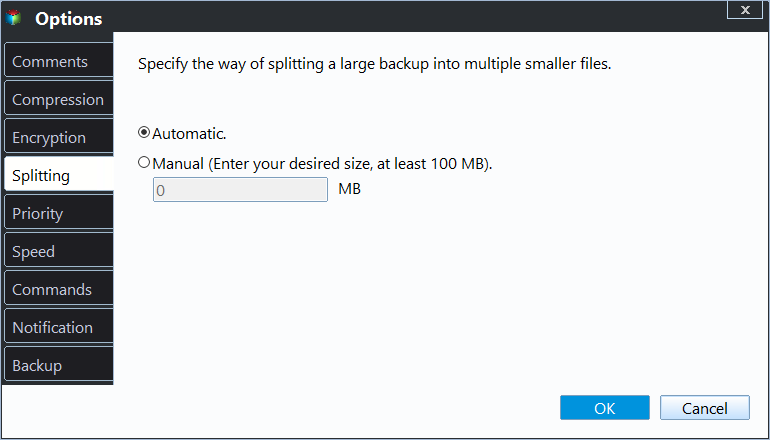
4. To split the image file, go to Options > Advanced > Splitting, specify the desired size, and click OK. Alternatively, you can use the Automatic Splitting feature, which splits the backup image to 4GB or 2GB depending on the file system of the target disk. Once done, click Proceed to backup large files to an external hard drive.
To customize the size as you like, you need to upgrade to the Professional edition. The minimum image file size is 50MB, and you can further compress the file with a high compression level. Additionally, you can enable features like email notifications, comments, and splitting in the Options feature.
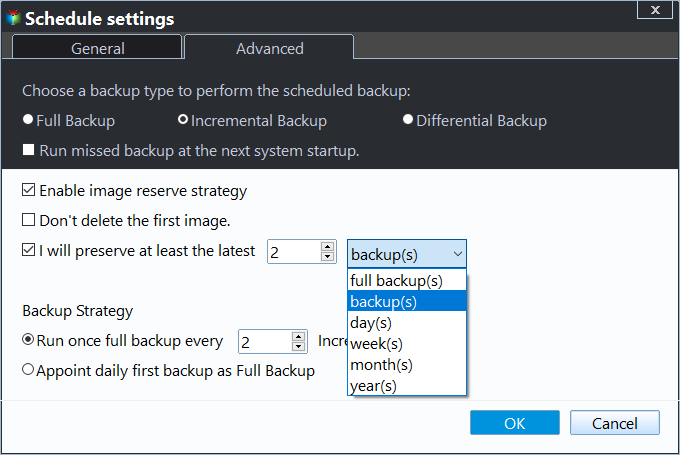
To automate and flexibly execute tasks, you can set advanced features. For large files and future changes, you can set a Schedule Backup to automatically backup files, choosing from Daily, Weekly, Monthly, Event trigger, or USB Plug in options, with the last two being premium features available on the professional version.
This software creates a full backup and 6 incremental backups by default, which can lead to a full backup disk over time. To avoid this, it's recommended to enable the Backup Scheme feature and set it to automatically delete backup files, with options to delete by quantity, time, daily, weekly, or monthly.
The main difference between incremental and differential backups is the level of recovery required. Incremental backups have a high requirement for recovery, whereas differential backups are much easier to recover. For a detailed comparison, refer to my previous article: Incremental or Differential Backup.
After splitting, it's recommended to keep the image files in the same directory for ease of data management.
Verdict
Don't panic if your file is too large to copy to an external hard drive. Take some time to try the methods above, or use Qiling Disk Master Standard to automatically backup the large file to the external hard drive. Alternatively, you can use this freeware to backup files to cloud drives, network, or NAS devices for added security, considering the risk of external hard drives being damaged or lost.
The Clone feature is useful for copying a partition or disk for hard drive replacement, allowing you to clone a larger drive to a smaller SSD using intelligent clone technology.
Related Articles
- Solved: External Hard Drive Freezes When Copying Files
Does your external hard drive freeze when copying files? Don't worry! Follow this article to solve the problem efficiently. - 3 Ways to Backup Large Files in Windows 10/8/7
Have you ever failed to backup very large files? This article will show you the best way to backup large files. - Easily Backup Files to External Hard Drive in Windows 10/8/7
In this article, you are going to learn how to backup computer files to external hard drive in Windows 11, 10, 8.1, 8, 7, XP, Vista? For detailed steps, please keep reading below. - Solved | Can't Backup System to Removable USB Drive in Windows 10/8/7
Can't back up system to USB drive? What's the reason and how to solve it? In this post, I'll introduce the common errors you may encounter, and a free alternative if you find it's troublesome to fix them.
