Workaround: Initialize Disk MBR or GPT without Losing Data
The issue: disk showing unknown and not initialized
Losing access to your hard drive can be a stressful experience, especially when it's marked as 'Not Initialized'. However, initializing the disk MBR or GPT doesn't necessarily mean you'll lose all your data. This guide will walk you through the process of recovering your data without initializing the disk.
Does initializing a disk erase data?
Do you confront a similar issue that the hard disk cannot be recognized by Windows and shown as “Not Initialized”? The problem usually emerges after a file system corruption, virus infection, bad sector, MBR damaging, or connection problem. You may dare not to start the “Initialize Disk” process when there is important data. Very smart! Since that behavior will erase your data completely.
Actually, it does not mean initializing a disk will erase the data. The purpose to initialize the disk is to rebuild MBR which will not erase data on your disk. However, to make the disk usable again, you need to format the disk and this action will wipe out your data. Therefore, you have to take measures to get data back before initializing.
How to initialize disk MBR or GPT without losing data in Windows 10/7 (2 steps)?
To get hard disk not initialized fixed, follow the instruction below. In the first part, you’ll learn how to recover data to a safe place on the problem disk. Later, you can initialize the disk properly. Finally, restore or transfer those data to your hard disk. Let’s learn the detailed steps.
How to retrieve data from a not initialized disk effectively?
Dealing with a "Hard Disk Not Initialized" situation can be frustrating, especially when you have valuable data stored on it. Fortunately, there's a reliable solution to help you recover your lost data: Recoverit Pro. This professional data recovery software is designed to help you recover data from any disaster, including a not initialized hard disk.
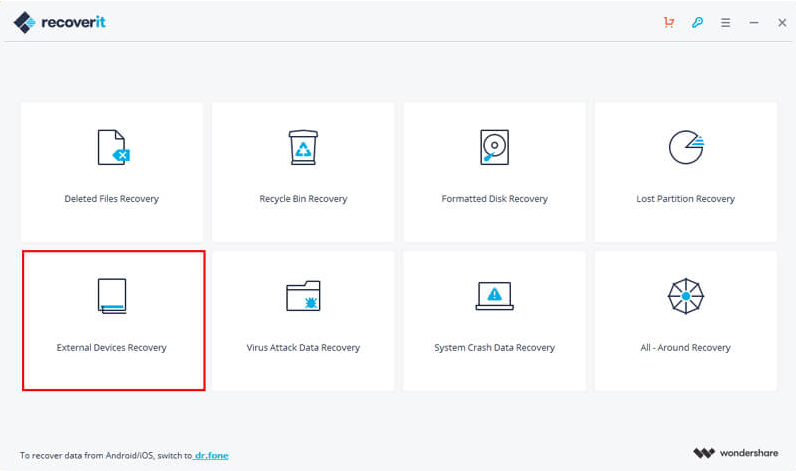
1. Install and run the Recoverit Pro on your computer where the “Not Initialized” disk connected. Click “External Devices Recovery”. If it is not an external device, choose All-Around Recovery.
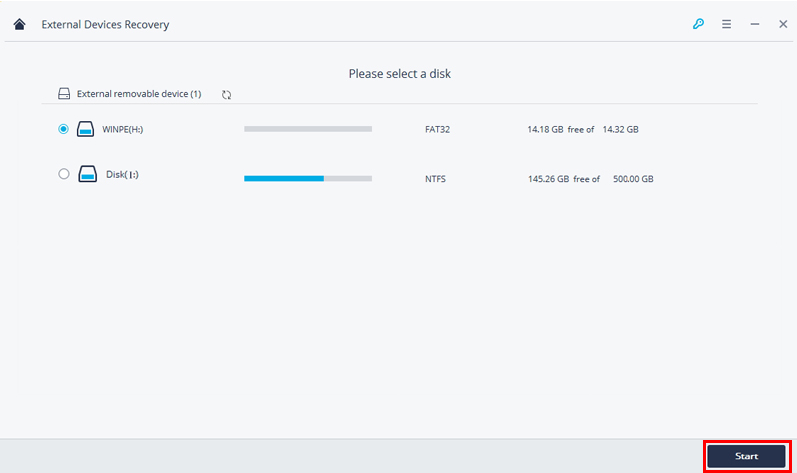
2. Select the problematic disk and click "Start".
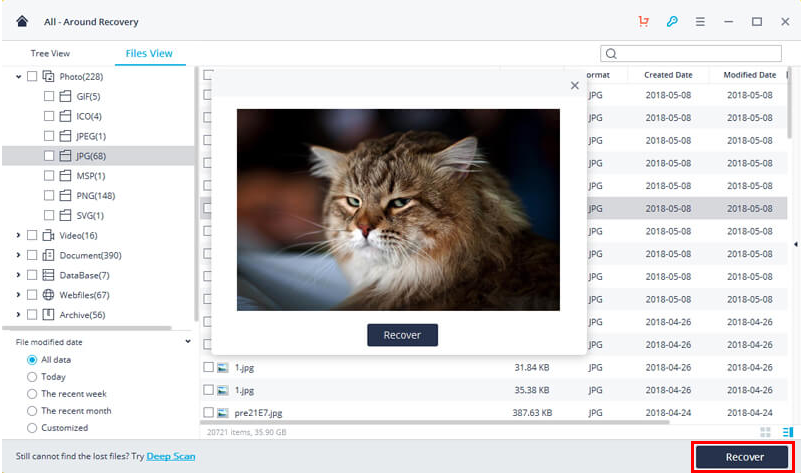
3. A quick scan will start and you can simply preview those files once it completes. If no files find, please go to All-Around Recovery and try again.
4. Now, select files you’d like to recover from the not initialized disk and click “Recover”. Please save these files to another disk or a safe place.
After recovering data from a not initialized hard disk, the next step is to initialize the hard disk. Initializing the hard disk is a process that prepares the disk for use in a computer system. This process is essential for ensuring that the disk is properly configured and ready for use.
Initialize hard disk properly
Initializing a hard disk is a process that prepares the disk for use in a computer system. This process is essential for ensuring that the disk is properly configured and ready for use. In Windows, there are two ways to initialize a hard disk: using the graphical user interface (GUI) and using the command line interface (CLI).
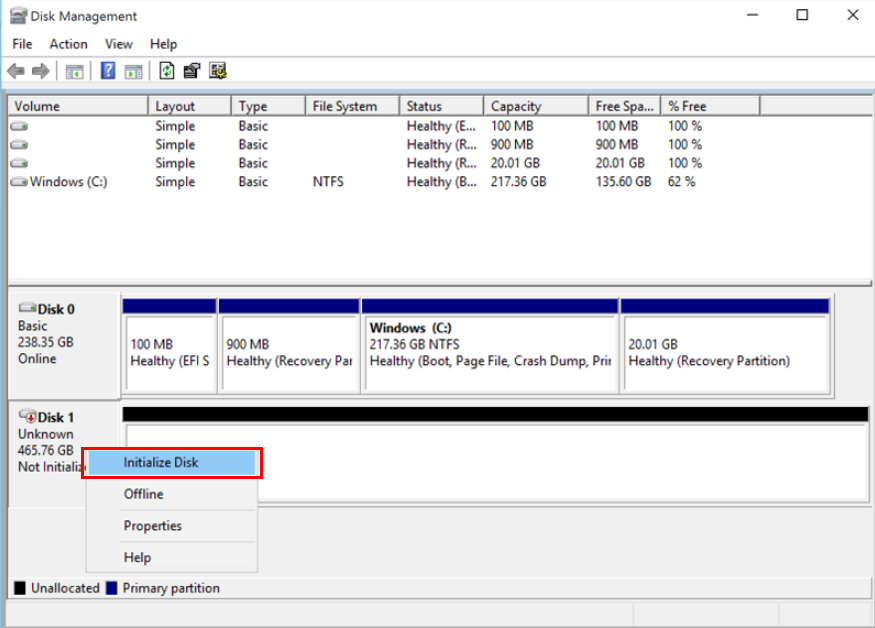
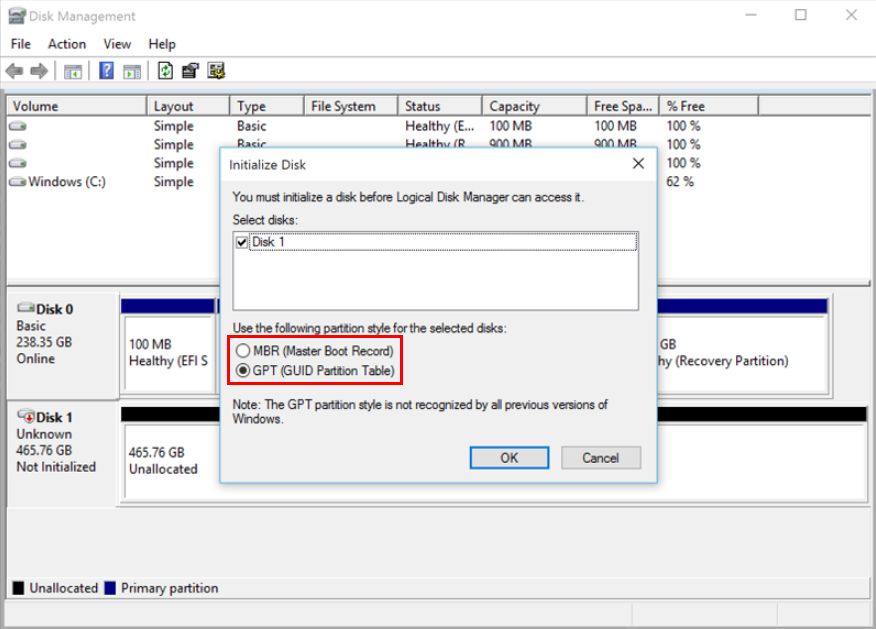
1. Open Disk Management. Find the disk that is not initialized, right-click it and select “Initialize Disk”.
2. Partitioning a hard disk is a process that divides the disk into multiple sections, called partitions, to organize and manage data. In Windows, there are two partition styles: Master Boot Record (MBR) and GUID Partition Table (GPT). The choice of partition style depends on the disk size and the operating system being used.
Tips: When partitioning a hard disk, you have two options: Master Boot Record (MBR) and GUID Partition Table (GPT). The choice between these two partition styles depends on the size of your hard disk and the operating system you are using.
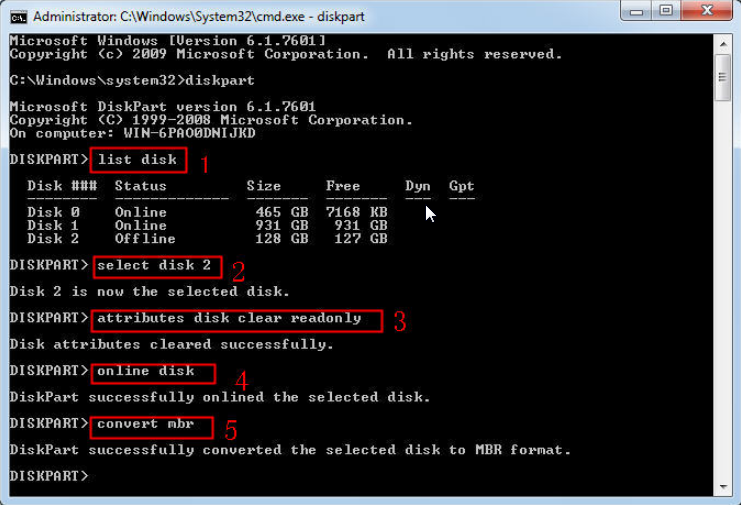
For advanced users, Windows provides a way to initialize a disk in the Command Prompt using a series of commands. This method is useful for users who are comfortable with the Command Prompt and want to initialize a disk without using the built-in Disk Management tool.
1. Open an elevated command prompt. Type Diskpart and press Enter.
2. Type following commands successively.
- list disk
- select disk n (where n is the disk number of the problematic disk)
- attributes disk clear readonly
- online disk
- convert mbr (you can type: convert gpt if you want to initialize the disk GPT)
- exit (leave diskpart)
- exit (leave cmd)
Partition and format the disk
Open Disk Management > right-click the unallocated space and choose New Simple Volume... > click Next on the New Simple Volume Wizard screen and follow the wizard to complete the process.
Now that you have initialized the new disk, you can transfer data from other sources to this disk. This process is a great opportunity to organize your files and free up space on your original disk.
Protect data in a simpler way
While initializing a disk without losing data is possible with professional data recovery software, the anxiety and frustration of potentially losing data can be overwhelming. To avoid this stress and ensure your valuable files are safe, it is highly recommended to back up your important data regularly.
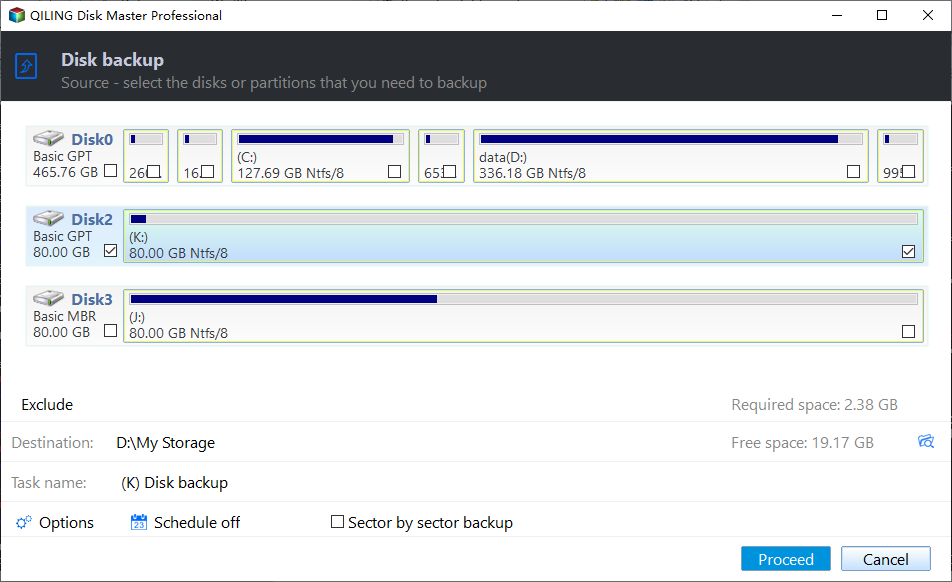
Qiling Disk Master Standard is a free backup and recovery software that provides a reliable and efficient solution for backing up important data. With its user-friendly interface and robust features, you can easily set up automatic backups to run at regular intervals, such as daily, weekly, or monthly.
The Backup software offers a wide range of features to cater to different backup needs. The main console provides an intuitive interface for setting up scheduled backup tasks, ensuring that your hard drive, system, partition, or files are always protected.
Conclusion
When a hard disk becomes "Not Initialized" in Windows 10/7, it can be a frustrating experience, especially if there is important data stored on it. However, do not initialize the disk as this can result in data loss. Instead, use a comprehensive recovery software like Recoverit Pro to recover your data from the error disk.
In today's digital age, it's essential to back up your valuable data regularly to prevent loss in case of a disk failure. Qiling Disk Master Standard is a free backup software that offers powerful backup and restore features, making it a great tool for backing up your data.
Related Articles
- Move Users Folder to Another Drive in Windows Server 2012
Want to move Users folder to another drive in Windows Server 2012 (R2)/2016/2019/2022? The best Windows Server backup software – Qiling Disk Master Server and a Windows built-in feature can give you a hand. - Windows Copy Large Files Over Network in Windows 10/7 (Best Way)
You will learn the fastest way of Windows copy large files over network. And it also works for large amount of files. - How to Run PC to PC Sync for Folders in Windows 10/8/7?
Want to sync your PC folders to another PC or a cloud drive in Windows 11/10/8/7? Read this article to get the best free PC sync software to help you. - Password Protect USB Drive in Windows 10 Easily (2 Ways)
You can learn 2 easy ways to password protect USB drive in Windows 10, including Windows built-in feature and the professional third-party software. You can read on to know the detailed information.
