How to Do Robocopy Incremental Backup [Switch & Example]
Can You Use Robocopy to Do Incremental Backup/Copy?
Robocopy is a powerful command-line utility for file replication, introduced in Windows Vista and Windows Server 2008. It offers more advanced features than Xcopy, including mirroring, monitoring, and retrying when errors occur, making it a versatile tool for file copying and backup tasks.
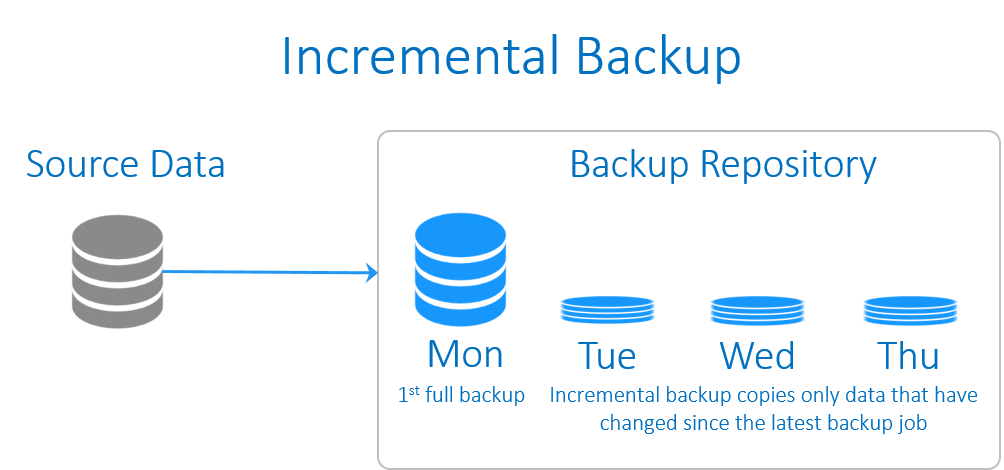
One of the key benefits of Robocopy is its incremental backup capability. When used for the first time, Robocopy creates a full copy of the source files to the target directory. Subsequent runs only sync the changed files, making it an efficient tool for incremental backups. Therefore, the answer is yes, you can use Robocopy for incremental backup.
To further enhance the efficiency of Robocopy, you can leverage its capabilities with additional parameters or integrate it with the Windows Task Scheduler. By doing so, you can automate the incremental copy process to run at scheduled intervals, ensuring your backups are up-to-date with minimal manual intervention.
- It cannot copy open files or live operating system volume;
- The operation is not intuitive enough for users who are used to GUI software;
- Most of all, Robocopy won’t keep different versions of the source data nor provide image recovery.
If you inadvertently delete or modify files and then run the backup, these changes will be propagated to the target directory, effectively overwriting any previous copies. This means that any older versions of the files will be lost, and you will not be able to recover them.
If you're not concerned about the potential risks, you can continue with the steps to perform an incremental backup with Robocopy. Alternatively, you may want to consider using a dedicated incremental backup tool that offers recovery options, which can help mitigate the consequences of accidental deletions or modifications.
How to Create Robocopy Incremental Backup
You can use Robocopy to perform incremental copy automatically.
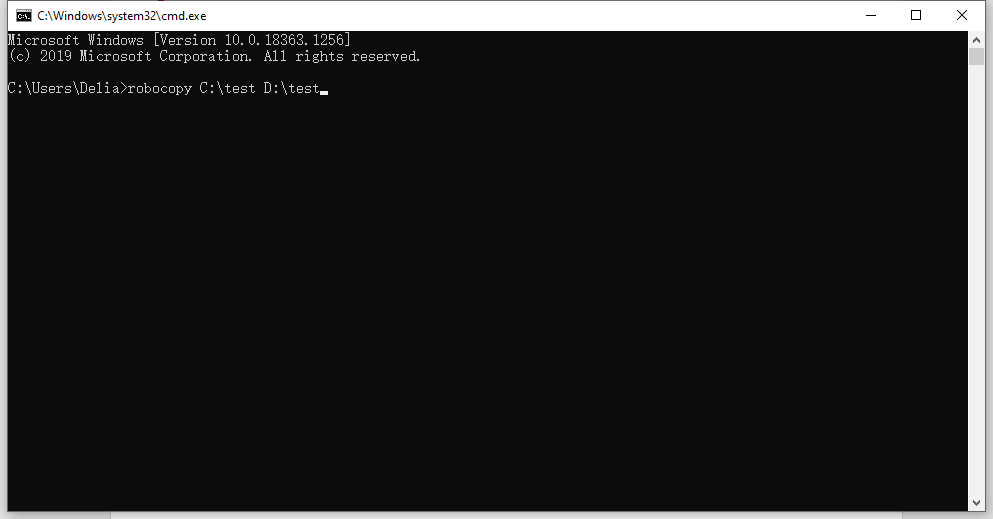
To illustrate the process, let's consider a specific example. Suppose we want to backup files from the C:\test directory to the D:\test directory.
Step 1. Open CMD
To initiate the command prompt, press the Win+R key to open the "Run" window. In the "Run" window, type "CMD" and click OK to open the Command Prompt.
Step 2. Input the command for incremental copy
The basic command of robocopy is: robocopy [source] [destination]
The files from the source folder will be copied to the destination folder.
Here's an example:
robocopy C:\test D:\test
Verify the target directory, where you'll find that the files have been backed up successfully. If you add or modify files in the source directory later and run Robocopy again, the changed and newly added files will be synchronized to the destination.
Step 3. Add useful switches to customize the backup
You can further enhance your Robocopy incremental backup script with useful switches.
*To copy all changes and deletions in the source directory, as well as back up empty subdirectories, you can add the `/mir` switch to your Robocopy command. This will mirror the source directory, including all subdirectories. The `/mir` switch is a shorthand for `/mov /purge`, which moves files from the source to the destination and then deletes them from the source.
*You can also use the `/xo` switch to exclude older files during the copying process. This switch is useful when you want to perform an incremental backup and avoid overwriting newer files in the destination directory. When you use `/xo`, Robocopy will skip copying files that already exist in the destination directory and have the same or newer timestamp. This means that if you modify a file in one directory and then make the same changes to the same file in another directory, the `/xo` switch will prevent the updated file from being copied, because the file in the second directory is already newer.
*You can use other parameters, like /s (include subdirectories), /z (copy files in restartable mode), /np (don't display percentage of copied files) and so on. You could combine Robocopy incremental backup with switches you need.
For example, the command could be like:
robocopy C:\test D:\test /s /xo /z /np
Step 4. Automate the incremental copy with Robocopy
To create an incremental backup task using Robocopy on regular basis, you can either add parameters or use Windows Task Scheduler.
👉By parameters:
/MON:n will monitor the source directory and execute incremental backup when "n" or more changes are detected.
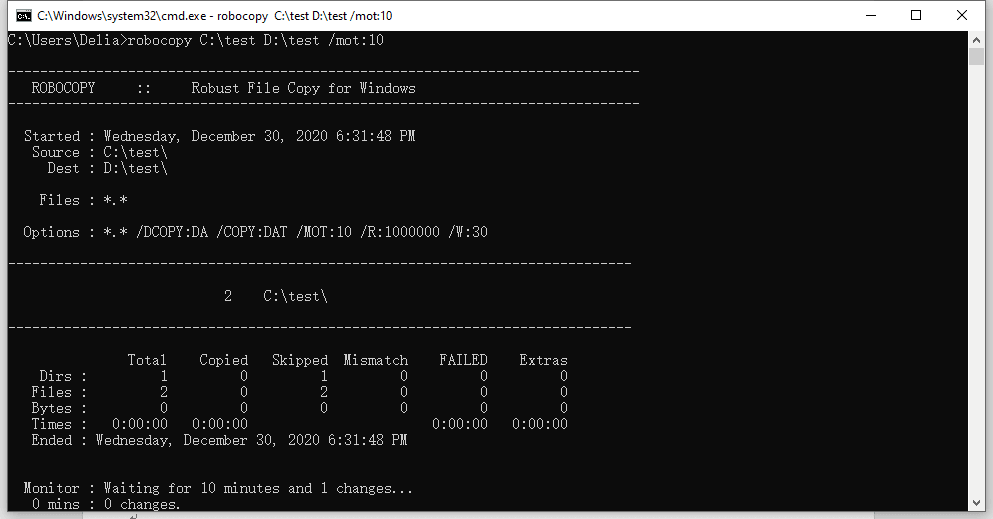
/MOT:m will execute another incremental backup if changes are detected in "m" minutes'.
/RH:hhmm-hhmm To configure Robocopy to copy files between specific hours of the day, you can use the `/RH` switch. This switch allows you to specify a time range during which Robocopy will copy files.
In my case, I use the command below to back up changed files every 10 minutes.
robocopy C:\test D:\test /mot:10
With Robocopy, you can schedule incremental file copies at a frequency of your choice. By using the `/R` switch, you can specify the interval between backups, ensuring that only changed files are copied at each interval.
*If you need to terminate the Robocopy task, you can open a new Command Prompt window and execute the command "taskkill /f /im robocopy.exe". This will forcibly close the Robocopy process, allowing you to stop the task without waiting for it to complete.
👉By Windows Task Scheduler:
You can also create a batch file that uses Robocopy to perform an incremental copy, and then schedule it to run automatically using Task Scheduler. This will allow you to automate the task without needing to manually run the batch file each time.
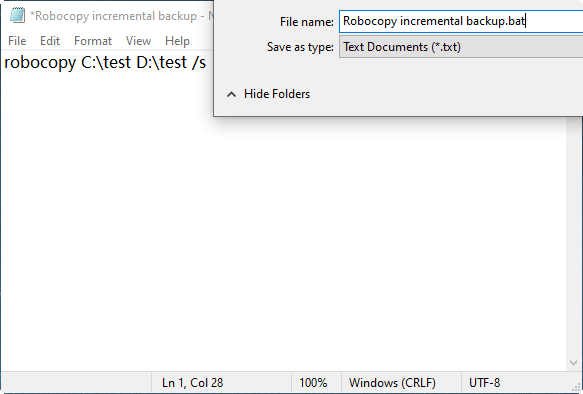
Open Notepad and create a new file. Inside this file, you'll input the Robocopy script that you want to implement. To perform an incremental copy of all subdirectories, you'll need to add the `/s` parameter to the script.
Next, click on the "File" menu and select "Save As". Give the file a name that reflects its purpose, such as "Robocopy incremental backup". When prompted, change the file extension from ".txt" to ".bat". This will save the file as a batch script, which is the format required by Windows to run the Robocopy command. Click "Save" to save the changes.
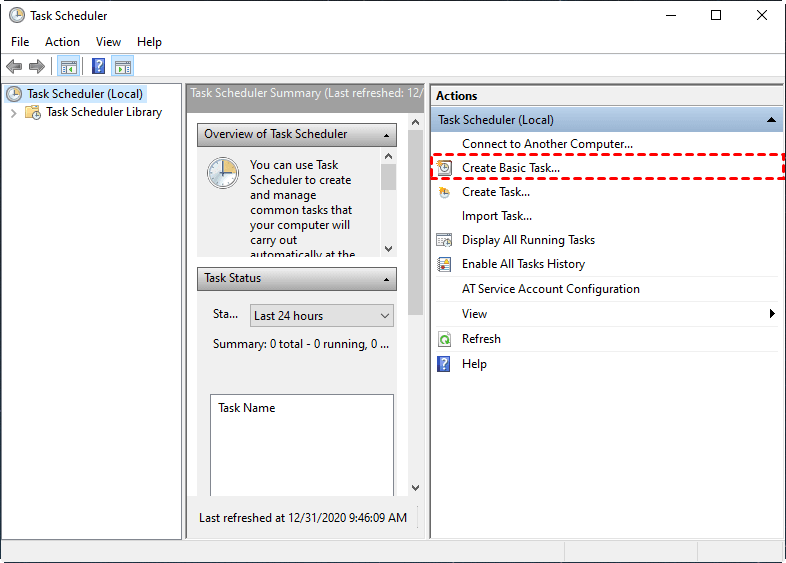
To access the Task Scheduler, you can search for it in the Windows search bar or navigate to the Control Panel. Once you've found it, open the Task Scheduler and click on "Create Basic Task" to begin setting up a new task. This will guide you through the process of creating a scheduled task that can run the Robocopy command.
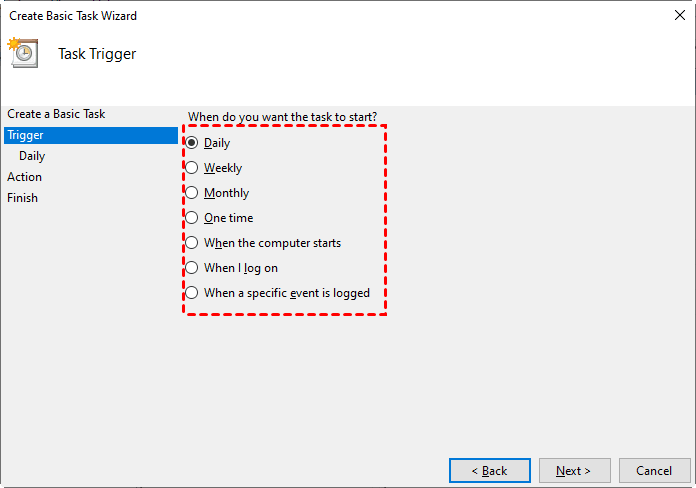
Next, you'll be prompted to enter a name and description for the task. Fill in the required information, then proceed to the next step. Here, you'll specify the trigger for the task.
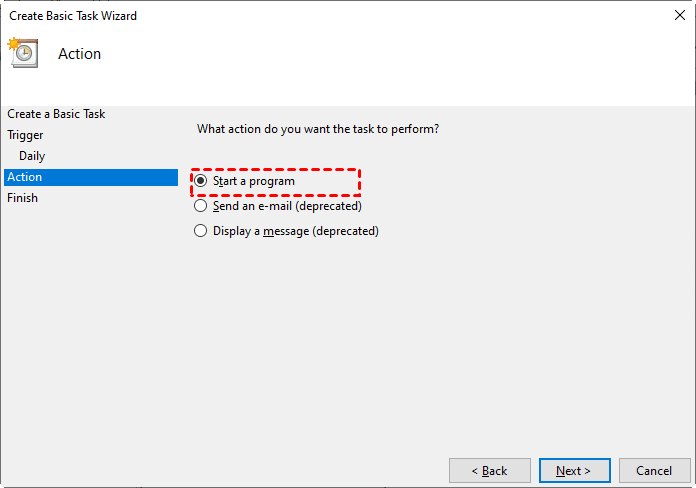
To proceed, select the action type as Start a program, which will allow you to specify the program to run as part of the task. This will enable the Robocopy command to be executed as a separate program, ensuring that it runs independently and according to the specified schedule.
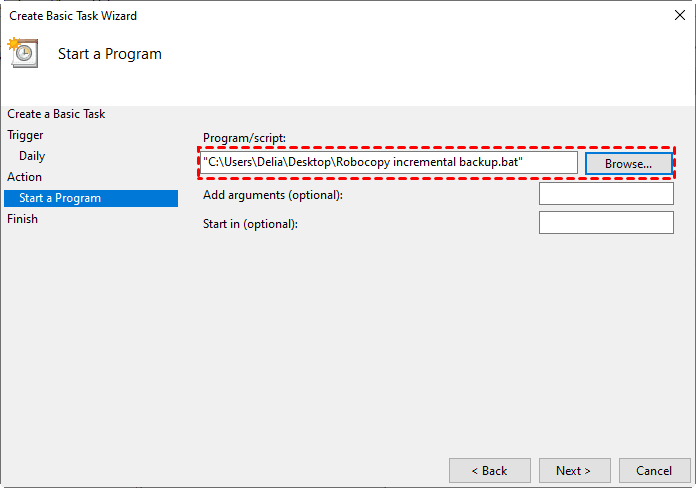
To proceed, click the Browse button to locate and select the Robocopy backup script (the .bat file) you created earlier. This will allow you to specify the script as the program to run as part of the task, enabling the scheduled execution of the Robocopy command.
Upon completing the task creation process, review the information for accuracy. Once satisfied, click the Finish button to finalize the task creation. The scheduled task will now be visible in the Task Scheduler Library, where you can execute, modify, or delete it as needed.
More copy options to optimize your Robocopy incremental backup script
If you need further assistance, you can refer to the available Robocopy switches to enhance your incremental backup script. For a comprehensive list of Robocopy syntax, click here to access the full edition. This will provide you with the necessary information to optimize your script according to your specific needs.
👉Copy options
/s Copies subdirectories and excludes empty directories.
/e Copies subdirectories and includes empty directories.
/z Copies files in restartable mode.
/b Copies files in Backup mode.
/purge Deletes destination files and directories that are no longer present in the source, ensuring consistency between the two locations.
/mir Mirrors a directory tree (equivalent to /e plus /purge).
/mov Copies files from the source to the destination and then deletes the original files from the source, effectively moving them.
/move Copies files and directories from the source to the destination and then deletes the original files and directories from the source, effectively moving them.
/mon: Tracks changes to the source, and re-runs the command when more than n changes are detected, ensuring that the command is executed in response to changes in the source directory.
/mot: Tracks changes to the source, and re-runs the command after a specified interval (m minutes) if any changes are detected, allowing for periodic execution based on time elapsed since the last run.
/rh:hhmm-hhmm Specifies run times when new copies may be started.
👉File selection options
/a Copies only files for which the Archive attribute is set.
/m Copies only files that have the Archive attribute set, and resets the Archive attribute on the source files after copying, effectively backing up and restoring the archive state of files.
/xc Excludes changed files.
/xn Excludes newer files.
/xo Excludes older files.
/is Includes the same files.
/it Includes modified files.
/maxage: Specifies the maximum file age (in days or date) to exclude files that are older than the specified value. This can be used to filter out files that are too old or no longer relevant.
/minage: Specifies the minimum file age (in days or date) to exclude files that are newer than the specified value. This can be used to filter out files that are too new or not yet relevant.
👉Others
/r: Specifies the number of retries on failed copies. The default value of n is 1,000,000 (one million retries). This option can be used to customize the number of retries on failed copies.
/w: Specifies the wait time between retries, in seconds. The default value of n is 30 (wait time 30 seconds). This option can be used to customize the wait time between retries.
/l Specifies that files are to be listed only, and not copied, deleted, or time stamped. This option can be used to list files without actually copying them.
/x Reports all extra files, not just those that are selected.
How to Do Scheduled Incremental Backup with Recovery Option
When it comes to backing up important data, using Robocopy can be a bit risky. Without a rollback option, any mistaken changes or deletions that are copied to the target directory can be difficult to recover from. This can lead to data loss and other issues.
▪ Compatibility Qiling Disk Master Standard is a powerful backup and sync tool that supports all Windows operating systems. With this software, you can easily perform full or incremental backups between different devices, including internal and external hard drives, USB drives, network shares, NAS devices, and cloud storage.
▪ Image Backup To automate the backup process, you can set up a scheduled task to run incremental backups at regular intervals. This ensures that only changed files are captured, allowing you to easily roll back to any previous version. By automating the backup process, you can rest assured that your data is secure and up-to-date, without having to manually intervene.
▪ File Sync In addition to recoverable image backups, you can also use the Sync feature to copy files in their original formats. This option is similar to Robocopy's incremental copy feature, but with a user-friendly graphical interface. The Sync feature allows you to schedule backups, ensuring that your files are consistently updated and backed up at regular intervals.
*The Standard edition, which is free, is often sufficient to meet the needs of incremental backup users. However, if you choose to upgrade to a higher edition, such as Professional, you'll gain access to more advanced features that can enhance your backup and synchronization experience. These features include eal-time sync, two-way sync, and differential backup, among others.real-time sync, two-way sync, and differential backup, among others.
To perform incremental backups using a Robocopy alternative, I'll guide you through the process. You can start by downloading and installing the freeware, which is available for free.
Step 1. Launch the tool to get started
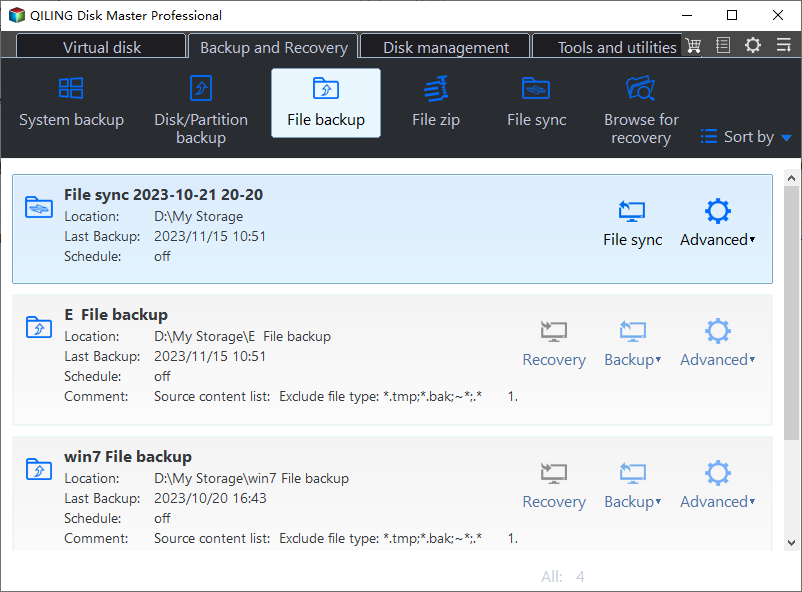
To initiate a backup, go to the Backup section and select File Backup. Alternatively, you can choose from other backup options such as Partition Backup, Disk Backup, System Backup, or Cloud Backup, depending on your specific needs.
Step 2. Specify the source folders or files
Click Folders or Files to select the source data.
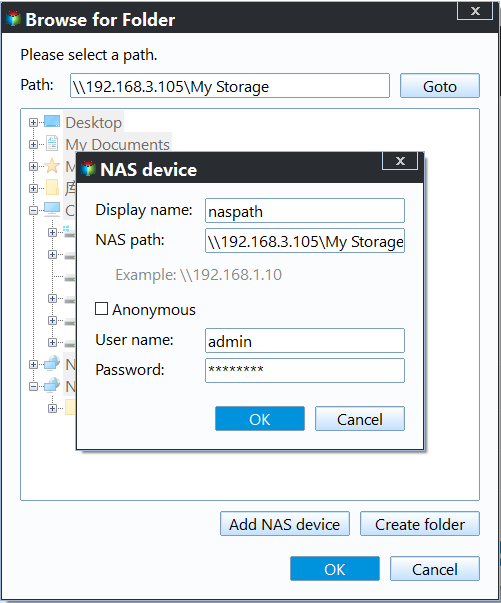
To add files from network locations, click on Share/NAS in the pop-up window. Then, select Add Share or NAS Devices to specify the path.
In advanced editions, you can further refine your backup selection by clicking the funnel icon. This allows you to include or exclude files with specific extensions, giving you even more control over what gets backed up.
Step 3. Select the target path that you want to copy files to
In addition to selecting a local folder or a connected removable device, you can also choose to back up your files to a network location or cloud drive. By clicking the small triangle, you can access a wider range of options and select the destination that best suits your needs.
Step 4. Schedule the incremental backup task
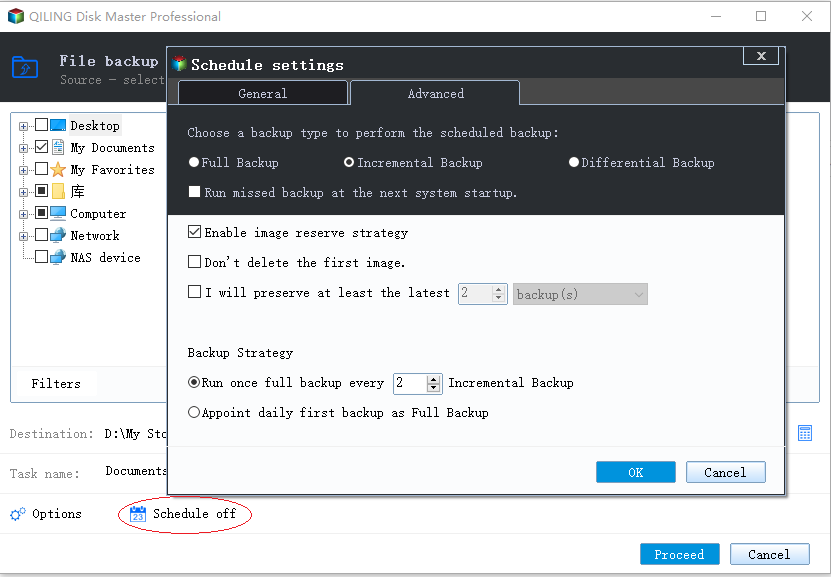
To set up an automatic backup, click on the "Schedule Backup" option. By default, the backup will run in incremental mode, which means that only the changes made since the last backup will be saved. If you'd like to customize your backup settings, you can click on the "Options" tab to manage more backup settings. Alternatively, you can click on the "Scheme" tab to set up a backup schedule.
Schedule Backup The backup options include a range of frequencies to suit different needs. You can choose to back up your files Daily, Weekly, or Monthly, depending on how often you want to update your backups. Additionally, you can set up Event triggers to initiate a backup when a specific event occurs, such as a system crash or a file modification.
Options The software offers a range of advanced features that enable you to fine-tune your backup process. With this tool, you can customize settings such as compression level, image splitting, and comments to suit your specific needs.
Backup Scheme The software offers a feature that enables you to automate your backup process by performing scheduled differential backups. Additionally, it allows you to set up a rule for automatically deleting older backups, ensuring that your backup storage remains organized and clutter-free. This feature is available in the advanced editions of the software.
Then, click Proceed to execute the task.
Related information about backup and sync
Incremental and differential backup options are available to help you save time and space. These features enable you to back up only the files that have changed since the last backup, rather than re-uploading the entire dataset.
When it comes to restoring your data, the type of backup you've been using can make a big difference. Incremental backups require a specific sequence of backups to be restored, starting with the last full backup and followed by all subsequent incremental backups. This can be a time-consuming process, especially if you have a large amount of data to restore.
Conclusion
Robocopy, a powerful command-line utility, performs incremental backups by default. This means it only copies files that have changed or were newly added since the last backup. While this approach can be efficient, it's essential to consider the limitations of using Robocopy for incremental backups.
If you're looking for a more comprehensive backup solution, Qiling Disk Master is an excellent alternative to Robocopy. This powerful tool allows you to set up incremental or differential backups with scheduling, ensuring that all your copies at different time points are saved for future recovery.
Related Articles
- How to Use Robocopy in Windows 10 to Copy Files & Folders
- How to Run Robocopy Two-Way Sync for Folders in Windows 10/8/7
- Best Free PowerShell Robocopy Equivalent in Windows 7/8/10
- How to Do Incremental and Differential Backup in Windows 10
