2 Ways to Sync Network Folder to OneDrive | Windows 11/10/8/7
🌟 Video Guide: How to Sync Network Folder to OneDrive
Case: How do I sync a network folder to OneDrive?
I am using OneDrive to store files but I cannot synchronize my network folder to OneDrive. I tried to sync the network folder to a local desktop, then, sync the network folder from the local desktop to OneDrive. This process is so cumbersome since I have to do it manually each time, and I have to repeat this operation daily or weekly. There must be a simpler way to sync network folder to OneDrive directly. I hope someone can help me! Thanks in advance!
OneDrive is a cloud-OneDrive allows users to store, manage, and share files securely, and can synchronize computer folders directly to their account, keeping files up to date. However, network folders can also be synced automatically to OneDrive, making it possible to access and share files across different platforms and locations.
Why sync network folder to OneDrive automatically
Users often want to sync network folders to OneDrive (for business) for various reasons, including being able to access and collaborate on shared files from anywhere, having a centralized location for team files, and being able to easily share files with colleagues or external partners.
- Save your physical storage device space.
- Keep a copy of your files and folders to keep them safe.
- Share files with others easily with the built-in "Share" feature.
- Microsoft account allows users to access and manage their files and folders across multiple devices, including tablets and phones, making it easy to stay organized and productive on-the-go.
Some users may face issues syncing network folders to the cloud directly. To resolve this, you can use a third-party tool or service that specializes in syncing network folders to cloud storage services. These tools can automate the syncing process, eliminating the need for manual operation each time.
How to sync network folder to OneDrive (2 ways)
OneDrive is a free online storage service offered by Microsoft that allows users to sync files between their computer and the cloud easily, and it comes pre-installed with Windows 11/10/8. For Windows 7 users, it's a separate download and installation, but still a must-step. To use OneDrive, simply sign up with a Microsoft account, and you can choose to use it for personal or business purposes.
✍Note: The OneDrive desktop app is available on Windows Server 2019, 2016, 2012 (including R2), and 2008 R2, making it accessible to server users. If your system is not supported, you can use the OneDrive web browser or explore alternative methods.
There are 2 ways to sync a network folder to OneDrive in Windows 7/8/10/11 or Windows Server directly.
- Way 1. Create a symbolic link between network folder and OneDrive to sync folder using Command Prompt.
- Way 2. To sync folders between a network and OneDrive, use a free sync tool like Qiling Disk Master Standard. This tool allows for easy syncing and also offers additional features such as �cheduled syncing, which can be set to run daily or weekly.scheduled syncing, which can be set to run daily or weekly.
Download Best Free Sync Tool
Sync folders across local disk, network folders, external drive, and cloud services with ease.
Way 1. Sync network folder to OneDrive using Command Prompt
You can sync a network folder to cloud storage by using symbolic links, which create a reference to a file or folder in another location, allowing you to access the files from the new location without copying them over.
To add a network folder to OneDrive using the Command Prompt, follow these steps. First, open the Command Prompt as an administrator and navigate to the directory where the network folder is located.
1. Install the OneDrive desktop application on your server, designating a folder like C:\OneDrive as the sync target.
2. To create a subfolder in OneDrive called "Data" on the C drive, navigate to C:\OneDrive and create a new folder named "Data". This will create a subfolder in OneDrive called "Data" on the C drive, which the OneDrive desktop application will then sync with the cloud.
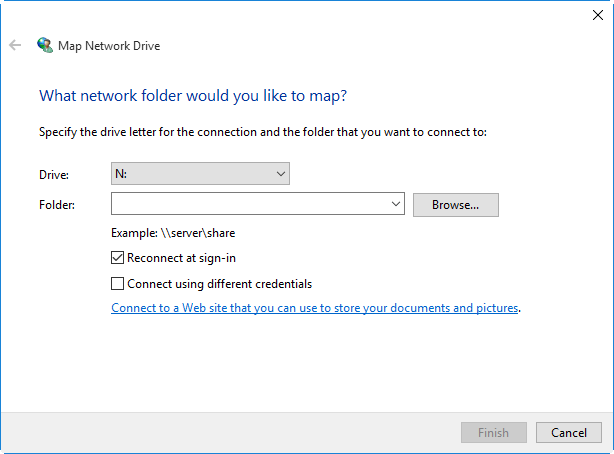
3. To access a network drive, click on "This PC/Computer" on your computer, then click on "Map Network Drive", enter the network path you want to access, and a network drive with a drive letter will be created on your computer.
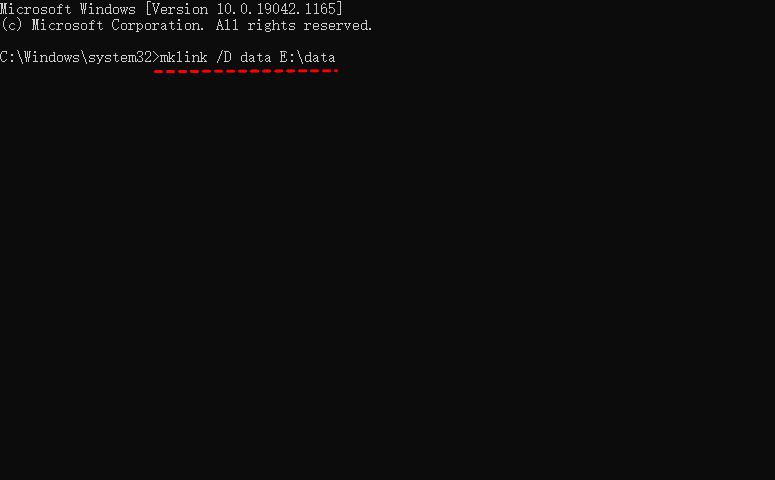
4. To create a symbolic link, type the command `mklink /D "C:\Users\YourUsername\Documents\Data" "N:\Data"` in the Command Prompt, then press Enter. Replace "YourUsername" with your actual username and "Data" with the actual name of the folder you want to sync. This command creates a symbolic link between the two paths, allowing you to access the contents of the network drive as if it were a local folder.
OneDrive syncs contents from N:\Data to C:\OneDrive\Data, creating a fake subfolder that points across the Network.
Way 2. Sync network folder to OneDrive with Qiling Disk Master
Qiling Disk Master Standard is a free Windows software that allows users to sync files and folders from their network to cloud drives like OneDrive, Dropbox, and Google Drive.
This feature also enables syncing OneDrive to external hard drives, USB flash drives, NAS, external hard drives, networks, and more, in addition to syncing with devices.
In addition to syncing files and folders, you can also set up automatic sync schedules to sync all files and folders to OneDrive at daily, weekly, or monthly intervals.
Download Qiling Disk Master, install and launch it, then follow the steps to sync network folder/drive to OneDrive, which also applies to syncing network folder to Google Drive and Dropbox.
If you're a Windows Server user, you can switch to the Server edition and test it out on the trial version.
🔹Step-by-step guide to sync network folder to OneDrive automatically:
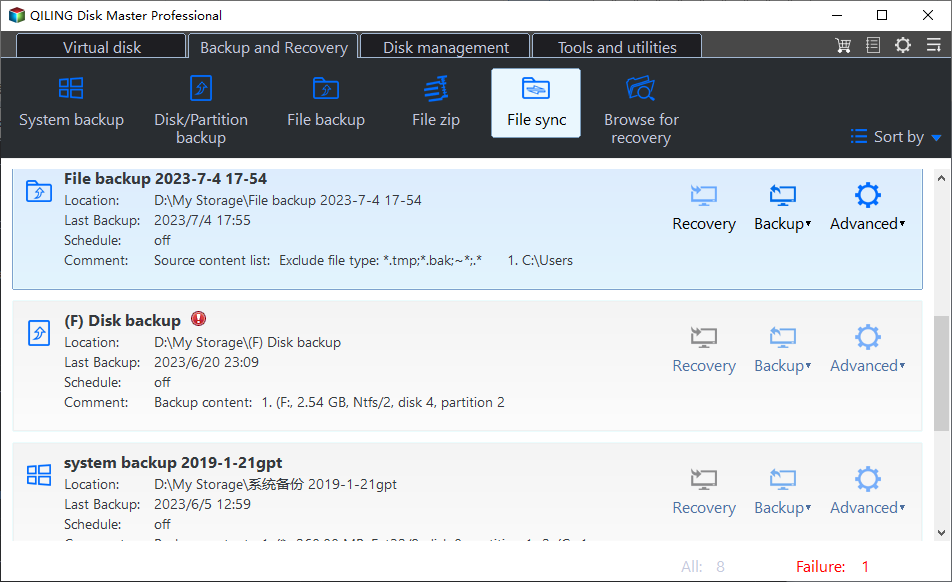
1. To sync changed files from a source network folder to a target OneDrive folder, click Sync and choose File Sync, which allows you to schedule the sync process.
You can upgrade to Professional edition to enjoy more advanced sync modes:
▪ File Sync: Sync changed files from source directory to target directory in real time.
▪ File Sync: Always keep the files in source directory exactly same as target directory.
▪ Two-Way Sync: Any changes made to source or target directory will be synchronized to the other side.
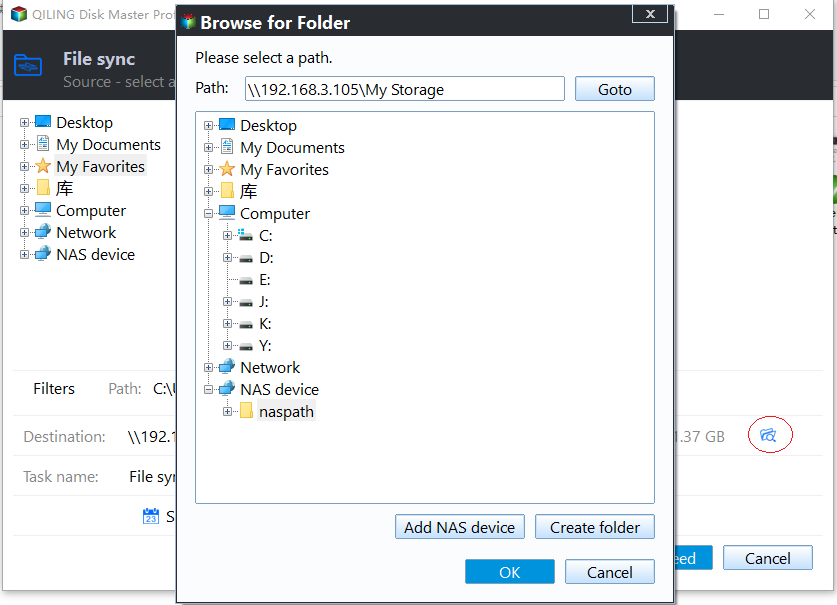
2. To share a folder on your network, click on "Folder" then "Share/NAS", and subsequently click on "Add Network location". Next, enter a display name, the network path, and click "OK" to select the folder you need to share on the network. This will allow others to access the folder via the network.
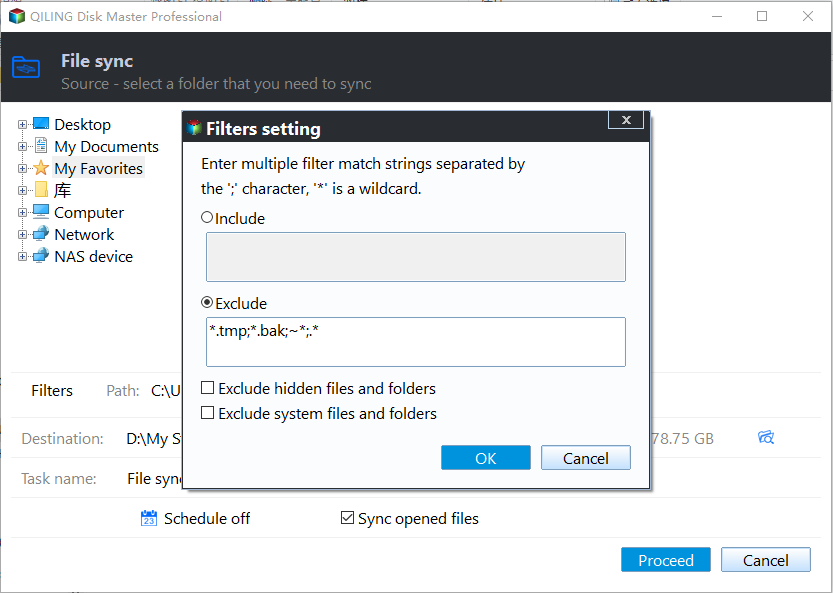
✎Note: You can open the "Filter settings" by clicking on the icon shown below, which allows you to select which file extensions to keep and which to abandon, a feature available in the Professional edition.
3. To set the destination path for a file, click the drop-down menu and select "Select a cloud drive", then choose OneDrive as the destination path.
4. To sync files and folders automatically, select "Schedule" and choose a frequency such as Daily, Weekly, or Monthly. Then, click Proceed to execute the operation.
Conclusion
Syncing network folders to OneDrive offers a convenient and efficient way to access and manage your files, and can be easily achieved with the help of Qiling Disk Master, following the step-by-step guide provided. This allows for seamless file synchronization and can be a valuable experience.
With its useful features, you can set an automatic sync in daily/weekly/monthly or real-time mode, saving you time and effort.
Related Articles
- Automatically Sync OneDrive to External Hard Drive in Windows 10/8/7
Want to sync OneDrive to external hard drive in Windows 11/10/8/7? This page offers you a free tool to setup scheduled OneDrive sync task. - How to Sync Desktop to OneDrive Automatically (2 Ways Included)
Syncing desktop to OneDrive is one of the best ways to protect data safely, not only the current files but also changes made later. - How to Sync External Hard Drive Files and Folders to Cloud Storage?
Best sync tool Qiling Disk Master can help you easily sync external hard drive files and folders to cloud drive like OneDrive, Google Drive, Dropbox. Get the steps below and try yourself. - How Much Free Disk Space Should I Have and How to Free up Disk?
How much free disk space should I have? Here, you can find relevant info and learn to free up disk storage in only a few steps.

