ASUS TUF Gaming A15 SSD Upgrade – Replace or Add a New SSD
- Introduction to ASUS TUFGaming A15
- Is ASUS TUF A15 upgradable?
- Preparations for ASUS TUF add SSD or replace one
- Step-by-step guide to finish ASUS TUF gaming A15 upgrade SSD
- Install the new SSD to ASUS TUF A15
- Transfer all data from old SSD to new one without data loss
- Boot from the newly cloned SSD
- Bottom line
Introduction to ASUS TUFGaming A15
The ASUS TUF Gaming A15 is a powerful gaming laptop featuring the latest AMD Ryzen processors and NVidia graphics cards, paired with a 15.6-inch IPS display that boasts a smooth 144Hz refresh rate, making it perfect for gamers seeking seamless and responsive gameplay.
Upgrading the storage on your ASUS TUF A15 with an SSD can significantly improve system responsiveness, with faster boot, loading, and transfer times, while also reducing power consumption, heat generation, weight, and noise.
Is ASUS TUF A15 upgradable?
The ASUS TUF Gaming A15 is upgradeable, allowing users to improve its performance by upgrading the RAM and SSD, with a maximum supported RAM of 32GB.
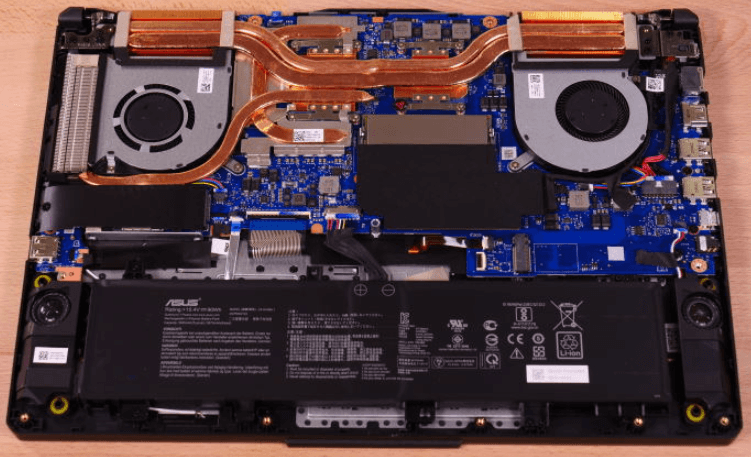
The ASUS TUF A15 laptop comes with two M. 2 slots for SSDs, one pre-installed with a drive, and the other empty, located in the bottom-right and upper-left corners of the motherboard respectively.
This configuration offers flexibility and security for users who want to upgrade their storage, and I'll guide you through the process of upgrading the ASUS TUF A15 SSD in the following part of this article.
Preparations for ASUS TUF add SSD or replace one
Before upgrading to a Solid-State Drive (SSD), you need to prepare the necessary tools, which include a screwdriver, a Torx driver, a plastic spudger, a Phillips head screwdriver, a USB cable, and a power cord. These tools will help you safely disassemble your laptop or desktop, access the SSD, and complete the upgrade process.
- A screwdriver and an anti-static wristband (optional but recommended)
- A new SSD that suit your laptop
- A cloning software is used to transfer all the data from the old SSD to the new one. This software makes a duplicate of the old drive, allowing the user to transfer all files, programs, and settings to the new drive, making the transition to the new SSD seamless and hassle-free.
To upgrade the SSD of your ASUS TUF Gaming A15, start by preparing the necessary tools, including a screwdriver and a Torx T5 driver. Next, shut down your laptop and unplug it from the power source.
Step-by-step guide to finish ASUS TUF gaming A15 upgrade SSD
- Install the new SSD to ASUS TUF A15
- To transfer all data from an old SSD to a new one without any loss, start by connecting both SSDs to your computer using USB enclosures or adapters. Next, use the built-in Windows tool, 'Disk Management', or a third-party software like Acronis True Image or EaseUS Todo Backup to clone the old SSD to the new one.
- Boot from the newly cloned SSD
Install the new SSD to ASUS TUF A15
1. Turn off the laptop and unplug it from the power source. Remove the screws on the bottom cover by flipping the laptop over.
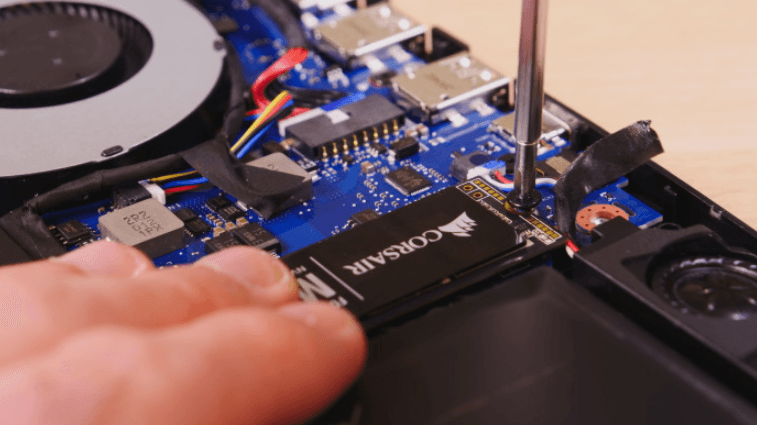
2. Carefully remove the bottom cover, locate the M.2 slot, remove the screw holding the SSD in place, and gently pull the SSD out of the slot.
3. Insert the new SSD into the M.2 slot and secure it with the screw. Reattach the bottom cover and screw it back in place.
4. Turn on the laptop and check if the new SSD is detected. If it's not detected, check the connections and ensure it's properly seated.
Transfer all data from old SSD to new one without data loss
To transfer data from an old SSD to a new one without reinstalling Windows or other programs, use professional SSD cloning software such as Qiling Disk Master Professional to securely transfer the data. This will prevent the need to reinstall Windows or other programs.
✍Replacing the old SSD in an ASUS TUF A15 laptop with a new one can be done securely with this tool, ensuring a smooth transfer of the operating system, system reserved partition or efi partition, installed programs, and personal data in Windows 11/10/8/7/XP/Vista. The process also allows for optimization of the new SSD's performance using the SSD Alignment feature.
To avoid data loss, download Qiling Disk Master and carefully follow its instructions to transfer data from your old SSD to the new one. Now download Qiling Disk Master to have a try and follow the instructions carefully to transfer data to the new SSD to avoid data loss.
✐Tip: Before upgrading your SSD, ensure you back up important files to a safe location as the cloning process will overwrite all data on the SSD.
Step 1. Launch Qiling Disk Master Professional, navigate to the Tools tab and choose Disk Clone. If you want to migrate OS only, you can choose to perform System Clone.
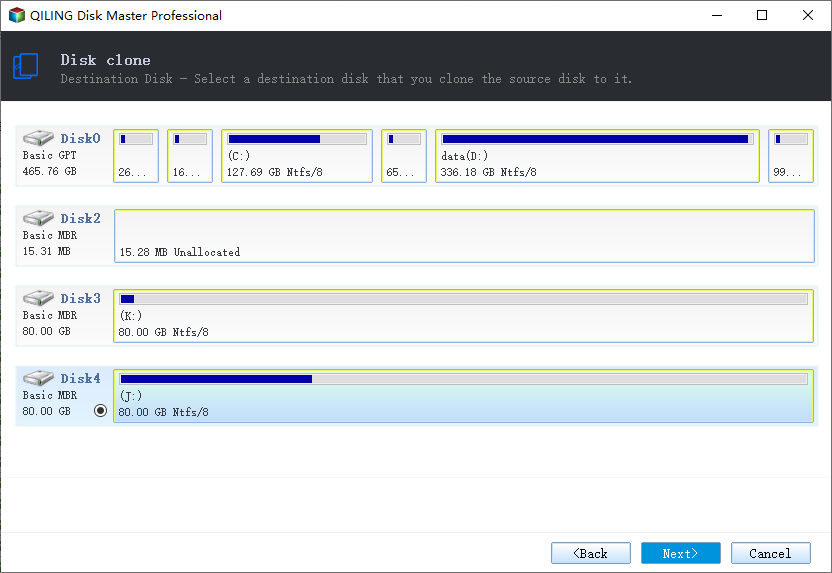
Step 2. Select your current ASUS SSD as the source directory, and click Next.
Step 3. Select the new SSD as the cloning destination, with the intelligent cloning technology, you can even clone larger drive to smaller SSD. Then click Next.
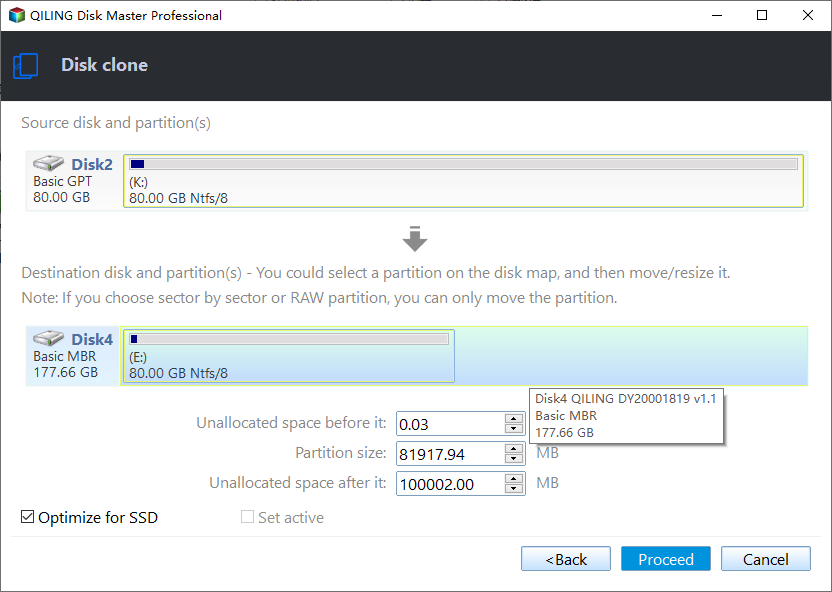
Step 4. Preview the information of your source SSD and destination SSD, then click Proceed. Wait for the process to complete, and finally click Finish.
👣 Notes:
✎ This feature will clone all sectors, including unused sectors, from the old SSD to the new SSD.
✎ It helps to clone MBR to GPT disk without losing data, and vice versa.
Boot from the newly cloned SSD
👉 If you replace the old SSD with a new one, simply restart your ASUS laptop and it will boot up normally with the new SSD.
👉 To keep the old SSD as a secondary storage device, simply restart your computer, enter the BIOS by pressing the required key, and set the new SSD as the first boot option. This will allow you to utilize the new SSD as the primary drive while still keeping the old one available for secondary storage.
Bottom line
Upgrading the SSD on your ASUS TUF A15 laptop is a straightforward process that can significantly improve its performance. By following the steps outlined above, you can easily swap out the old SSD for a new one, enjoying faster loading times, more storage space, and a smoother overall experience. This upgrade will allow you to download and store more games, apps, and files, making it a great way to breathe new life into your laptop.
Qiling Disk Master allows you to transfer data from an old SSD to a new one, and also offers advanced features such as transferring large files between PCs and creating a �ortable Windows 10 USB drive. This makes it a worthwhile tool to try portable Windows 10 USB drive. This makes it a worthwhile tool to try.
Related Articles
- Quick Answer: Replace ASUS Laptop Hard Drive with SSD
You will get the ultimate guide to replacing ASUS laptop hard drive with an SSD and you don't need to reinstall Windows 7, 8, 10, 11, etc. - How to Use ASUS System Recovery Partition for Factory Reset
In this article, you will get how to factory reset your computer with ASUS recovery partition in Windows 7/8/10. Here are x ways, you could try it according to your situation.


