Top 2 Ways to Clone Dell Laptop Hard Drive (No Reinstalling OS)
When to clone Dell laptop hard drive?
Staying at the forefront of innovation and the computing experience, Dell laptops, desktops and tablets are favored by a number of users. In spite of the superb performance brought by the original hard drives, some users encounter following situations:
Case 1: “Hi I just got a new laptop and I would like to upgrade it to a SSD 1TB but how do I transfer my data and OS to the new SSD when I get it.”
Case 2: “Diagnostics is telling me that my hard drive is failing. I intend buying a new SATA drive but larger capacity. I am on Windows 10. What is the simplest way to copy/clone the whole drive, OS and all, onto the new drive and then slip the new drive back into the laptop as if nothing has changed!”
As you see, it is necessary to clone Dell laptop hard drive when you want to replace laptop HDD with SSD or another drive with larger capacity. And you may prepare a cloned drive for instant replacement in case that the current hard drive refuses to work some day. Then, how to clone Dell hard drive safely and efficiently? Please read on.
How to clone a Dell laptop hard drive in Windows 11/10/8/7
Here I’m going to show you top two ways to clone Dell laptop hard drive in Windows 11/10/8/7. If you plan to upgrade your Dell hard drive to a Samsung SSD, you can follow method 1; if you prepare to clone to other SSD brands, method 2 is applicable.
Method 1: Clone Dell hard drive to SSD using specific cloning software
Although Dell doesn’t provide users with Dell hard drive cloning software, some SSD manufacturers offer disk cloning software to help users upgrade HDD to SSD, such as VisionTek USB 3.0 Universal SSD Installation Kit, Samsung Data Migration and so on. Let’s take Samsung Data Migration for example. Learn how to clone Dell laptop hard drive to a Samsung SSD below:
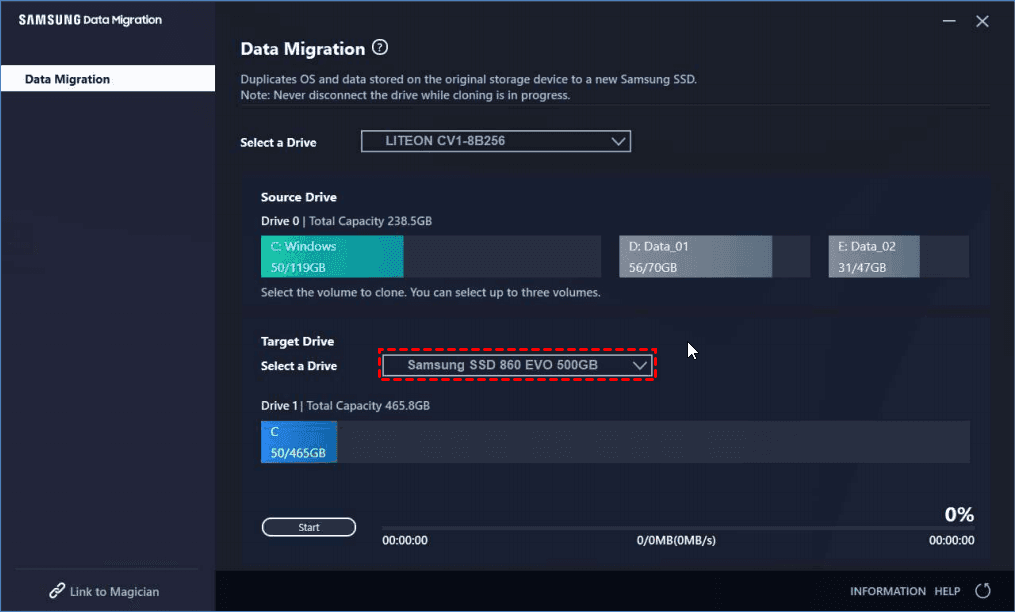
1. Connect the Samsung SSD to your computer and ensure it is recognized. Download and run Samsung Data Migration.
2. The drive with OS installed will automatically be selected as the Source Drive. Select the Samsung SSD you just connected as the Target Drive. If you don’t see your SSD, click the Refresh button at the right bottom and try again.
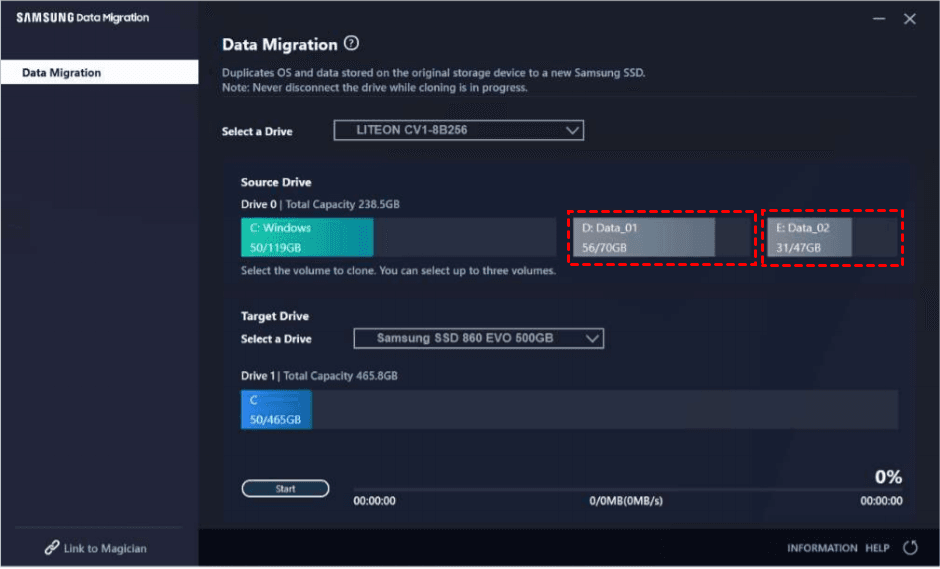
3. Select additional volumes that you wish to clone besides the C: volume. You can select at most two more volumes.
4. Click on Start to begin the migration process. Once the cloning process is complete, the computer will shut down automatically within 20 seconds. Replace the old hard drive with the new Samsung SSD and you will get the system and all your data back instantly.
Simple as it looks like, errors occur sometimes—users are confronted with Samsung Data Migration cloning failed, Samsung Data Migration cannot change source disk and the like. Additionally, these utilities only support SSDs of the corresponding manufacturer. Is there such cloning software that fits all? The answer is YES.
Method 2: Clone Dell hard drive to SSD via an all-around cloning tool
Qiling Disk Master Professional, the best disk cloning software, comes to help.
- With the Disk Clone feature, you can copy old hard drives to SSDs of all common brands, including Samsung, Crucial, PNY, WD, etc. You can also copy a specific partition using Partition Clone.
- What’s more pleasant is that it offers an option called SSD Alignment which will help to improve the reading and writing speed of the destination SSD.
- All Windows PC operating systems like Windows 11/10/8.1/8/7/Vista/XP are supported.
💜 Preparations:
▶ Backup files on the target disk if you still need them, because the target disk will be completely overwritten during the cloning process.
▶ Free download Qiling Disk Master and install it.
💜 Detailed steps to clone Dell laptop hard drive to an SSD:
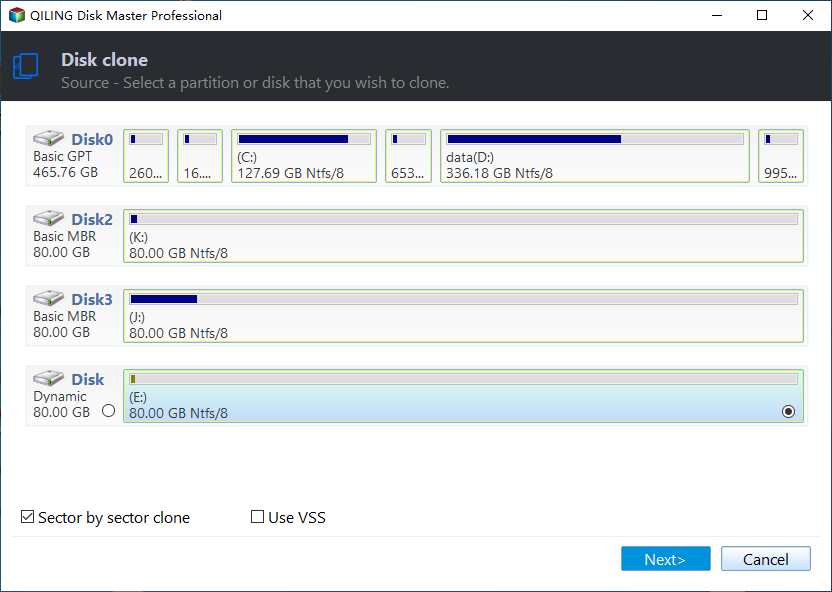
Step 1. Connect the target SSD to your computer and make sure it is detected. Launch Qiling Disk Master, click “Clone” on the left pane and select “Disk Clone”.
✎ Note: To clone OS only to the destination SSD, please use the System Clone feature.
Step 2. Select the current hard drive as the source disk and click “Next”.
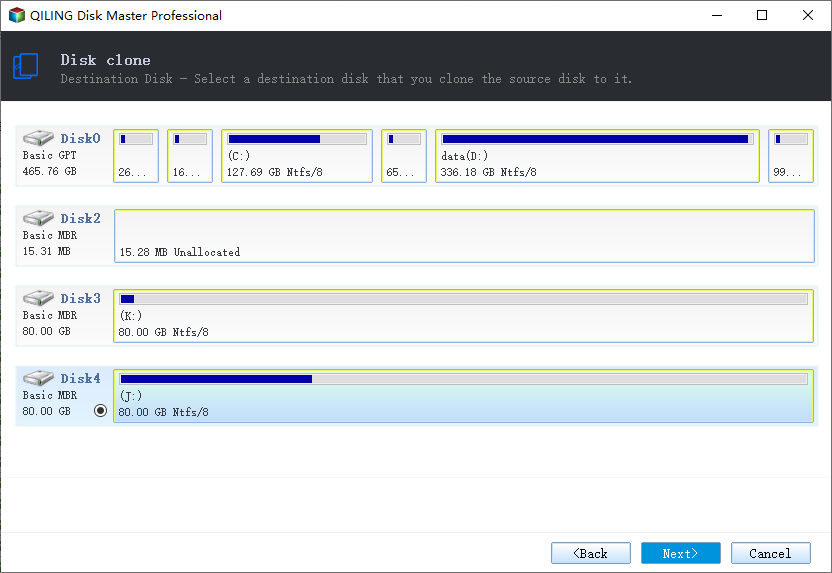
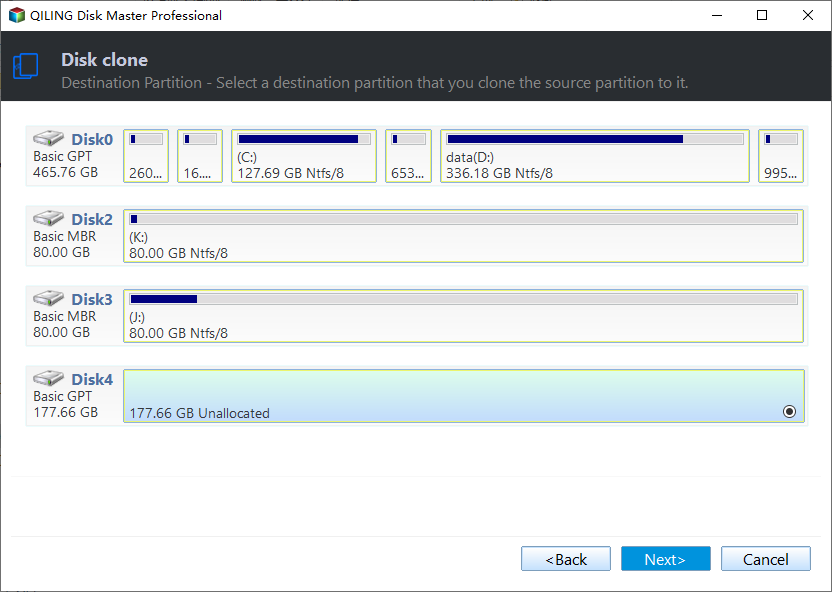
Step 3. Select the destination SSD you have connected to your computer and click “Next”.
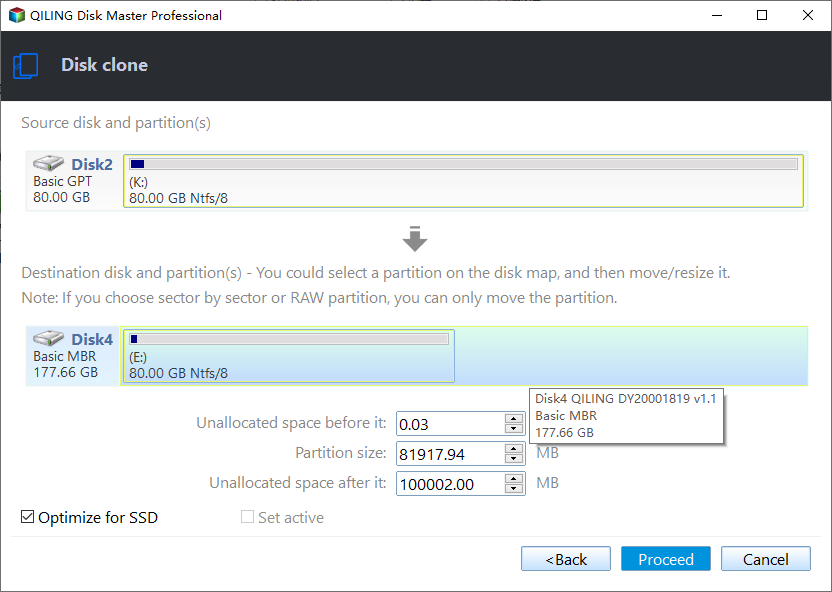
Step 4. Tick “SSD Alignment” to optimize the performance of the destination SSD. Confirm the operation and click “Proceed”.
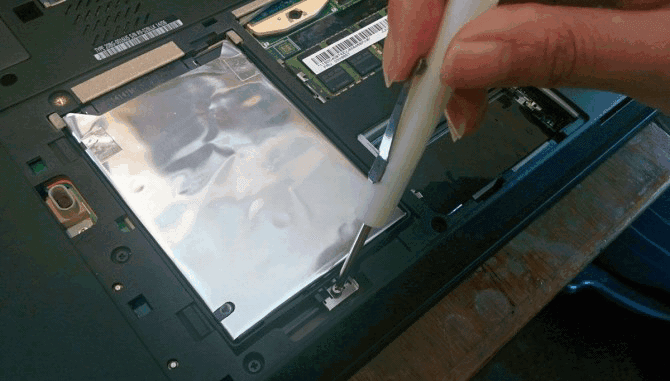
Step 5. Shut down your computer and replace the current hard drive with the cloned SSD. You may use a Phillips #0 screwdriver to remove the original hard drive.
Common clone issues and the fixes
Apart from SSD Alignment, Qiling Disk Master offers two other useful clone options: Sector by sector clone to copy all sectors including blank ones and Edit Partitions to adjust the partition size on the destination disk. Moreover, Edit Partitions can help you resolve two potential issues after cloning.
#1: The cloned drive not showing full capacity.
By default, all the cloning software keeps the old partition layout on the destination disk unless you change the partition size while cloning. To prevent this problem from the beginning, you can click Edit Partitions and choose:
👉 Add unused space to all partitions: It will reallocate the unallocated space to each partition of the target disk, appropriate for the disk size.
👉 Manually adjust partition size: It allows you to extend unallocated space to any partition on the destination disk as you want.
#2: The cloned drive not bootable after cloning.
One of the common reasons for boot failure is the destination and source disks have different partition styles and you don't convert them to the same before cloning. In this situation, you can simply check the option Convert the destination disk from MBR (GPT) to GPT (MBR).
🌟 Bonus tip: how to check disk partition style
If you are not sure about the partition style of your disks, you can check them in Disk Management. The overall steps are below:
- Press Win + R to open the Run window. Then, type diskmgmt.msc and hit OK to open Disk Management.
- Then, right-click the disk you want to clone and select Properties in the expanded menu.
- In the Properties window, select the Volume tab and confirm the partition style. It can be MBR (Master Boot Record) or GPT (GUID Partition Table).
- Similarly, check the partition style of the destination disk.
Conclusion
To clone Dell laptop hard drive to an SSD, you can use either SSD manufacturers’ utilities or Qiling Disk Master. Compared with SSD manufacturers’ utilities, Qiling Disk Master supports different brands of SSDs and provides more advanced options like 4K partition alignment.
In addition to the clone feature, Qiling Disk Master is built-in with the backup & restore functions. You are enabled to run system restore from BIOS in Windows 7 via Qiling Disk Master. Go for this tool at once!
Related Articles
- How to Clone Dell Laptop Hard Drive to SSD with Secure Boot?
- Replace Dell XPS SSD and Clone Data to Larger SSD
- Free and Easy Dell Hard Drive Cloning Software (Secure Boot)
- Windows 10 Backup Keeps Failing? Solutions to Fix It Quickly
If you're using Windows Backup and Restore to back up files and system, but it keeps failing, you're not alone. Here we will show you why it occurs, and some solutions to fix Windows 10 backup keeps failing issue quickly.

